Uninstall an On-Premises Scan Engine
To remove an on-premise Scan Engine, you must perform the following steps:
- Run the Application Security (InsightAppSec) Uninstaller
- Delete the Engine from the Manage On-Premise Engines screen
Run the Application Security (InsightAppSec) Uninstaller
- Navigate to the Rapid7 > Application Security (InsightAppSec) folder, which is usually located at
Program Files\Rapid7\InsightAppSec. - Right-click the
uninstall_InsightAppSec.exetool and select Run as Administrator. - Follow the steps of the uninstaller to remove the Scan Engine and all associated tools.
❌
Note:
Do not use the Uninstall feature in the Windows Control Panel > Programs and Features screen to remove the scan engine. It will not remove certain related tools and your system will continue trying to connect with the Rapid7 platform.
If you have attempted to uninstall from the Programs and Features screen, contact Rapid7 Support.
Delete the Engine from the Manage On-Premise Engines screen
To delete a Scan Engine from Application Security (InsightAppSec):
- Go to Settings > Manage On-Premise Engines from the left navigation.
- Select the Engines tab.
- Select the Scan Engine to be deleted in the “On-Premise Engines” table by checking the box in the first column.
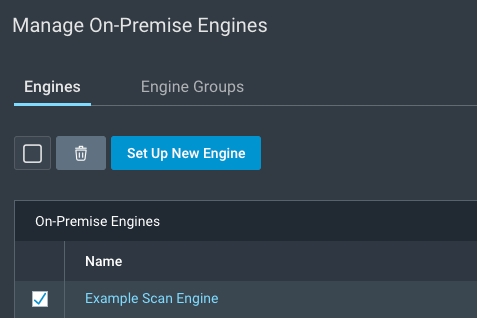
- Click the Delete button that has the icon of a trash can on it.
- A confirmation screen will pop up to warn that this process cannot be undone. Click the Delete button on this screen.
- Optionally, select the Engine Groups tab and delete the engine group for this engine.
❌
Note
Existing scan configs that use a deleted engine group will switch back to the default engine group and all their in-progress scans will be canceled.