Cisco ASA
You can automate the management of network objects with the Cisco ASA plugin for Automation (InsightConnect) . Additionally, you can use this plugin to determine if a host is blocked by checking if it’s found in an address group applied to a firewall rule. Cisco ASA also allows you to block and unblock hosts from the firewall through object management.
To use the Cisco ASA plugin, choose an existing user account or create a dedicated user account to configure the connection in Automation (InsightConnect). For more information about the Cisco ASA plugin, see the Extension Library listing .
Intended use - check Cisco ASA Firewall
A common use case for the Cisco ASA plugin is to quickly respond to threats by blocking them at the firewall. This is accomplished through the management of address objects in address groups. To begin, you must have an existing Cisco ASA deny-all firewall policy in place with a predefined address group assigned to the policy. As threats are detected, you can leverage the Cisco ASA plugin to block malicious hosts from your network by adding malicious addresses to the predefined address group, and unblock hosts by removing addresses from the predefined address group. Using the Cisco ASA plugin and firewall functionality in the way described allows for a safe and flexible policy management of large groups of dynamic addresses.
You can build your own workflow to accomplish this use-case and many more, or you can choose from a number of out-of-the-box prebuilt workflows for firewall blocking to get up and running quickly. These are available on the Rapid7 Extension Library .
Rest API Agent
In order for the Insight-Connect to connect to the Cisco ASA, it needs a REST API agent installed, for more information please use following Cisco documentation: https://www.cisco.com/c/en/us/td/docs/security/asa/api/qsg-asa-api.html#pgfId-61941
Creating a user and giving appropriate permissions
- Connect to your Cisco ASA device and login using a user account with admin permissions.
- Enter enable mode by running the
enablecommand. - Enter terminal configuration mode by runninng
config terminal. - Create a user using the following command structure
username <username> password <password> <permission level>. For exampleusername insightconnect password my-secure-password123 privilege 15.

- If not configured already, you need to set up
User-Agentstring for authentication, in order to do this use the following command structure while in config terminal prompt:http server basic-auth-client <user-agent-string>, for example:http server basic-auth-client insight-user-agent. Note: on some Cisco device versions, there’s a default User Agent ofREST API Agent, if your device applies, you can choose to omit this step.
Premissions required for actions
Cisco ASA supports the following permissions levels:
- Privilege level 3 or greater is required to invoke monitoring requests.
- Privilege level 5 or greater is required for invoking GET requests.
- Privilege level 15 is necessary for invoking PUT/POST/DELETE operations.
The user account must have the necessary permissions for the intended actions:
- Actions that only read from your Cisco ASA device require privilege level 5 (to enable GET requests)
- Action that make any updates to your device will need privilege level 15
Configure the Cisco ASA connection in Automation (InsightConnect)
Now that you’ve created your user in Cisco ASA, you can configure the Cisco ASA connection in Automation (InsightConnect) to use the plugin.
- In Automation (InsightConnect), open the connection configuration for the Cisco ASA plugin.
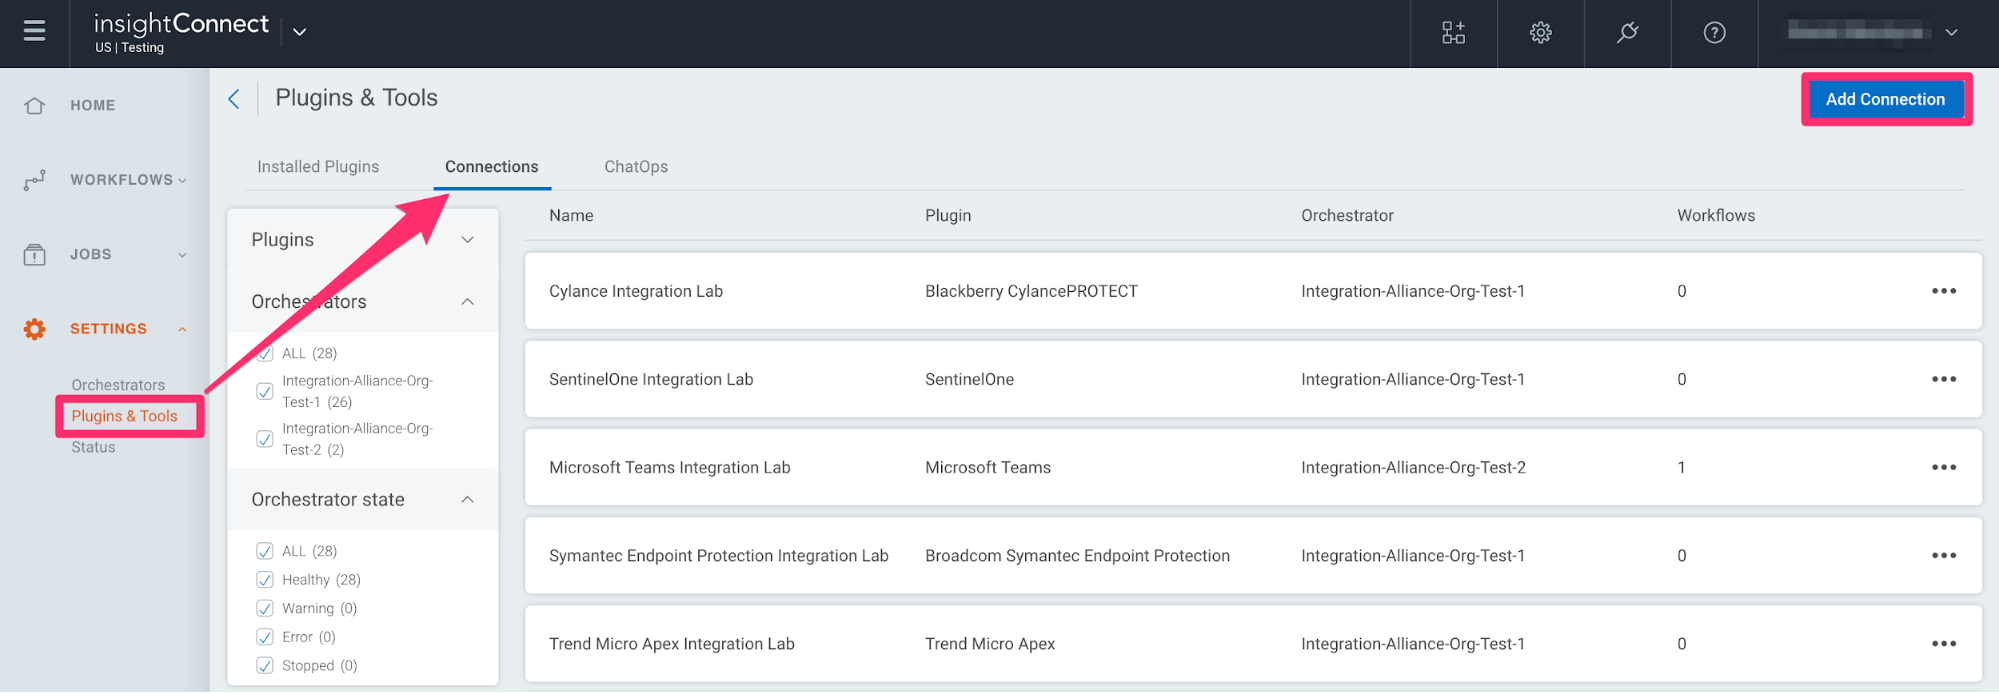
- You can do this when selecting the Cisco ASA plugin during a workflow building session, or by creating the connection independently by choosing Plugins & Tools from the Settings tab on the left menu. On the Plugins & Tools page, select the Connections tab and click Add Connection in the upper-right corner.
-
Configure the connection for the Cisco ASA plugin.
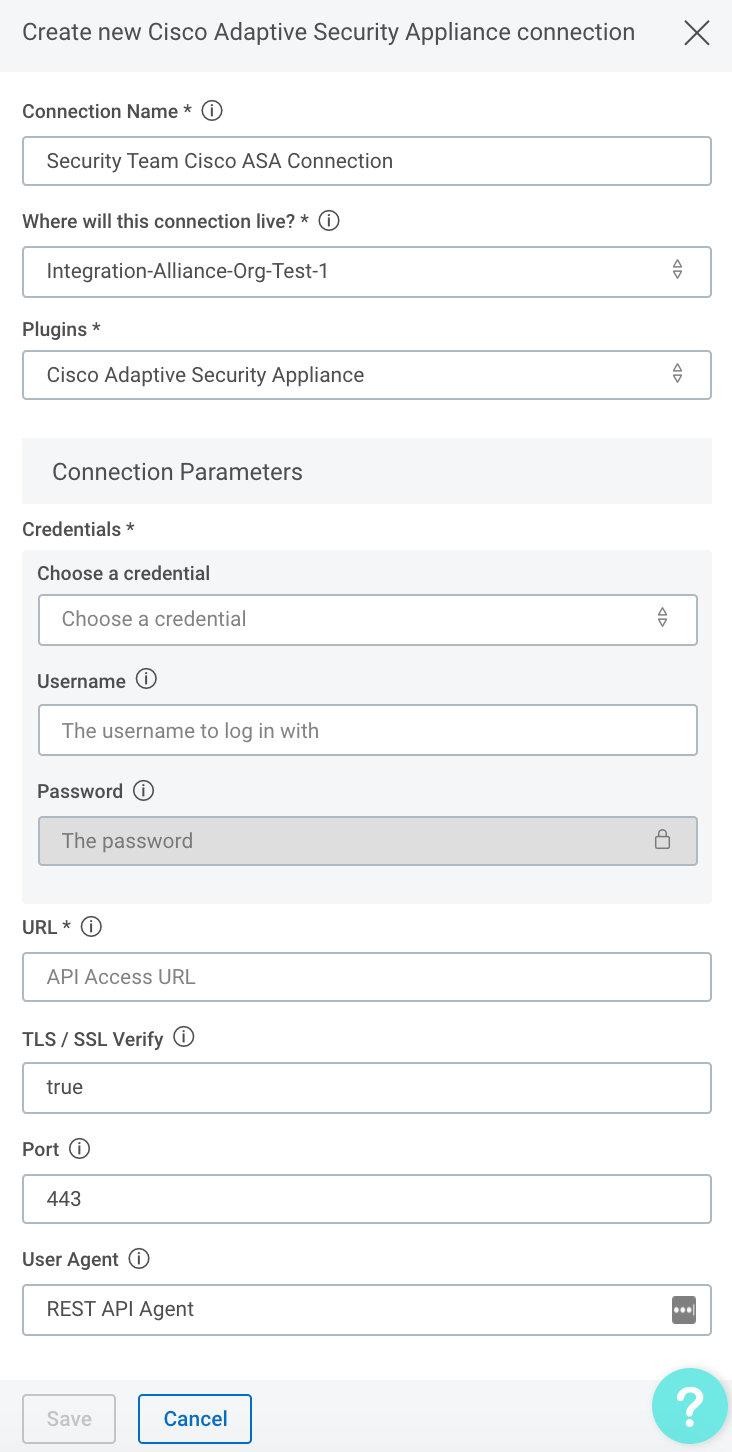
- Give the connection a unique and identifiable name, select where the plugin should run, and choose the Cisco ASA plugin from the list. If it’s not available, import the plugin from the Installed Plugins tab.
-
Configure your Cisco ASA credentials.
- In the Credentials field, select existing Cisco ASA credentials or enter a newly created username and password.
- In the URL field enter the full URL to your instance of Cisco ASA.
- You can specify whether you want to verify TLS / SSL by setting by value to
trueorfalsein the TLS / SSL Verify field. - If using a custom port for your Cisco ASA device, you can set it in the Port field, by default it’s 443.
- In the User Agent field enter the previously configured User Agent string.
Test your connection
When you save the connection, the connection test will attempt to authenticate to the specified Cisco ASA device. A blue circle on the Connection tile indicates that the Connection test is in progress.

Successful connection tests
If there is no circle, the connection succeeded and you’re ready to begin orchestrating your processes with Cisco ASA.

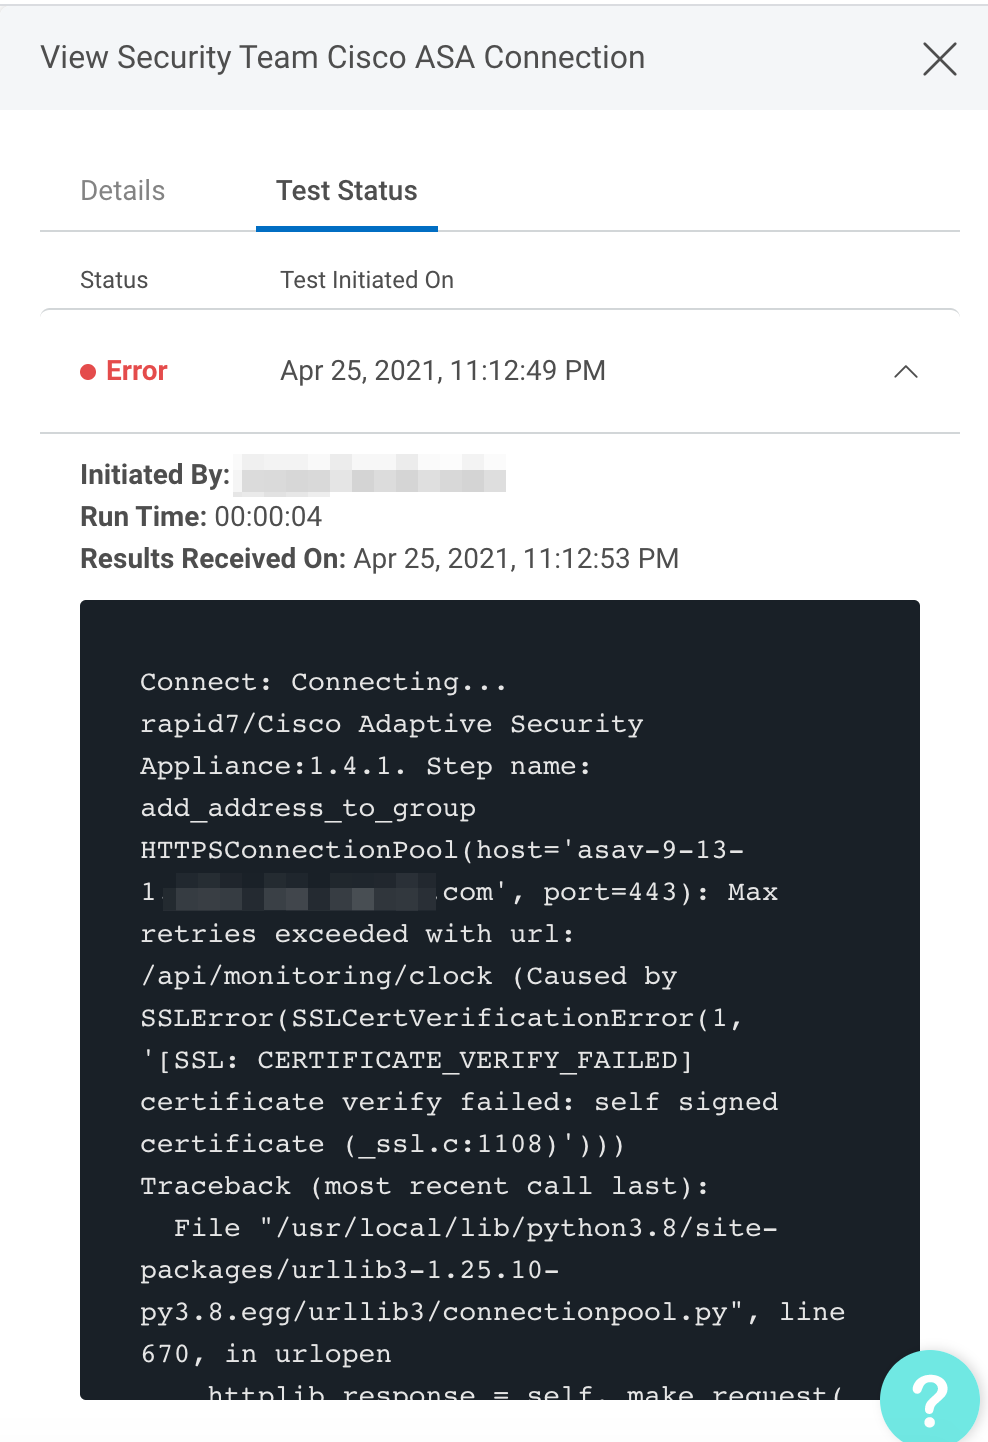
Failed connection tests
A red circle indicates that the connection test failed. If this occurs, check your connection details (including the ServiceNow URL, username, and password) before trying again.

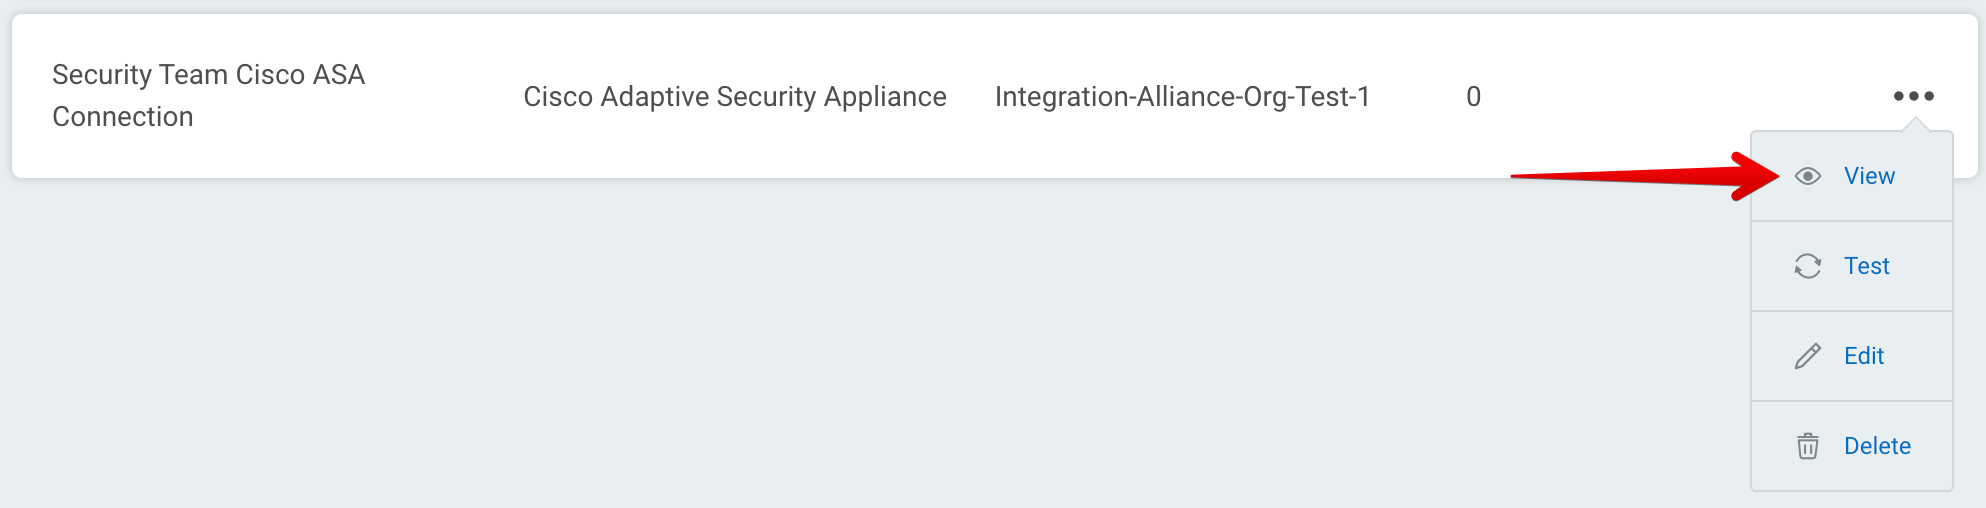
The log may contain useful troubleshooting information. First, click View to see a list of your recent connection tests.
Under the Test Status tab, expand the dropdown for the test that encountered an error to view its log.