Create Custom Parsing Rules
The Custom Parsing Tool gives you the ability to create custom parsing rules to extract log data that is most relevant to your organizational needs. With the Custom Parsing Tool, you can:
- Parse logs in a format that is unknown to SIEM (InsightIDR), which allows you to pull and monitor data that is not automatically extracted by SIEM (InsightIDR).
- Further parse log entries to include additional fields that are not parsed by default.
For example, if you are using an electronic health record (EHR) tool, you may want to parse out patient IDs, login successes and failures, and EHR event types. With this data, you can create operational dashboards that track the data that is uniquely important to your business needs.
Building custom parsing rules is simple. The Custom Parser provides an interface you can use to show SIEM (InsightIDR) exactly what you want to extract from the logs. Based on your input, it auto-generates the patterns needed to extract the data.
Things to Know about Custom Parsing Rules
As you are building a custom parser, here are some things to keep in mind:
- Once your parsing rule is created, you can expect a 5-10 minute delay before your parsed data shows up in Log Search.
- Previously collected data will not be parsed with your new parsing rules. Only data collected after the parsing rules are implemented will be parsed with them.
- Parsing rules can impact current dashboards. You will need to check your filters to assess how the parsing rules will impact your dashboards and basic detections.
- Edits to a parsing rule are not applied retroactively. Older logs will not be updated. It may take up to 10 minutes for your edited rule to be applied to new logs.
- Data that is parsed with a custom parsing rule appears in Log Search with a “custom_data” tag in the log entry. If your data does not appear in Log Search, it could indicate an issue with your parsing rule. For more details, see the Troubleshooting section.
- For complex log entries, the Parsing Tool works best if you create more than one parsing rule for the same set of entries. For example, if you need to parse log entries with many different types of entries. Or cases when log entries have many fields.
How Custom Parsers Work
Custom parsers apply to raw events, which are lines of text collected by an event source. Your custom parsing rule will parse raw events when it is uploaded to the Insight Cloud. To build your rule, you define the values extracted from a log entry and the values you want to map them to. With the custom parsing tool, you can also normalize the structure of your logs, making it easier to find the fields you want to extract.
Steps to build a custom parsing rule:
- Task 1: Name your rule
- Task 2: Select a log
- Task 3: Create a filter
- Task 4: Extract Fields from the log
- Task 5: Bulk Apply Rules
Build a Custom Parsing Rule
To build your rule, define the values extracted from a log entry and the values you want to map them to.
To get started:
- Navigate to Log Search.
- Open the Log Management menu and select Custom Data Parsing > Create Parsing Rule.
- Once you are in the Custom Parsing Tool, complete tasks 1-5 to build your custom rules.
Task 1: Name your rule
You should use a name that is unique and also descriptive so that you can easily find the rule later. For example, if you want to create parsing rules for your firewall logs, you could enter, “Firewall Log 1”.
To add a name:
- Enter a unique name.
- Click Next: Select Logs.
Task 2: Select a log
This task involves two steps: selecting the log and setting the time range. The time range allows you to preview a specific range of logs that have the fields you want to parse. Log entries are displayed from oldest to newest, so it’s important to select a time range that will generate the most relevant sampling of data. In Task 4, you will extract fields from these log entries.
To select a log:
- Under Step 1: Log select the log that you want to extract fields from.
- Under Step 2: Sample Log Lines select a time range. If you don’t see any sample data, you may need to increase the time range you’ve selected.
- Click Next: Create a Filter.
Task 3: Create a filter
Next, let’s determine whether you need to create a filter. To do this, review the structure of your log entries: if your log streams have multiple formats for the log events, complete this step to ensure that your custom parsing rule applies to only the relevant logs. However, if your log entries are uniformly formatted, you can skip this step and proceed to Task 4: Extract Fields.
Filters added to your custom parsing rule are applied to incoming logs before they are parsed. Say for example, you have an event source that sends DNS, VPN, and firewall events in a single log entry. You can create a filter that focuses on firewall events, giving you increased visibility into malicious activity happening along that layer.
To create a filter:
- Enter the values that you want to include as part of your filter.
- Click Apply. This filter will be applied to any data before it is parsed by this rule
- Click Next: Extract Fields.
Task 4: Extract Fields from the log
In this task, choose what data you would like to extract from the log using guided mode, or manually extract fields with the Regex Editor. Guided mode is the default mode for new parsing rules.
Guided mode
To extract fields:
- Highlight the data you want to extract from the sample log. The Custom Parsing tool will automatically highlight the matching data in the other log entries. When extracting data, we recommend that you not include brackets or quotation marks, as this may make it more difficult for you to search for your fields later.
- When you are satisfied with the selected data, click Validate.
- Name your field, and click Add Field.
- Repeat steps 1-3 until you have extracted all the fields you want to include in your rule. You may also switch to the Regex Editor to further define your parsing rule using regular expression.
- Click Next: Bulk Apply Rules.
Regex Editor
Use the Regex Editor to manually extract fields with regular expressions. You can use the editor to complete the entire field extraction process, or you can begin in guided mode and use the Regex Editor to fine tune your extracted fields.
Before you begin, note the following:
- The Regex Editor only supports RE2 regular expressions. At this time, unnamed capture groups are not supported.
- Fields that are extracted in guided mode will display as auto-generated regular expressions in the Regex Editor, and may vary in format from human-written regular expressions.
- Group names cannot contain numbers, special characters, or spaces.
- Any changes you make in the Regex Editor will be permanently lost if you revert back to the guided mode.
To extract fields:
- From the Field Extraction step, click Open in Regex Editor.
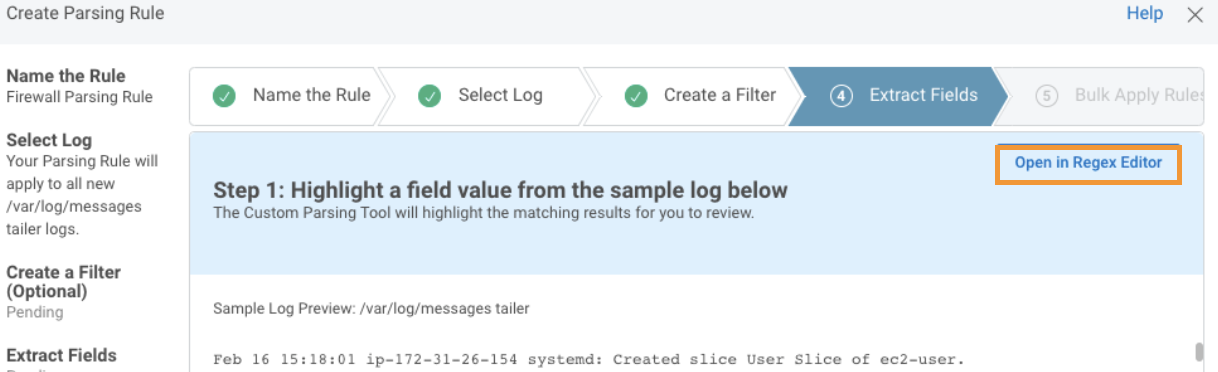
- To define the fields you want to extract, type the regular expressions in the text editor.
- When ready, click Apply. Your newly extracted fields will display in the summary section to the left of the editor, under Extract Fields. Within the Sample Log Preview, you’ll also see a highlight over the part of the log entry being extracted by your query.
- Click Next: Bulk Apply Rules.
Rules modified with the Regex Editor cannot be reverted
If you modify or create a parsing rule with the Regex Editor and then save it, you cannot revert back to guided mode. If you want to edit a parsing rule that was modified or created with the Regex Editor, you must use the Regex Editor to do so.
Task 5: Bulk Apply Rules
You can apply your new custom parsing rules to other logs. To do so, select your logs from the list of suggested logs.
You must choose logs that are identical to the format of the parsing rule that you created. For example, if your sample logs are firewall logs, you can select matching firewall logs from this list.
Manage Custom Parsing Rules
Edit a Parsing Rule
You can edit your rule to account for changes in log format, to add additional fields, or to refine your existing field selection. Note that edits are not retroactively applied to existing logs. It may take up to 10 minutes for changes to be applied to new logs.
To edit a parsing rule:
- Go to Log Search, select Log Management > Custom Data Parsing > Create Parsing Rule.
- From the Manage Parsing Rules page, find the rule you want to update, and click the Edit icon.
View All Parsing Rules
From the left menu, go to Log Search and choose Log Management > Custom Data Parsing > Create Parsing Rule. The table displays all of the parsing rules.
View Extracted Fields for a Parsing Rule
From the left menu, go to Log Search and choose Log Management > Custom Data Parsing > Create Parsing Rule. The Manage Parsing Rules table displays all of the parsing rules.
The Extracted Fields column shows the extracted fields for each parsing rule.
View Logs for a Parsing Rule
From the left menu, go to Log Search and choose Log Management > Custom Data Parsing > Create Parsing Rule. The Manage Parsing Rules table displays all of the parsing rules.
The Logs column shows the logs that the parsing rule is applied to.
Delete a Parsing Rule
Deleting a parsing rule may affect the dashboards, queries, and basic detection rules (formerly known as custom alerts) that use its data. Please review your queries. After you delete a parsing rule, you cannot revert the changes.
Note that once you delete your parsing rule, new incoming data will be unparsed. Previously parsed data will remain in a parsed state.
To delete a parsing rule:
- From the left menu, go to Log Search and choose Log Management > Custom Data Parsing > Create Parsing Rule. The Manage Parsing Rules table displays all of the parsing rules.
- Find the parsing rule you want to delete and click the Delete icon.
Troubleshoot your Custom Parsing Rules
Here are some common scenarios and how to solve them.
My parser stopped parsing my logs
If the Custom Parsing Tool is no longer parsing your logs, the most likely reason is that the incoming logs no longer match the parsing rule (s) that you created, usually because a change made to the sending device has changed the format of the logs. Although you may not be aware of the device being changed, the vendor may have changed the format during a product upgrade or an admin might have changed the logging configuration. To fix this, you should create new parsing rule (s) that match the current logs. Depending on the log data, you may also wish to delete the old parsing rules.
My parsing rule worked when I was testing it in the Custom Parsing Tool, but after I saved the rule I do not see any logs being parsed
You may be trying to extract too many fields with one parsing rule. Instead of using one parsing rule to extract many fields, try creating several parsing rules instead.
The Regex Editor is able to parse out one or two fields from my logs, but when I try to add additional fields for parsing, the logs do not parse as expected
You may need to create multiple rules to parse your particular logs. Create parsing rules to extract a smaller number of fields per rule rather than trying to create one rule that parses out all of the fields at once.