Tour the Home Page
Welcome to the Home page!
Read on to familiarize yourself with the Security Console Home page and get an introduction to some of the features you’ll use on a regular basis. This article will cover some initial functions, display objects, navigation, and quick links to features, settings, and other resources.
Use the following keyed screenshot to locate each part of the interface along the way.
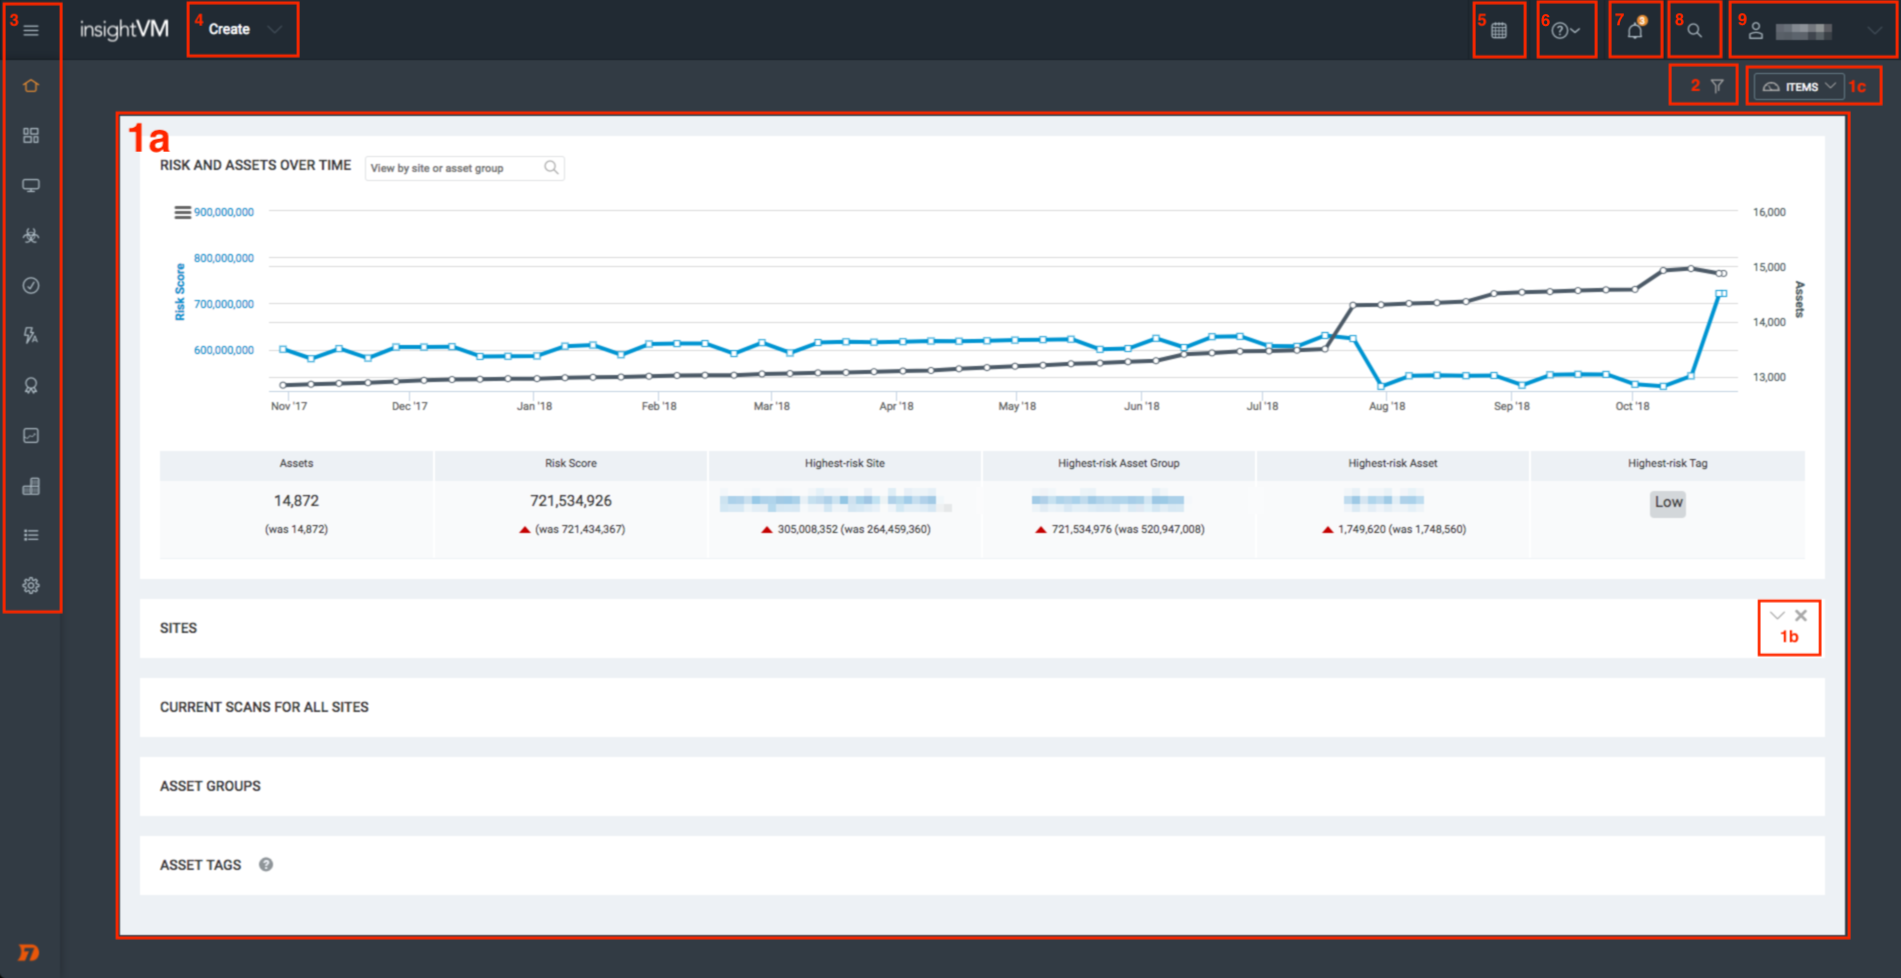
1a. Default Items
The Home page of the Security Console includes several informational panels reflecting the assessment of risk in your environment along with your existing configurations. The data you accumulate and settings you configure during the course of this guide will populate this space later.
These default items include:
- Risk and Assets Over Time - This chart is a combination of two line graphs: one representing your total asset count, and one representing your total assessed risk score. This chart can give you a general idea of how your risk is being managed over time relative to the number of assets in your network.
- Sites - This table shows all the sites you have configured along with their current metrics, status, and quick links to site functions. A site is a collection of assets that are targeted for a scan. You’ll create your first site in the next article of this guide.
- Current Scans for All Sites - This table displays any in-progress scans. You’ll run your first scan after creating your site.
- Asset Groups - Your configured asset groups are shown here. Asset groups are used for monitoring and reporting purposes and are based on the assessment results of your scans.
- Asset Tags - You can tag your assets, sites, and asset groups with several built-in or custom tags to provide additional context in your network as you see fit. All default and configured tags are shown in this table.
1b. Item Collapse, Expand, and Removal Controls
You can collapse, expand, and remove any default item using the item controls shown in this corner of the item panel.
1c. Re-add Removed Items
If you need to re-add removed items back to your Home page, click the Items dropdown shown in the upper right corner of your screen.
2. Filtered Asset Search
Click the filter icon to launch the Filtered Asset Search function. Filtered assets searches are used to organize your scanned assets according to a variety of parameters. You’ll create your first asset group with a filtered asset search later on in this guide.
3. Left Navigation Menu
The left navigation menu contains quick links to program features and settings. Hover your mouse cursor over this area to expand it.
NOTE
Your product license determines which tabs are available to you from this menu.
4. Create Dropdown
The Create dropdown contains quick links for creating some of the most common Security Console objects, including sites, asset groups, reports, and tags. This helpful shortcut will save you from navigating through the web interface for common tasks.
5. Calendar
Click the Calendar icon to view a calendar that shows all your current scan schedules, report schedules, and blackout periods.
6. Help Dropdown
The Help dropdown contains quick links to different kinds of resource material, including product documentation, API documentation, and release notes. The Content Updates option lists all new and modified vulnerability coverage content that was applied to the Security Console within the last seven days.
7. Notification Center
Expand the Notification Center to browse all in-product notifications posted to your Security Console, color-coded by importance. Some notifications may suggest that you take action to address your settings or a condition in your environment and will provide shortcut links to assist you.
8. Search Field
Separate from Filtered Asset Search, use this general search field to find sites, assets, asset groups, tags, vulnerabilities, and Common Configuration Enumerations (CCEs) according to the string value you specify. Use asterisks to wildcard portions of your string to return additional results.
9. User Dropdown
The User dropdown displays your username. Click here to quickly access your user preferences or log out.
Now you know your way around!
You should now have an understanding of where to find menu items and functions in the Security Console. Next, we’ll create your first site and run your first scan.