Linking assets across sites
You can choose whether to link assets in different sites or treat them as unique entities. By linking matching assets in different sites, you can view and report on your assets in a way that aligns with your network configuration and reflects your asset counts across the organization. Below is some information to help you decide whether to enable this option.

Option 1
A corporation operates a chain of retail stores, each with the same network mapping, so it has created a site for each store. It does not link assets across sites, because each site reflects a unique group of assets.
Option 2
A corporation has a global network with a unique configuration in each location. It has created sites to focus on specific categories, and these categories may overlap. For example, a Linux server may be in one site called Finance and another called Ubuntu machines. The corporation links assets across sites so that in investigations and reporting, it is easier to recognize the Linux server as a single machine.
What exactly is an “asset”?
An asset is a set of proprietary, unique data gathered from a target device during a scan. This data, which distinguishes the scanned device when integrated into Nexpose, includes the following:
- IP address
- host name
- MAC address
- vulnerabilities
- risk score
- user-applied tags
- site membership
- asset ID (a unique identifier applied by Nexpose when the asset information is integrated into the database)
If the option to link assets across sites is disabled, Nexpose regards each asset as distinct from any other asset in any other site whether or not a given asset in another site is likely to be the same device.
For example, an asset named server1.example.com, with an IP address of 10.0.0.1 and a MAC address of 00:0a:95:9d:68:16 is part of one site called Boston and another site called PCI targets. Because this asset is in two different sites, it has two unique asset IDs, one for each site, and thus is regarded as two different entities.
Assets are considered matching if they have certain proprietary characteristics in common, such as host name, IP address, and MAC address.
If the option to link assets across sites is enabled, Nexpose determines whether assets in different sites match, and if they do, treats the assets that match each other as a single entity .
Do I want to link assets across sites?
The information below describes some considerations to take into account when deciding whether to enable this option.
Use Cases
You have two choices when adding assets to your site configurations:
- Link matching assets across sites. Assets are considered matching if they have certain characteristics in common, such as host name, IP address, and MAC address. Linking makes sense if you scan assets in multiple sites. For example, you may have a site for all assets in your Boston office and another site of assets that you need to scan on a quarterly basis for compliance reasons. It is likely that certain assets would belong to both sites. In this case, it makes sense to link matching assets across all sites.
- Treat each asset within each site as unique. In other words, continue using Nexpose in the same way prior to the release of the linking capability. This approach makes sense if you do not scan any asset in more than one site. For example, if your company is a retail chain in which each individual store location is a site, you’ll probably want to keep each asset in each site unique.
Security considerations
- Once assets are linked across sites, users will have a unified view of an asset. Access to an asset will be determined by factors other than site membership. If this option is enabled, and a user has access to an asset through an asset group, for instance, that user will have access to all information about that asset from any source, whether or not the user has access to the source itself. Examples: The user will have access to data from scans in sites to which they do not have access, discovery connections, Metasploit, or other means of collecting information about the asset.
Site-level controls
- With this option enabled, vulnerability exceptions cannot be created at the site level through the user interface at this time. They can be created at the site level through the API. Site-level exceptions created before the option was enabled will continue to apply.
- When this option is enabled, you will have two distinct options for removing an asset:
- Removing an asset from a site breaks the link between the site and the asset, but the asset is still available in other sites in which is it was already present. However, if the asset is only in one site, it will be deleted from the entire workspace.
- Deleting an asset deletes it throughout your workspace in the application.
Transition considerations
- Disabling asset linking after it has been enabled will result in each asset being assigned to the site in which it was first scanned, which means that each asset’s data will be in only one site. To reserve the possibility of returning to your previous scan results, back up your application database before enabling the feature.
- The links across sites will be created as assets are scanned. During the transition period until you have scanned all assets, some will be linked across sites and others will not. Your risk score may also vary during this period.
If you choose to link assets across all sites on an installation that preceded the April 8, 2015 release, you will see some changes in your asset data and reports:
- You will notice that some assets are not updating with scans over time. As you scan, new data for an asset will link with the most recently scanned asset. For example if an asset with IP address 10.0.0.1 is included in both the Boston and the PCI targets sites, the latest scan data will link with one of those assets and continue to update that asset with future scans. The non-linked, older asset will not appear to update with future scans. The internal logic for selecting which older asset is linked depends on a number of factors, such scan authentication and the amount of information collected on each “version” of the asset.
- Your site risk scores will likely decrease over time because the score will be multiplied by fewer assets.
Enabling or disabling asset linking across sites
The cross-site asset linking feature is enabled by default for new installations as of the April 8, 2015, product update.
To enable assets in different sites to be recognized as a single asset:
- Review the above considerations.
- Log in to the application as a Global Administrator.
- Go to the Administration page.
- Under “Global and Console Settings”, next to “Global”, select Manage.
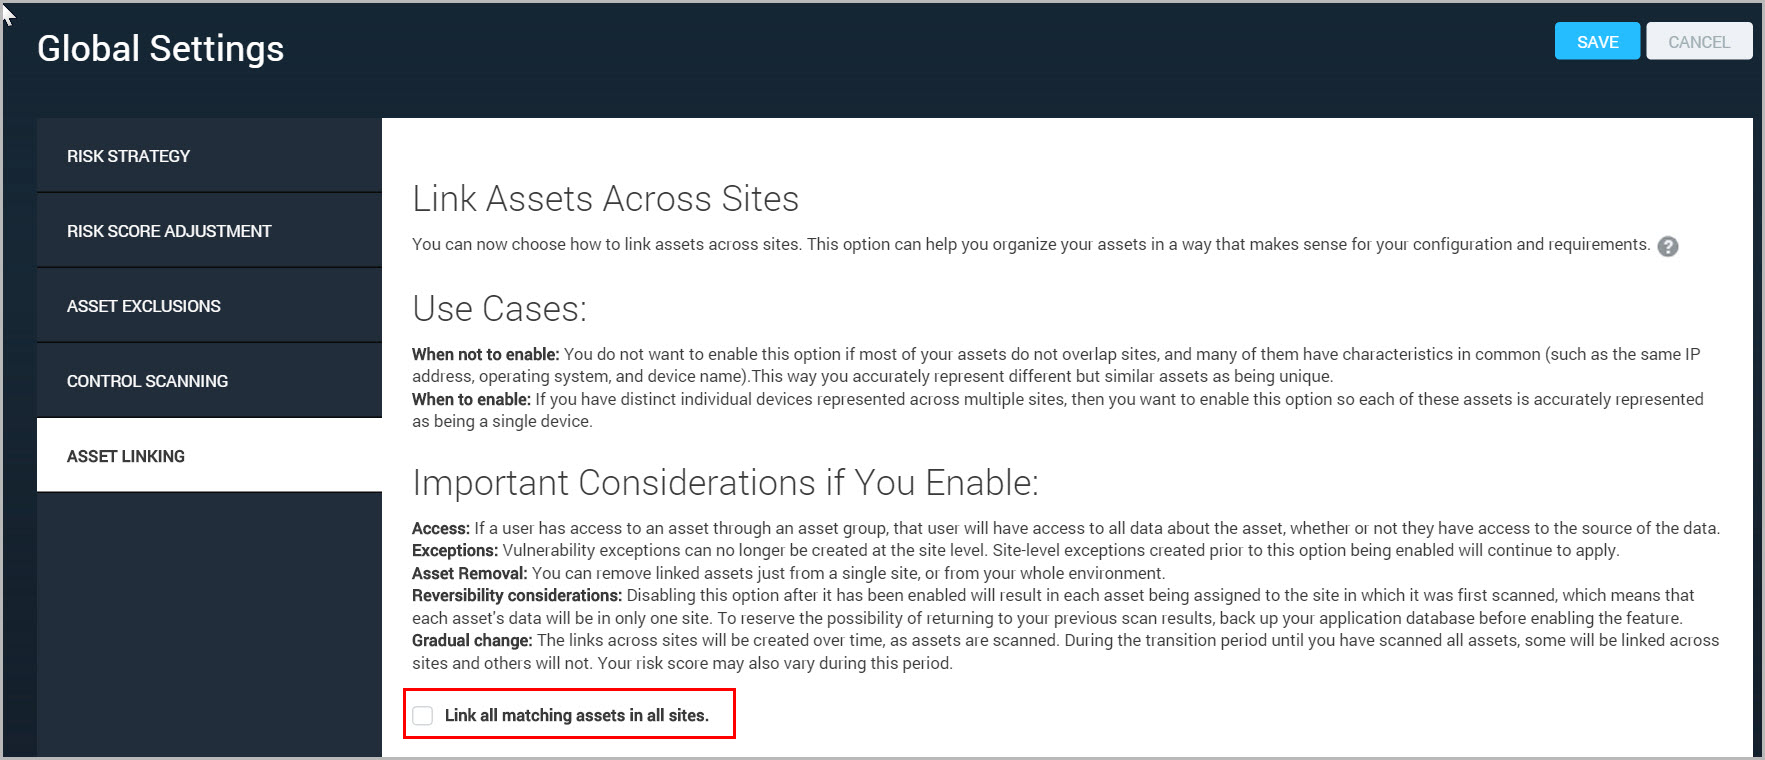
- Select Asset Linking.
- Select the check box for Link all matching assets in all sites.
To disable linking so that matching assets in different sites are considered unique:
- Review the above considerations. Also note that removing the links will take some time.
- Log in to the application as a Global Administrator.
- Go to the Administration page.
- Under “Global and Console Settings”, next to “Global”, select Manage.
- Select Asset Linking.
- Clear the check box for Link all matching assets in all sites.
- Click Save under Global Settings.