On demand response actions
Active Response enables Rapid7’s expert SOC analysts to respond directly to validated threats in your environment with two containment actions:
- Quarantining assets
- Disabling users
Note: Active Response is an optional free enhancement to your Managed Detection and Response (MDR Elite or MTC) service. To enable Active Response you must set up containment response actions in SIEM (InsightIDR).
On demand response actions
On demand response actions are simple containment automations that can be run on individual actors (users or assets) from an investigation. These actions are limited to disable users, and quarantine assets.
To set these up, you must visit the Investigations page in SIEM (InsightIDR). If you are visiting this page for the first time, you should see an in-product walk-through which will guide you through the setup process. Alternatively, you can follow the steps below.
Configuring a response action
Response actions need to be configured before they can be run. Response actions are powered by Automation (InsightConnect) snippets. A snippet is a group of steps that can be run standalone as a response action, or reused in workflows within Automation (InsightConnect). More information on snippets can be found here .
To configure an action, follow these steps:
- Find an investigation with at least one actor.
- To create a new investigation, click ‘Create an Investigation’ on the investigations home page in SIEM (InsightIDR).
- To add a new user or asset to an investigation, navigate to an investigation and click the button labeled ‘Explore Contextual Data’ and then ‘Inspect Actor Activity’ from the dropdown.Select your desired asset(s) and user(s) to test with and click ‘Run Job’. Refresh the Investigation.
- Click on the blue automation icon next to an actor’s name (either a user or an asset).
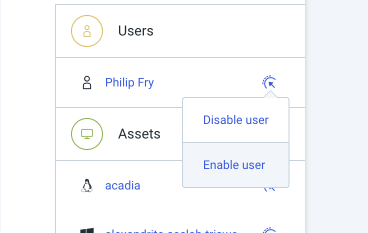
- Click on the action you wish to perform in the context menu, e.g. Quarantine Asset.
- A peek panel with a list of snippets will open on the right side of the screen. Click on the snippet that best suits your needs. For example, if you normally use the Rapid7 Rapid7 Agent (Insight Agent) to quarantine assets, click on that snippet.
- You will see a message on screen that asks you to configure the snippet in Automation (InsightConnect). Click the button labeled ‘Configure in Automation (InsightConnect)’.
- Automation (InsightConnect) will open in a new browser window. The snippet you have chosen will automatically download into your environment, and you will see the snippet control panel.
- From the snippet control panel, navigate to the ‘Snippet Setup’ tab. Here you will find a list of all global artifacts that need to be configured and all plugins that require connections for the automation to run.
- Configure your global artifacts.
- For all asset quarantine and un-quarantine snippets, you will see a row with a label on the right hand side that reads “Global Artifact”. This global artifact will store your asset exclusion list. Select the button that reads ’+ new global artifact with this schema’. Name the artifact with something descriptive, like “Asset Exclude List”. Click ‘Create Global Artifact’, then click ‘Save’. You will have the option later to populate this list with assets you’d like to exclude from quarantine actions, or leave this list empty.
- For the user disable and enable snippet, you will see two rows with labels on the right hand side that read “Global Artifact”.
- The first global artifact you’ll see will allow user containment across multiple domains. Regardless if you use multiple domains, you will need to configure this step for the automation to run. select the button that reads ’+ new global artifact with this schema’. Name the artifact with something descriptive, like “Active Directory Domain Mapping”. Click ‘Create Global Artifact’, then click ‘Save’.
- The second global artifact you’ll see will store your user exclusion list. Select the button that reads ’+ new global artifact with this schema’. Name the artifact with something descriptive, like “User Exclude List”. Click ‘Create Global Artifact’, then click ‘Save’. You will have the option later to populate this list with users you’d like to exclude from containment actions, or leave this list empty.
- Configure your plugin connections. Work your way through each plugin by clicking on the row to expand. Fill out connection details for each plugin. More information on plugin connections can be found here , and setup guides for specific connections can be found here .
- For all asset quarantine and un-quarantine snippets, you will only need to create one plugin connection for your desired tool. All of the asset quarantine and un-quarantine snippets can run in the cloud. Make sure to select this option when creating your connection.
- For the user disable and enable snippet, you will need to create a connection to SIEM (InsightIDR) and a connection to Active Directory LDAP. If your organization has multiple Active Directory domains, follow these steps:
- Fill out your Active Directory connection with your desired default domain.
- Create a separate Active Directory connection for each domain. To do this, go to ‘Settings’ on the left navigation menu, then ‘Plugins & Tools’, and click on ‘Connections’. Add a new connection for each domain for the Active Directory v8.0.0 plugin.
- Copy the connection ID for each domain. You will need this for the global artifact.
- Navigate to ‘Settings’ on the left navigation menu, then click ‘Global Artifacts’ and click on the global artifact you had created previously for domain mapping.
- Add an entry for each AD domain you have with the corresponding connection ID to your global artifact. The AD domain should only include the domain part of the user, in the format of “example.com”. The match is case-sensitive.
- When you have worked your way through configuring all connections, each row should display a green dot to indicate it has been configured. Once your snippet is fully set up, click the button labeled ‘Publish’ on the top right of the screen. If you need to make further changes to your snippet you can come back to the snippet control panel at any time.
- Once your snippet is published, return to SIEM (InsightIDR). You should land back to the peek panel mentioned in point 5 in this walk-through. From here, click on the button labeled ‘Check Configuration’.
- The peek panel will have moved on to a new screen titled ‘inputs’. This means your action is ready to use.
Repeat the above steps for each action you want to enable for active response. For each asset quarantine action, configure an asset un-quarantine action. For each user disable action, configure a user enable action.
Configuring Microsoft Defender and Carbon Black Cloud
Microsoft Defender and Carbon Black Cloud containment actions (quarantine and unquarantine) require a domain each time you run a response action.

We recommend that you add a default domain to these snippets. By doing so, this will allow Rapid7 MDR analysts can perform the action on your behalf without having to ask about your preferred domain in the middle of an investigation. To enter a default domain follow these steps:
- Visit Automation (InsightConnect).
- Navigate to Workflows in the navigation on the left of the page, then select the Snippets tab.
- Open the either the quarantine snippet that require a default domain.
- Open the snippet builder by clicking the View in Builder button on the top right of the page.
- Click on the Configure button on the top right of the page, this will open the Configure Details peek panel.
- You will see a list of input variables. Locate the variable called Domain. You can read more about snippet inputs here .
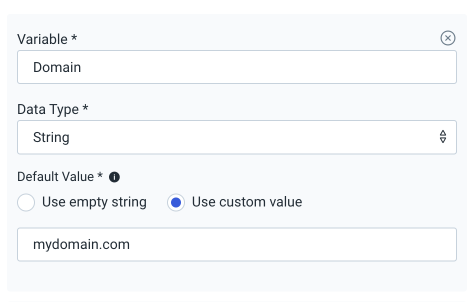
- For the Default Value of this domain, select the radio button labeled Use custom value.
- Enter your default domain into the input below the radio buttons.
- Click on Save at the bottom of the peek panel.
- Publish your changes by clicking on the blue Publish button on the top right of the page.
- Repeat the above steps for the unquarantine snippet.
If you follow these steps, next time a Microsoft Defender or Carbon Black Cloud response action will have a default domain prepopulated.
Testing response actions
Response actions can be tested out of SIEM (InsightIDR).
- Add an asset or user you’d like to test with to an investigation in SIEM (InsightIDR). To do this, click the Add Actors button on the right side panel of the investigation. Search for the user or asset to add to the investigation. Select your desired asset(s) and user(s) to add to the investigation and click Apply. Please note: testing will perform the quarantine or disable action on the user. You may want to choose a test asset or user for this.
- Refresh the investigation to ensure the actor has been added.
- Click the three dots next to your test actor’s name under Actors (either a user or an asset).
- From here, you should see the automation you had previously configured with a green dot next to the name, indicating the automation is active. Click on the automation card.
- The input field should pre-populate with the asset name or the user RRN (Rapid7 Resource Name) of the actor you selected from your investigation.
- Click ‘Run’ at the bottom of the peek panel. The Job State will be Running while the automation is in progress.
- When the automation has completed, you will see the Job State update. It will say that the automation has either finished or failed.
- A finished job means your response action is working and ready to use. Look under the Results object in the output to see if the automation correctly contained or un-contained the specified actor.
- If it has failed there is likely a problem with your snippet or the asset/user that you have tried to test with. Click View Full Job to get more information on the job.
Configuring exclude lists
With Active Response you are able to exclude some of your assets and users from being quarantined when running quarantine actions as they are critical to your business. This is done via the Global Artifact feature in Automation (InsightConnect). You can read more about Global Artifacts here .
Your User or Asset exclude list should have been created during the response action configuration above. If for some reason it was not, you can create an exclude list by following these steps:
- Log into Automation (InsightConnect).
- Expand the ‘Settings’ option in the main navigation on the left hand side, and select ‘Global Artifacts’.
- Click on the ‘Add Global Artifact’ button on the top right of the screen. This will open up a modal called ‘Create Global Artifact’** that will walk you through the creation of a global artifact.
- Under the ‘Array Type’ dropdown, choose ‘Object’. This will allow you to add multiple variables into a global artifact entry.
- Name the first variable ‘asset’ or ‘user’ (depending on what this exclude list is for). Choose the data type as ‘String’.
- Next, click on ‘Add Variable’. Name this variable ‘notes’ and choose the data type as ‘String’.
- Lastly, click on ‘Add Variable’. Name this variable ‘excluded’ and choose the data type as ‘Boolean’.
- Click ‘Next at the bottom of the modal. This will take you to the details section.
- Fill out details about your global artifact. You can give your global artifact any name, but we recommend naming it either ‘Asset Exclude List’ or ‘User Exclude List’ so it’s easy to find at a later date.
- Once you have created your global artifact you can start filling it in (there’s a full walk-through on how to do this below).
- Lastly, you’ll need to reference your global artifacts in the snippets. To do this, visit Automation (InsightConnect), click on Workflows in the main navigation, select the Snippets tab and click on your quarantine assets and/or disable user snippets to view the snippet control panel.
- When in the control panel, you will be promoted to select a global artifact under the Snippet Setup tab. Select the exclude list global artifact from the dropdown. Once this has been selected your response actions will no longer quarantine or disable items listed in your exclude lists.
Once your list has been created you can go ahead and start filling it out.
- Log into Automation (InsightConnect).
- Expand the ‘Settings’ option in the main navigation on the left hand side, and select ‘Global Artifacts’.
- Locate the global artifact you want to update, eg Asset Exclude List, and click it.
- Now you can start adding items to your exclude list.
- If the exclude list already has items, click the plus icon on the top right of the table
- If the list is empty, click the blue button labeled ‘Add Entry’.
- Depending on whether you are updating your asset exclude list or your user exclude list, you’ll be entering different information:
- When adding users to the User Exclude List, add the user’s display name. Information on users can be found on the User Details page in SIEM (InsightIDR).
- When adding assets to the Asset Exclude List, add the asset’s host name. Information on assets can be found on the Asset Details page in SIEM (InsightIDR).
Opting-in to Active Response
Once you have followed the previous steps, you’ll need to opt-in to the Active Response service. To do this, contact your Cybersecurity Advisor or Deployment Consultant and tell them that you’d like to opt-in to Active Response.