IBM QRadar App Installation and Configuration
This section describes how to install and configure the IBM QRadar App for IntSights.
The following table shows the minimum version requirements:
| Component | Version |
|---|---|
| IBM QRadar | 7.4.3 and later |
Version updates
The following table shows version updates:
| App version | Change description |
|---|---|
| 2.0.0 | - Qradar now supports ingesting TC alerts as events. - Alert events can be configured from ‘Input config. - Alert overview and Alert Details dashboards to visualize ingested alerts were added. |
| 1.2.0 | - Added a configurable option “Protocol” on the Account Config page to support TCP/UDP protocol for forwarding events. - Alignment to new TIP API routes. - Added a configurable option “Fetch Retired IOCs” on the Input Config page for each IOC type. |
| 1.1.0 | - Migrated IntSights API endpoints to v2. - Added a configurable option “Fetch Retired IOCs” on the Input Config page for each IOC Type. |
| 1.0.2 | - Fixed CEPs conflict for “IOC Value” and “IOC Type”. |
| 1.01 | - Resolved the issue of Internal Server Error on configuration page in QRadar instances with version 7.4.3 FP3 or higher. |
To integrate Digital Risk Protection (Threat Command) data, you must have a valid Digital Risk Protection (Threat Command) subscription to the TIP module.
Before you can use the external app with Rapid7 Digital Risk Protection (Threat Command) you need to add the app.
Add external app
Before using an external app, you must add it. There are two parts to adding an app:
- Your admin must enable the app for you to add.
- After that, you add the external app.
To add an external app:
- From the main menu, select Automation > Integrations.
- From the Integrations page, click External.
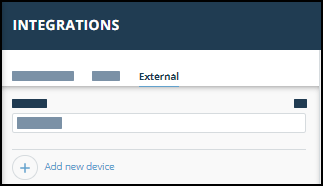
- Click Add new device.
- Select the Device type.
A default name is added. If the external device to add isn’t displayed, ask your admin to enable it for you. - Click Add.
The new device is added.
Installing the IntSights IBM QRadar App
Before installing, ensure that you fulfill the following prerequisites:
- You have the Digital Risk Protection (Threat Command) account ID and API key, as described in API key and account ID.
This enables the IBM QRadar app to connect with your Digital Risk Protection (Threat Command) instance. - You can access the IBM app store.
- You must be able to authenticate with IBM QRadar as administrator.
Installation and use of the app is described in the IntSights App for Qradar App Specification Guide (https://exchange.xforce.ibmcloud.com/api/hub/extensionsNew/db64c241f2085de6737ae5edd364f644/User_Guide_IntSights_QRadar_App_2_0_0.pdf ).