Integrate an Azure Active Directory Device
You can validate and remediate leaked company credentials by integrating Digital Risk Protection (Threat Command) with your Azure Active Directory.
Only one Active Directory validation can be active, either Azure AD in the cloud or Microsoft AD.
To communicate with Digital Risk Protection (Threat Command), you must register an application in the Azure AD configuration panel. Digital Risk Protection (Threat Command) will use the application credentials as the endpoint to access and remediate users.
Configure an application in Azure AD
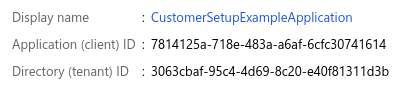
For this example, we will create an application called CustomerSetupExampleApplication.
To configure an application:
-
Register an application:
- From the Azure AD Home > Default Directory, select Register an Application.
- Enter the name of the application (our example name is CustomerSetupExampleApplication).
- Select Accounts in this directory only.

After the application is created, the following details are used to access the customer’s users data:
-
Generate a client secret:
-
From the new application, go to the Certificates and secrets section.
Use this link: https://portal.azure.com/#blade/Microsoft_AAD_IAM/ActiveDirectoryMenuBlade/RegisteredApps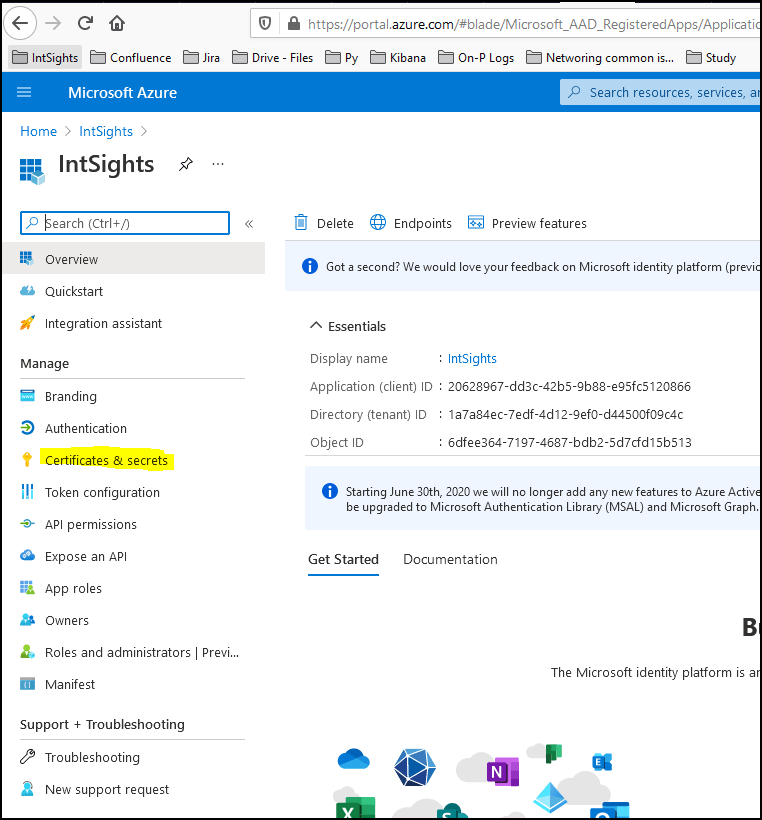
-
Select the created application, then click Certificates & Secrets.
-
Click New client secret.
-
Specify a name and expiration date, then click Add.

-
-
Add API permissions to the application:
- From Microsoft Graph, select Application permissions:
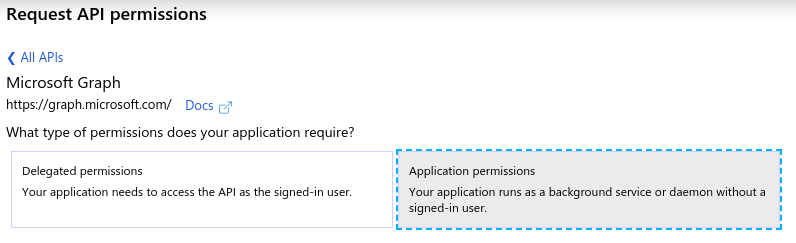
- The following API permissions are required for the application to check and disable users:

- From Microsoft Graph, select Application permissions:
-
After selecting the appropriate permissions, grant admin consent:

-
To support the remediation option of resetting user passwords, perform the following:
- Select the application, go to Roles and administrators, then click the here link to go to the directory level:

- Search for the Helpdesk administrator role and select it.
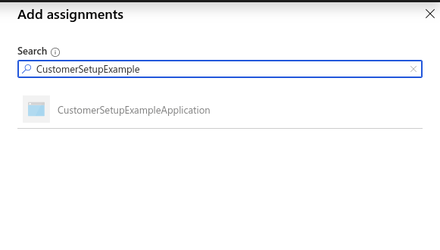
- Add a new assignment by clicking Add assignments and searching for the application name and selecting it:
- Select the application, go to Roles and administrators, then click the here link to go to the directory level:
The following Azure AD details are needed in Digital Risk Protection (Threat Command):
- Authority (Directory ID): From App registrations, select the app.
- Client ID (Application ID): From App registrations, select the app.
- Client credential (Client secret): From Certificates and secrets.
Add an Azure Active Directory cloud integration
Before you begin, ensure:
- You have administrative credentials to access Digital Risk Protection (Threat Command) with a subscription to the Automation module.
- The Azure AD has been configured as described earlier in this section.
- You have the following Azure AD values:
- Authority (Directory ID)
- Client ID (Application ID)
- Client credential (Client secret)
- The user needs the following permissions:
- User.ReadWrite.All - application permission
- User.Read - delegated permission
To add an Azure Active Directory cloud integration:
- From the Digital Risk Protection (Threat Command) main menu, select Automation > Integrations.
- From the Integrations window, click Cloud.
- Click Add new device.
- Type a user-defined name for the device.
The name can contain a maximum of 50 letters, spaces, numbers, and underscores. - From the Device type dropdown, select Azure Active Directory.
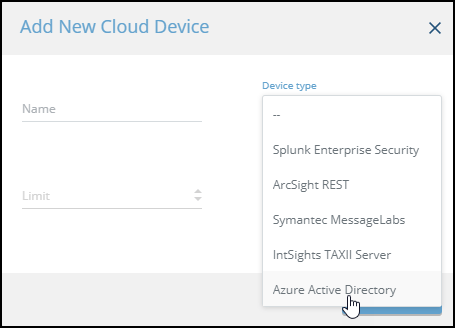
The fields change to accommodate the required Azure credentials
- Type the Azure Directory ID, Client ID, and Client Credential.
- Click Add.
The new device is added to the Devices list, and its details are displayed: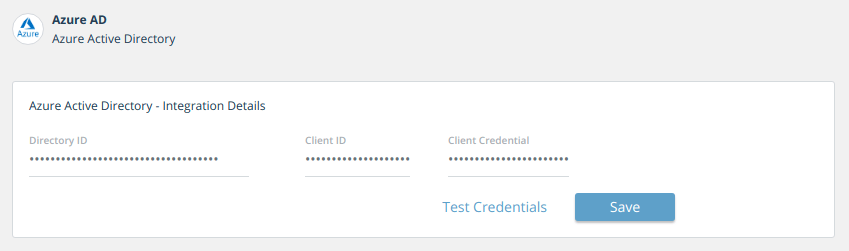
- Click Test Credentials. In the Devices list, next to the device name, there is a red dot, indicating that communication has not yet been established. The dot will change to green when the device is synchronized. Digital Risk Protection (Threat Command) checks for this connectivity on a constant basis.
Create a policy to validate credentials against Azure Active Directory
Before you begin, ensure that:
- The Azure AD device cloud device was added to Digital Risk Protection (Threat Command) and connectivity has been established.
- You have administrative credentials to access Digital Risk Protection (Threat Command) with a subscription to the TIP and Automation modules.
To validate leaked credentials against Azure AD:
- From the Automation > Policy page, click Data Leakage.
- Add a new rule by clicking + in the lower right-hand of the page.
The rule editor is displayed.
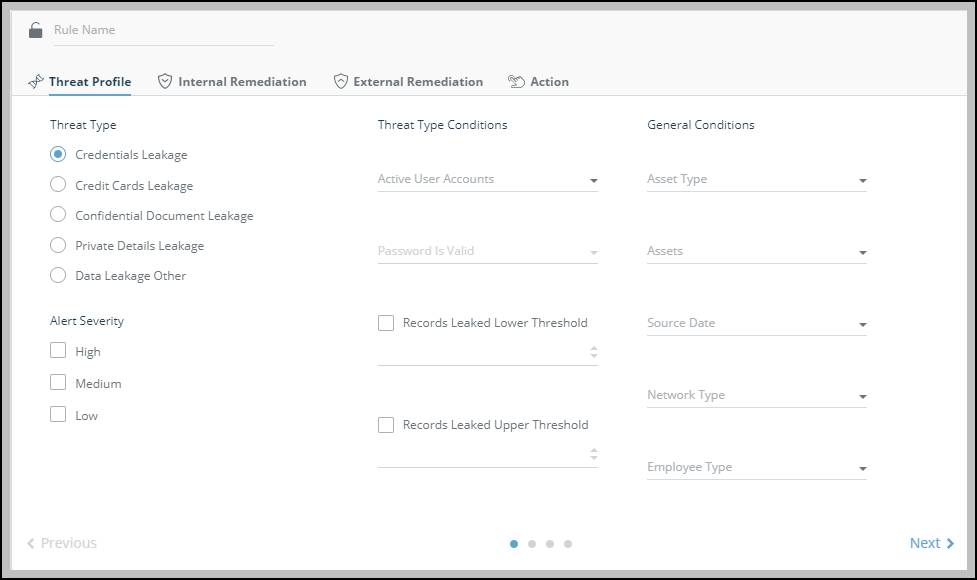
- Type a name for the rule.
- Use the Threat Profile tab to configure which threats match, and when to apply this rule:
- In the Threat Type section, select Credentials Leakage. In the Alert Severity section, select which severity of alerts to match. You must select at least one value.
- Select the Threat Type Conditions according to the following table:
| Condition | Value | Description |
|---|---|---|
| Active User Accounts Validate the leaked user names to determine whether they are active in AD. | Yes | The policy will be applied to all alerts if any of the leaked usernames are active in AD. |
| No | The policy will be applied to all alerts only if none of the leaked usernames are active in AD. (In this case, where none of the usernames are active, password validation is not relevant.) | |
| Password is Valid Validate the leaked passwords to determine whether they are valid for the matched active user in AD. | Yes | The policy will be applied to all alerts if any of the leaked passwords validate in AD. |
| No | The policy will be applied to all alerts only if none of the leaked passwords validate in AD. |
For example, to apply the new rule when at least one of the username/password combinations is active and valid, select Active = Yes and Valid = Yes.
- If no remediation or action is necessary, click Save.
- In the Historical alerts matching dialog, set whether to run the rule on past alerts. The rule is added.
- You can block leaked users from logging in:
- Click Internal Remediation.
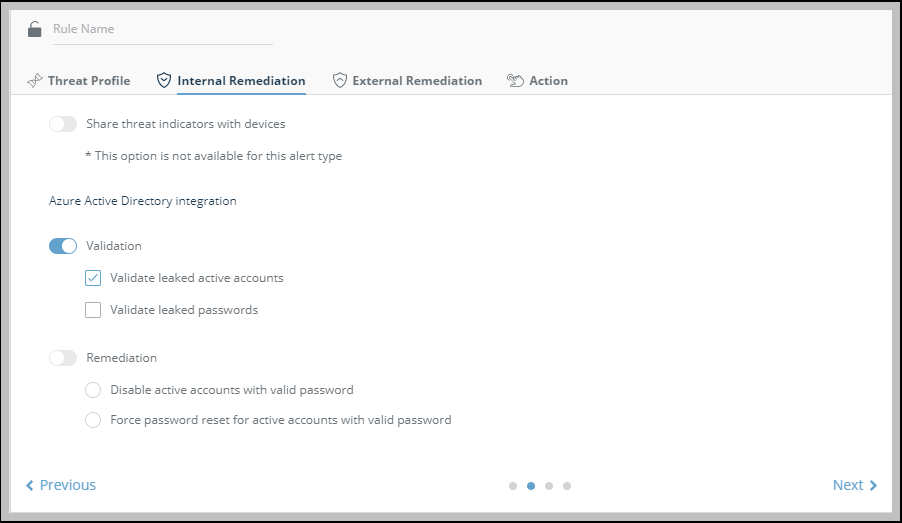 Note: The AD section is only displayed after an AD device has been added in the Automation > Integration section of Digital Risk Protection (Threat Command).
 - In the Validation section, configure for which leaked usernames the remediation will take place:
- Validate leaked active accounts: Remediate if the username is active in the AD.
- Validate leaked passwords: Remediate if the username is active in the AD and the password is valid in the AD.
- In the Remediation section, determine the form of remediation to be used:
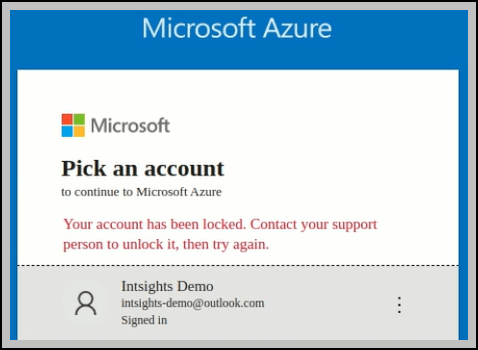
- Lock account access: The user cannot log in to Azure.
- Force reset: The user must reset their password before they can log in to Azure.
- Lock account access: The user cannot log in to Azure.
- If no remediation or action is necessary, click Save.
- In the Historical alerts matching dialog, set whether to run the rule on past alerts.
- Click Internal Remediation.
- You can use the policy to configure additional actions to be done when alerts pass or fail the rules. For more information, see Automating Actions on Alerts.
You can see the effect of the AD validation in the alert details:
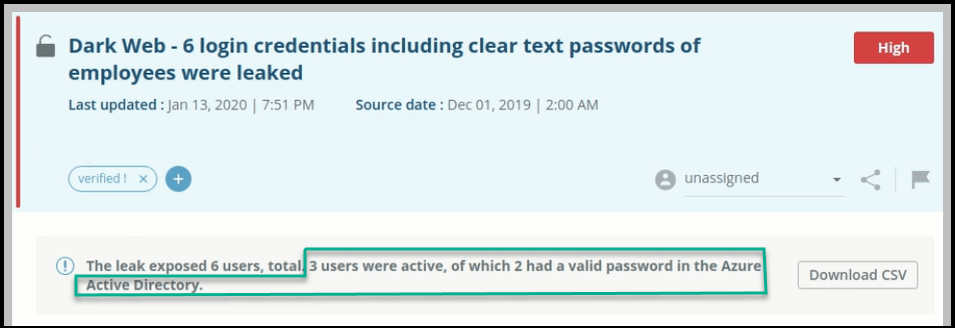
In addition, the remediation status is displayed in the downloaded CSV.