Splunk App Install, Configure, and Upgrade
This section describes how to install and configure the IntSights App for Splunk, an external app.
The following table shows the minimum server requirements:
| Component | Version |
|---|---|
| Splunk Enterprise | 9.1.x, 9.2.x, 9.3.x, 9.4.x |
| Operating system | Linux or Windows |
| System requirements | - 12 core and 12 GB (minimum suggested by Splunk)- 16 core and 32 GB (recommended for optimal performance) |
| Supported Splunk deployments | Standalone environment, Splunk Cloud (v2.0.0 or later), Splunk Distributed Deployment, or Splunk ES |
Digital Risk Protection (Threat Command) subscriptions
To integrate Digital Risk Protection (Threat Command) data, you must have valid Digital Risk Protection (Threat Command) subscriptions:
| To integrate this | You need a subscription to this Digital Risk Protection (Threat Command) module |
|---|---|
| IOCs | TIP |
| Alerts | Digital Risk Protection (Threat Command) |
| Vulnerabilities | Vulnerability Risk Analyzer |
Version updates
The following table shows version updates:
| Version | Change description |
|---|---|
| 2.6.0 | Migrated the App using Add-On Builder version 4.4.1. Updated the retirement logic to handle Splunk limit. |
| 2.4.0 | Added a Macros Configuration page to update macros. Added an “IOC Status” filter in IOCs input configuration page to collect IOC data according to selected IOC status. Added an IOC search filter and First Match Time column in the Correlation Details dashboard. Updated the IOCs retirement logic to consider IOCLastSeen field for retirement. Removed the “Verify SSL Certificate” checkbox from configuration page. Updated the retirement policy of IOCs for IOC type IP, Email, and Hash. Added a default value for the index field while creating the input. Made the Start date and Report date noneditable while editing input. Enhanced the log messages. |
| 2.3.0 | Replaced the V1 allowlist endpoint with the V2 allowlist endpoint. Updated the Correlation Details dashboard to reflect the result count in the panel. |
| 2.2.1 | Added the codependency on correlated time for the filters on the Correlation Details Dashboard. |
| 2.2 | Modified the limit value for IOCs v2 route to 1000. Added co-dependency for the filters in IOC Correlation Details Dashboard. Enhanced the IOC correlation logic to improve performance. Added support for “PendingEnrichment” severity type for IOCs. |
| 2.1 | Updated the IOC Splunk route from v1 to v2. Using the tags instead of Systemtags in knowledge objects and dashboards. |
| 2.0 | Provided action field support on the Correlation dashboard for IOCs. Modified the IOC correlation saved searches to use stats command instead of table command. Migrated the TA with the latest AOB v4.1 |
| 1.3 | Support of Splunk Enterprise Security (ES) Support for Splunk v8.2.x New macro for creating alerts within Splunk on newly added Digital Risk Protection (Threat Command) alerts. New macro for creating alerts within Splunk for correlated vulnerabilities. |
| 1.2 | Added support for Digital Risk Protection (Threat Command) Alerts and Vulnerabilities. Added macro to disable outgoing tags and comments for correlated IOCs. |
| 1.1 | Filters were added to the Correlation Overview and Correlation Details dashboards. The Correlation Details dashboard shows many more details, and enables simple viewing of IOCs in the Digital Risk Protection (Threat Command) IOCs page. Enhanced custom alert options. Bug fixes. Support for Splunk v8.1.x |
| 1.0.2 | Minor bug fixes. |
| 1.0.1 | IOCs are “retired” from the app, based on their last update date. Retired IOCs are not stored in Splunk and are not part of the correlation searches. |
Before you can use the external app with Digital Risk Protection (Threat Command) you need to add it.
Add external app
Before using an external app, you must add it. There are two parts to adding an app:
- Your admin must enable the app for you to add.
- After that, you add the external app.
To add an external app:
- From the main menu, select Automation > Integrations.
- From the Integrations page, click External.
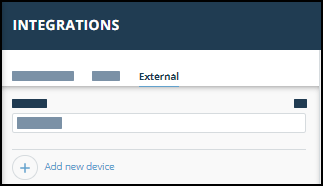
- Click Add new device.
- Select the Device type.
A default name is added. If the external device to add isn’t displayed, ask your admin to enable it for you. - Click Add.
The new device is added.
Installing the IntSights Splunk App
The Splunk app can be installed as a cloud or an on-premises installation. Installation requires the Digital Risk Protection (Threat Command) account ID and API key. This enables the Splunk app to connect with your Digital Risk Protection (Threat Command) instance.
Prerequisites
- You have the Digital Risk Protection (Threat Command) account ID and API key, as described in API key and account ID.
- You must be able to authenticate with Splunk Enterprise as an administrator.
- You must have access to the Splunk App Store (for cloud installation) or the Splunkbase (for on-premises installation).
To install the IntSights Splunk App in the cloud:
- Log in to theSplunkbase store .https://store.servicenow.com/
- Download the IntSights Splunk App.
- To complete the installation, contact Splunk support.
The application is installed.
To install the IntSights Splunk App as an on-premises application:
- Log in to the Splunkbase.
- Download the IntSights Splunk App.
- Install, using either of the following methods:
- Extract the ZIP file $SPLUNK_HOME/etc/apps/ folder
- Install from the UI:
- From Splunk Enterprise, chooseApps > Manage Apps.
- Click Install app from file.
- Click Choose file and select the IntSights Splunk App installation file.
- Click Upload.
- Restart Splunk Enterprise.
Topologies according to the environment
- Standalone Mode
* Install the IntSights Splunk App for Splunk.
* Configure an account and create modular input.
- Distributed Environment
* Install the IntSights Splunk App for Splunk on the Search Head, Indexer
and On-Premise/IDM/UF/HF.
* Configure an account on both Forwarder and Search Head.
* Create modular input only on Forwarder.
Note that for the distributed environment, only Forwarder indexes will be shown in the input configuration page.
The application is installed.
Configuring the IntSights Splunk App for Splunk account, proxy, and logging
After installation, you must configure the account. You can also configure the proxy (optional) and logging (optional).
Prerequisites
- The IntSights Splunk App for Splunk must be installed.
To configure the account, proxy, and logging:
- Log in to Splunk Enterprise as a system administrator.
- Select IntSights Splunk App for Splunk > Setup > Configuration.
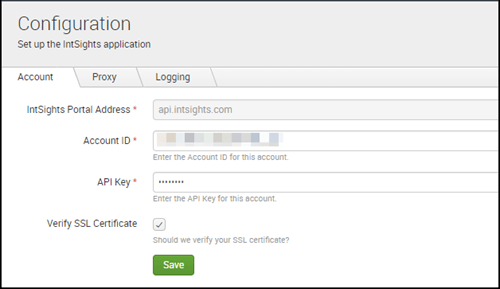
- In the Account tab, enter the Digital Risk Protection (Threat Command) account ID and API key.
- (Optional) To verify the SSL certificate, select that option.
- Click Save.
- (Optional) To set up the proxy, proceed as follows:
- Click the Proxy tab.
- Enable the proxy and enter the required values.
- Click Save.
- (Optional) To set up logging, proceed as follows:
- Click the Logging tab.
- Select the log level.
- Click Save.
The IntSights App for Splunk User Guide
Click here to download the IntSights App for Splunk User Guide.