Start the AppSpider Pro User Interface
To use the AppSpider Graphical User Interface, it needs to have been selected during the installation process on the “Choose Components” window. For more information, view the article about Installing AppSpider Pro.
To start the program, select the AppSpider shortcut on the desktop or from the Start Menu. A splash screen will appear while the application is loading.
AppSpider Main Screen
Some of the primary components of the AppSpider main screen are:
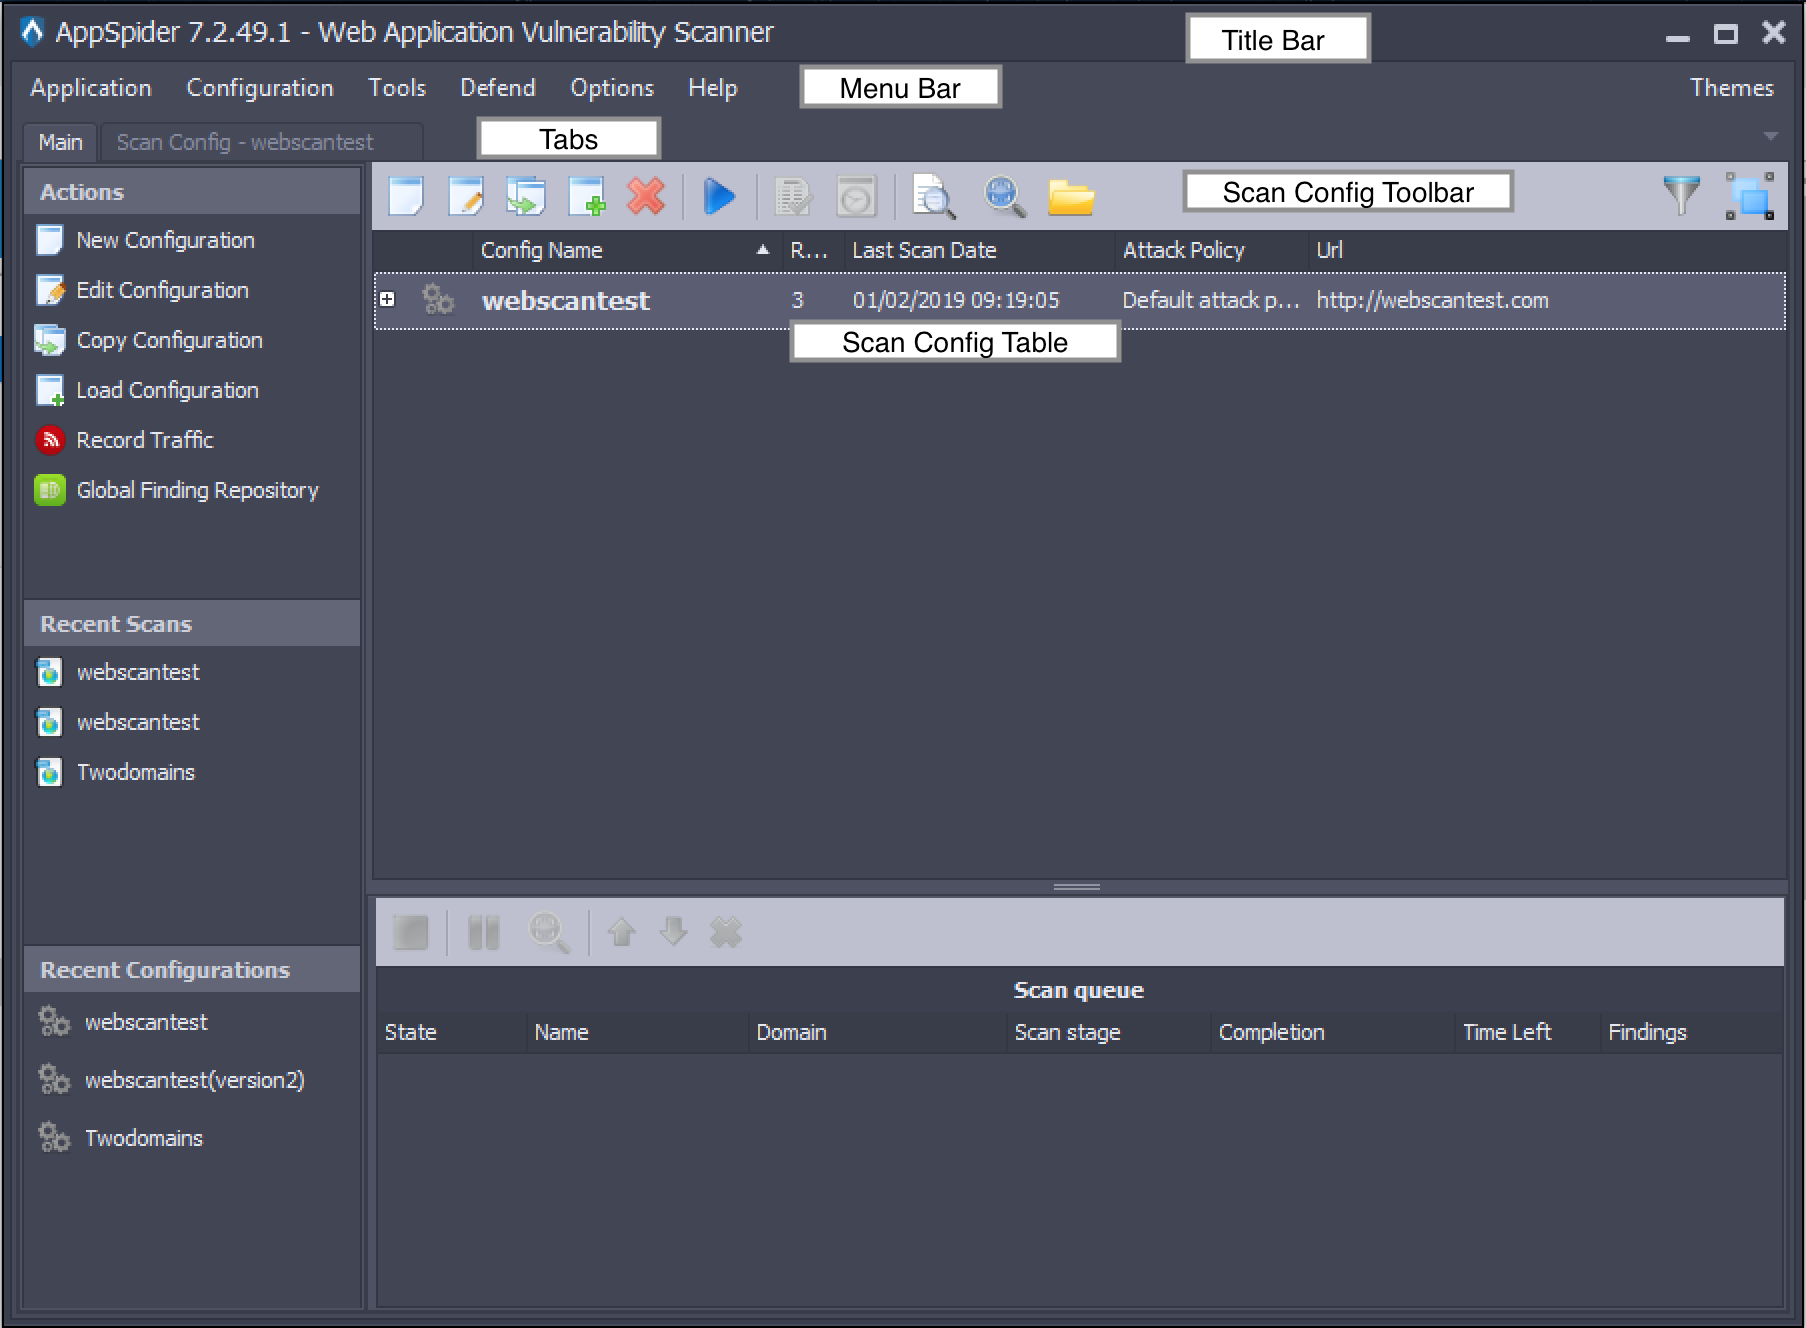
Title Bar
The title bar displays the product name and version. You can check the release notes page to ensure that you are running the latest version of the product.
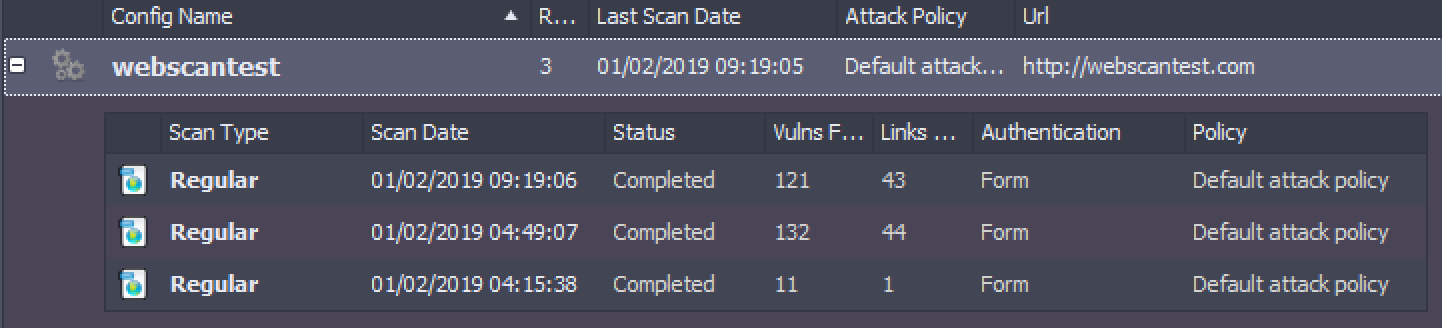
Scan Config Table
This panel contains the list of all scan configurations. You can expand a scan configuration using the + button to see the list of all scans for this scan configuration. Double-clicking a scan opens the HTML scan report with details about the scan and vulnerabilities found.
Scan Config Toolbar

The following buttons are available in this toolbar:
- New - Launches the scan config wizard so that you can create a Scan Configuration.
- Edit - Launches the scan config wizard to edit the selected scan config.
- Copy - Launches the scan config wizard and creates a copy of the selected scan config. The name of this new scan config is
<original scan config>_copy. - Load - Launches the file explorer so that you can load an existing scan config file (of type
.scfg) into AppSpider. This option is useful when you are upgrading your server, and need to move all your data into a new installation of AppSpider. - Remove - Removes the selected scan config. If you press this button, you will receive a popup to choose whether you want to keep the existing scans and data related to this scan config or delete everything.
- Run - Starts a new scan based on the selected configuration.
- Create Validation Scan - Starts a validation scan to test if the vulnerabilities from the selected scan still exist.
- Start Incremental Scan - Starts an incremental scan to test for any changes in the app since the selected scan.
- View Report - View the latest HTML report for the selected scan config, or the report for the selected scan.
- View Scan Results - View the scan results for the selected scan.
- Open folder in Explorer - Opens the scan config folder in the file explorer, so that you can look through the logs and reports in the subfolders.
- Show Filter - Displays a row at the top of the table where you can enter search terms and filter the scan configs.
- Enable Grouping - You may wish to group your scan configs by application or infrastructure. You can assign a scan config to a new group by right-clicking on the scan config name and selecting the Group > Create New… option. When you click the Enable Grouping button, it hides the list of scan configs and displays the list of Scan Config Groups.
Menu Bar
The Menu Bar contains menus with shortcuts to various functions.
Application
The Application menu contains the following button:
- Exit - Closes the AppSpider window but does not stop any scans that are already running. If you wish to stop running scans, you need to explicitly click the Stop button in the “Scan Queue” panel or the “Scan Status” window.
Configuration
The Configuration menu contains the following items:
- New - Launches the scan config wizard so that you can create a Scan Configuration.
- Load - Launches the file explorer so that you can load an existing scan config file (of type
.scfg) into AppSpider. This option is useful when you are upgrading your server, and need to move all your data into a new installation of AppSpider.
Tools
The Tools menu contains the following items:
- Traffic Recorder - Launches the Traffic Recorder tool that records web traffic between a web application and its backend server.
- Traffic Viewer - Launches the Traffic Viewer tool that you can use to view and modify web traffic (
.trec) files. - RegEx Builder - Launches the Regex Builder tool that tests regular expressions and ensures that they match the expected strings.
- Request Builder - Launches the Request Builder tool that you can use to send custom requests to web apps and analyse the responses.
- Attack Policy - Launches the Attack Policy tool that you can use to create new scan templates and modify existing ones.
- Global Finding Repository - Launches the Global Finding Repository tool that monitors all your vulnerabilities across all applications.
- Encoder/Decoder Utility - Launches the Encode/Decode utility that encodes and decodes text using a number of techniques such as Hex, Base64, and Rapid7’s proprietary encoding.
- Swagger Utility - Launches the Swagger Utility that you can use to view, edit, and test Swagger (https://swagger.io/about/ ) files. You can export these files to the AppSpider Traffic Recording format and use them for scanning.
Defend
The Defend menu contains the following item:
- Defend - Launches the Defend tool which can convert your vulnerability data into custom rules for web application firewalls (WAF).
Options
The Options menu contains the following item:
- Environment - Launches the Environment tool that lets you configure various settings such as data storage paths, auto update preferences, and browser preferences.
Help
- User guide - Opens the AppSpider User Guide
- License - Opens the License Information window
Actions Panel
The Actions panel on the main window contains the following items:
- New Configuration - Launches the Scan Config wizard so that you can create a Scan Configuration.
- Edit Configuration - Launches the scan config wizard to edit the selected scan config.
- Copy Configuration - Launches the scan config wizard and creates a copy of the selected scan config. The name of this new scan config is
<original scan config>_copy. - Load Configuration - Launches the file explorer so that you can load an existing scan config file (of type
.scfg) into AppSpider. This option is useful when you are upgrading your server, and need to move all your data into a new installation of AppSpider. - Record Traffic - Launches the Traffic Recorder tool that records web traffic between a web application and its backend server.
- Global Finding Repository - This button launches the Global Finding Repository tool that monitors all your vulnerabilities across all applications.
Recent Scans
The Recent Scans panel displays the list of scan configs with recently completed scans. Double-clicking a scan name opens the HTML report for that scan in the web browser.
Scan Queue
The Scan queue panel displays the list of active and queued scans. Scans are executed in the order that they are queued in this panel. For the active scan, the panel displays a snapshot of the scan status. If the scan engine is not certain of the completion status or time left for the scan, those columns will show a value of “Unknown”. Double-clicking a scan opens the Scan Status screen for the clicked scan.
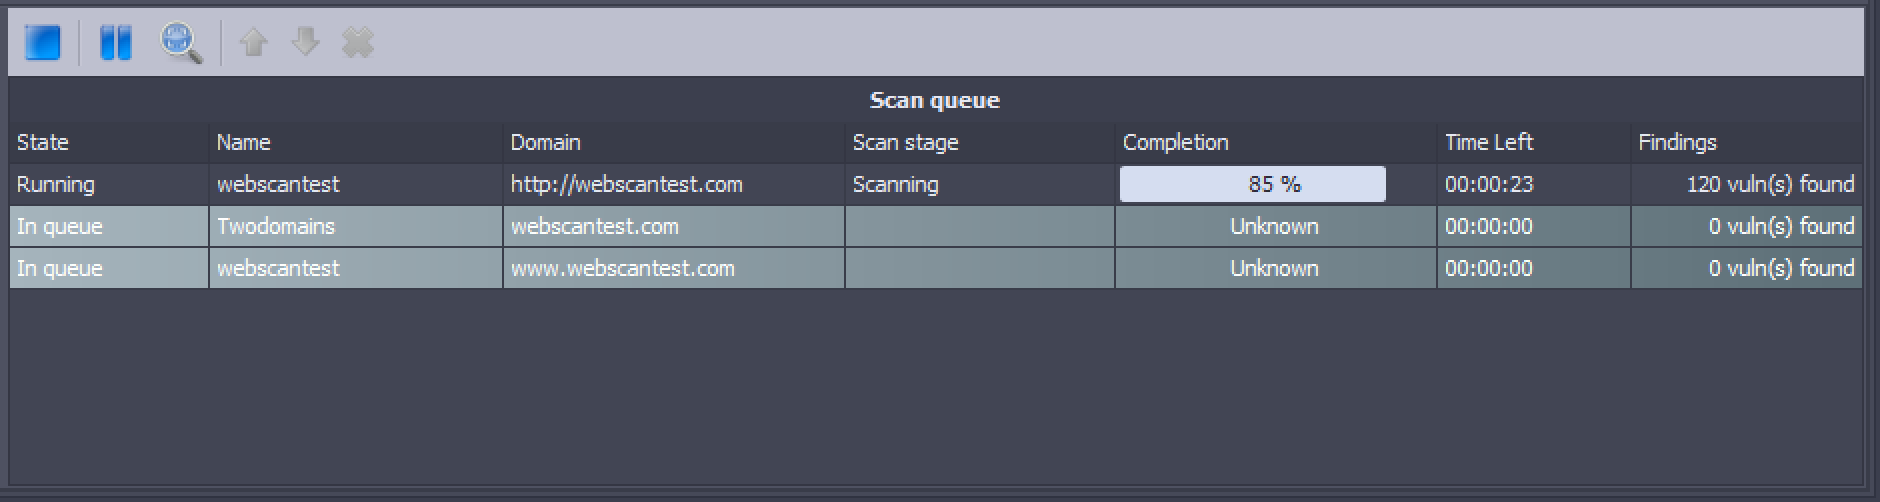
Scan Queue Toolbar
The following buttons are available in this toolbar:
- Stop - Stops the selected scan.
- Pause - Pauses the selected scan.
- Status - Opens the Scan Status screen for the selected scan.
- Move Up - Moves the selected scan higher in the scan queue.
- Move Down - Moves the selected scan lower in the scan queue.
- Remove - Removes the selected scan from the scan queue.