Configure Scan Authentication
Web applications often have a section for registered users only. This part of the web application can only be assessed by logging into the app. The process for logging in is called “Authentication”. Application Security supports a number of ways to authenticate into your application at the site, browser, and server levels. You can also add a login and logout regex.
Site Authentication
In the scan config, on the Authentication > Site Authentication page, use the toggle to Enable Site Authentication, and configure the authentication method.
Automated Login
Modern web applications have more complex interfaces than simple HTML websites. Automated Login allows you to automatically authenticate to modern apps in a scan without relying on a macro. During a scan with Automated Login authentication, Application Security (InsightAppSec) analyzes and identifies the login pages, enters the credentials, and logs in to the app automatically. As well as this, it identifies when the app has been logged out and logs back in, preventing authentication loops.
Step 1: Configure Automated Login
- On the Apps page, select your app.
- On the Scan Configs tab, open your scan config.
- On the Authentication > Site Authentication page, select Automated Login.
- Enter your username and password in the respective fields.
- (Optional) Test the login credentials.
- Save the Scan Config.
- Click Save to save and close.
- Click Save and Scan to save and run the scan.
Test your login credentials
Test the login credentials while adding or updating a scan config to catch incorrect credentials and resolve them before running into an issue during a scan.
AppSec Chrome plugin required for Verify Credentials
You need the AppSec Chrome Extension in order to verify your credentials.
- In the scan config, on the Authentication tab, go to Site Authentication > Automated Login.
- Enter the username and password. In the Verify Credentials section, enter the Login URL
- Click Verify. A window appears and shows the realtime login attempt.
- After the credentials are successfully verified, save the scan config.
- Click Save to save and close.
- Click Save and Scan to save and run the scan.
When you save the scan config, the credentials are encrypted. To verify credentials on a saved scan config, re-enter the username and password.
Step 2: Configure a check to test whether the scan is authenticated and logged in
Occasionally, the scan engine can trigger a logout action that means it cannot continue to scan areas of the website that require authentication. To mitigate this happening, the scan engine constantly checks the authentication status. One method the scan engine employs to achieve this is by checking the location field of the header response, to identify a login redirect. To configure this feature for your website, perform the following steps:
- In the first field, enter a URL from your site that can only be reached if you are logged in.
- Press View Logged Out Response.
- In the second field, the location string automatically populates. This is the string the scan engine looks for in the Location field of the response header to identify a login redirect. This field accepts regex, which you can use to anonymize the string, for example if there is any user-specific element.
In an instance where the engine detects it has logged out, it then attempts to log in again.
Macro Authentication
Application Security (InsightAppSec) may sometimes be unable to reach the login page of your application, or the login form may become available only after a certain specific sequence of actions has been carried out on your website. For example, the login form may appear in a pop-up that gets dynamically generated via Javascript when the “Login” button is pressed from the “Administration” window. You can enable Application Security to perform this sequence of steps by recording a macro.
A macro is a sequence of actions, such as clicking of buttons, or text entry in a web page recorded in a .rec file. During the scan, Application Security can replay the actions in this file to log in to the web application.
AppSec Chrome plugin required for Attack Replay
You need the AppSec Chrome Extension in order to record macros to authenticate into your application.
Step 1: Configure Macro Authentication
- Open the Authentication > Site Authentication page and select Macro Authentication.
- Click the Record New Macro button and enter the login URL for your application. Once you have done so click the Start Recording button.
- A confirmation dialog will appear, notifying that the recording sequence has begun. The macro window will open at the URL you provided. Simply log in normally. Once you have logged in successfully, close the macro window and click the Stop Recording button.
- A message will appear confirming that the recording was successful. Name your macro and click the Save Macro button. You should now see your recorded macro. [/block]
- Save and run your config. It will now attempt authentication using your recorded macro. If successful, the following will appear in the scan’s event log:

Macros recorded by the AppSec plugin are set to the following by default:
  format: "xml"
  min_duration: 3000,
  element_path: "fullpath"
  event_type: "javascript"
Step 2: Configure a check to test whether the scan is authenticated and logged in
Occasionally, the scan engine can trigger a logout action that means it cannot continue to scan areas of the website that require authentication. To mitigate this happening, the scan engine constantly checks the authentication status. One method the scan engine employs to achieve this is by checking the location field of the header response, to identify a login redirect. To configure this feature for your website, perform the following steps:
- In the first field, enter a URL from your site that can only be reached if you are logged in.
- Press View Logged Out Response.
- In the second field, the location string automatically populates. This is the string the scan engine looks for in the Location field of the response header to identify a login redirect. This field accepts regex, which you can use to anonymize the string, for example if there is any user-specific element.
In an instance where the engine detects it has logged out, it then attempts to log in again.
Traffic
You may run into web applications built with technologies that are not supported by the Application Security crawler. You can authenticate into such applications by using a web proxy tool such as the Traffic Recorder in the Rapid7 AppSec Toolkit . Using the proxy tool, you can record the interactions (e.g. HTTP GET and POST requests) between the front end application and the back end server in a Traffic File. Application Security can replay these interactions to authenticate into your application.
Step 1: Authenticate with a Traffic file
- Complete the steps for logging into your application and record the interactions in a traffic file on your computer. Traffic files can be of the following formats:
- AppSec toolkit Traffic Files (*.trec)
- Burp Files (*.xml)
- Paros Files (*.txt)
- WebScarab Files (conversationlog)
- HAR (HTTP Archive) Files (*.har)
- Fiddler Files (*.saz)
- Open the Authentication > Site Authentication page and select Traffic.
- Click the Choose File button.
- Click the Upload File button and upload the traffic file from your computer.
- Select the newly uploaded file or an existing traffic file from the “All my Files” tab in the popup.
- Click the Use 1 Selected File(s) button.
Step 2: Configure a check to test whether the scan is authenticated and logged in
Occasionally, the scan engine can trigger a logout action that means it cannot continue to scan areas of the website that require authentication. To mitigate this happening, the scan engine constantly checks the authentication status. One method the scan engine employs to achieve this is by checking the location field of the header response, to identify a login redirect. To configure this feature for your website, perform the following steps:
- In the first field, enter a URL from your site that can only be reached if you are logged in.
- Press View Logged Out Response.
- In the second field, the location string automatically populates. This is the string the scan engine looks for in the Location field of the response header to identify a login redirect. This field accepts regex, which you can use to anonymize the string, for example if there is any user-specific element.
In an instance where the engine detects it has logged out, it then attempts to log in again.
Multi-factor
Many modern web applications use security measures, like two-factor authentication and CAPTCHA, that require manual intervention for logging in to the application. For example, your application may require a one time password sent via SMS. Multi-factor authentication will pause the active scan and allow you to interactively log in to the target application. After authentication is complete, you can resume the scan. The scan engine will continue to crawl and attack your application.
In order to enable multi-factor authentication, you’ll need:
- Chrome browser
- The latest version of the AppSec Chrome Extension
- Engine version number 7.2.049 or later, if you are using an on-premises scan engine
Step 1: Enabling Multi-factor Authentication for a Scan
To enable multi-factor authentication for your scan, go to Authentication > Authentication Type. Click the Authentication Type dropdown and select Multi-factor.
After you have started the scan:
- Monitor the scans table. When your scan is ready for authentication, the “Status” column will show the message “Awaiting Authentication”.
- Click on the name of the scan to open the scan window. You will see the “Authenticate Scan” button on the upper right side of the screen.
- Click the Authenticate Scan button. If you have not installed the AppSec Chrome Extension, you will see a message prompting you to install it. If you have installed the extension, you will see the “Multi-factor Authentication” screen.
- Enter the URL of the application and click Start. A popup message with the name of the file where the multi-factor authentication web traffic will be recorded on the Command Platform (Insight Platform) will appear. Click OK to continue. A Chrome browser window will pop up and open the web page for your URL.
- Log in to the application. When the login process is successful, close the Chrome window and return to the “Multi-factor Authentication” screen.
Note
During this step, you should only perform the steps required for logging in to the application. The Application Security (InsightAppSec) scan engine will replay these steps and match the pattern from the Advanced > Logged-in Regex field to the web page open in the browser. After it confirms that the authentication was successful, it will continue the scan.
- Click Stop. The Multi-Factor Authentication screen will close, and you will return to the scan window.
- Monitor the “Event Log” to ensure that authentication has been successful. The Chrome extension records the web traffic of your authentication session and converts it into an HTTP Archive (HAR) file. The scan engine replays this traffic in memory to log in to your application. If the login is successful, you will see the message “Session ‘Authentication with Multi-Factor File:’ logged in” in the event log. You can also see the status “Logged In” under the Crawled Links count on the scan page.
If the login is not successful, you should ensure that the regular expression in the “Logged-in Regex” field from the “Advanced” screen matches the text in the web page that appears after authentication. If the indicator for logged-in state is hidden under a menu item, expand it so that Application Security (InsightAppSec) can examine it and check the logged-in state.
For example, if you want to use the presence of the “Logout” link as an indicator that user is logged in, expand the drop down where the Logout link is hidden as part of the authentication steps.
Use Case: Testing Web Apps
You have been scanning your site without credentials, but due to a new initiative, you want to test the site for security weaknesses using multi-factor authentication. However, multi-factor authentication limits the ability to automate authentication and scale DAST scans. The best practice is to disable multi-factor authentication to the target web application. In this scenario, either bypass multi-factor authentication or use Bootstrap authentication for a one-time login.
Step 2: Configure a check to test whether the scan is authenticated and logged in
Occasionally, the scan engine can trigger a logout action that means it cannot continue to scan areas of the website that require authentication. To mitigate this happening, the scan engine constantly checks the authentication status. One method the scan engine employs to achieve this is by checking the location field of the header response, to identify a login redirect. To configure this feature for your website, perform the following steps:
- In the first field, enter a URL from your site that can only be reached if you are logged in.
- Press View Logged Out Response.
- In the second field, the location string automatically populates. This is the string the scan engine looks for in the Location field of the response header to identify a login redirect. This field accepts regex, which you can use to anonymize the string, for example if there is any user-specific element.
In an instance where the engine detects it has logged out, it then attempts to log in again.
Selenium
Selenium is a framework for automated testing of web applications. Users can record actions like entering data in forms and clicking buttons using Selenium and replay them on demand to ensure that the web application behaves as desired.
Application Security (InsightAppSec) supports authentication using Selenium files, so you can record the actions needed to log in to your application in a Selenium .side file. During the scan, Application Security (InsightAppSec) can replay the actions in this file to log in to the web application. The following is a Selenium authentication file for Hackazon.
{
  "id": "21835ec2-a3fb-4be5-87e0-0008d439e4bd",
  "version": "2.0",
  "name": "Hackazon_Login",
  "url": "https://hackazon.webscantest.com",
  "tests": [{
    "id": "3c20000d-6927-42b5-b833-abc8bbf95fc8",
    "name": "Login",
    "commands": [{
      "id": "a682f8fe-5c36-4656-b6cd-16cc9de97024",
      "comment": "",
      "command": "open",
      "target": "/user/login",
      "targets": [],
      "value": ""
    }, {
      "id": "197ef686-b02b-4f4f-8b2f-c2e0caacbdd4",
      "comment": "",
      "command": "setWindowSize",
      "target": "1490x614",
      "targets": [],
      "value": ""
    }, {
      "id": "7f523e30-859d-4332-b1e0-43db5d53b755",
      "comment": "",
      "command": "click",
      "target": "id=username",
      "targets": [
        ["id=username", "id"],
        ["name=username", "name"],
        ["css=.form-group:nth-child(1) > #username", "css:finder"],
        ["xpath=//input[@id='username']", "xpath:attributes"],
        ["xpath=//form[@id='loginPageForm']/div/div/div/input", "xpath:idRelative"],
        ["xpath=//div/div/div/input", "xpath:position"]
      ],
      "value": ""
    }, {
      "id": "d3658c7f-04a6-4321-9fe0-ae27a10c4833",
      "comment": "",
      "command": "type",
      "target": "id=username",
      "targets": [
        ["id=username", "id"],
        ["name=username", "name"],
        ["css=.has-success > #username", "css:finder"],
        ["xpath=//input[@id='username']", "xpath:attributes"],
        ["xpath=//form[@id='loginPageForm']/div/div/div/input", "xpath:idRelative"],
        ["xpath=//div/div/div/input", "xpath:position"]
      ],
      "value": "test_user"
    }, {
      "id": "58efc617-ea4a-489e-bad3-751d46b32ee9",
      "comment": "",
      "command": "type",
      "target": "id=password",
      "targets": [
        ["id=password", "id"],
        ["name=password", "name"],
        ["css=.has-success > #password", "css:finder"],
        ["xpath=//input[@id='password']", "xpath:attributes"],
        ["xpath=//form[@id='loginPageForm']/div[2]/div/div/input", "xpath:idRelative"],
        ["xpath=//div[2]/div/div/input", "xpath:position"]
      ],
      "value": "123456"
    }, {
      "id": "f087221e-8b40-4635-bf7d-02d9fec8529f",
      "comment": "",
      "command": "click",
      "target": "id=loginbtn",
      "targets": [
        ["id=loginbtn", "id"],
        ["css=.row:nth-child(7) #loginbtn", "css:finder"],
        ["xpath=//button[@id='loginbtn']", "xpath:attributes"],
        ["xpath=//form[@id='loginPageForm']/div[3]/div/button", "xpath:idRelative"],
        ["xpath=//div[3]/div/button", "xpath:position"],
        ["xpath=//button[contains(.,'Sign In')]", "xpath:innerText"]
      ],
      "value": ""
    }]
  }],
  "suites": [{
    "id": "0674c923-d54a-4893-b9bc-47c8e630905b",
    "name": "Default Suite",
    "persistSession": false,
    "parallel": false,
    "timeout": 300,
    "tests": ["3c20000d-6927-42b5-b833-abc8bbf95fc8"]
  }],
  "urls": ["https://hackazon.webscantest.com/"],
  "plugins": []
}
Authenticate with a Selenium file
- Complete the steps for logging in to your application and record the interactions in a Selenium file of the
.sideformat. - On the Authentication > Site Authentication page, select Selenium.
- Click the Choose File button.
- Click the Upload File button and upload the Selenium file from your computer.
- Select the newly uploaded file or an existing Selenium file from the “All my Files” tab in the popup.
- Click the Use 1 Selected File(s) button.
Step 2: Configure a check to test whether the scan is authenticated and logged in
Occasionally, the scan engine can trigger a logout action that means it cannot continue to scan areas of the website that require authentication. To mitigate this happening, the scan engine constantly checks the authentication status. One method the scan engine employs to achieve this is by checking the location field of the header response, to identify a login redirect. To configure this feature for your website, perform the following steps:
- In the first field, enter a URL from your site that can only be reached if you are logged in.
- Press View Logged Out Response.
- In the second field, the location string automatically populates. This is the string the scan engine looks for in the Location field of the response header to identify a login redirect. This field accepts regex, which you can use to anonymize the string, for example if there is any user-specific element.
In an instance where the engine detects it has logged out, it then attempts to log in again.
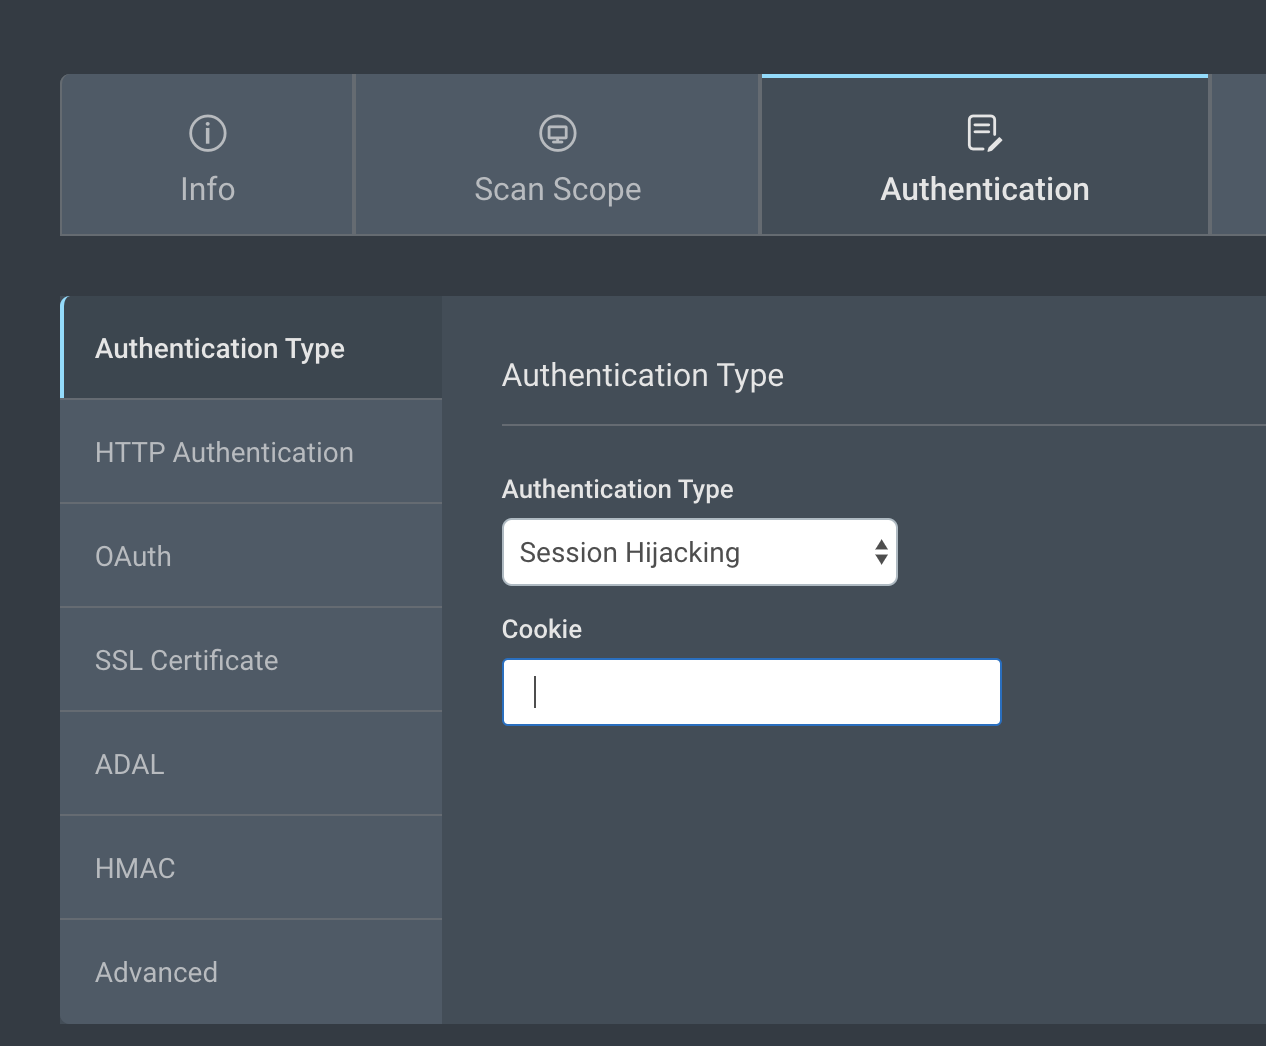
Session Hijacking
Configure Browser Authentication
In the scan config, on the Authentication > Browser Authentication page, use the toggle to Enable Browser Authentication, and configure the authentication method.
HTTP Authentication
The HTTP protocol supports authentication using a username and password. You can use this reference article to learn more about HTTP Authentication: https://docs.microsoft.com/en-us/dotnet/framework/wcf/feature-details/understanding-http-authentication
Application Security (InsightAppSec) supports the Basic, NTLM, and Kerberos protocols for HTTP authentication.
Configure the authentication process
- Open the Authentication > HTTP Authentication screen.
- Click the Enable HTTP Auth switch to enable HTTP authentication.
- Enter your username and password in the respective fields.
HMAC
HMAC is a MAC (Message Authentication Code) that uses a cryptographic hash function and a secret key to authenticate. To learn more about HMAC, see https://en.wikipedia.org/wiki/HMAC .
Configure HMAC authentication
- Go to the Authentication > HMAC page.
- Use the toggle button to Enable HMAC.
- Enter the following information:
- Username - The username for your hash algorithm.
- Secret Key - A unique code used to compute the HMAC. It is known by both the sender and receiver.
- Hash Algorithm - Choose the hash algorithm type.
- Md5
- Sha1
- Sha256
- Header Generation DLL Filename - A user created DLL file (https://support.microsoft.com/en-us/help/815065/what-is-a-dll ), which contains the cryptographic hash function. This is only needed if using an on-premise engine. If you don’t provide a file, the system will use the DLL provided by the engine.
Configure Certificate Authentication
In the scan config, on the Authentication > Certificate Authentication page, use the toggle to Enable Certificate Authentication, and configure the authentication method.
SSL Certificates
You may need to authenticate your application on the client side so you can scan pages found behind your SSL. This authentication method can be used with both cloud and on-premise scan engines.
PFX Certificate Format
The SSL Certificate must be a .pfx file.
Configure SSL authentication
- Click Choose File. You can click Upload File or drag and drop your SSL .pfx file.
- Click Use Selected File
- Optional: If a password is required, enter it in the provided box.
- When you have successfully uploaded your .pfx file, save the scan config.
- Click Save to save and close.
- Click Save and Scan to save and run the scan.
Configure Server Authentication
In the scan config, on the Authentication > Server Authentication page, use the toggle to Enable Server Authentication, and configure the authentication method.
OAuth
OAuth (https://oauth.net/ ) is an authorization method that is used by applications to grant fine grained access to clients. Application Security supports OAuth 2.0 which is the industry-standard protocol for authorization. OAuth 2.0 focuses on client developer simplicity while providing specific authorization flows for web applications, desktop applications, mobile phones, and living room devices. If your application has granted Application Security the access to certain capabilities, you can enter the required details in the Authentication > OAuth screen. When starting a scan, Application Security can provide these details to your application and receive an access token.
Set Up OAuth Authentication
If you want to scan an application that uses OAuth, you will need to know the grant type used by your application. You can usually get this information from your application developers. If you examine the traffic from a connection, you can also often see the grant type in the URL.

OAuth and Automated Login
The Authentication > OAuth screen has a number of options to configure your application’s OAuth properties. You will need to click the Enable OAUTH switch to enable OAuth authentication, and then provide the required values based on your grant type.
- Resource Owner URL - An entity capable of granting access to a protected resource. Optional, in most cases should be equal to Resource Server URL
- Resource Server URL - The identifier for your API server. The resource server handles authenticated requests after the application has obtained an access token
- Authentication Server URL - The authentication server URL, obtained from your identity provider (reference: https://en.wikipedia.org/wiki/Identity_provider )
- Redirect URI - The URL that the authorization server will redirect the user back to, with an authorization code or access token in the URL. Resource Server URL will be used if empty
- Client Scope - One or more space-separated strings indicating which permissions the application is requesting. The specific OAuth API you’re using will define the scopes that it supports
- Client ID - The public identifier for the application, obtained from your identity provider
- Client Secret - The application’s client secret, obtained from your identity provider. This ensures that the request to get the access token is made only from the application
- Client State - The application generates a random string and includes it in the request. It should then check that the same value is returned after the user authorizes the app. This is used to prevent CSRF attacks
- ExtensionGrant - Can be ignored at this moment
- Username - The username of the end user in case of using the “Resource Owner Password Credentials” or “Client Credentials” grant types
- Password - The password of the end user in case of using the “Resource Owner Password Credentials” or “Client Credentials” grant types
- Username Form - The username for additional form authentication flow on the application
- Password Form - The password for additional form authentication flow on the application
- Never Do Basic Auth - Prevents Application Security from sending HTTP Basic authentication header (base64 encoded Username and Password values) in case of using “Resource Owner Password Credentials” or “Client Credentials”
OAuth Grant Types
Depending on your use case, you will need to use a different OAuth flow. The “grant type” property determines the OAuth flow that your application is using. You can learn more about grant types here: https://oauth.net/2/grant-types/ .
The following chart can help you choose the appropriate grant type for your application.
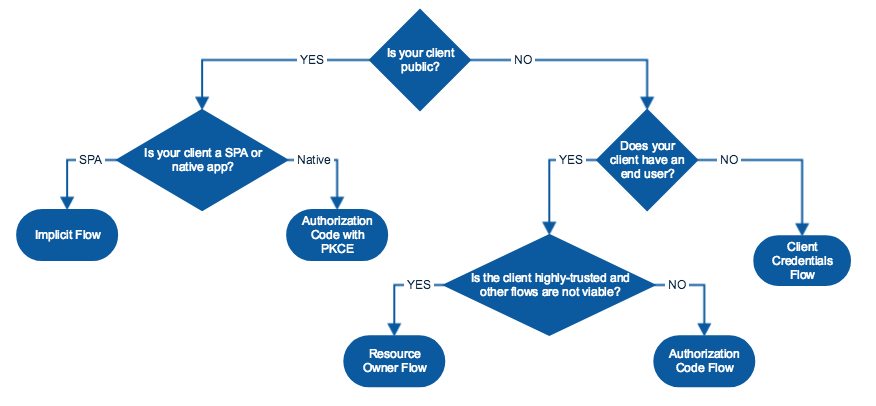
The following sections describe which OAuth properties you need to provide to Application Security (InsightAppSec) based on your grant type.
Authorization Code
The Authorization Code grant type is used by web and mobile apps. It differs from most of the other grant types by first requiring the app launch a browser to begin the flow. At a high level, the flow has the following steps:
- The application opens a browser to send the user to the OAuth server
- The user sees the authorization prompt and approves the app’s request
- The user is redirected back to the application with an authorization code in the query string
- The application exchanges the authorization code for an access token
The Authorization Code flow is best used by server-side apps where the source code is not publicly exposed. The apps should be server-side because the request that exchanges the authorization code for a token requires a client secret, which will have to be stored in your client. The server-side app requires an end-user, however, because it relies on interaction with the end-user’s web browser which will redirect the user and then receive the authorization code. See https://developer.okta.com/authentication-guide/auth-overview/#authorization-code-flow and https://developer.okta.com/authentication-guide/implementing-authentication/auth-code for more information.
Mandatory properties
- Resource Server URL
- Client ID
Implicit
The Implicit grant type is a simplified flow that can be used by public clients, where the access token is returned immediately without an extra authorization code exchange step.
It is generally not recommended to use the implicit flow (and some servers prohibit this flow entirely). In the time since the spec was originally written, the industry best practice has changed to recommend that public clients should use the authorization code flow with the PKCE extension instead.
Mandatory properties
- Resource Server URL
- Client ID
NOTE: PKCE is not supported yet
Resource Owner Password Credentials
The resource owner password credentials grant type is suitable in cases where the resource owner has a trust relationship with the client, such as the device operating system or a highly privileged application. The authorization server should take special care when enabling this grant type and only allow it when other flows are not viable. See https://tools.ietf.org/html/rfc6749#4.3 for more information.
Mandatory properties
- Resource Server URL
- Username
- Password
Client Credentials
The Client Credentials grant is used when applications request an access token to access their own resources, not on behalf of a user. The client needs to authenticate themselves for this request. Typically the service will allow either additional request parameters Client Id and Client Secret, or accept the Client Id and Client Secret in the HTTP Basic auth header.
Mandatory properties
Resource Server URL
Additional OAuth Properties
In addition to the properties in the OAuth section of the Authentication screen, there are some Advanced Options that can be helpful to configure the OAuth flow for your application.
- JsonPostBodies - Support JSON format on OAuth Authorization Server requests and responses
- OAuthCustomField - Any additional parameters that should be sent to the Authorization Server
Note
In most cases, except the Implicit grant type, OAuth authentication can be bypassed using a macro. If you are having trouble configuring OAuth with Application Security (InsightAppSec), you should try Macro authentication.
MSAL
You can authenticate your Application Security (InsightAppSec) scans using the Microsoft Authentication Library (MSAL).
Configure MSAL
To configure MSAL authentication, go to Authentication > MSAL screen in the scan config wizard, and complete the following steps:
- Click Choose File. Upload the required cert by browsing to the .pfx file. You can also drag and drop.
- Click Use Selected File.
- Fill out the following fields:
- X509CertPassword - The password of the cert provided.
- X509CertStoreKey - The file name of the cert provided.
- TenantId - Domain name of tenant.
- ClientId - The Application (client) ID under the app that you have registered.
- Scope - OAuth 2.0 permissions.
- Token Refresh Period (10 minutes minimum) - The frequency at which you want to refresh the token.
Configure additional settings using Regex
While attempting authenticated scanning of an app, Application Security needs a way to know that authentication has been successful. It attempts to deduce the logged-in state of the app by examining the headers and body of web pages. The fields in the Authentication > Additional Settings tab can be used to train Application Security to recognize the logged-in state of your application.
Session Loss On Canary Page Regex
The regex is trying to match the text on the page of a 302 redirect from a canary page. If it matches, then the application assumes you are logged out.
Note: The canary page is a URL from your site that can only be reached if you are logged in. You can specify this URL by following the steps here .
Login Link Regex
A regular expression that matches the text on the link that points to the login page. Application Security will use this regex to find the login link and apply the user-provided credentials. If the user is already logged in, this regex will help Application Security from accidentally crawling the login again.
Logged-in Regex
If the text on your page matches this regular expression, Application Security assumes that you are still logged in. This regex usually matches the sign out link, since the sign-out option is only available if the user is still logged in.
Logged-in Header Regex
If your application always populates a specific HTTP header when a user is logged-in, you can use a matching regex in this field. If the headers match the regex, Application Security will assume that the user is logged-in.
Session Loss Regex
If the text on your page matches this regular expression, Application Security assumes that the session has expired.
Session Loss Header Regex
If your application always populates a specific HTTP header when a session expires you can use a matching regex in this field. If the headers match the regex, Application Security assumes the session has been lost/expired.
Logout Link Regex
The regex will be used to determine whether a link is a logout link
Logout Post Body Regex
The regex is used to determine whether a request with POST data can cause session logout.
You can use the Regex Builder of the Rapid7 AppSec Toolkit to test your regular expressions before using them in Application Security.