Specification File
So you want to build a plugin? You’ve come to the right place!
The following will demonstrate how to correctly build a plugin using the Python SDK.
Plugins support any number of triggers or actions. Plugins are defined using a plugin.spec.yaml, and a plugin shell can be codegen’d using
insight-plugin create <path/to/plugin.spec.yaml>
When writing plugins, work directly out of the plugins repository. Locate your plugins.spec.yaml to plugins/myplugin.yaml and generate the skeleton from there, so it fits nicely with the other plugins.
Plugin Specification
Plugins are code generated from a plugin spec file.
The Plugin Specification
First, create a file called {plugin-name}.yaml and populate it with some data:
plugin_spec_version: v2
extension: plugin
products: [insightconnect]
name: example
title: Example Plugin
description: Example plugin for testing
version: 1.0.0
supported_versions: ["1.0.0", "1.0.1"]
vendor: rapid7
status: []
tags: [malware, hash]
hub_tags:
  use_cases: [data_enrichment,threat_detection_and_response]
  keywords: [malware, hash]
  features: []
resources:
  source_url: https://github.com/rapid7/insightconnect-plugins/tree/master/example
  license_url: https://github.com/rapid7/insightconnect-plugins/blob/master/LICENSE
  vendor_url: https://www.rapid7.com
enable_cache: true

types:
  person:
    first_name:
      title: First Name
      type: string
    last_name:
      title: Last Name
      type: string

connection:
  hostname:
    title: Host
    description: Enter the hostname
    type: string
    required: true
    example: https://www.google.com/
  port:
    title: Port
    description: Enter the port
    type: integer
    default: 80
    required: true
    example: 8080
  username:
    title: Username
    description: Enter the username
    type: string
    required: true
    example: UserName

triggers:
  emit_greeting:
    title: Trigger a New Greeting
    description: Triggers a greeting every interval
    input:
      interval:
        title: Interval
        description: How frequently (in seconds) to trigger a greeting
        type: integer
        default: 15
        required: true
        example: 20
    output:
      greeting:
        title: Greeting
        description: The user generated greeting message
        type: person
        required: true
        example: Hello World!

actions:
  say_goodbye:
    title: Say Goodbye
    description: Emit say goodbye message
    input:
      name:
        title: Name
        description: Name to say goodbye to
        type: string
        required: true
        example: Rapid7Name
    output:
      message:
        title: Message
        description: User generated message
        type: string
        required: true
        example: Hello World!
Let’s review this file in detail.
Metadata Section
At the top of the spec, you define metadata about your plugin such as the name, version, and tags. The metadata section ends with two newline characters.
The table below lists all the metadata properties.
| Property | Type | Description |
|---|---|---|
| plugin_spec_version | string | Plugin specification version which changes how the plugin operates |
| extension | string | Extension type, value should be: plugin |
| products | string | Compatible Insight products, value should be: [insightconnect] |
| name | string | Plugin name for development purposes |
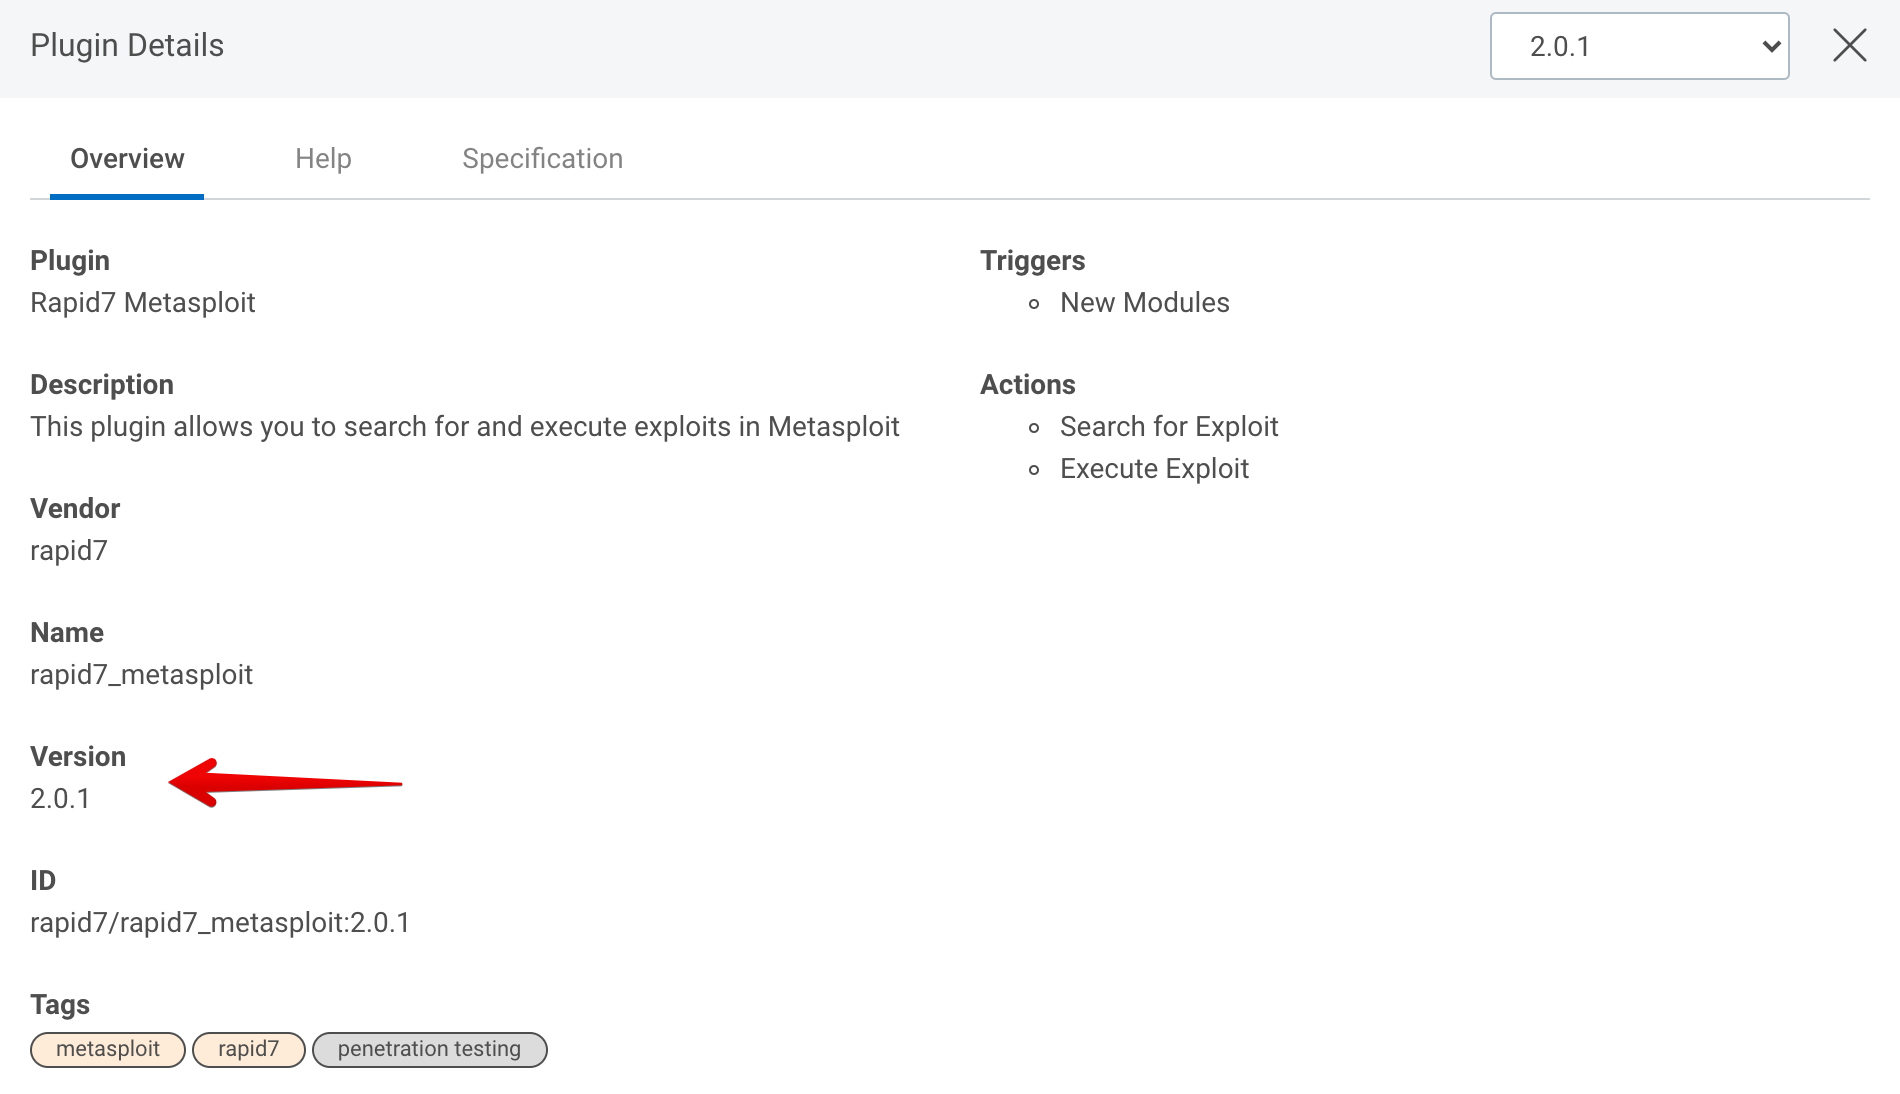
| title | string | Plugin name displayed in the UI |
| description | string | Plugin description displayed in the UI |
| version | string | Plugin version in semver format |
| references | array | A list of supporting documentation related to the plugin or service |
| supported_versions | array | Versions of the vendor product that are tested and supported by this plugin |
| vendor | string | Vendor who developed plugin, used for organization and The Extension Library |
| tags | array | Plugin tags used as search terms in the UI and The Extension Library |
| hub_tags | object | Object containing keys used for categorization in The Extension Library |
| resources | object | Object containing keys for linking in The Extension Library |
| support | string | Determine ownership of plugin maintenance, values: rapid7, partner, community |
| status | array | Plugin status to determine the state of the integration |
| enable_cache | boolean | Enable storage on host for plugin to keep state |
| cloud_ready | boolean | If supported, the plugin can be connected via the cloud orchestrator. |
| key_features | []string | A list of key features a user can add to help identify use cases for the plugin, visible on the extension library. |
| version_history | []string | List of previous and current versions of the plugin. |
| requirements | []string | URLs or other resources that highlight requirements of the plugin. |
Below, you can find more details about each property.
plug_spec_version
This defines the plugin specification version, which changes how plugins operate.
v2- is a standalone plugin as an HTTP REST server that is invoked once. This is currently the only supported plugin_spec_version in Automation (InsightConnect).v1- is a standalone plugin that exits after each invocation (legacy, and unsupported in insightConnect).
extension
This defines the type of extension. For plugins, it will be:
extension: plugin
More extension types may be available in the future.
products
This field defines compatible Insight products for categorization in The Extension Library.
For plugins, it will be:
products: [insightconnect]
name
The name of the plugin for development purposes. This value determines the directory and file system naming of the plugin.
E.g. name: example_plugin
See the style guide on how to properly set the name.
title
The title of the plugin is displayed in the Automation (InsightConnect) UI. Users of the product see this value. The title should conform to proper noun rules.
E.g. title: Example Plugin

description
The Automation (InsightConnect) UI displays the plugin’s description. Users of the product see this value. The description should conform to sentence-like structure.
E.g. description: Example plugin for testing

version
The plugin’s version follows the semver format.
For a plugin’s initial version, please use:
0.1.0 - Initial pluginfor plugins in development1.0.0 - Initial pluginfor plugins in production
supported_versions
This lists versions of the vendor software the plugin maintainers support, and against which the plugin has been tested. The values should be in ascending order.
- Supported versions are strings that identify specific releases of the vendor product software. The format of the version numbers should match the format used by the product vendor.
- For SaaS software without specific versions, supported versions should be a running list of timestamps that this plugin was tested against the vendor API in the format yyyy-MM-dd.
E.g. ['1.0.0', '1.0.1', 1.2.3']
E.g. ['2021-01-31]
vendor
The vendor who developed the plugin, used for organization, searching, and display on The Extension Library
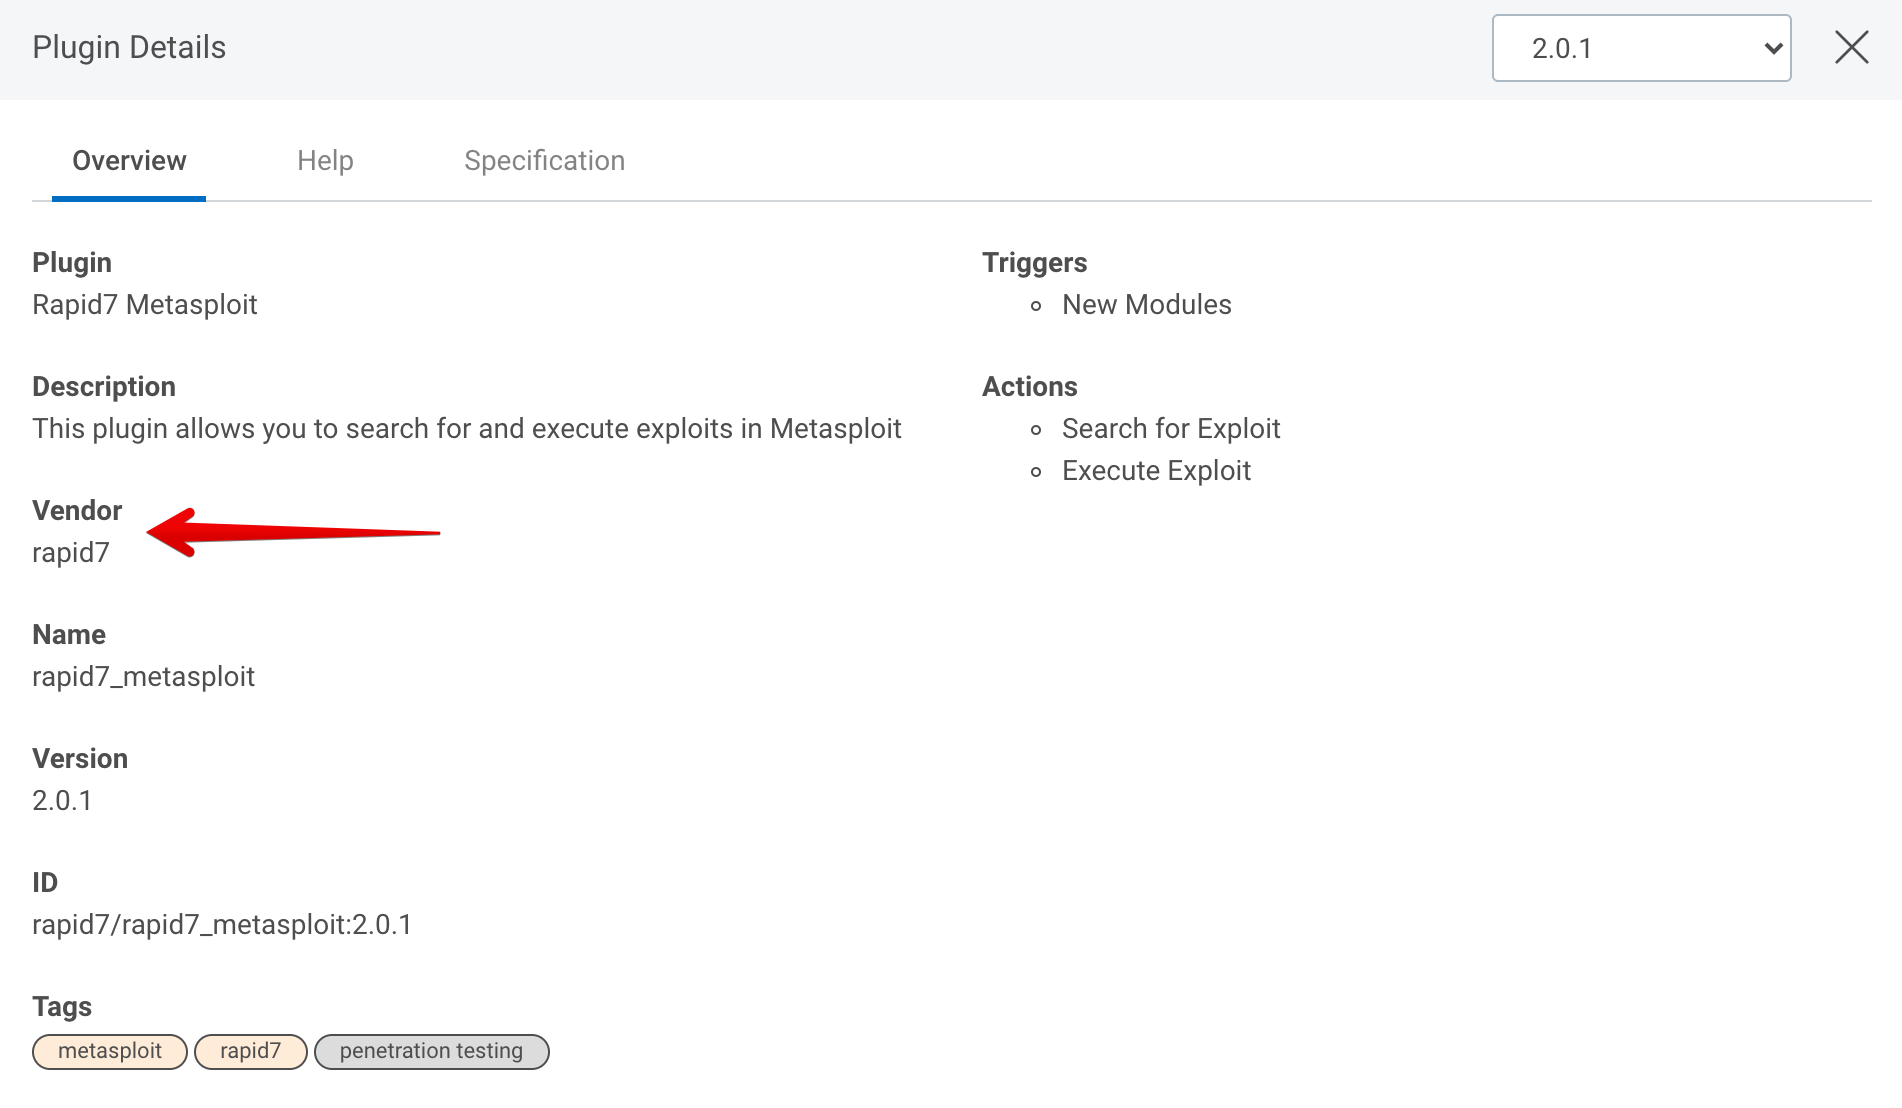
tags
Optional tags that describe your plugin’s functionality. The Automation (InsightConnect) UI and The Extension Library uses these tags to find your plugin.
Tags are created as an array of strings.
E.g. tags: [ malware, hash ]
hub_tags
Tags that describe your plugin’s use cases, features, and searchable keywords for The Extension Library.
Tags are created as an array of strings.
hub_tags:
  use_cases: [data_enrichment,threat_detection_and_response]
  keywords: [malware, hash]
  features: []
The following table lists valid use_cases values:
| Display | Spec Value |
|---|---|
| Data Enrichment | data_enrichment |
| Alerting & Notifications | alerting_and_notifications |
| Application Management | application_management |
| Devops | devops |
| Asset Inventory | asset_inventory |
| Container & Cloud Security | cloud_security |
| Credential Management | credential_management |
| Data Utility | data_utility |
| Offensive Security | offensive_security |
| Remediation Management | remediation_management |
| Reporting & Analytics | reporting_and_analytics |
| Threat Detection & Response | threat_detection_and_response |
| User Management | user_management |
| Vulnerability Management | vulnerability_management |
resources
Resources provides a place to link official URLs in The Extension Library.
An example for an open-source plugin on Github:
resources:
  source_url: https://github.com/rapid7/insightconnect-plugins/tree/master/example
  license_url: https://github.com/rapid7/insightconnect-plugins/blob/master/LICENSE
  vendor_url: http://www.rapid7.com
If a key doesn’t apply, then the key should be omitted in the spec.
support
Field to determine the ownership of the plugin for maintenance as well as to handle user requests.
Values can be: rapid7, partner, community.
E.g. support: community
status
Status describes the state of the integration as an array of strings. Therefore multiple statuses can be applied at the same time.
E.g. status: [deprecated]
Values are deprecated, insecure, and obsolete.
If none of these apply, leave the array empty:
E.g. status: []
enable_cache
Enables persistent storage on the host for a given plugin.
E.g. enable_cache: true
Base Types
The following types are available in the types, connection, trigger input/output, and action input/output sections.
The base type must be selected from one of the valid data types below:
| Type | Description |
|---|---|
| boolean | True or false |
| integer | Integer is a signed integer |
| float | Floating point number |
| string | String value |
| date | Date string value (In RFC 3339 format) per the JSON schema |
| bytes | Bytes are base64 encoded byte strings |
| object | Generic JSON object |
| file | File object with filename (string) and base64 content bytes |
| password | Hide typed strings for passwords and keys in the UI by masking the characters |
| python | Python code |
| file | File object consisting of filename of type string and content of type bytes |
| credential_username_password | Auth object consisting of username of type string and password of type password |
| credential_asymmetric_key | Auth object consisting of key of type string for private keys |
| credential_secret_key | Auth object consisting of secretKey of type password for API keys |
| credential_token | Auth object consisting of token of type password and optional domain of type string |
You can also specify a collection (array) type by doing []<base type> wrapped in strings, e.g. type: "[]string". You must wrap it in double-quotes.
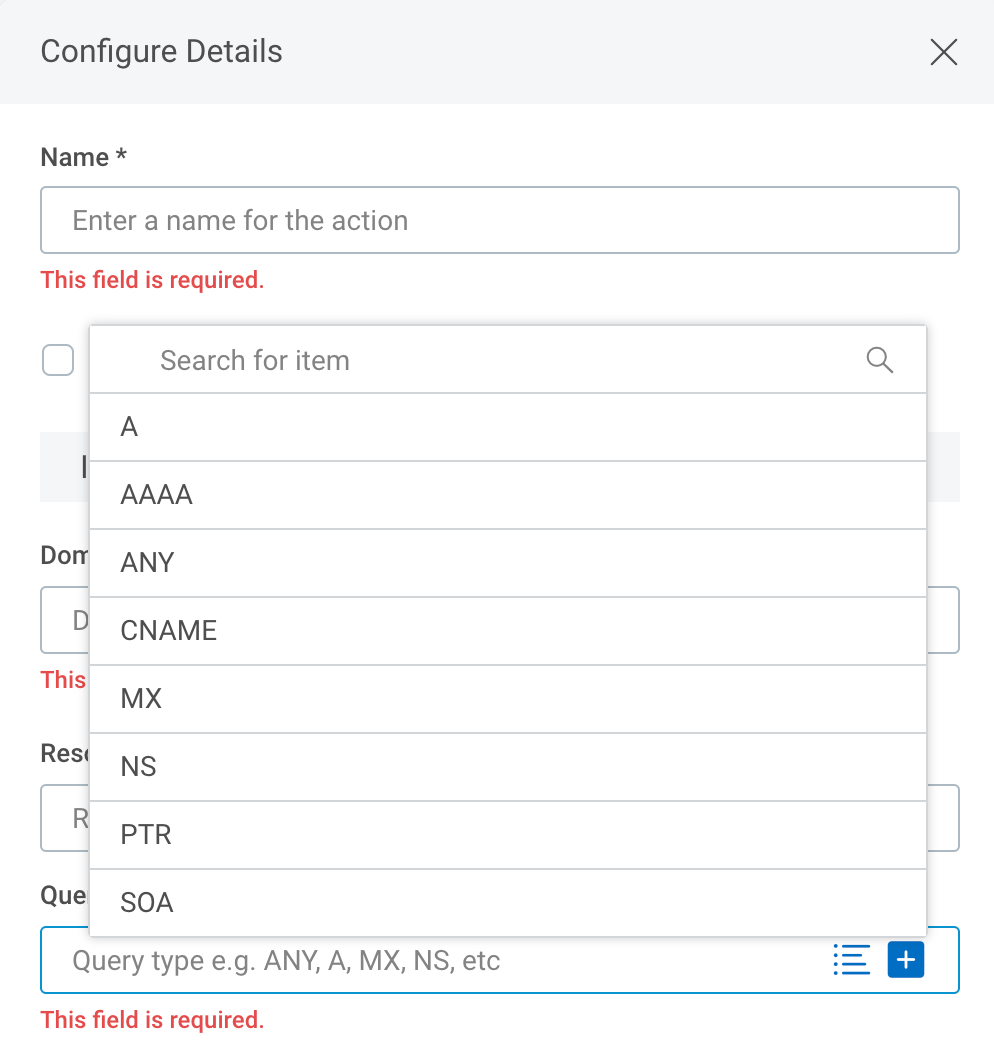
enum is an optional modifier that can be used to limit and declare the possible options for an input field. For example:
actions:
  forward:
    title: Forward Lookup
    description: Forward DNS query
    input:
      domain:
        type: string
        description: Domain name to resolve
        required: true
      query:
        type: string
        description: Optional query type e.g. ANY, A, MX, NS, etc.
        enum:
        - A
        - AAA
        - ANY
        - CNAME
        - MX
        - NS
        - PTR
        - SOA
The enumerated DNS query types are selectable from a drop-down box in the Automation (InsightConnect) Workflow UI.
Custom Types Section
The types section defines any custom complex type objects you may need. It is in the format of a map which has the <type name> identifier as the key, and then an object definition that describes the property for the object. You can use these types later in your plugin specification as types for your input/output parameters, or within your connection definition.
The table below lists all of the types properties.
| Property | Type | Description |
|---|---|---|
<type name> | identifier | Unique identifier for developer, begins a new custom type |
<identifier> | identifier | Unique identifier for developer, begins a new variable |
| title | string | Title variable name displayed in Automation (InsightConnect) UI |
| description | string | Type variable description displayed in Automation (InsightConnect) UI |
| type | string | Variable data type |
| default | <any> | Default value for the variable |
| required | boolean | Whether variable must be set to a value to continue |
types:
  <type name>:
    <parameter no. 1 identifier>:
      type: <choose from a valid type>
      title: <optional, descriptive name for the UI>
      description: <optional, string description>
      default: <optional,  default>
      required: <optional, true or false, default is false. Set to true if required>
   <parameter no. 2 identifier>:
      type: <choose from a valid type>
      title: <optional, descriptive name for the UI>
      description: <optional, string description>
      default: <optional,  default>
      required: <optional, true or false, default is false. Set to true if required>
In the example at the beginning of this page, we defined a custom type called person that has two properties: first_name and last_name.
These types will now be available in the connection sections, trigger input/output, and action input/output sections to use in addition to the base types.
...
   output:
     greeting:
       title: Greeting
       description: Greeting for person
       required: true
       type: person
Connection Section
The connection section defines the configuration variables you need for a connection. If your plugin does not require a connection, you can remove this section.
If a connection does exist, the UI will render a Configure Connection page for the values in the Workflow Builder.
In the connection section, each variable is defined in a map with its identifier. The identifier must be unique, including lowercase letters, numbers, or underscores only.
The table below lists all of the connection properties.
| Property | Type | Description |
|---|---|---|
<parameter> | identifier | Unique connection parameter identifier |
| title | string | Connection parameter name displayed in Automation (InsightConnect) UI |
| description | string | Connection parameter description displayed in Automation (InsightConnect) UI |
| type | string | Connection parameter data type |
| required | boolean | Whether parameter must be set to a value to continue |
| default | <any> | Default value for the connection parameter |
| example | string | A sample value that would be valid for this parameter. See the style guide for guidelines |
connection:
  <parameter no. 1 identifier>:
    title: <descriptive name for parameter>
    description: <tooltip description string>
    type: <choose from a valid type>
    required: <optional, true or false, default is false. Set to true if required>
    default: <optional, default>
    example: <optional, sample value that would be valid>
  <parameter no. 2 identifier>:
    title: <descriptive name for parameter>
    description: <tooltip description string>
    type: <choose from a valid type>
    required: <optional, true or false, default is false. Set to true if required>
    default: <optional, default>
    example: <optional, sample value that would be valid>
Input and output sections should not contain name identifiers.
Triggers Section
Triggers are long-running processes that kick off workflows. All workflows must start with a trigger. This is in contrast to actions, which must occur after a trigger in a workflow. These actions are short-lived processes that run, do something, and then stop.
The code for triggers run in the body of a continuous loop, where the purpose is to poll for new events. When this event is found, the plugin triggers a workflow with the found event as JSON passes it to the next plugin in the workflow.
Example:
- Poll an RSS feed for new content
- When new content is available, pass the content as JSON to the engine
- Sleep for x seconds
- Repeat
A plugin can define 0 or more triggers. Simply create a section triggers and add a map (defined by a unique key) for each of the triggers you support.
The table below is a list of all the trigger properties.
| Property | Type | Description |
|---|---|---|
<identifier> | identifier | Unique trigger identifier for developer, begins a new trigger’s section |
| title | string | Trigger name displayed in Automation (InsightConnect) UI |
| description | string | Trigger description displayed in Automation (InsightConnect) UI |
| input | map | Section to define supported input variables from the user |
| output | map | Section to define supported output variables from the user |
triggers:
  <unique trigger identifier>:
    title: <optional, descriptive name for the UI>
    description: <optional, string description>
    input: <optional, map of identifier -> variable inputs>
    output: <map of identifier -> variable outputs>
Input and output sections should not contain name identifiers. For usability, all triggers should support an input called frequency, which is passed to a sleep mechanism in the SDK.
frequency:
  type: integer
  description: Poll frequency in seconds
  default: 300
  required: false
Actions Section
Each plugin may contain zero or more actions, which are short-running processes that execute, return results, and then exit. Workflows typically contain many actions chained together. Plugin code is executed in a Docker container. As the action initializes, the connection object is created and then the action code runs.
The table below lists all of the actions properties.
actions:
  <unique action identifier>:
    title: <optional, descriptive name for the UI>
    description: <optional, string description>
    input: <optional, map of identifier -> variable inputs>
    output: <map of identifier -> variable outputs>
UI Rendering
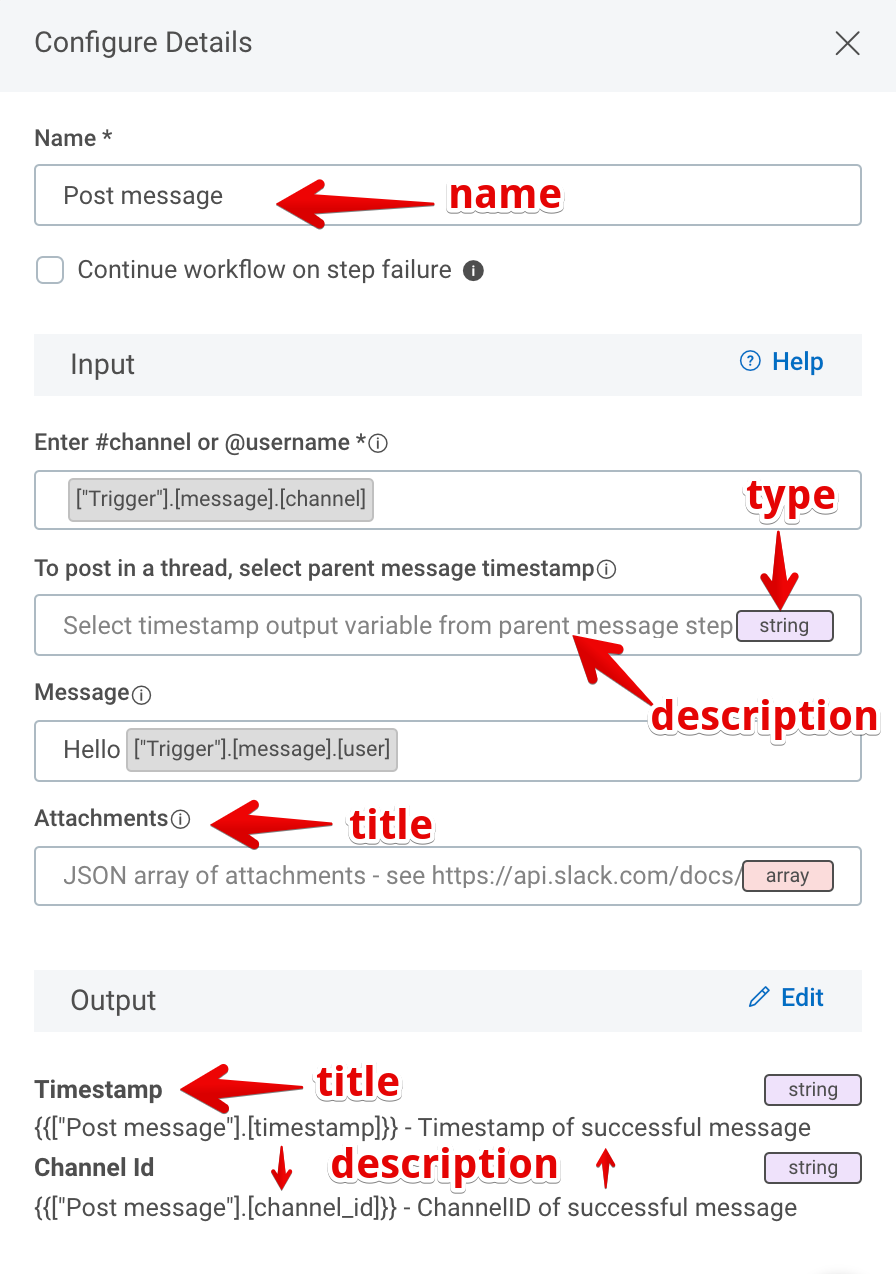
The UI renders the name, title, description, etc. properties from the spec file in the following ways.
Action & Trigger Selection
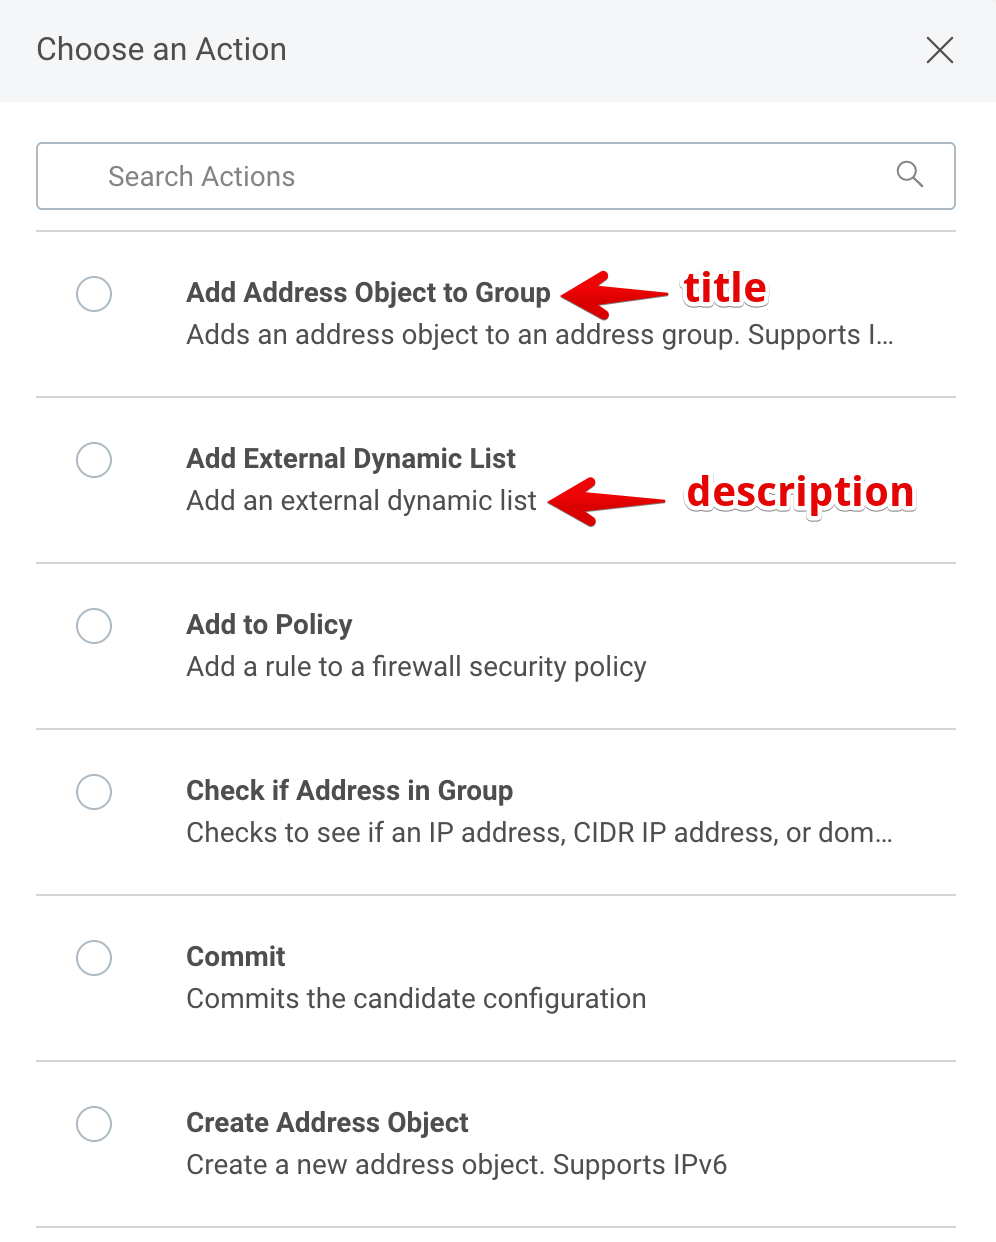
Action & Trigger Configuration
Creating a Plugin
Now that you have a valid plugin spec file, you can codegenerate a plugin shell. You need to have the insight-plugin tool. The latest tooling is available here.
Run it as follows:
insight-plugin create plugin.spec.yaml
You may change plugin.spec.yaml to the path of your plugin spec. By default, it will generate the plugin folder with the value of name defined in your plugin spec yaml. You can also use the -d or --target-dir flag to specify a custom path to generate your plugin e.g. --target-dir /tmp/example.
Our plugin above was generated in /tmp/example. You should be able to build it now by going to the folder and typing make.
$ insight-plugin create plugin.spec.yaml -d /tmp/example
INFO[0000] Writing to file: /tmp/example/komand_example/__init__.py
INFO[0000] Writing to file: /tmp/example/komand_example/util/__init__.py
INFO[0000] Writing to file: /tmp/example/Makefile
INFO[0000] Writing to file: /tmp/example/.gitignore
INFO[0000] Writing to file: /tmp/example/setup.py
INFO[0000] Writing to file: /tmp/example/Dockerfile
INFO[0000] Writing to file: /tmp/example/requirements.txt
INFO[0000] Writing to file: /tmp/example/bin/komand_example
INFO[0000] Writing to file: /tmp/example/komand_example/connection/connection.py
INFO[0000] Writing to file: /tmp/example/komand_example/connection/__init__.py
INFO[0000] Writing to file: /tmp/example/komand_example/connection/schema.py
INFO[0000] Writing to file: /tmp/example/komand_example/actions/say_goodbye/action.py
INFO[0000] Writing to file: /tmp/example/komand_example/actions/say_goodbye/schema.py
INFO[0000] Writing to file: /tmp/example/komand_example/actions/say_goodbye/__init__.py
INFO[0000] Writing to file: /tmp/example/komand_example/actions/__init__.py
INFO[0000] Writing to file: /tmp/example/komand_example/triggers/emit_greeting/trigger.py
INFO[0000] Writing to file: /tmp/example/komand_example/triggers/emit_greeting/schema.py
INFO[0000] Writing to file: /tmp/example/komand_example/triggers/emit_greeting/__init__.py
INFO[0000] Writing to file: /tmp/example/komand_example/triggers/__init__.py
INFO[0000] Code generation completed! Your plugin is located at: /tmp/example
The make task does two things: Creates a <vendor>/<name>:<version> container with the plugin code, and also a <vendor>-<name>-<version>.tar.gz package that can be uploaded via the plugins UI within the Automation (InsightConnect) interface.
All the plugins are built as Docker containers for easy packaging and running.
You can always type make during the process of writing your plugin to build the latest version of it. Any code changes require packaging for use, so get in the habit of running make often.
You now have a plugin shell you can interact with. To continue, see the next page on Running Plugins.