Creating and Managing CyberArk Credentials
CyberArk integration is not compatible with MVM
The CyberArk integration can not be used with Rapid7 hosted consoles or Managed Vulnerability Management (MVM). If you have questions, reach out to Rapid7 Support or contact your Cybersecurity Advisor.
Credentialed scanning enables you to obtain deeper visibility into your environment by allowing you to access assets on your network to gather information you may not be able to otherwise access. The CyberArk integration enables you to easily run credentialed scans and dynamically assign credentials for authentication to multiple sites by leveraging the CyberArk Vault technology. It allows you to globally manage your privileged accounts without having to provide them directly through the Security Console.
Configuring a credentialed scan with CyberArk as the authentication source is nearly identical to configuring any other type of credentialed scan. Like other credentialed scans, you can set up shared scan credentials to use across multiple sites or credentials that can only be used by a specific site. When the scan runs, a request is made to CyberArk for the credentials that are needed to access the target assets, and CyberArk will provide the requested credentials so that the scan can authenticate to and assess those assets.
TIP
In the context of this CyberArk credential lookup feature, the “target assets” described previously are the assets you have specified in your site configuration using the following methods:
- By IP address
- By IP address range
- By hostname
- By asset group
The following sections will help you understand how you can set up CyberArk as an authentication source for credentialed scans.
Supported Services
CyberArk is a supported authentication source for the following services:
- IBM AS/400
- Kerberos
- Microsoft SQL Server
- Microsoft Windows/Samba (SMB/CIFS)
- Secure Shell (SSH)
- Secure Shell (SSH) Public Key
When you add any of these credential types, CyberArk will be available to configure as a credential management source.
You can utilize privilege escalation for SSH, SSH Public Key, for both shared credentials and Site level credentials, when CyberArk is selected for Credential Management.
You can use the Test Credential function to test the escalated credentials.
About testing your credentials
The function for testing credentials may fail even when a full scan succeeds. This is because this feature uses a different request path and makes more restrictive lookup calls to CyberArk. If an attempt to test your credentials fails but the CyberArk configuration appears correct, run a scan to validate the credential behavior.
Domain-only CyberArk accounts are not supported
Vulnerability Management does not support CyberArk accounts that are stored only at the domain level without a hostname.
If a CyberArk account is indexed using only a domain, such as as.domain.com, Vulnerability Management’s lookup will fail because Vulnerability Management sends the full hostname of the scanned asset to CyberArk as part of the query.
To use CyberArk credential retrieval successfully, the CyberArk account must include a lookup entry that contains the fully-qualified domain name (FQDN) of the target system.
Examples
Here is a working example of a supported configuration:
- Asset hostname:
server01.example.com - CyberArk account contains:
address=server01.example.com - Result: Vulnerability Management successfully retrieves the credential.
Here is an example of a configuration that will not work and is not supported:
- Asset hostname:
server01.example.com - CyberArk account contains only:
address=example.com - Result: CyberArk does not return a match because the domain-only entry does not match the hostname-based query sent by Vulnerability Management.
Before You Can Add CyberArk as an Authentication Source
Before you can add CyberArk as an authentication source, you’ll need to:
- Register your Security Console with CyberArk - Any machine that requests passwords must be defined in the CyberArk vault as an application. Registering your Security Console enables the provider to assign an AppID to the console and retrieve passwords for it.
- Install the CyberArk Application Identity Manager - The Application Identity Manager, or AIM, must be installed on the same machine as your Vulnerability Management instance.
- Define the “User DN” field in CyberArk - Make sure that you fill out the “User DN” field in CyberArk for the account that you want to use for scanning.
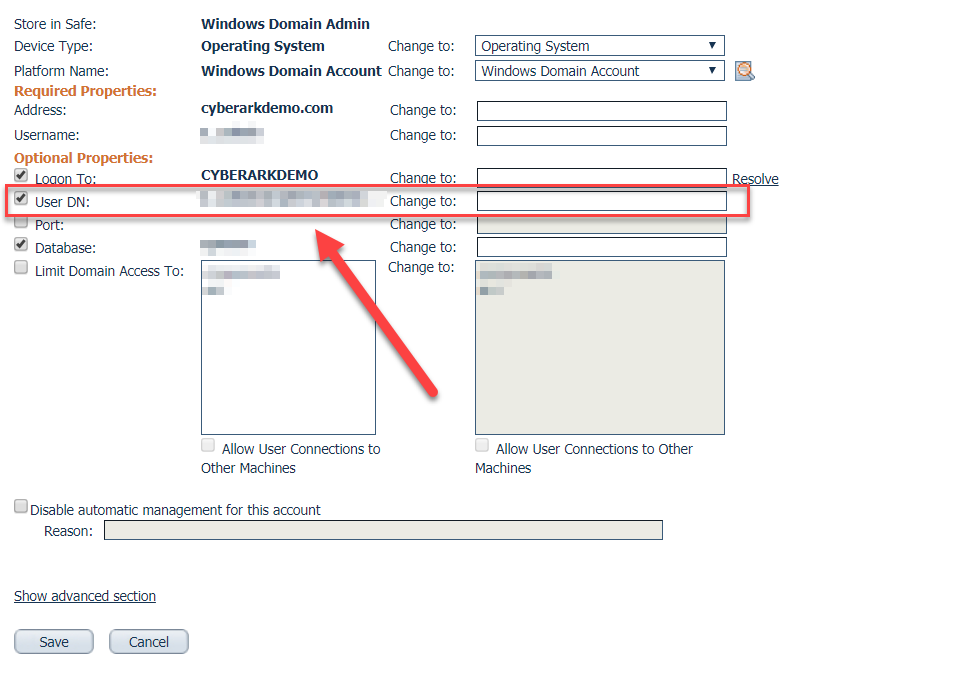
For help with any of these prerequisites, please visit the CyberArk documentation or contact their support team.
Understanding CyberArk Vault Options
Adding CyberArk as the authentication source for credentialed scans is a simple process. You can set up CyberArk to provide shared scan credentials to use across multiple sites or credentials that are site-specific. Regardless of the scope of the credential you create, the options that are available for creating them will be the same.
The following table provides descriptions for all the CyberArk Vault options:
| Option | Description |
|---|---|
| AppID | The AppID that has been authorized to provide to access to CyberArk and retrieve credentials. This option is required. |
| Lookup Type | The method that is used to choose credentials from the vault. You can choose between Static Binding or Dynamic Binding. |
| Lookup Attributes | Lookup attributes allow you to specify criteria for the credentials that will be retrieved. You can create a lookup using a combination of the following attributes: the asset’s IP address, Object name, username, Policy ID, and custom attributes. |
| Lookup Location | The location you want to use to search for credentials in the Vault. You can search through all safes or specify a safe and folder you want to search. |
| Permission elevation source | Select CyberArk to store the permission elevation credentials in CyberArk. |
| Safe | The ID of the CyberArk safe that contains the credentials for the assets that will be scanned. |
| Folder | The ID of the CyberArk folder that contains the credentials for the assets that will be scanned. The default folder is Root. |
| Domain | An optional domain name for the user account. If enabled, this domain can also be used to authenticate to applicable assets during scans. |
Looking Up Credentials in the CyberArk Vault
A lookup allows you to match credentials based on a set of criteria. There are two types of lookups you can perform:
- Static binding - Obtains a single credential from the vault using the lookup attributes.
- Dynamic binding - Obtains credentials for each asset using the lookup attributes. This is useful when you don’t know the credentials that are needed for an asset and want to specify criteria to find the credentials you need during a scan.
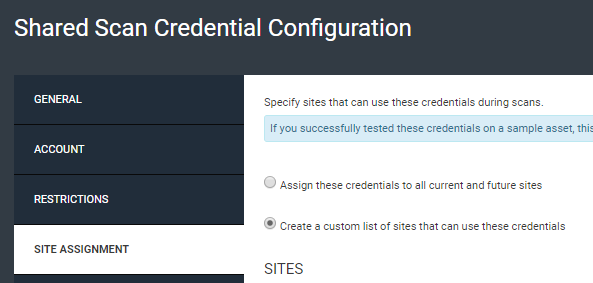
If you are adding a credential dynamically, you should restrict it to sites that do not contain many non-CyberArk credentials. Otherwise, a CyberArk lookup will be performed on every target in the site, which would cause a large number of failed lookups. To prevent this from occurring, you can create a custom list of sites that can use the CyberArk credentials. From the Shared Scan Credential Configuration page, go to the Site Assignment tab and select the Create a custom list of sites that can use these credentials option.
Along with the lookup type, you can use the lookup attributes to specify the criteria that identifies the credentials that can be used for an asset during a scan.
You can query the CyberArk Vault using these attributes:
- Address - The IP address or fully-qualified domain name (FQDN) for the asset.
- Object Name - The name of the object that stores the credentials.
- Username - The username for the account that will be retrieved.
- Policy ID - The policy ID that is assigned to the credentials that will be retrieved.
- Custom Attributes - Custom attributes enable you to add a key and value from your CyberArk password object. The lookup attributes that are available in Vulnerability Management cover the most common request parameters; however, if there are other parameters you want to request from your CyberArk password object, you can specify them using custom attributes.
Vulnerability Management always uses the asset's hostname (FQDN) in CyberArk
When Vulnerability Management retrieves a credential from CyberArk, it automatically includes the scanned asset’s hostname (FQDN) as part of the lookup query. This occurs even if the credential configuration only specifies a domain name in the Address field. As a result:
-
CyberArk accounts that are stored only at the domain level - for example,
as.domain.com- will not match Vulnerability Management’s lookup queries, because CyberArk expects the hostname or server name to exist in the stored object. -
You must ensure that the CyberArk account contains an entry that includes the specific hostname (FQDN) of the asset being scanned.
This behavior is intentional and part of the current integration design, and applies only when using dynamic binding, where Vulnerability Management retrieves credentials individually for each asset during the scan.
When using static binding, Vulnerability Management uses only the lookup attributes you explicitly provide and does not automatically append the asset’s hostname.
Tip: If you supply an IP address and select dynamic binding, the feature will do a reverse-DNS-lookup and retrieve the FQDN for you.
Adding Shared Scan Credentials for CyberArk
Shared scan credentials are managed globally in the Security Console and can be used by multiple sites. To configure shared credentials, you must be a Global Administrator role or have a role with Manage Site permissions.
- Click the Administration tab.
- In the Scans > Shared Credentials section, click Manage.
- From the General tab, name the new credential set that will be used with CyberArk.
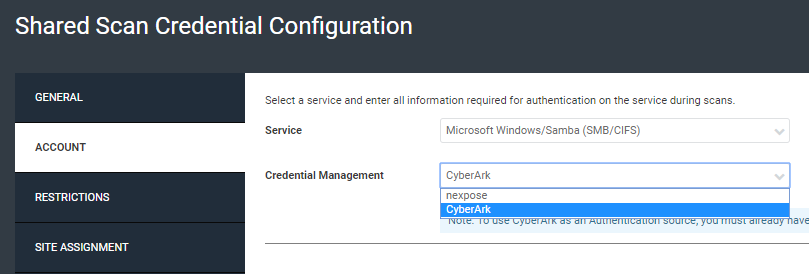
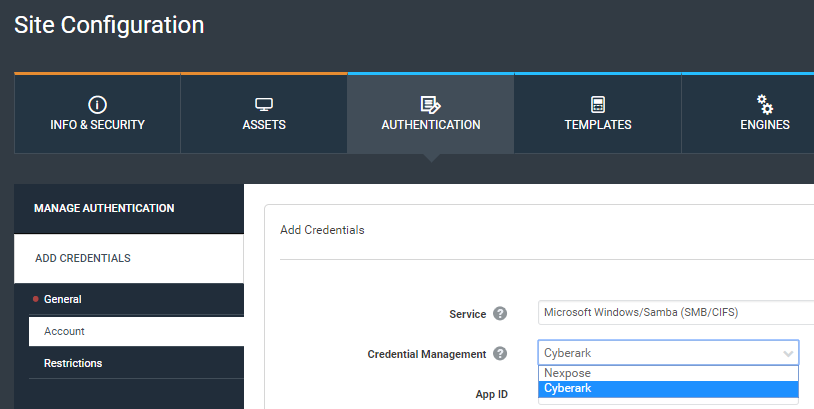
- From the Account tab, select one of the following services: Microsoft Windows/Samba (SMB/CIFS), Secure Shell (SSH), or Secure Shell (SSH) Public Key. These services support CyberArk as an authentication source.
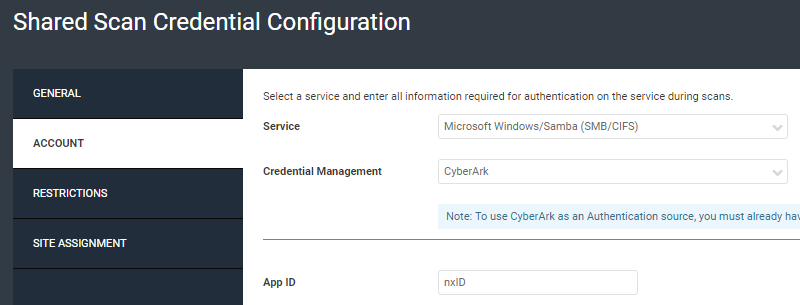
- From the Credential Management dropdown, select CyberArk.
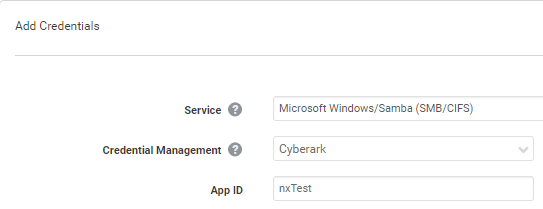
- When the CyberArk options appear, you must provide the AppID, which will identify the application that is requesting the credentials.
- Additionally, you can provide lookup attributes and a lookup location if you want to configure the scan to retrieve credentials from specific safe or based on a specific set of criteria in CyberArk. Please see Understanding CyberArk Vault Options for more details.
- It may be necessary to specify at least two lookup attributes for the connection to pull the proper credentials. For example, consider specifying both the “User Name” and the “Address” attributes when configuring your connection.
Always enter the fully-qualified hostname (FQDN)
When using CyberArk with hostnames, the Address lookup attribute must contain the fully-qualified hostname (FQDN) of the asset being scanned.
Domain-only values (for example as.domain.com) will not match Vulnerability Management’s lookup requests and will cause credential failures.
Tip: If you supply an IP address and select dynamic binding, the feature will do a reverse-DNS-lookup and retrieve the FQDN for you.

- From the Site Assignment tab, you can choose to add these scan credentials to all existing and new sites or you can choose the set of sites that will have access to these credentials. The best practice is to use the Create a custom list of sites that can use these credentials option. This will allow you to control the sites that have access to the CyberArk credentials and prevent CyberArk lookups from being performed on every target in the site, which would cause a large number of failed lookups. You should reduce the scope of sites to the ones you know will contain targets that will return a CyberArk credential.

- Save your changes.
When you are done, you’ll be able to select the credentials you’ve added for any site that has been granted access to them.
Adding Site-Specific Credentials for CyberArk
Scan credentials can be site-specific, which means that they are restricted to a single site for use. To configure site-specific credentials, you must be a Global Administrator or Site Owner.
To add CyberArk as an authentication source:
- Create or edit a site.
- Go to the Authentication tab.
- Go to the Add Credentials tab.
- From the General tab, name the new credential set that will be used with CyberArk.
- From the Account tab, select one of the following services: Microsoft Windows/Samba (SMB/CIFS), Secure Shell (SSH), or Secure Shell (SSH) Public Key. These services support CyberArk as an authentication source.
- From the Credential Management dropdown, select CyberArk.
- When the CyberArk options appear, you must provide the AppID, which will identify the application that is requesting the credentials.
- Additionally, you can provide lookup attributes and a lookup location if you want to configure the scan to retrieve credentials from a specific safe based on a specific set of criteria in CyberArk. Please see Understanding CyberArk Vault Options for more details.
- It may be necessary to specify at least two lookup attributes for the connection to pull the proper credentials. For example, consider specifying both the “User Name” and the “Address” attributes when configuring your connection.
- Save your changes.
When you are done, the site you’ve added the credentials to will be able to use them for authenticated scans.
Permission elevation
When CyberArk is used for credential management, permission elevation using CyberArk is also supported. A second lookup can be retrieved along with that for credential management.
Having completed the steps for credential management described in Adding Shared Scan Credentials for CyberArk above, complete these steps to add permission elevation using CyberArk:
- Select CyberArk as the Permission Elevation Source.
- Select the Permission Elevation Type.
- Select the Lookup Attributes. You can create a lookup using a combination of the following attributes: the asset’s IP address, Object name, username, Policy ID, and custom attributes.
- Save your changes.
Example CyberArk configurations
These are example configurations for common scenarios reflecting best practices for authentication. These examples assume that you already have CyberArk AAM setup and the integration installed. The main configuration to focus on for each example are the service and lookup attributes.
CyberArk AAM
The CyberArk AAM only allows 1 account to be returned per request. This means that if your vault or console credential configuration is not configured properly to ensure a single credential can be returned from the request to CyberArk, an error will be returned.
Example 1: SSH key authentication + SUDO elevation
Sudo elevation uses the same user authenticated with the SSH key.
Prerequisite steps
For sudo elevation, ensure your user has been added to the sudoers file in the asset.
Elevation failure
Elevation will fail when using sudo if user is not in the sudoers file.
CyberArk configuration
You must create two accounts on CyberArk:
- Create account using platform UnixSSHKeys. This account will be used for the SSH authentication.
- Create account using platform SSH. This account will be used for the sudo elevation.

Console configuration
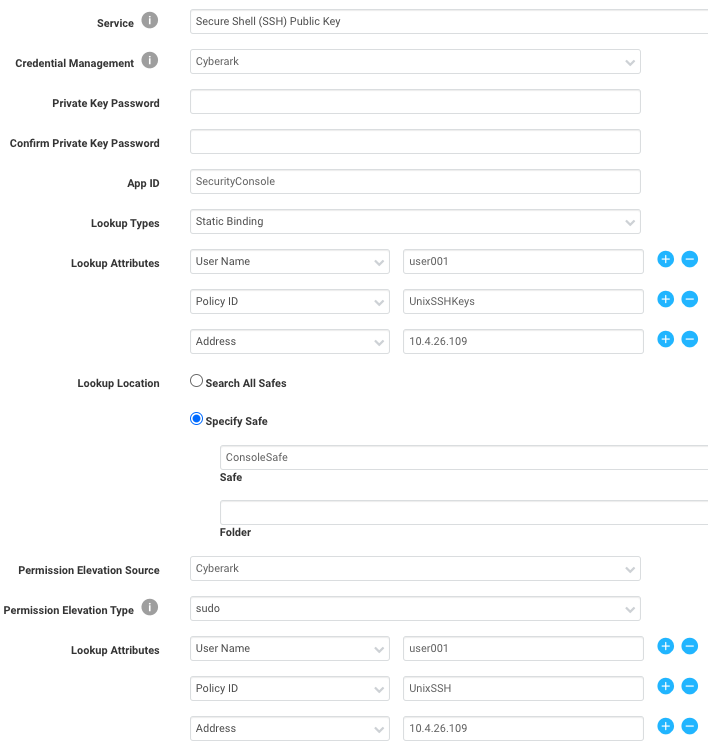
Complete the fields as shown in the table below:
| Field name | Description |
|---|---|
| Service: SSH Public Key | Use key based authentication |
| Credential Management | The key is stored in CyberArk |
| Private Key password | Only required when your private key is protected by a password |
| App ID | The application accessing the vault (part of the AAM configuration) |
| Lookup types | Both static and dynamic are fine. One credential will be returned per request to AAM. Dynamic lookup will automatically add IP and DNS for every asset in the site. |
| Lookup attributes | A specific set of attributes used in a query to return a single credential from CyberArk |
| Address | The address associated with the account |
| Policy ID | Maps to the Platform ID in CyberArk. Use UnixSSHKeys for initial authentication |
| User Name | The username on the account |
| Permission Elevation Source | The permission elevation credentials (used with SUDO) are stored in CyberArk |
| Permission Elevation Type | The elevation type (sudo, su, etc.) |
Ensure your lookup attributes are specific
Ensure your lookup attributes are specific enough that only 1 account is returned for the SSH Key authentication and 1 account is returned for the SUDO elevation.
Scan results
The result of a scan should be successful SSH and elevation.

Example 2: SSH + authentication + su elevation
SU elevation uses a different user than SSH.
CyberArk config

Prerequisite steps
There are no prerequisite steps if elevating to the root user.
Console config
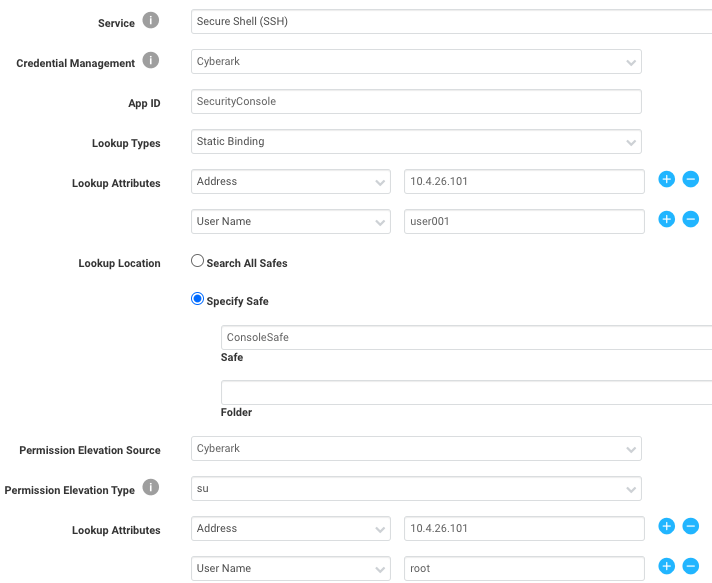
Complete the fields as shown in the table below:
| Field name | Description |
|---|---|
| Service: SSH Public Key | Use key based authentication |
| Credential Management | The key is stored in CyberArk |
| App ID | The application accessing the vault (part of the AAM configuration) |
| Lookup types | Both static and dynamic are fine. One credential will be returned per request to AAM. Dynamic lookup will automatically add IP and DNS for every asset in the site. |
| Lookup attributes | A specific set of attributes used in a query to return a single credential from CyberArk |
| Address | The address associated with the account |
| User Name | The username on the account |
| Permission Elevation Source | The permission elevation credentials (used with SUDO) are stored in CyberArk |
| Permission Elevation Type | The elevation type (sudo, su, etc.) |
| Lookup Attributes | A specific set of attributes used in a query to return a single credential from CyberArk |
| Address | The address associated with the account |
| User Name | The username on the account (see root account being used for elevation) |
Ensure your lookup attributes are specific
Ensure your lookup attributes are specific enough that only 1 account is returned for the SSH Key authentication and 1 account is returned for the sudo elevation.
Scan results
The result of a scan should be successful SSH and elevation.
