Install Plugins
Plugins require connection information
We strongly recommend that you gather the connection information for each plugin prior to beginning your setup. We also recommend copying and pasting these values into a temporary document while you collect them, as you will need to enter them into Automation (InsightConnect) later.
The following 6 plugins contain parameters, actions, and connections that Active Response needs to run successfully.
These plugins are hosted in the Rapid7 Extension Library. Your next step is to install each plugin so you can access and configure them in Insight Connect. We recommend that you install all your plugins before creating your connections. You only need to install those optional plugins that you will be utilizing. After installation, your Cybersecurity Advisor will configure the HTTP Requests plugin on your behalf.
- Active Directory LDAP
- Microsoft Office 365 Email (Optional)
- VMware Carbon Black EDR (Optional)
- VMWare Carbon Black Cloud Standard
- Crowdstrike Falcon
- SentinelOne
1. Active Directory LDAP
This plugin enables Active Response to disable or enable users when the MDR team initiates a quarantine action. You will need the following connection information to set up this plugin:
- Host name and port number.
- If you are using an LDAP Server, make sure that Port 636 (LDAPS) is open between the Orchestrator and the LDAP server.
- If you are just using LDAP, make sure to open port 389 between Orchestrator and LDAP server.
- Account credentials: this account will need the ability to query, enable, and disable for Active Response.
To install this plugin:
- Open the Active Directory LDAP plugin in the Extension Library.
- Click Install.

2. Microsoft Office 365 Email (Optional)
If you want to receive emails from the MDR team when they initiate a quarantine action on your behalf, install this plugin. The Microsoft Office 365 Plugin requires the following connection information:
- Your API secret key.
- The Tenant ID, or the ID of the directory that identifies the tenant.
- The App ID, which is the ID of the app that obtained the refresh token.
This plugin will require both a Sender address and a Recipient address from your instance. Ensure that the API you create has send as permissions for your Sender address. For detailed instructions, see Configure Microsoft Office 365.
To install this plugin:
- Open the Microsoft Office 365 plugin in the Extension Library.
- Click Install.

3. VMware Carbon Black EDR (Optional)
Required only if you are using the VMware Carbon Black EDR agent for Active Response Isolation.
- An API Key from VMware Carbon Black EDR.
- The base URL.
To install this plugin:
- Open the VMware Carbon Black EDR plugin in the Extension Library.
- Click Install.

4. VMWare Carbon Black Cloud Standard
Required only if you are using the VMware Carbon Black Cloud Standard agent for Active Response Isolation.
- An API Key from VMware Carbon Black Cloud Standard
- An API ID
- An Org Key
- The base URL
To install this plugin:
- Open the VMware Carbon Black EDR plugin in the Extension Library.
- Click Install.
5. Crowdstrike Falcon
Required only if you are using the Crowdstrike Falcon agent for Active Response Isolation.
- A Client Secret
- A Client ID
- The base URL
To install this plugin:
- Open the Crowdstrike Falcon plugin in the Extension Library.
- Click Install.
SentinelOne
Required only if you are using the SentinelOne agent for Active Response Isolation.
- An API key generated from a Service User (this user needs the ability to quarantine assets)
- The base URL
To install this plugin:
- Open the SentinelOne plugin in the Extension Library.
- Click Install.
Success! You installed your plugins!
Next, configure Microsoft Office 365 Email so you can receive email notifications from the Managed Services team.
Configure Microsoft Office 365
Configure the Microsoft Office 365 plugin if you want receive emails from the MDR team after they’ve initiated quarantine actions in your environment. This section covers the steps you must complete to enable communication between Active Response and Microsoft Office 365. Please click the links below in order to get more information on each step.
Create Plugin Connections
Now that you’ve installed your plugins, you must configure connections.
Connections are individual instances of credentials and other parameters needed to authenticate Automation (InsightConnect) to supported integrations or plugins. Credentials can be passwords, API keys, or other sensitive information, while other connection parameters can include data like IP addresses or port numbers. Active Response cannot run successfully if connections are configured improperly.
Follow the steps below to configure your plugin connections.
- Add new connections
- Active Directory LDAP Plugin
- Microsoft Office 365 Email
- VMware Carbon Black EDR
- VMWare Carbon Black Cloud Standard
- Crowdstrike Falcon
- SentinelOne
1. Add new connections
You can add connections on the Connections tab of the Plugins & Tools page in Automation (InsightConnect). Automation (InsightConnect) automically tests each connection that you create. Learn more here .
Check for extra spaces after pasting connection values
As you complete the following steps, you will need to paste values (such as an app ID) into specified fields in Automation (InsightConnect). After you paste a value, check to make sure no additional spaces or lines were added, as they will cause your connection to fail.
To create a connection:
- From the Automation (InsightConnect) left menu, click Settings > Plugins & Tools.
- Click the Connections tab.
- Click the Add Connection button.
2. Active Directory LDAP Plugin
Users in domains configured in a Parent/Child or Trust Relationship must be able to be managed by a single Domain User with permissions to enable and disable users across all domains. The time to replicate account changes across the organization depends on your configuration within Active Directory.
To set this up you’ll need:
- Host name and port number.
- If you are using an LDAP Server, make sure that Port 636 (LDAPS) is open between the Collector and the LDAP server.
- If you are just using LDAP, make sure to open port 389 between Collector and LDAP server.
- Credentials entered in the DOMAIN\username format.
Create a connection:
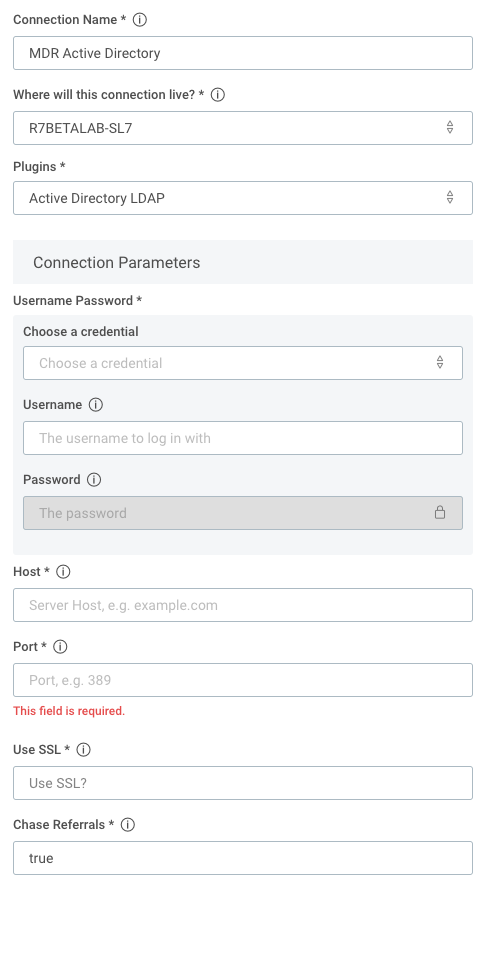
- In Connection Name, enter a name for your directory such as MDR Active Directory.
- Under the “Where would you like this connection to live?” field, select your orchestrator.
- Under Plugins, select Active Directory LDAP.
- Click the Choose a Credential field, and click Create New Credential.
- Name your credential.
- Enter the name of the Active Directory you want to grant the orchestrator access to. Make sure you enter your username in the DOMAIN\username format.
- Enter the password of that directory.
- Click Save.
- Under Host, Enter the IP address of the server where the AD is hosted.
- Enter the Port number:
- If you are using an LDAP Server, enter 636.
- If you are just using LDAP, enter 389.
- Under Use SSL, select True for port 636 or False for port 389.
- Under Chase Referrals, select True if Parent/Child or Trusted Domains are being managed. Otherwise, select False.
- Click Save. If you don’t see the connection appear after you save it, refresh your screen.
3. Microsoft Office 365 Email (Optional)
This plugin enables the MDR team to send email notifications when they initiate quarantine actions on your behalf.
To set this up you’ll need:
- Your API secret key.
- The Tenant ID, or the ID of the directory that identifies the tenant.
- The App ID, which is the ID of the app that obtained the refresh token.
Create a connection:
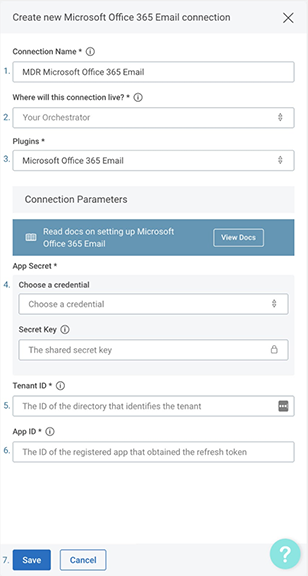
- Enter a unique and easily identifiable connection name, such as MDR Email Alert.
- Under “Where will this connection live?” select your orchestrator.
- Click the Choose a Credential field, and click Create New Credential.
- Name your credential.
- Name the credential and paste the Azure Private Key Value in the Secret Key field.
- Click Save.
- In the Tenant ID field, paste your Directory ID.
- In the App ID field, paste your App ID.
- Click Save. If you don’t see the connection appear after you save it, refresh your screen.
4. VMware Carbon Black EDR
You only need to install this plugin if you are using VMware Carbon Black EDR.
To set this up you’ll need:
- An API Key from VMware Carbon Black EDR.
- The base URL.
Create a connection:
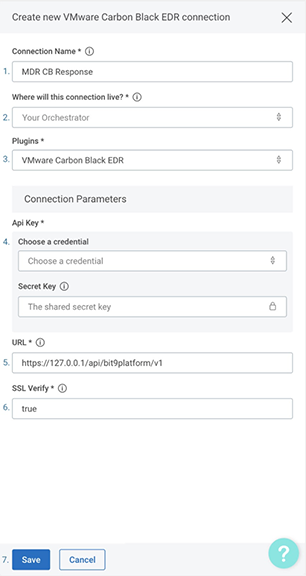
- In Connection Name, enter a unique and easily identifiable name, such as MDR Cb Response.
- Under the “Where would you like this connection to live?” field, select your orchestrator.
- Under Plugins, select VMware Carbon Black EDR.
- Select the Choose a credential dropdown, and click Create New Credential.
- Name the credential and enter the Cb Response Secret Key.
- Click Save.
- Enter the URL.
- In SSL Verify, select true or false.
- Click Save.
Congrats, you've installed your plugins!
5. VMWare Carbon Black Cloud Standard
You only need to install this plugin if you are using VMware Carbon Black Cloud Standard for asset containment.
To set this up you’ll need:
- An API Key
- An API ID
- An organization key
- The base URL
Create a connection:
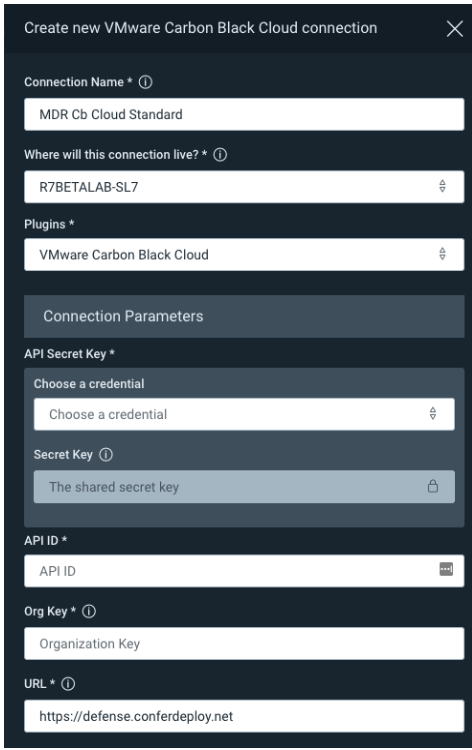
- In Connection Name, enter a unique and easily identifiable name, such as MDR Cb Cloud Standard.
- Under the “Where would you like this connection to live?” field, select your orchestrator.
- Under Plugins, select VMware Carbon Black Cloud.
- Select the Choose a credential dropdown, and click Create New Credential.
- Name the credential and enter the VMWare Carbon Black Cloud Standard API Key.
- Click Save.
- Enter the API ID
- Enter the Org Key
- Enter the URL
- Click Save.
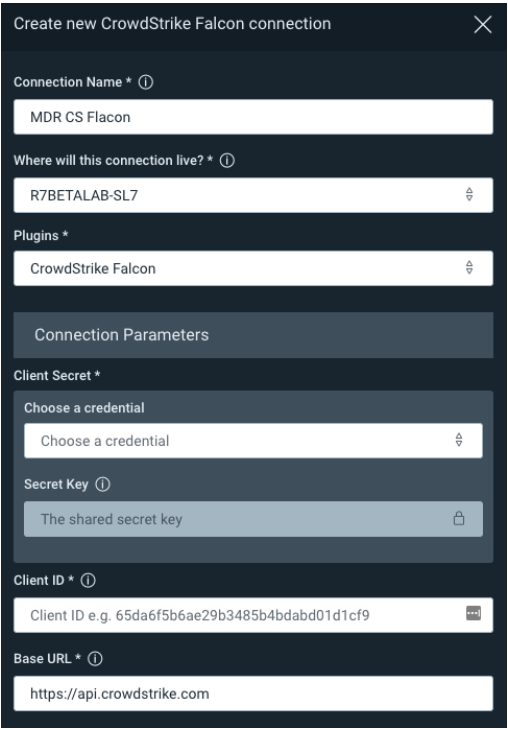
6. Crowdstrike Falcon
You only need to install this plugin if you are using Crowdstike Falcon for asset containment.
To set this up you’ll need:
- A Secret Key
- A client ID
- The Base URL
- Permissions for the API should be
- Hosts - Read/Write
- Quarantined Files - Write
Create a connection:
- In Connection Name, enter a unique and easily identifiable name, such as MDR CS Falcon.
- Under the “Where would you like this connection to live?” field, select your orchestrator.
- Under Plugins, select Crowdstrike Falcon.
- Select the Choose a credential dropdown, and click Create New Credential.
- Name the credential and enter the secret key from the Crowdstrike Falcon console
- Click Save
- Enter the Client ID
- Enter the Base URL
- Click Save
7. SentinelOne
You only need to install this plugin if you are using SentinelOne for asset containment.
To set this up you’ll need:
- An API key generated from a Service User (this user needs the ability to quarantine assets)
- The Base URL
Create a connection:
- In ‘Create a new Connection’, select the SentinelOne Plugin
- In Connection Name, enter a unique and easily identifiable name, such as MDR SentinelOne.
- Under the “Where would you like this connection to live?” field, select your orchestrator
- Select the Choose a credential dropdown, and click Create New Credential
- Name the credential
- Enter the API Key generated from the SentinelOne Service User
- Click Save
- Choose the User Type as ‘Service User’
- Enter the Base URL
- Click Save

Configure your Slack Workspace
In Automation (InsightConnect), ChatOps steps are automated tools that interact with your chat apps. The Rapid7 Automation (InsightConnect) Slack App allows you to use ChatOps actions with your Slack workspaces. ChatOps is a required component of Active Response, as it enables our MDR team to send you Slack notifications and provides you with the ability to cancel or undo quarantine actions. Rapid7 ChatOps currently only supports Slack.
A user from your organization must install Slack in your environment
While Rapid7 Cybersecurity Advisors are happy assist with Active Response deployments, they cannot install Slack in your environment. You should work with an IT Administrator from your organization to complete this section.
If you do not already have Slack installed, go to https://slack.com/ , select the Slack plan you want, and complete the installation steps provided by Slack.
- Configure Slack Workspace
- Find a Slack Administrator
- Install the Automation (InsightConnect) Slack App
- Invite the Automation (InsightConnect) Chatbot to your Slack Workspace
- Add a Workspace from the ChatOps Manager
Configure Slack Workspace
To set this up you’ll need:
- Administrative privileges to your organization’s Slack workspace.
Find a Slack Administrator
If you’re not an administrator of your organization’s Slack workspace, contact one to approve the Rapid7 Automation (InsightConnect) app. You won’t be able to configure a ChatOps step until the app is approved for other users in your workspace.
3 ways to find your Slack Administrator
- To find your Slack administrators from a web browser, log into your Slack account at https://slack.com/signin , then visit https://<your-workspace-url>.slack.com/account/workspace-settings#admins
- To find your Slack administrators from Slack for desktop, click on the workspace name in the top left corner to open the settings menu, then click Customize Slack. This will open your organization’s Slack settings in a browser window. Now visit https://<your-workspace-url>.slack.com/account/workspace-settings#admins.
- Alternatively, navigate to the administrators page in your Slack settings with these steps:
- Click on Customize Slack as previously instructed.
- In the browser window that opens, click Menu in the top left corner, then About this workspace.
- Click on the Admins & Owners tab.
- Note the Slack username and email address of your workspace admins, then provide them with the administrator setup instructions in an email or Slack message.
Install the Automation (InsightConnect) Slack App
One of your organization’s Slack administrators should follow these instructions to approve the Rapid7 Automation (InsightConnect) app for your workspace.
To set up the Rapid7 Automation (InsightConnect) Slack App for your organization’s workspace:
- Navigate to it in the Slack App Directory in your Slack settings, or click here for a direct link. Click the Install link and then click the Approve button.
- In a web browser, navigate to the App Manager in your Slack settings. The URL should be something like: https://YOUR-WORKSPACE-URL.slack.com/apps/manage .
- Locate “Rapid7 Automation (InsightConnect)” under the “Restricted Apps” section, then click the Approve button for the Rapid7 Automation (InsightConnect) Slack App. This enables other users in your organization to configure your workspace.
- Let your team know when you’ve approved the app for their use.
Invite the Automation (InsightConnect) Chatbot to your Slack Workspace
- Create a new channel called, MDR Active Response. Your CA will use this channel for Slack notifications.
- Enter @Automation (InsightConnect) Bot in the Message field of your new channel to Invite the Automation (InsightConnect) Chatbot
Add a Workspace from the ChatOps Manager
To add a new workspace to Automation (InsightConnect) from the ChatOps manager:
- In Automation (InsightConnect), click Settings > Plugins & Tools.
- Click the ChatOps tab.

- Click the Add Slack Workspace button. The Slack installation page will open.
- Click Authorize. You’ll be notified if the installation was successful.
- Return to Automation (InsightConnect) and refresh the window. The newly added workspace will display.
You're ready to prepare your exclude list.
To get started, go to Prepare your Exclude List.