Configure Generic SAML SSO
If your SSO provider does not have a formal Rapid7 Digital Risk Protection (Threat Command) app, you can support SAML SSO authentication independently using a custom/local app.
In addition, you can enable SP-initiated SSO and also user provisioning with the SAML Just In Time (JIT) method.
Before configuring generic SSO:
- Generic SSO is supported only in IdP providers that support SAML 2.0 and that enable SAML claims (attributes) to specify the user Email address.
- This process is for advanced users who are very proficient in the setup and configuration of their SSO provider.
- If configurations are required that exceed what is described here, this generic option may not be suitable.
- Please contact your Customer Success Advisor or Customer Support to determine what help can be provided and if it is covered under your support agreement.
The following example demonstrates the necessary configuration to an enterprise app with the Digital Risk Protection (Threat Command):

Follow these same guidelines with other SSO providers that support the SAML protocol. Terminology and parameter names may differ.
Ensure that you use the Digital Risk Protection (Threat Command)-registered user email address for the email and Unique User Identifier attributes.
For assistance, contact Rapid7 Support.
Configure the Digital Risk Protection (Threat Command) to accept sign-in from a generic SAML SSO
Before you begin, ensure that:
- You can access the Digital Risk Protection (Threat Command) as an administrator.
- You have created and downloaded the base 64 certificate from your SSO provider.
- (Optional) To enable SP-initiatedlogin, you can provide the IDP URL and Issuer ID for the SSO provider.
To configure the Digital Risk Protection (Threat Command) to accept the generic SSO:
- Log in to Digital Risk Protection (Threat Command) as an administrator.
- From the Digital Risk Protection (Threat Command) main menu, select Settings > Authentication.
- Enable SAML single-sign-on.
- For Provider name, select generic :
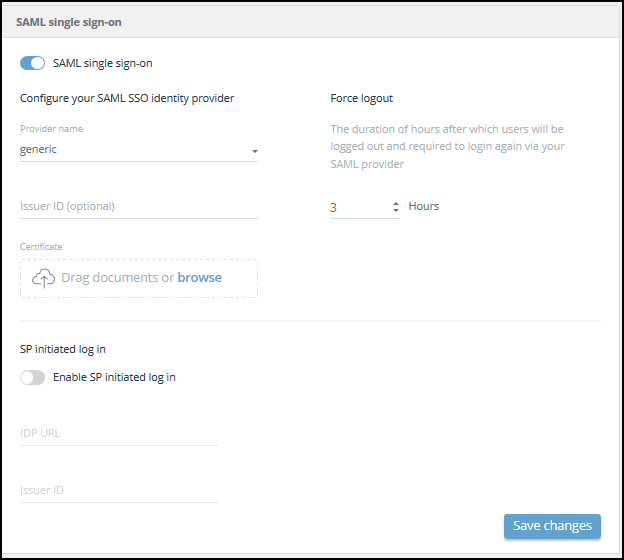
- Upload the certificate.
- (Optional) To enable SP-initiated login to the Digital Risk Protection (Threat Command), perform the following:
- Select Enable SP-initiated login.
- Enter the IDP URL and Issuer ID. You can get this information from the SSO provider. For more information, see Enable SP-Initiated User Login.
- (Optional) In the Force logout**** section, set the maximum hours for a user session to remain valid. After this time period, the user must sign in through their SSO to regain access to Digital Risk Protection (Threat Command).
- Click Save changes.