Virtual Appliance Deployment and Set-Up
The virtual appliance can be deployed on a virtual machine in the VMware or Hyper-V environments. After the initial deployment, there is one-time configuration to perform.
Proceed to the section that matches your operating system:
Deploy the virtual appliance on VMware
Installation and set up of the Digital Risk Protection (Threat Command) virtual appliance on VMware vSphere.
Set up the Digital Risk Protection (Threat Command) virtual appliance (“appliance”) to enable company security devices to accept indicator of compromise (IOC) feeds from Digital Risk Protection (Threat Command). This process is performed only once and is relevant only for on-premises devices.
To set up the appliance, you must deploy its OVA on a virtual machine and then configure the appliance web interface.
Make sure that you know your appliance IP address. This IP address (DHCP or static) may be used by different security devices. To configure a static IP address, see Optional OVA configurations.
Ensure that your environment meets these requirements:
- VMware vSphere 5.5 or later hypervisor to host the appliance.
- x86-64 architecture.
- Minimum 2 CPUs, 8GB RAM, 40GB disk space.
Prerequisites:
- You need a valid Digital Risk Protection (Threat Command) Account ID and appliance key, which can be retrieved from Settings > Subscription, as described in Subscription Settings, Keys, and API.
- Be sure to use the appliance key, not the API key.
- Ensure that you have admin access to a VM on a supported hypervisor.
To deploy the virtual appliance on VMware:
- Download the appliance OVA:
- Log in to Digital Risk Protection (Threat Command) at https://dashboard.ti.insight.rapid7.com .
- From the main menu, select Automation > Integrations.
- From the Devices screen, click Download.
- Save (don’t run) the OVA file.
The OVA is saved in the browser default downloads location.
- Deploy the appliance OVA on a dedicated virtual machine:
- From the ESXi console, create a VM based on the downloaded OVA image (appliance.ova ).
- Select default settings for machine creation, with the appropriate networks, storage, and other settings, as necessary.
Continue with the one-time virtual appliance configuration.
Configure the virtual appliance web user interface
Perform one-time configuration of the Digital Risk Protection (Threat Command) virtual appliance (“appliance”) web interface.
Before you begin, ensure that you have:
- The virtual appliance is deployed on a VMware or on a Hyper-V machine.
- The virtual appliance IP address or hostname.
- The Digital Risk Protection (Threat Command) API account ID and appliance key, as described in Subscription Settings, Keys, and API.
- (Optional) Proxy information.
To configure the appliance web interface:
- From an internet browser, navigate to https://<virtual appliance IP address>
- Review and approve security certificates, if necessary.
- Run the initial settings wizard.
The Proxy screen is displayed: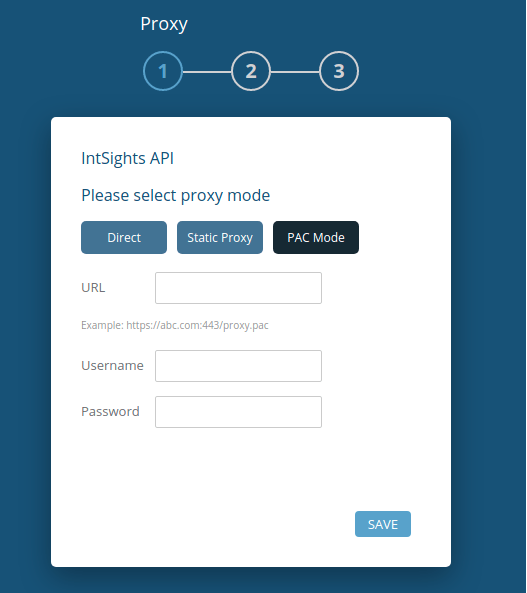
- Select one:
- Direct - Do not use a proxy.
- Static Proxy - Use a static proxy.
- PAC Mode - Use a proxy auto-configuration file.
- If you selected to use a static proxy or PAC, enter the URL or IP address.
- (Optional) If a username and password is required, enter those.
- Click Save.
- In the next step, enter the Account ID and appliance key.
Copy and paste this information from Digital Risk Protection (Threat Command).
- Select one:
- Click Next.
- Type a new username and password for the appliance web interface.
- Password criteria:
- Length of 8 to 20 characters
- At least one lower case English letter
- At least one upper case English letter
- At least one 0-9 digit
- At least one of these special characters: ”~!@#$%^&*()|:?_`’+=-
This is the login information you will use to access the appliance web interface (not the SSH console).
- Password criteria:
- Click Next.
An update process may start. When finished, the virtual appliance login page is displayed.
Deploy the virtual appliance on Hyper-V
Installation and set up of the Digital Risk Protection (Threat Command) virtual appliance on Hyper-V.
Set up the Digital Risk Protection (Threat Command) virtual appliance (“appliance”) to enable company security devices to accept indicator of compromise (IOC) feeds from Digital Risk Protection (Threat Command). This process is performed only once and is relevant only for on-premises devices.
To set up the appliance, you must deploy its virtual machine and then configure the appliance web interface.
Make sure that you know your appliance IP address. This IP address (DHCP or static) may be used by different security devices. To configure a static IP address, see Optional Configurations.
Ensure that your environment meets these requirements:
- Machine: Minimum 2 CPUs, 8GB RAM, 40GB disk space
- OS: The DEB installation requires an Ubuntu 20.04 LTS Server Machine
Prerequisites:
- You need a valid Digital Risk Protection (Threat Command) Account ID and appliance key (va_key), which can be retrieved from Settings > Subscription, as described in Subscription Settings, Keys, and API.
- Be sure to use the appliance key, not the API key.
- You need full, unrestricted internet access for the installation.
To deploy the virtual appliance on Hyper-V:
- Run the prerequisite checking scripts:
- Run this command:
$ curl https://storage.googleapis.com/tip-intsights/va/va\_preinstall\_check.sh > va_check.sh - Run this command:
$ chmod +x va_check.sh - Run this command:
$ sudo ./va_check.sh - Output, similar to the following, should be displayed:
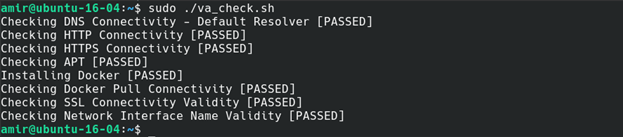 If all the tests are [PASSED], continue to the next step.
If any test fails, run $ cat intsights_va_log.txt and share the output with a Customer Service Manager for further investigation. - Run this command:
- Download and verify the DEB package:
- From the Ubuntu machine, run:
$ curl —user “[account_id]:[va_key]” https://api.intsights.com/agent/packages/intsights-appliance-6.0.0.deb > intsights-appliance.deb
Replace [account_id]:[va_key] with the values retrieved earlier. The command should be all run on one line (no line breaks). - Compare the file’s SHA1 hash to the original SHA1, by running the following commands:
$ sha1sum intsights-appliance.deb - **$ curl —user “[account_id]:[va_key]” https://api.intsights.com/agent/packages/intsights-appliance-6.0.0.sha1 -**Both commands should print the same hash value.
- From the Ubuntu machine, run:
- Install the DEB file, by running the following command:
$ sudo apt install -f -y ./intsights-appliance.deb
Follow the instructions in the prompt screens.
The package is installed. - Enable the appliance service for boot by running this command:
$ sudo systemctl enable coordinator && sudo systemctl start coordinator - (Optional) You can verify the installation by running this command:
$ sudo docker ps —format ‘table{{.Image}}\t{{.Status}}’
Output, similar to the following, should be displayed (version numbers might differ): If the STATUS says “Up,” the installation was successful.
If you don’t see any running docker containers, run the following then check again:
$ sudo systemctl restart coordinator
Continue with the one-time virtual appliance configuration.
Configure the virtual appliance web user interface
Perform one-time configuration of the Digital Risk Protection (Threat Command) virtual appliance (“appliance”) web interface.
Before you begin, ensure that you have:
- The virtual appliance is deployed on a VMware or on a Hyper-V machine.
- The virtual appliance IP address or hostname.
- The Digital Risk Protection (Threat Command) API account ID and appliance key, as described in Subscription Settings, Keys, and API.
- (Optional) Proxy information.
To configure the appliance web interface:
-
From an internet browser, navigate to https://<virtual appliance IP address>
-
Review and approve security certificates, if necessary.
-
Run the initial settings wizard.
The Proxy screen is displayed:
-- Select one:
- Direct - Do not use a proxy.
- Static Proxy - Use a static proxy.
- PAC Mode - Use a proxy auto-configuration file.
- If you selected to use a static proxy or PAC, enter the URL or IP address.
- (Optional) If a username and password is required, enter those.
- Click Save.
- In the next step, enter the Account ID and appliance key.
Copy and paste this information from Digital Risk Protection (Threat Command).
- Select one:
-
Click Next.
-
Type a new username and password for the appliance web interface.
- Password criteria:
- Length of 8 to 20 characters
- At least one lower case English letter
- At least one upper case English letter
- At least one 0-9 digit
- At least one of these special characters: ”~!@#$%^&*()|:?_`’+=-
This is the login information you will use to access the appliance web interface (not the SSH console).
- Password criteria:
-
Click Next.
An update process may start. When finished, the virtual appliance login page is displayed.