Deploy Vulnerability Management (InsightVM) in InsightGovCloud
What is Vulnerability Management (InsightVM)?
Vulnerability Management (InsightVM) is a data-rich resource that can amplify the other solutions in your tech stack, from SIEMs and firewalls to ticketing systems.
Vulnerability Management (InsightVM) brings together Rapid7’s library of vulnerability research knowledge from Nexpose, exploit knowledge from Metasploit, global attacker behavior, internet-wide scanning data, exposure analytics, and real-time reporting.
A Vulnerability Management (InsightVM) installation has these components:
| Component | Description |
|---|---|
| Security Console | This is the component you’ll use to create sites, run scans, generate reports, and much more. You access the Security Console through a web-based user interface in any of our supported browsers. |
| Scan Engine | Scan Engines are responsible for performing scan jobs on your assets. Note that Scan Engines only store scan data temporarily before sending it back to the Security Console for integration and long-term storage. |
Get support from a Rapid7 Engineer
To ensure a smooth and successful deployment, your account team will assign a dedicated Rapid7 Engineer to guide you through each step of the process.
Before you begin the deployment, ensure you have read and completed any outstanding tasks in the deployment overview.
Do not start the Security Console
During this deployment, do not automatically start the Security Console or reboot your system. Follow the instructions in this topic carefully to ensure a successful deployment.
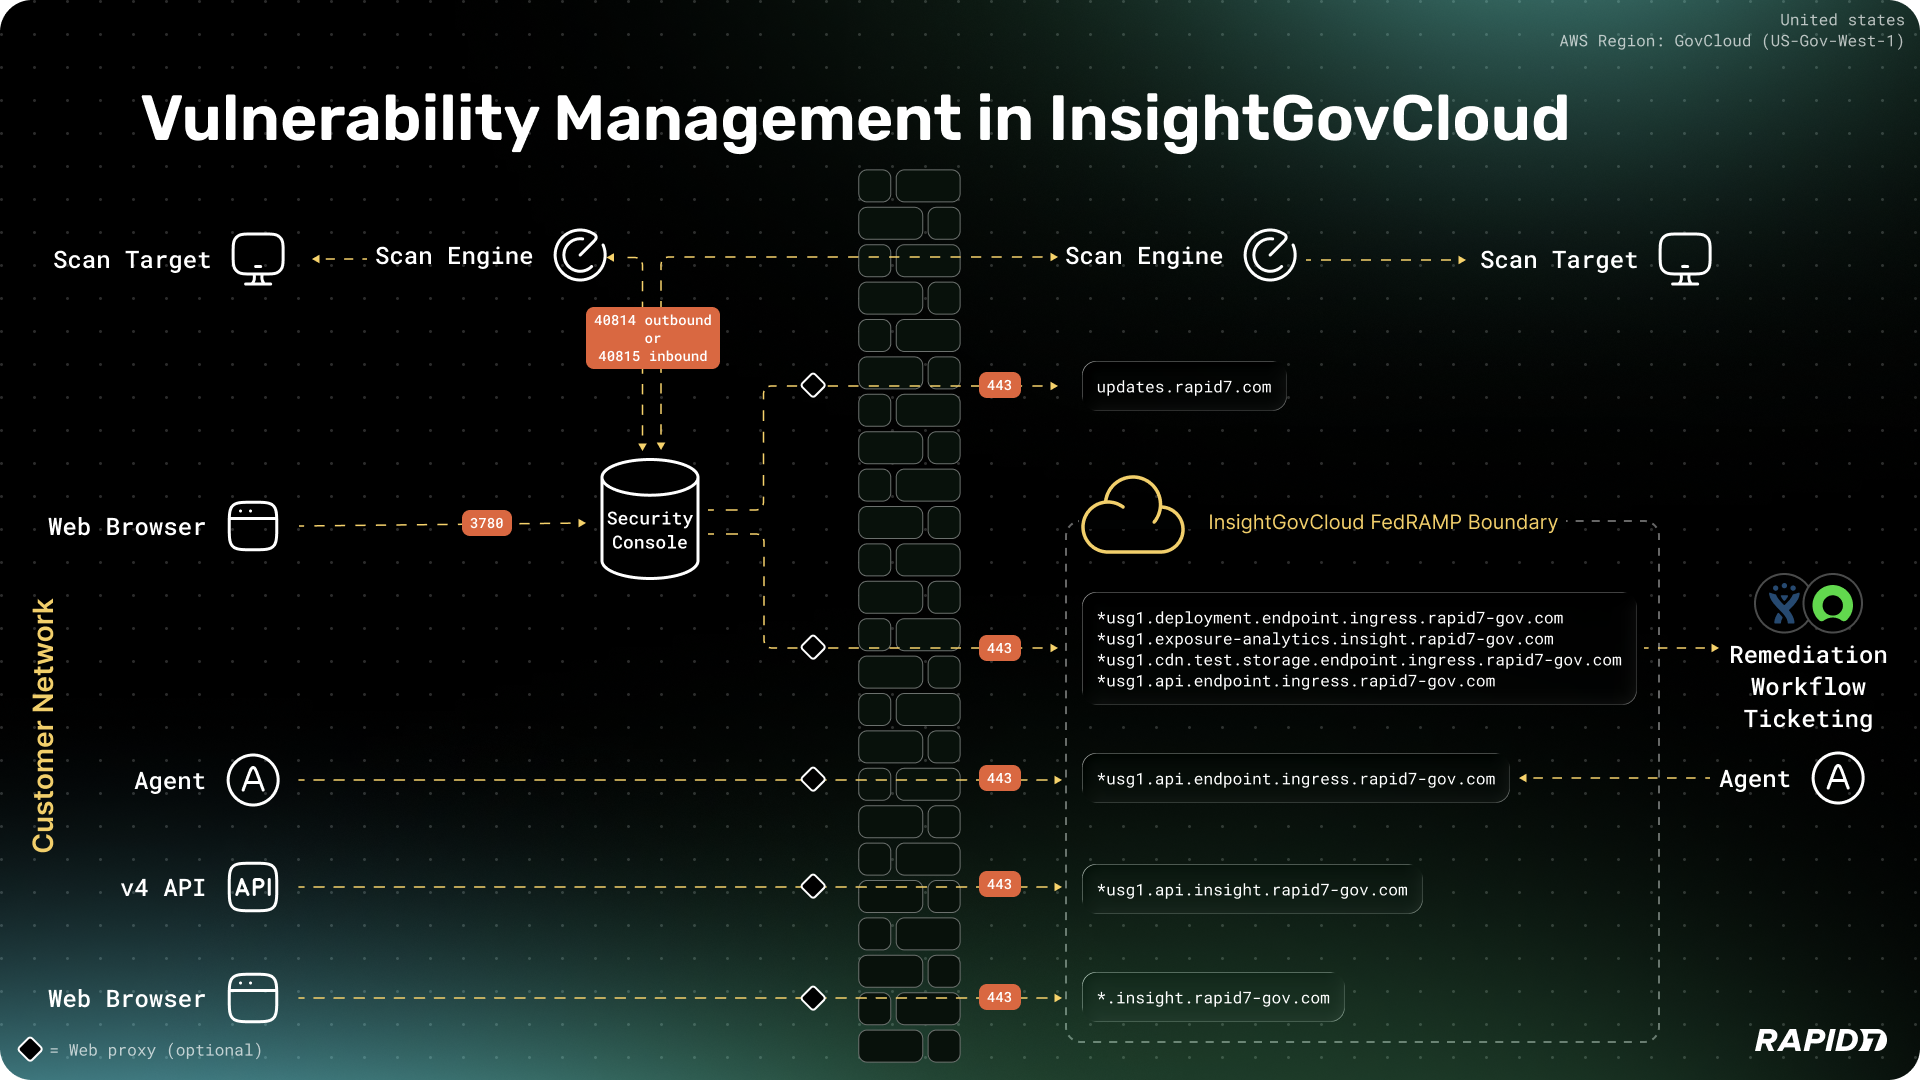
Network architecture of Vulnerability Management (InsightVM) in InsightGovCloud
This architecture diagram identifies the components that reside inside the customer network and those that are hosted within the Rapid7 InsightGovCloud FedRAMP boundary.
Security Console system requirements
The complete hardware and software requirements are provided in the system requirements section of the Vulnerability Management (InsightVM) quick start guide.
It is important to note that the Security Console requires significantly more system resources than a Scan Engine, as it includes a Web interface, PostgreSQL database, and reporting capabilities.
Rapid7 is responsible for Security Console patching only
InsightGovCloud does not validate the Security Console for compliance. It is your responsibility, as the customer, to handle Security Console configuration, scanning, and ongoing maintenance. Read the Security Console Best Practices .
Deploying on a virtual machine
There are some requirements to consider before you deploy the Security Console on a virtual machine (VM):
- The memory reservation must match the allocation. For example, if you allocate 32 GB of RAM, you must also reserve 32 GB.
- Avoid using shared memory configurations, which can lead to:
- Degraded performance
- Out-of-memory (OOM) errors
Supported architecture
At this time, Rapid7 supports only x86_64 architecture.
Security Console minimum specifications
| Asset Volume | CPU Cores | Memory | Storage |
|---|---|---|---|
| 5,000 | 4 | 16 GB | 1 TB |
| 20,000 | 12 | 64 GB | 2 TB |
| 150,000 | 12 | 128 GB | 4 TB |
| 400,000 | 12 | 256 GB | 8 TB |
Scan Engine minimum specifications
Several factors can affect memory consumption during scans, including the type of scan being conducted (for example, Policy, Vulnerability, or Discovery), the number of ports detected that require fingerprinting, and the configured Maximum assets scanned simultaneously per Scan Engine.
Additionally, the operating system on which the scan engine application is installed can influence memory usage; for example, a Windows server may use more memory compared to a Linux server.
| Processor | Memory | Storage |
|---|---|---|
| 4 cores | 16 GB | 200 GB |
Operating systems
Microsoft and Linux Servers are supported. Specific server information is available in the Vulnerability Management (InsightVM) Quick Start Guide .
User access and security
Whether you are a new or an existing Rapid7 customer, an essential part of the deployment is to enable FIPS mode .
FIPS stands for the Federal Information Processing Standard and it is required to ensure compliance with the InsightGovCloud environment.
The Security Console and Scan Engine can store and interact with sensitive data and should therefore be installed on a FIPS-compliant encrypted partition and FIPS-compliant operating system.
It is advisable that access to the file system and operating system be monitored and restricted to users who are authorized for the highest security classification within your organization.
Deploy as a new or existing customer
A Rapid7 Engineer will be assigned to help you with the initial deployment of the Security Console. When you are ready to begin the deployment, contact your Rapid7 Federal Customer Success Manager.
The deployment process includes some steps to prepare your operating system, which are essential to ensure a successful installation.
Updating firewall rules can take time
It is important to factor in time for firewall rule updates before you begin the deployment. Depending on your internal change control process, firewall updates can often take several days to complete.
Here is an overview of the deployment process:
- If you haven’t yet activated your InsightGovCloud account, do so now by following the instructions in Phase 2, Task 1: Activate your account of the deployment overview.
- Enable Multi-Factor Authentication as explained in Phase 2, Task 4: Configure security policies of the deployment overview.
- Complete Prerequisite 1: Update the firewall rules for external, internal, and Rapid7 Agent connectivity.
- Complete Prerequisite 2: License and system requirements.
- Follow the Vulnerability Management (InsightVM) for InsightGovCloud installation procedure according to your operating system.
Do not start the Security Console
You must enable FIPS mode before you start the Security Console for the first time.
Prerequisite 1: Update the firewall rules
Firewall rules for external network connectivity
The InsightGovCloud environment uses a different set of network endpoints for communication with Vulnerability Management and Exposure Analytics (EA). To ensure full functionality, update your firewall rules as follows:
| Source | Endpoint (destination) | Port | Protocol | Purpose |
|---|---|---|---|---|
| Security Console | cdn.exposure-analytics.insight.rapid7-gov.com | 443 | TCP | Exposure Analytics Website CDN |
| Security Console | insight.rapid7-gov.com | 443 | TCP | Platform Web Interface |
| Security Console | updates.rapid7.com | 443 | TCP | Console Updates (not in boundary) |
| Security Console | usg1.api.endpoint.ingress.rapid7-gov.com | 443 | TCP | Console Asset Upload |
| Security Console | usg1.api.insight.rapid7-gov.com | 443 | TCP | Platform API (includes EA v4 API) |
| Security Console | usg1.deployment.endpoint.ingress.rapid7-gov.com | 443 | TCP | Console Asset Upload |
| Security Console | usg1.exposure-analytics.insight.rapid7-gov.com | 443 | TCP | Exposure Analytics Website |
| Security Console | usg1.cdn.test.storage.endpoint.ingress.rapid7-gov.com | 443 | TCP | Connectivity Test |
Firewall rules for internal network connectivity (host level firewall)
Scan Engines and Security Consoles must be able to communicate with each other in order to initiate scans and integrate scan data. Distributed Scan Engines can communicate with a Security Console in two ways:
- Standard (Console-to-Engine) - This is the most common communication method for a distributed Scan Engine. When the Security Console determines that a scan needs to take place on your target assets, it initiates the connection to communicate with the Scan Engine. As a result, Scan Engines must allow inbound traffic on the default port of 40814 in order to create this connection.
- Reverse (Engine-to-Console) - The engine-to-console communication method, which is implemented by a “reverse” pairing procedure, is useful in cases where your security policies restrict inbound connections to the network hosting the scan engine. In engine-to-console configurations, the Scan Engine routinely pings the Security Console to see if a scan job needs to be run. If the Security Console does in fact have a scan job ready, it accepts the connection from the Scan Engine and the communication channel is established. As a result, Security Consoles must allow inbound traffic on the default port of 40815 in order to create this connection.
Firewall rules for Rapid7 Agent connectivity
The InsightGovCloud environment uses a different set of network endpoints for agent communication.
To maintain full agent functionality:
- Review and update your firewall rules to allow outbound access to FedRAMP-specific URLs and IP addresses.
- Ensure connectivity for critical agent functions, including data transmission, update delivery, and vulnerability assessments.
Updating the firewall rules is essential
Missing this step will block essential Rapid7 Agent (Insight Agent) functionality such as data transmission, update retrieval, and vulnerability management.
| Endpoint | Description | Supported static IP addresses |
|---|---|---|
| usg1.endpoint.ingress.rapid7-gov.com | For Insight Agent messages and beacons. | 56.136.3.166; 3.30.247.167; 15.205.227.208 |
| usg1.storage.endpoint.ingress.rapid7-gov.com | For Insight Agent file uploads. | 56.136.3.166; 3.30.247.167; 15.205.227.208 |
| usg1.api.endpoint.ingress.rapid7-gov.com | For Insight Agent messages, beacons, and file uploads. | 56.136.3.166; 3.30.247.167; 15.205.227.208 |
| usg1.bootstrap.endpoint.ingress.rapid7-gov.com; usg1.cdn.storage.endpoint.ingress.rapid7-gov.com | For Insight Agent software updates. | 56.136.3.166; 3.30.247.167; 15.205.227.208 |
| usg1.deployment.endpoint.ingress.rapid7-gov.com | For certificate files used in token-based Insight Agent installations. | 56.136.3.166; 3.30.247.167; 15.205.227.208 |
Internal ports for scan engine connectivity
The Security Console requires specific internal ports to be opened to allow communication to the console and between the scan engines.
The requirements are as follows:
| Source | Destination | Port | Protocol |
|---|---|---|---|
| Scan Engine | Target Assets | All | All |
| User Browser | Web Interface | 3780 | HTTPS |
| Security Console | Scan Engine | 40814 | TCP |
| Scan Engine | Security Console | 40815 | TCP |
| Scan Engine | Target Host (Agent listening port) | 31400 | UDP |
| Scan Engine | Target Host (Scan Assistant listening port) | 21047 | TCP |
Rapid7 Agent (Insight Agent) requirements
To use the Rapid7 Agent (Insight Agent) with Vulnerability management, read the requirements in Deploy Rapid7 Agent in InsightGovCloud. This section of the documentation also contains helpful information about asset correlation in the Security Console and how to use the Universally Unique Identifier (UUID) retrieval feature.
Operating Systems that support the Scan Assistant
Information about the supported operating systems and installation instructions for the Scan Assistant is available in the Scan Assistant documentation .
Benefits of using the Scan Assistant and Rapid7 Agent
The value of having both the Rapid7 Agent (Insight Agent) and the Scan Assistant on the same system is multifaceted:
- Complementary functionality - The Rapid7 Agent (Insight Agent) and Scan Assistant are designed to complement each other. The Agent performs local checks, while the Scan Assistant allows for immediate authenticated vulnerability scans, which are useful for remediation scans. This combination ensures comprehensive vulnerability assessment and management.
- Efficient remediation - If a vulnerability is discovered by the Agent, the Scan Assistant can be used to immediately verify remediation by kicking off an authenticated scan, rather than waiting for the Agent to conduct another assessment.
- Expanded policy scanning - The Scan Assistant provides access to a broader range of policy scans beyond what the Agent can assess. It supports all categories of policy scans, including CIS, DISA, FDCC, and USGCB, and allows for custom policy building, which is beneficial for adhering to specific internal policies.
- Resource efficiency and security - The Scan Assistant consumes fewer resources and provides a more secure scanning method by removing the need for administrative credential management. It also decreases the time required to complete policy scans.
Overall, deploying both tools on the same system enhances vulnerability coverage, allows for immediate verification of remediation, and supports comprehensive policy compliance checks.
Prerequisite 2: License and system requirements
In order to complete the installation, you will need this information from your account team:
- A Security Console license key, in the format: MOCK-KEY0-L8ET-CHRD.
- An email with the subject line Rapid7 Insight: Activate Your Account.
You will also need a server to be used as the Security Console. Specifically, you will require:
- Hardware as outlined in the Vulnerability Management (InsightVM) system requirements :
- 24 GB RAM, 8 CPU, fast SSD.
- Network connection: The IP address is referred to in this article as
<yourConsoleIPaddress>.
- A dedicated IP address.
- Administrator privileges.
Install Vulnerability Management for InsightGovCloud (Linux)
Linux software packages
These packages will be installed when you run the installation commands or the quick install script:
- rng-tools – Required for FIPS-mode. Provides hardware and kernel random number generator (RNG) utilities to ensure the system has sufficient entropy for cryptographic operations, which is important for SSL, SSH, and FIPS.
- policycoreutils – Core administrative utilities for SELinux (Security-Enhanced Linux), such as setsebool, restorecon, and load_policy, used to manage and apply SELinux security policies.
- policycoreutils-python-utils – Adds extra SELinux management tools written in Python, like semanage (for managing ports, file contexts, booleans, and users).
How to perform the installation
Choose one of the methods available for performing the installation:
- Review and run the quick install script for your environment (recommended).
- Manually install the prerequisites, install the Security Console and Scan Engine, and configure the Scan Console and Scan Engine for FIPS-mode.
Run the Linux quick install script (recommended)
The quick install script has been tested on these versions:
- RedHat Enterprise Linux (RHEL) 10.0 (Coughlan)
- Ubuntu 24.04.3 LTS
- Rocky Linux 10.0 (Red Quartz)
As the quick install script runs, it performs these actions:
- Installs the required Linux packages, such as
rng-tools,policycoreutils, andpolicycoreutils-python-utils. - Ensures the random number generator (
rngd) is installed and running, which is a FIPS requirement. - If needed, the script configures SELinux rules for
file/folder/processaccess. - Downloads and runs the Rapid7 installer. Use all default settings unless your installation requires advanced configuration, such as separate Scan Engines.
- Enables Federal and FIPS mode.
- Starts the Security Console service and enablement startup on boot.
- Ensures the Security Console service is running in FIPS mode.
Installation errors on Ubuntu may require a reboot
If you see Java error messages during the Security Console installation, ensure your Linux package is up-to-date and run a server reboot. When the reboot is complete, run the script again.
Create, review, and run the script
- Log in to the new server with administrator access (sudo privileges), for example, SSH:
<YourConsoleIPaddress>. - Make a directory called
insightgovcloud_vm_install. - Copy and paste the quick install script into a file named
install_fedramp_insightvm.sh. - Review and run the script, for example:
# Example command. Adjust for version number.
cat ./install_fedramp_insightvm.sh
chmod +x ./install_fedramp_insightvm.sh
./install_fedramp_insightvm.sh
Perform the Linux installation manually
The section that follows provides sample commands for Ubuntu, RHEL, and Rocky for the prerequisite, Security Console, and InsightGovCloud configuration. The comments specify the distribution.
Example Linux installation procedure
# Update system packages..."
# for RHEL
sudo dnf -y update
# for Ubuntu
sudo apt-get update -y


# Install prerequisite packages (RNG, SELinux tools when available, curl)..."
# for RHEL
sudo dnf -y install rng-tools policycoreutils policycoreutils-python-utils curl
# for Ubuntu
apt-get install -y rng-tools5 rng-tools


# Enable and start RNG daemon..."
# For RHEL/Rocky
sudo systemctl enable --now rngd.service
# For Ubuntu, varies by version
# Most common
sudo systemctl enable --now rngd.service
# Alternate sudo systemctl enable --now rng-tools.service
# Another variant
sudo systemctl enable --now rng-tools-debian.service


# Create /opt/rapid7/nexpose directory..."
sudo install -d -m 755 /opt/rapid7/nexpose
sudo chown -R root:root /opt/rapid7


# For RHEL/SELinux: label Rapid7 directories and opening TCP 3780...
sudo semanage fcontext -a -t usr_t '/opt/rapid7(/.*)?' || true
sudo semanage fcontext -a -t bin_t '/opt/rapid7/nexpose(/.*)?' || true
sudo semanage fcontext -a -t var_log_t '/opt/rapid7/nexpose/nsc/logs(/.*)?' || true
sudo semanage port -a -t http_port_t -p tcp 3780 2>/dev/null || sudo semanage port -m -t http_port_t -p tcp 3780 || true
sudo restorecon -RF /opt/rapid7 || true

# Download Rapid7 InsightVM installer..."
sudo curl -fL https://download2.rapid7.com/download/InsightVM/Rapid7Setup-Linux64.bin -o Rapid7Setup-Linux64.bin
sudo chmod +x Rapid7Setup-Linux64.bin

# Run Rapid7 installer...
# USE ALL DEFAULTS. DO NOT START AUTOMATICALLY
sudo ./Rapid7Setup-Linux64.bin


# Enable FedRAMP and FIPS mode..."
sudo bash -lc cat > /opt/rapid7/nexpose/nsc/CustomEnvironment.properties <<'EOF'
fipsMode=1
com.rapid7.federal=true
EOF


# Re-apply SELinux labels..."
sudo restorecon -RF /opt/rapid7/nexpose || true


# Reload systemd and enable Nexpose Console..."
sudo systemctl daemon-reload || true
sudo systemctl enable --now nexposeconsole.service || true

# Verify FIPS/Federal mode in logs..."
sudo grep -q "Console is a " /opt/rapid7/nexpose/nsc/logs/nsc.log
sudo grep -q "Console FIPS " /opt/rapid7/nexpose/nsc/logs/nsc.log
Install Vulnerability Management for InsightGovCloud (Windows)
- Login into the new server as an administrator, for example, RDP:
<yourConsoleIPaddress>. - Install one of the supported Windows versions as described in the Vulnerability Management (InsightVM) documentation .
- Download and install the Rapid7insightVM Install Package from https://download2.rapid7.com/download/InsightVM/Rapid7Setup-Windows64.exe .
Do not start the Security Console
Do not automatically start the Security Console or reboot your system. If you encounter a Visual C++ error, you can disregard it.
- Open a text editor, paste the following code, and save the file with the name
CustomEnvironment.properties.
fipsMode=1
com.rapid7.federal=true - Save the file to the ‘nsc’ directory within your install location. The nsc directory is usually located at
c:\Program Files\rapid7\nexpose\nsc\. - Reboot the server.
- Ensure that FIPS mode is enabled by searching the log for a line that says “Console FIPS Mode switched on = true”. The log is usually located at
c:\Program Files\rapid7\nexpose\nsc\logs\nsc.log.
Once this procedure is complete, you can proceed to pair the Security Console with InsightGovCloud.
Pair the Security Console with InsightGovCloud
Now that you have your Security Console set up, you can license and pair it to the InsightGovCloud Platform.
Prerequisites
Before you start the pairing process:
- Ensure you have your Security Console license key, in the format: MOCK-KEY0-L8ET-CHRD.
- Locate your activation email with the subject line Rapid7 Insight: Activate Your Account.
- Enable Multi-Factor Authentication (MFA) and enforce one of the FedRAMP-authorized MFA methods: WebAuthn or Okta Verify. For instructions, go to Multi-factor authentication . You may test this setting by logging out of the Command Platform and logging back in. You will be prompted for enrollment into MFA.
Contact Rapid7 Support if pairing fails
If your attempt to pair the Security Console with InsightGovCloud fails, you can check the nsc.log file to analyze the root cause. The easiest way to do this is to run the tail command on the log file - for example, run tail -f /opt/rapid7/nexpose/nsc/logs/nsc.log - and attempt the pairing process again. If the pairing is unsuccessful, copy the error message into a text editor and report the issue to the Rapid7 Support team in the Federal Customer Support Portal .
Task 1: Activate your license on the Security Console
- Log in to your Security Console at the URL with the format:
https://<yourConsoleIPaddress>:3780. Your login credentials are the corporate email address where you received the Activate Your Account email in Phase 1: Step 1 and the password that you set. - From the Security Console login page, navigate to Administration.
- Under the Console area, click Licensing > Activate A New License.
- Enter the license key that was provided by the Rapid7 Onboarding team or your account manager and click Activate with Key. If a pop-up window appears, close it to continue.
- Navigate to Administration > User Management > Add User.
- Create a new user with a matching destination email address as the recipient of the Rapid7 Insight: Activate Your Account email.
- Select InsightVM Users as the authentication method.
- Enter a password and save it to a password manager application if desired.
- On the User Role tab, select Global Admin and click Next.
- On the Site Permissions tab, click Next without making a selection.
- On the Asset Group Permissions tab, click Next without making a selection.
- When you receive a success message, log out of the Security Console from the menu at the top right of the screen.
Task 2: Activate and reset your password on the InsightGovCloud Command Platform
- If you did not already do so in Phase 2: Step 1, locate the email with the subject line Rapid7 Insight: Activate Your Account.
- Click Set My Password from within the email.
- Set your new password and specify your security questions.
- Log in to the Command Platform with your new password.
- The welcome message is displayed with an activation key for the Security Console, in the format:
b28c650f-6cc5-4fd7-a878-a4f79c443b1c-usg1. Click Copy and paste the key into a temporary text file. The key must be used within 1 hour. - Navigate to the settings menu at the top-right of the screen and select Company Settings.
- On the Multi-Factor Authentication tab, switch the Enabled toggle ON.
- Select either OKTA Verify or WebAuthn and click Save. The next time you log in, you’ll be required to use your chosen MFA method.
Task 3: Pair the Security Console to the Command Platform
During this procedure, you are prompted to log in to the Command Platform. Instead of insight.rapid7.com, ensure you navigate to insight.rapid7-gov.com.
- Log in to your Security Console once again, but this time with the newly created user account that you set up in Task 1.
- Navigate to Administration > Platform Data Synchronization and click Activate Console.
- When prompted with a welcome message, click Activate Now.
- Select I have an insight.rapid7.com account and click Next.
- On the next screen, click X to close the window.
- On the Security Console Configuration page, the VM Platform tab displays a field to enter the pairing key. Copy the key from the temporary text file, paste it into the field, then click Activate Console. A banner message appears to indicate that the pairing was successful.
- Click Save.
Allow some time for the Security Console to synchronize with the Command Platform. Data will soon appear in the Vulnerability Management application.
Transitioning from an existing customer environment
If you are transitioning to InsightGovCloud from an existing commercial environment, there are some important considerations to note:
- Historical data and configured experiences from your commercial Vulnerability Management (InsightVM) account can’t be migrated to InsightGovCloud. These include agent policies, dashboards, goals and SLAs, and remediation projects in Exposure Analytics (EA).
- Your commercial EA environment will expire 7 days after the new Security Console instance is deployed for InsightGovCloud. Follow the guidance in this customer update guide , which is available after you log in to your Rapid7 environment.
Install FedRAMP-compliant Rapid7 Agents
To ensure that your Rapid7 Agents (Insight Agents) appear in Data Collection Management (DCM) and your Policy assessment results appear in Vulnerability Management (InsightVM), you will need to install new Agents that are compatible with InsightGovCloud.
Follow the instructions in Deploy Rapid7 Agent (Insight Agent) in InsightGovCloud.