AWS CloudTrail SQS
Amazon Web Services, or AWS, is a cloud service integration that allows you to track how your corporate cloud services are being used. Whether you are using Amazon’s Standard or GovCloud regions, you can configure AWS CloudTrail to send logs to SIEM (InsightIDR).
You can also configure AWS CloudTrail with the CloudTrail API
When you configure using the AWS CloudTrail API, SIEM (InsightIDR) queries the API periodically to see what has changed and then downloads the logs. When you configure with SQS, SIEM (InsightIDR) receives messages through an SQS notification when the S3 logs are created and ready to download. Both methods work well, however when you use the SQS method, SIEM (InsightIDR) is often able to gather logs faster because messages are created as soon as the S3 files are ready. For instructions on how to configure AWS CloudTrail with the CloudTrail API, see the AWS CloudTrail API documentation.
To set up this event source:
Configure your AWS Settings
Before you can send logs from AWS CloudTrail to SIEM (InsightIDR), you must enable AWS CloudTrail in all of your regions, create a trail, create an SQS queue, subscribe the queue to the SNS topic, and set up AWS permissions.
To configure your AWS settings:
- Enable AWS CloudTrail.
- Create a trail.
- Create an SQS Queue.
- Subscribe the queue to the SNS topic.
- Set up permissions.
Step 1: Enable AWS CloudTrail
To get maximum coverage of CloudTrail monitoring, you should enable CloudTrail in all your standard regions and GovCloud regions, even if you don’t have any EC2 instances or other AWS resources running in all regions. Going forward, this helps ensure that if an attacker compromises a resource in your AWS account and they create or modify resources in other regions, you’ll be able to monitor and detect on that behavior.
AWS S3 Regions
Depending on the region your CloudTrail logs are stored in, the collector will need to reach the following URL to collect the logs:
| S3 Region | URL |
|---|---|
| US_STANDARD | https://s3.amazonaws.com |
| US_WEST_OREGON | https://s3-us-west-2.amazonaws.com |
| US_EAST_OHIO | http://s3-us-east-2.amazonaws.com |
| US_WEST_N_CALIFORNIA | https://s3-us-west-1.amazonaws.com |
| CA_CENTRAL | https://s3-ca-central-1.amazonaws.com |
| EU_IRELAND | https://s3-eu-west-1.amazonaws.com |
| EU_LONDON | https://s3-eu-west-2.amazonaws.com |
| EU_PARIS | https://s3-eu-west-3.amazonaws.com |
| EU_FRANKFURT | https://s3.eu-central-1.amazonaws.com |
| AP_MUMBAI | https://s3-ap-south-1.amazonaws.com |
| AP_SEOUL | https://s3-ap-northeast-2.amazonaws.com |
| AP_SINGAPORE | https://s3-ap-southeast-1.amazonaws.com |
| AP_SYDNEY | https://s3-ap-southeast-2.amazonaws.com |
| AP_TOKYO | https://s3-ap-northeast-1.amazonaws.com |
| SA_SAO_PAULO | https://s3-sa-east-1.amazonaws.com |
AWS CloudTrail is automatically enabled when an AWS account is created. All activity is recorded as an event and archived for 90 days. To help you store, analyze, and manage changes to your AWS resources, and extend the record of events beyond 90 days, you can create a CloudTrail trail.
GovCloud Regions
If you use AWS GovCloud, you can send data to SIEM (InsightIDR) for further analysis.
GovCloud data housed in standard AWS
Please note that while AWS GovCloud complies with Federal cryptographic requirements, SIEM (InsightIDR) servers are hosted in standard AWS, and any data that you send to SIEM (InsightIDR) will be stored there as well.
You can send data from the following GovCloud regions to SIEM (InsightIDR):
| GovCloud Region | URL |
|---|---|
| US East (GovCloud) | s3-website.us-gov-east-1.amazonaws.com |
| US West (GovCloud) | s3-website.us-gov-west-1.amazonaws.com |
Enable GovCloud Regions
For information on enabling GovCloud regions, see https://docs.aws.amazon.com/govcloud-us/latest/UserGuide/verifying-cloudtrail.html .
Step 2: Create a Trail
A trail is a long-term record of your AWS account activity. It allows you to filter and continuously deliver the trail’s log files to an Amazon S3 bucket, which will be sent to SIEM (InsightIDR). To learn more about CloudTrail trails, read the AWS documentation: https://docs.amazonaws.cn/en_us/awscloudtrail/latest/userguide/cloudtrail-tutorial.html
To create a trail:
- In the AWS Console, go to CloudTrail > Trails > Create trail.
- Add a name for your trail in the Trail name field.
- For the Apply trail to all regions field, select Yes.
- Click the Data Events section.
- Select the appropriate S3 buckets or all buckets in your account.
- Click the Storage Location section.
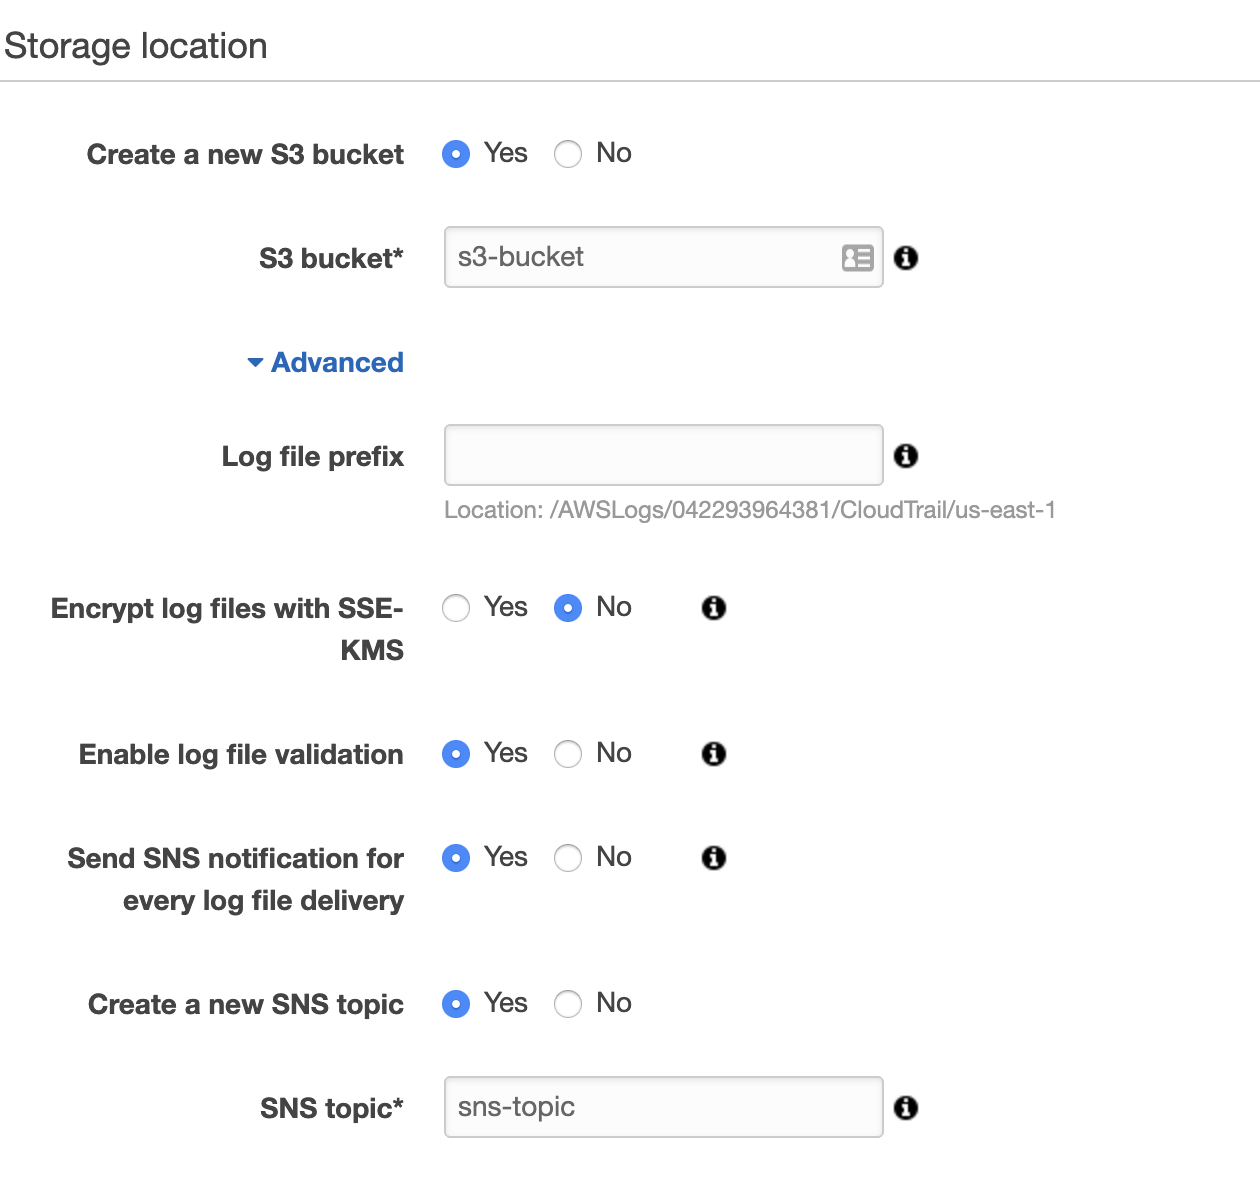
- For the Create a new S3 bucket section, select Yes.
- Add a name for your S3 bucket. Take note of this for later configuration in SIEM (InsightIDR).
- Expand the Advanced section.
- For the Send SNS notification for every log file delivery field, select Yes.
- For the Create a new SNS topic field, select Yes.
- Add a name for your SNS Topic. Take note of this for later configuration in AWS.
- Click Create.
See the AWS documentation for a more detailed explanation of using SNS with CloudTrail: https://docs.aws.amazon.com/awscloudtrail/latest/userguide/configure-sns-notifications-for-cloudtrail.html#configure-cloudtrail-to-send-notifications
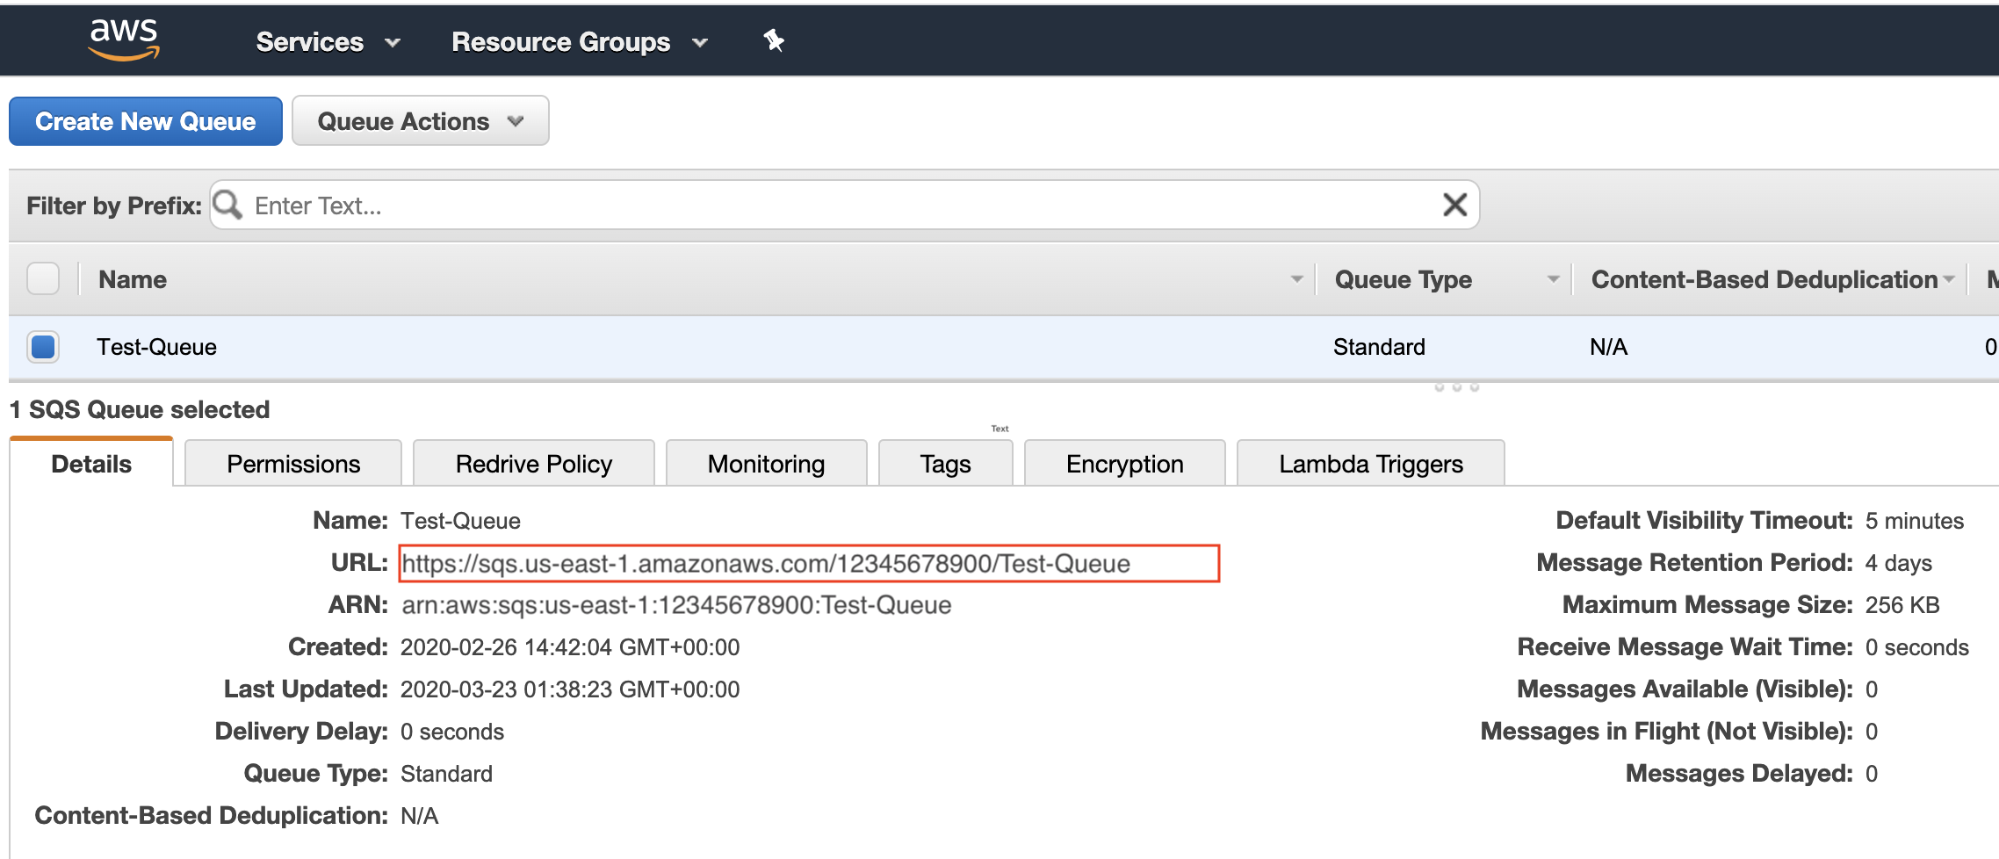
Step 3: Create an SQS Queue
- In the AWS Console, go to Simple Queue Service > Create New Queue.
- Type in a name for your queue in the Queue Name field.
- For the What type of queue do you need? field, select Standard Queue.
- Click Configure Queue if you want to set up the properties of the queue.
- Click Create Queue.
- Take note of the URL for your queue for later configuration in SIEM (InsightIDR).
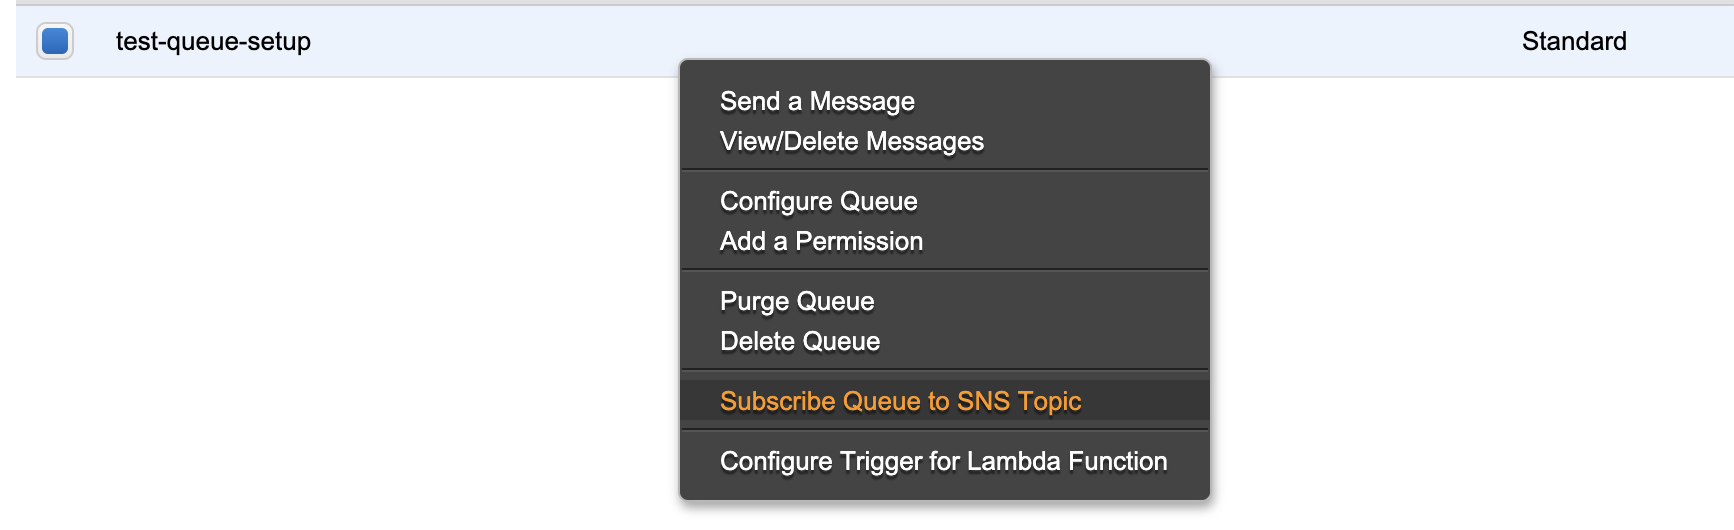
Step 4: Subscribe the SQS queue to the SNS topic
- In the list of queues, find the queue you just created.
- Right click on this queue and choose Subscribe Queue to SNS Topic.
- Choose the Topic you created earlier from the Choose a Topic dropdown.
- Click Subscribe.

To read more about subscribing to a SQS queue to a SNS topic, see the AWS documentation: https://docs.aws.amazon.com/AWSSimpleQueueService/latest/SQSDeveloperGuide/sqs-subscribe-queue-sns-topic.html
Step 5: Set Up Permissions
Access to AWS is managed through IAM policies that are attached to IAM identities or AWS resources. An IAM policy defines the permissions for an identity, like a role or user, or an AWS resource. These policies are used to assess whether requests are allowed or denied. For more information about IAM policies see the AWS documentation: https://docs.aws.amazon.com/awscloudtrail/latest/userguide/security_iam_service-with-iam.html
You can create an IAM policy or use an existing policy. We suggest that you set up permissions for:
- List and read permissions to the S3 bucket where you store the logs
- ReceiveMessage and DeleteMessage permissions for the SQS queue
Read the AWS documentation for more information on S3 bucket policies: https://docs.aws.amazon.com/awscloudtrail/latest/userguide/create-s3-bucket-policy-for-cloudtrail.html
Create an IAM policy
- Log in to your AWS Management Console and go to the IAM console.
- From the left menu, click Policies > Create policy.
- Set up a policy that grants permissions to the SQS queue you set up in the Create an SQS Queue procedure and the Amazon S3 bucket you created in the Create a Trail procedure to store your CloudTrail logs.
- Configure your S3 permissions to be List and Read.
- Configure your SQS queue permissions to be List, Read, and Write. Within each policy, you can select specific permissions like DeleteMessage and ReceiveMessage. At a minimum, you must select ReceiveMessage from Read and DeleteMessage from Write. Here is an example policy with these permissions:
{
"Version": "2012-10-17",
    "Statement": [
        {
            "Effect": "Allow",
            "Action": [
                "s3:Get*",
                "s3:List*"
            ],
            "Resource": [
                "arn:aws:s3:::CloudTrailsS3BucketNameGoesHere",
                "arn:aws:s3:::CloudTrailsS3BucketNameGoesHere/*"
            ]
        },
        {
            "Effect": "Allow",
            "Action": [
                "sqs:ReceiveMessage",
                "sqs:DeleteMessage"
            ],
            "Resource": [
                "arn:aws:sqs:region:account-id:resource-id"
            ]
        }
    ]
}- Create the policy.
Create an IAM group
To control user access to a group with specific privileges, you must create an IAM group and attach the policy you have just created.
Follow Amazon’s documentation to create an IAM group and attach policies .
Create and configure IAM user
Create the IAM user that can access the group and inherit the privileges.
To create the IAM user:
- In the AWS Console, go to IAM > User > Add user.
- Add a User name and select Programmatic Access under the Access Type section and select Next: Permissions.
- Select the Group you created earlier and select Next: Review.
- On the Complete page, select Show on the Secret Access Key.
- Securely record the User’s Access Key and Secret Key. You will need to provide these values when you configure the event source in SIEM (InsightIDR).
Configure SIEM (InsightIDR) to collect data from the event source
After you complete the prerequisite steps and configure the event source to send data, you must add the event source in SIEM (InsightIDR).
To configure the new event source in SIEM (InsightIDR):
- From the left menu, go to Data Collection and click Setup Event Source > Add Event Source.
- Do one of the following:
- Search for AWS CloudTrail in the event sources search bar.
- In the Product Type filter, select Cloud Service.
- Select the AWS CloudTrail event source tile.
- Select your collector and select AWS CloudTrail from the event source dropdown menu.
- Enter the name of your event source.
- Optionally choose to send unparsed logs.
- Select SQS Messages for the Collection Method.
- Select IAM User Credential or EC2 Instance Profile Credential .
- If you’re creating new credentials, enter the Secret Key and Access Key you obtained when creating the IAM user.
- Enter the SQS Queue URL for the queue you created in AWS.
- Select the appropriate Bucket Region Name.
- Click Save.
Troubleshooting
This section covers common troubleshooting scenarios that you might experience when configuring the AWS CloudTrails event source using SQS.
SIEM (InsightIDR) Not Ingesting Logs
If you find that SIEM (InsightIDR) is not ingesting logs and data is not appearing, please do the following:
- Check that your IAM policy is correct.
- Check that you’ve used the right region.
- Ensure there are actually logs in the S3 bucket.
- Ensure that the S3 region of your event sources matches the S3 region used by your CloudTrail.
301 Error
If you encounter a 301 error, the S3 region in the event source does not match the region of the CloudTrail logs. Make sure that both the event source and your CloudTrail use the same S3 region.