Automating security actions in changing environments
Security-wise, things are always changing inside and outside your environment. Inside, new assets come online every time your organization hires a new staff member or commissions a new server to replace an old model. Or, previously scanned assets come back online after not being visible in your network for some time.
Outside, new vulnerabilities keep coming into existence and threatening to expose your assets to an ever-growing number of attacks.
By automating responses to these changes, you can keep your security team informed of the latest developments and ready to take appropriate actions at any time. If a new asset comes online, you can have it scanned immediately for any flaws or exposures. If a new high-risk vulnerability is announced, you can find out right away which assets are affected by it.
The Automated Actions feature enables you to use events involving assets and vulnerabilities as triggers for running scans and modifying sites.
You must be a Global Administrator and have a Vulnerability Management (InsightVM) Enterprise license to use this feature.
Automating responses to new vulnerabilities
Each Vulnerability Management (InsightVM) content update adds a fresh set of new vulnerability checks that you can scan for. After an update occurs, you may want to know right away if any of your assets are affected with certain high-risk or high-severity vulnerabilities or those with high CVSS scores. If a hotfix content update has checks for a zero-day exposure, you may want to scan your network for that vulnerability as soon as possible.
Using new vulnerabilities as a trigger, you can set up automated actions:
- Click the Automated Actions icon in the left navigation pane
 .
. - Click the New Action button
 .
. - Select New vulnerability coverage available as the trigger.
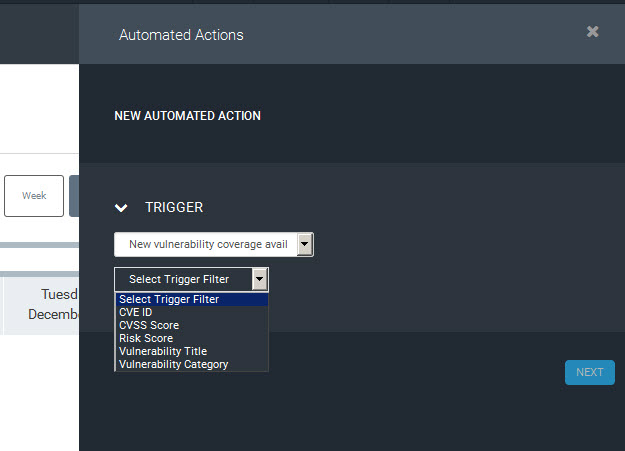
- In the Select Trigger Filter drop-down list, select one of the vulnerability metrics:
- CVE ID
- CVSS score
- Risk score
- Vulnerability Title
- Vulnerability category
- Depending on the metric you selected, choose an operator.
- CVSS scores are decimals ranging from 0.0 to 10.0.
- Risk scores vary, depending on the risk strategy you are using to calculate scores. For example, the Active Risk strategy produces a maximum score of 1,000, while the Temporal strategy has no upper bounds, with some high-risk vulnerability scores reaching the hundred thousands. For more information, see Working with risk strategies to analyze threats.
- Click Next.
- Select an action from the drop-down list. With new vulnerabilities, the only available action is a scan.
- Select a site to scan for the new vulnerabilities. For example, you might have a site containing sensitive assets that you will want to scan right away.
- Click Next.
- Enter a name to help you remember the automated action.
- Click Save.
The new action appears in the list of automated actions, with a status of Ready, which means that any time a new content update is applied with vulnerabilities that match the filter criteria, a scan for those vulnerabilities will run on the site you selected.
Automating responses to asset discovery
Your attack surface changes with every new hire getting a laptop or an employee getting a replacement workstation. Depending on the size of your organization, it may be difficult to keep track of every new asset with manual effort. By using the Dynamic Discovery feature and running scans, you can keep up to date with the latest changes to your asset inventory. You can also use these mechanisms to trigger automatic actions to track “new” assets more closely and assess any security flaws with them.
You can automate security-related actions to track newly discovered assets or assets that were scanned in the past and then disappeared and reappeared on your network.
Take action when new assets are discovered
The Dynamic Discovery feature continuously finds any assets added to your environment within the available sites or discovery connections.
Any time a new asset is discovered by one of these methods, you can have it added to a site and then, if you want, scan that site right away. Take the following steps to set up an automated action:
-
Click the Automated Actions icon in the left navigation pane
. -
Click the New Action button
. -
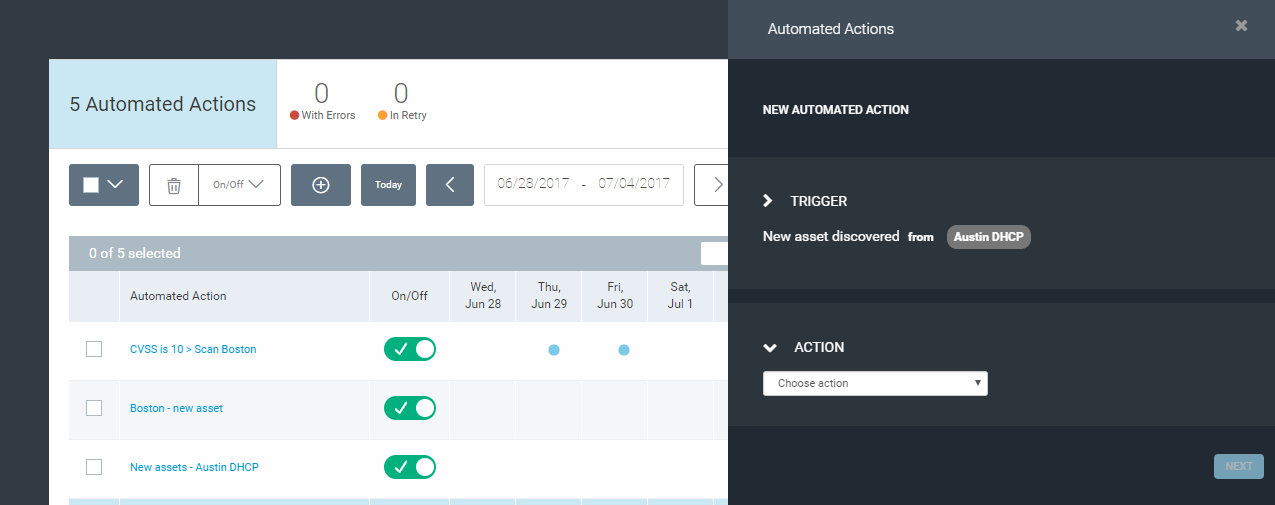
Select New asset discovered as the trigger.
-
Select a site or discovery connection for new assets that you want to take action on.
-
Optional: If you want to take action on a specific type of asset, select a filter that defines the asset. Then select the appropriate operator and value. For example, you may be concerned about new virtual machines coming online, as detected by your VMware vSphere connection. You may have assets in different resource pool paths named for different departments, such as for Marketing or Sales. Maybe you want to make sure that any new VM in your Sales resource pool gets scanned immediately.
- In this example, you would select Resource Pool Path as the filter and Contains as the operator. Then you would enter Sales as the value.
- To add a new filter, click the + icon.
- A new filter row appears. Set up the new filter as described in the preceding step.
Tip: Adding more filters typically narrows the field of assets because they have to match more criteria. For more information about using filters, see Using filters to refine Dynamic Discovery.
-
Click Next.
-
Select an action:
- Add to site - Adds an asset to a site only (without scanning). The asset will be scanned during the next scheduled window, or when a user runs a manual scan of that site. This option is preferable if scanning the new asset is less urgent and doesn’t require tying up scanning resources right away.
- Scan in site - Adds assets (that meet the criteria of the automated action) to a site for immediate scanning. This is preferable if scanning a new asset is more urgent because only assets will be scanned, not the whole site. This may be the case with more sensitive assets. Additionally, the Scan in site option can add assets to dynamic sites associated with dynamic discovery connections.
- Select a site to add the asset to.
You can only select sites containing assets that were manually added, as opposed to assets that were added via Dynamic Discovery connections.
- Enter a name to help you remember the automated action.
- Click Save.
The new action appears in the list of automated actions.
Take action when previously scanned assets are discovered again
Change is a constant in your organization. Certain assets that you have been scanned before may “disappear” for a few weeks and then “resurface.” Staff members go on vacations and not turn on their laptops while they are gone. Or IT may take workstations offline while repairing or upgrading their systems.
To help you keep current with these types of changes, you can use automation to add “re-discovered” assets to sites, scan them, or tag them for tracking and reporting:
-
Click the Automated Actions icon in the left navigation pane
. -
Click the New Action button
. -
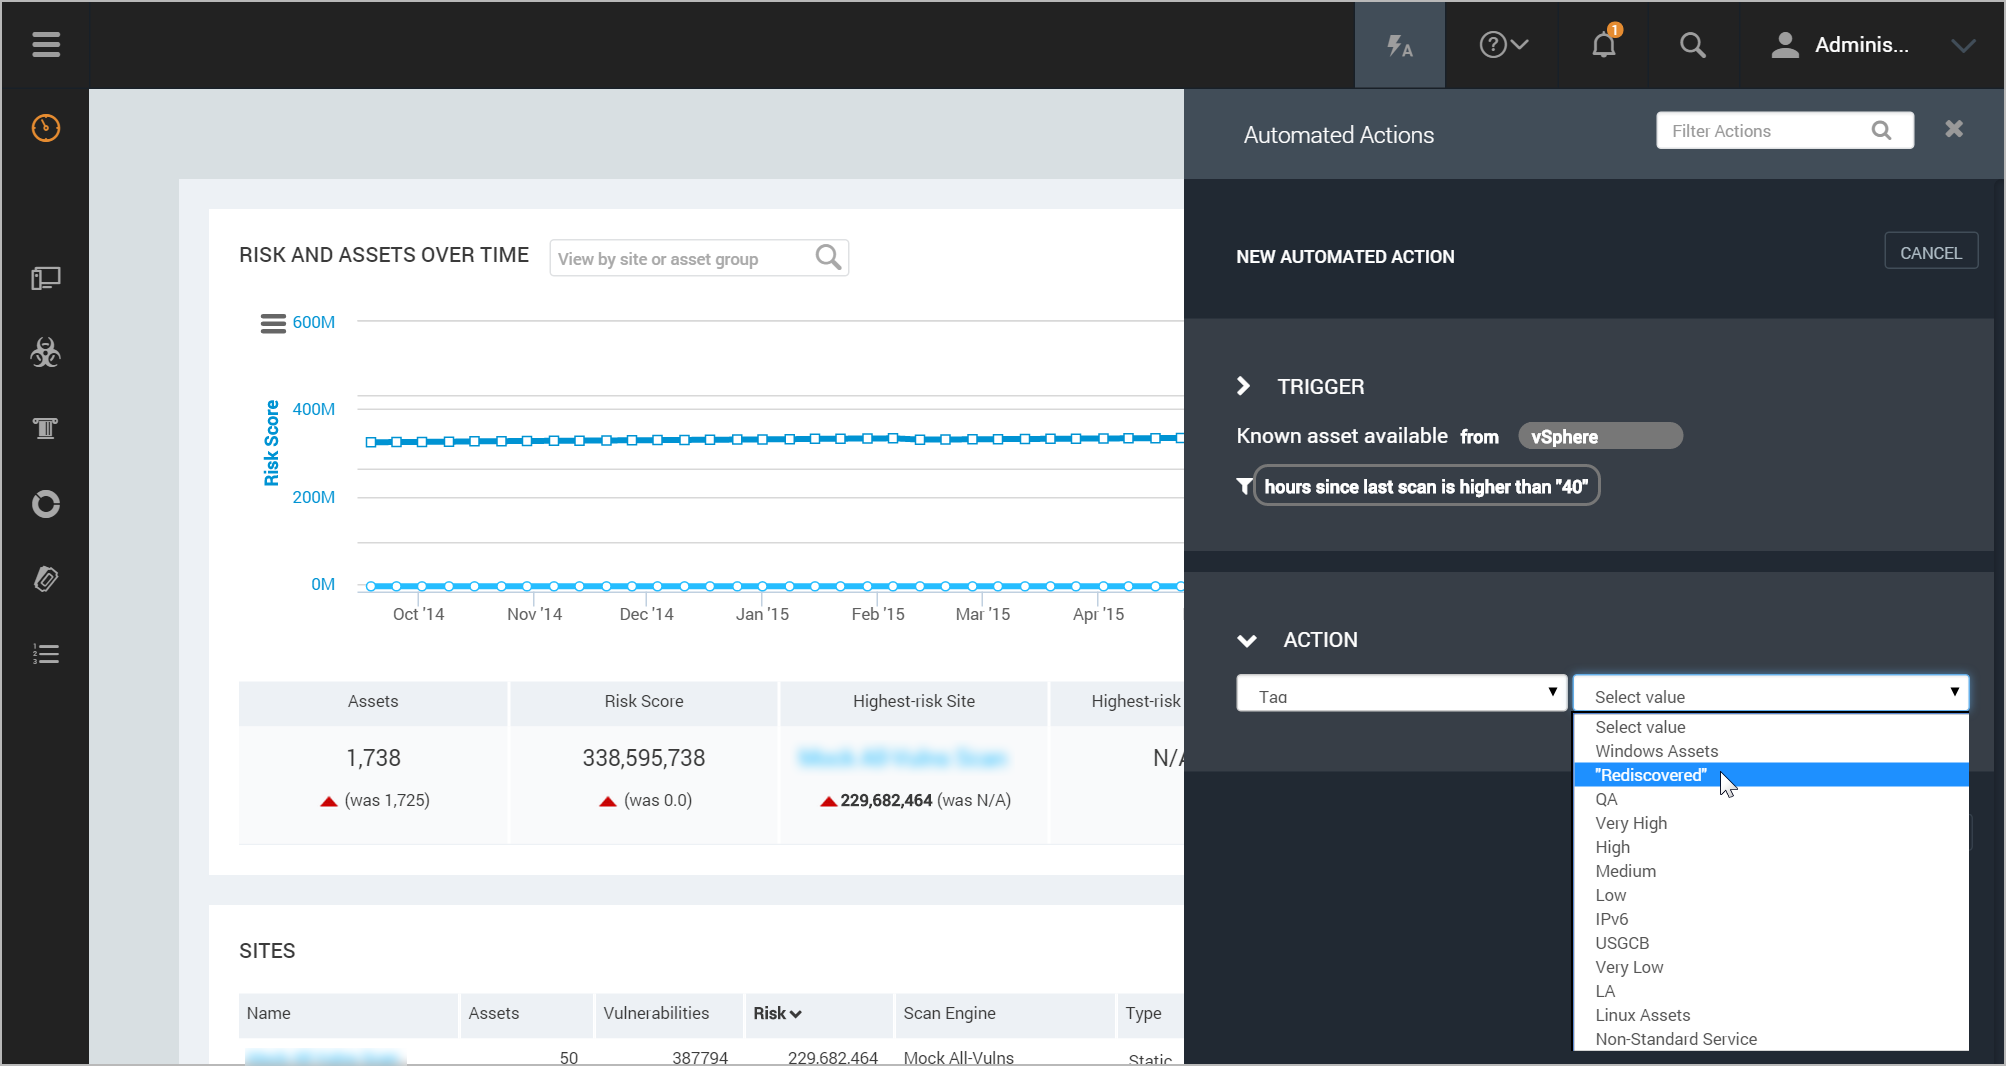
Select Known Asset Available as the trigger.
-
Select a site or discovery connection for new assets that you want to take action on.
-
Select a filter that defines what kind of asset you want to take action on. Then select the appropriate operator and value. For example, you may want to create an action for any known assets discovered on a site if it has been more than a certain number of hours since the last scan. In this example, you would select Resource Pool Path as the filter and Contains as the operator. Then you would enter Sales as the value.
-
To add a new filter, click the + icon.
-
A new filter row appears. Set up the new filter as described in the preceding step.
Tip: Adding more filters typically narrows the field of assets because they have to match more criteria. For more information about using filters, see Using filters to refine Dynamic Discovery.
The discover known -> site has several tag filters; User-Added-Criticality Level, User-Added Custom Tag, User-Added Tag(Locations) and User-Added Tag(Owners). If an asset is added to a dynamic asset group that tags assets and the site is configured to run scan on that dynamic asset group, when the asset is being scanned for the first time, trigger with those filters applied will not fire events even if the filter passes, but event will be fired for any second and on scans for the asset.
- Select an action:
- Add to site - Adds an asset to a site only (without scanning). The asset will be scanned during the next scheduled window, or when a user runs a manual scan of that site. This option is preferable if scanning the new asset is less urgent and doesn’t require tying up scanning resources right away.
- Scan in site - Adds an asset to a site and scans that site immediately. This is preferable if scanning the new asset is more urgent. This may be the case with more sensitive assets. Additionally, the Scan in site option can add assets to dynamic sites associated with dynamic discovery connections.
- Scan - Scans an asset without adding it to a site. This will scan the asset in the site in which it was most recently scanned. This option maintains the existing sites for assets and doesn’t add them to other sites. This is a good option for scanning “rediscovered” assets that have not recently been included in scheduled scans. This is also the best option for more sensitive assets.
- Tag - Tagging an asset allows you to give it a significance or context that is meaningful to your business, so that you sort and track it for reporting, scanning, and other purposes. You can apply tags for location, ownership, business criticality, or any other criteria that make sense to your organization. For more information, see Applying RealContext with tags.
- If you selected the site or site/scan option, select a site to add the asset to.
You can only select sites containing assets that were manually added, as opposed to assets that were added via Dynamic Discovery connections.
- If you selected the tagging option, select a tag to apply to the assets.
- Enter a name to help you remember the automated action.
- Click Save.
The new action appears in the list of automated actions.
Automating responses to malicious file events
If you have the McAfee Data Exchange Layer (DXL) integrated with McAfee ePolicy Orchestrator (ePO), you can create automated actions that are triggered when a file reputation event is detected. File reputation is determined by the number of vendors that have found the file malicious; for details, see the McAfee documentation. This automated action functionality is part of a larger integration. To learn more, see Discovering assets managed by McAfee ePolicy Orchestrator and Discovering vulnerability data collected by McAfee Data Exchange Layer (DXL).
A major use for automated actions related to file reputation event detection is to adjust the criticality rating of the asset based on the event detection. To learn more about tagging assets and criticality tags, see Applying RealContext with tags.This criticality adjustment then adjusts the asset’s risk score. To learn more, see Adjusting risk with criticality. Therefore, these actions can affect which assets appear in the Nexpose Summary dashboard that appears within ePO, and the rankings of those assets.
In order to trigger automated actions based on file reputation event detection, you must first configure an McAfee Data Exchange Layer Connection. To learn more, see Discovering assets managed by McAfee ePolicy Orchestrator and Creating and managing Dynamic Discovery connections.
To set up an automated action:
- Click the Automated Actions icon in the left navigation pane .
- Click the New Action button .
- Select TIE File Reputation Event as the trigger.
- Select the McAfee Data Exchange Layer connection that has been previously configured.
- Click Next.
- Select an action. The action currently available is Tag.
- Select a criticality tag. The values correspond to risk levels, which then influence the risk scores of the assets as managed in Vulnerability Management (InsightVM) and as displayed within ePO.
- Enter a name to help you remember the automated action.
- Click Save.
Monitoring existing automated actions
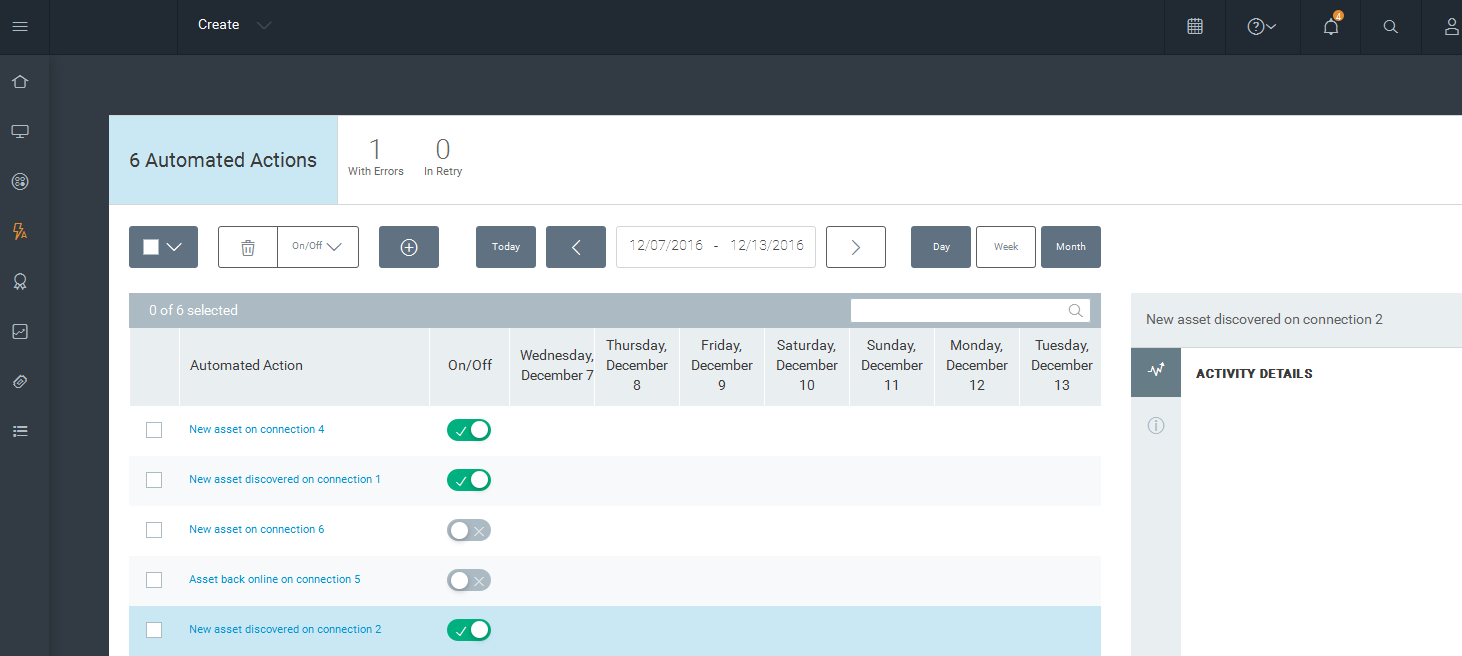
On the Automated Actions page, you can view a list of configured automated actions, see whether and when they initiated successfully, and enable or disable them. This view is called the Activity Monitor.
Console restart may be required in order to enable this feature.
Viewing the status of automated actions
The Activity Monitor displays a list of all the automated actions you have configured.
The On/Off column shows whether the automated action is currently enabled, and whether it is running as expected. When an action is enabled, it will continue to run according to the specified schedule unless it is disabled or encounters an error. To enable an action, move the toggle to the right so that the check mark displays. To disable an action, move the toggle to the left so that the x displays. You can also turn on or off multiple actions at a time by selecting the check boxes and then selecting On/Off from the top menu.The color will also change to indicate the current state of the action. The options are On + ready (green), On + retry (orange), or On + unavailable (red).
In addition, activity markers appear on the calendar for each day an action attempted to run, enabling you to view the history of your automated actions over time. You can use the calendar navigation buttons on the upper right to change the days displayed on the calendar.
The colors of the activity markers also change to indicate whether the action completed successfully on that date.
Available states:
- Initiated (blue): The action was triggered.
- Retry (orange): The action was triggered, but was unable to complete for some reason. For instance, a possible reason may be that the Scan Engine used by the site was unavailable at the time the action was attempted. The action will continue to be retried hourly for a week. After the threshold is reached, the state will change to Unavailable.
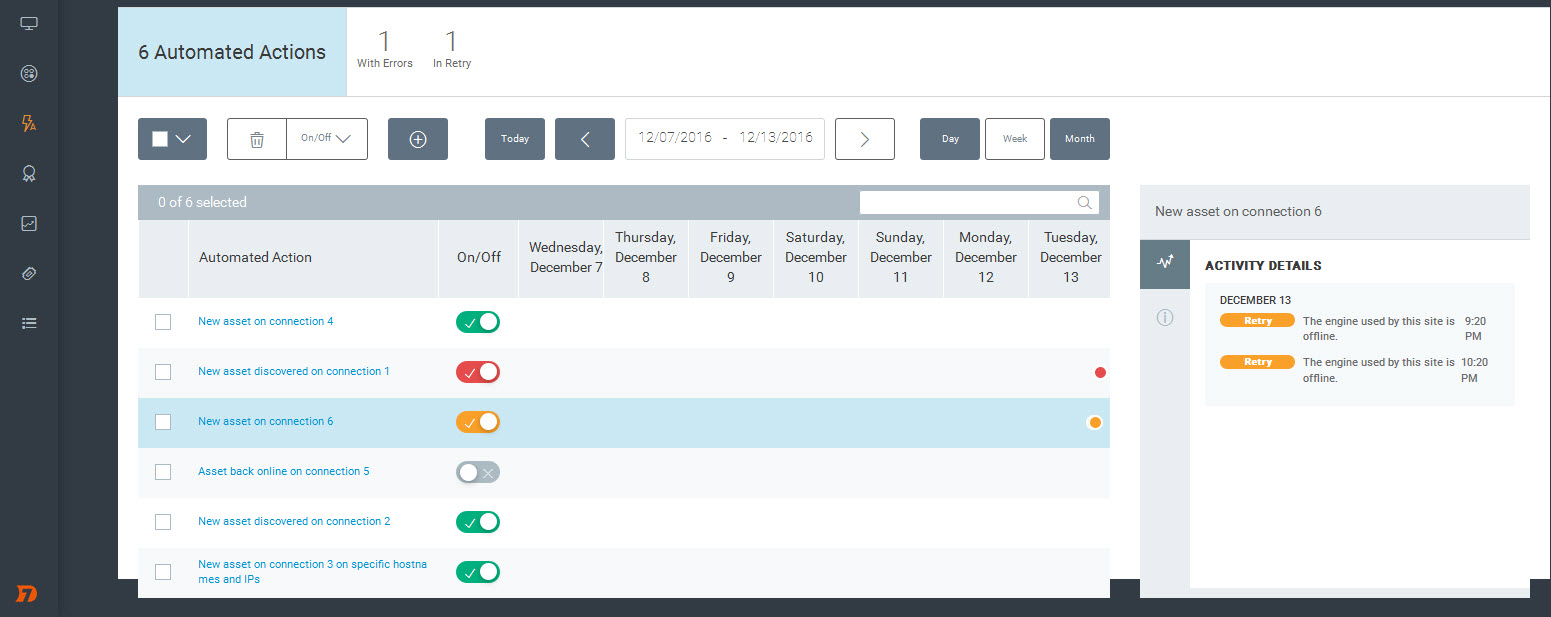
- Error (red): The action is currently in an error state. Something needs to be resolved so the action can be performed. Some errors, such as a deleted site, will cause the action to become unavailable automatically. Otherwise, it may transition from Retry to Error after a certain number of attempts have been made.
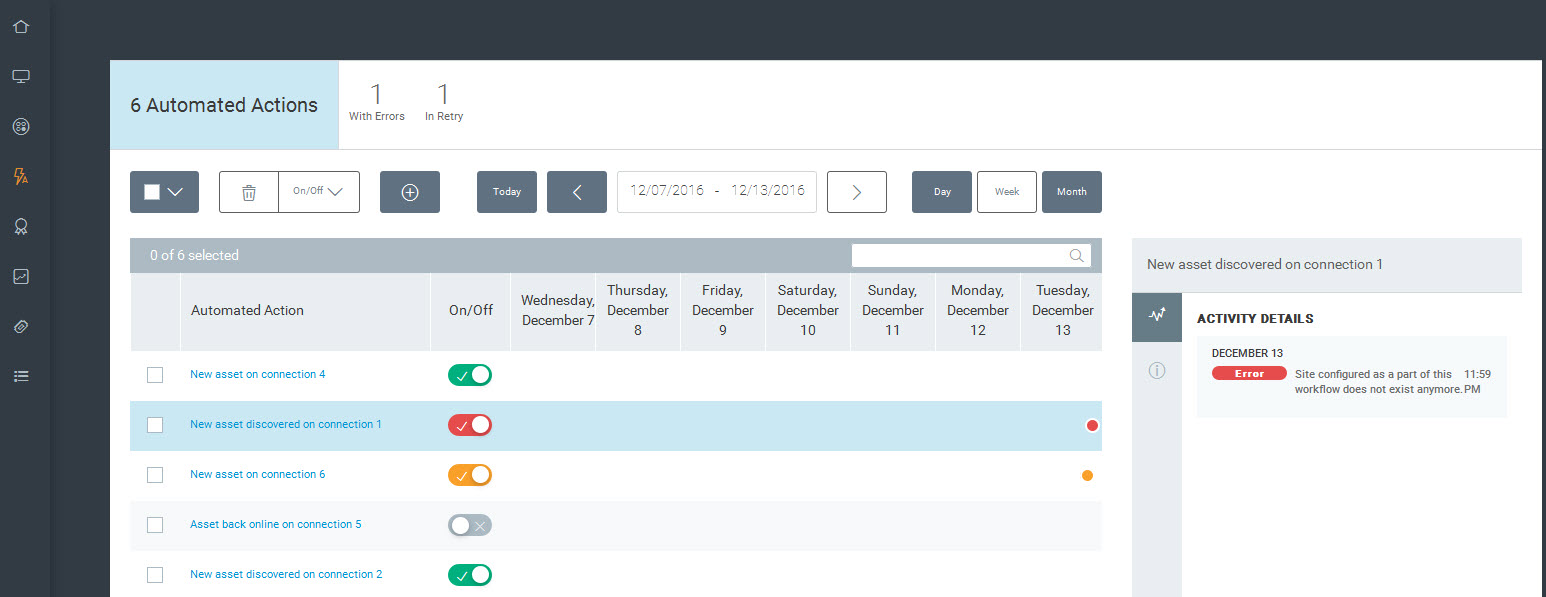
You can also view a more detailed status for each automated action. To view details, click within the line for the action whose details you want to view. The activity details panel will display more information about the action. This allows you to learn more about the action, such as what time it was initiated. If there was an issue with it running, this drawer allows you to learn more details about the state, such as why it was occurring, so you can troubleshoot.
Potential causes of Retry or Error states:
- The discovery configuration previously associated with this action no longer exists.
- The tag previously associated with this action no longer exists.
- The site previously associated with this action no longer exists.
- The user associated with the DXL TIE connection may not be authorized. Contact your DXL administrator to confirm the authorization.
- The Scan Engine used by the site is not sufficiently up to date to run the scan. Make sure the Scan Engine is up to date. The action will be automatically retried hourly for a week and then the action will enter an Error state.
- The Scan Engine used by the site is not available. Troubleshoot the Scan Engine availability.
- The specified tag could not be applied. Check the logs for more information.
- A scan could not be started on the site. Check the logs for more information.
- There was an unexpected error starting a scan on the site. The action will be automatically retried in case the error was temporary.
- The action configuration did not properly update to the latest software version.