Query Builder
The Query Builder is a cloud-based feature that helps you distill asset and vulnerability data using custom-built queries.
Benefits of the Query Builder
You can use the Query Builder to:
- Quickly pivot between asset, vulnerability, service, and software results using the same query
- Simplify the way you narrow down your data
- Export data to a CSV file.
Access the Query Builder
To access the Query Builder, sign in to your Insight platform account and open your Vulnerability Management (InsightVM) product. In the upper right corner, click the icon with the magnifying glass next to the account icon.
In the Query Builder, you can either:
- Load existing queries
- Build new queries
Load Existing Queries
To use any of the queries that your organization has made before, click Load Query to display a dropdown menu to load all existing queries, which can be unlocked or locked (designated with a lock icon).
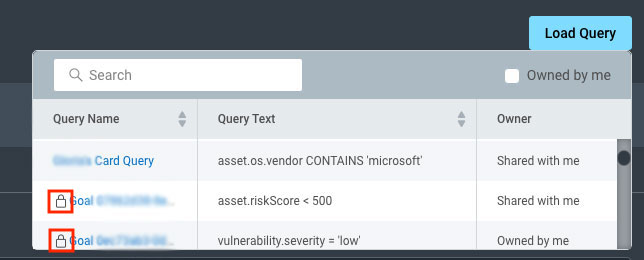
Unlocked Queries
Unlocked queries are editable. After loading an unlocked query, you’ll see the following:

A. Query Name - Edit the query name to make it easier for you to remember B. Owner Name - Either yourself or a colleague C. Query Creation Date - Date that the query was built D. Update Date - Last edit date (only appears if query has been edited)
Locked Queries
The lock besides a query name indicates that the query is locked and cannot be edited because it currently defines the scope of a static remediation project, a goal, an SLA, or an automation.
After loading a locked query, you’ll see the same information as before, with the exception of the reference to “places.” “Places” are the features that are using the existing query.

Because it’s being used, the query is locked. You can use the loaded query as-is or click Add Criteria to add more parameters to the existing query. You will Save As New to avoid overwriting the existing locked query.
Build New Queries
Before building a new query, let’s familiarize ourselves with the interface and learn some basic concepts. The Query Builder has two modes that allow you to build custom queries:
- Standard - Use if you are new to querying .
- Expert - Build more complex queries from scratch. Complex queries can combine AND and OR operators or contain parenthesis.
Build a Query in Standard Mode
As mentioned earlier, use Standard Mode if you are new to querying .
Queries built in Standard Mode are composed of “pills,” which are criteria that filter your data based on an array of unique parameters. These pills display and define the fields, operators, and values as the query is built.
Note - One Pill = One Criterion
When building your queries, note that one pill equals one piece of criteria. For example, to build a query that identifies Linux assets located in New York, you will need to build two pills:
- One pill that isolates Linux assets
- One pill that isolates assets in New York
Standard mode provides an interactive menu for you to select criteria and build pills without the need to manually enter query parameters.
In standard mode, you will:
- Add criteria using:
- Single pills - Narrows scope down a little
- Multiple pills - Narrows scope down even more to create a targeted query
- View your data
Familiarize Yourself With the Query Builder Interface
First, let’s walk through the Query Builder layout. Click Add Criteria to open the Query Builder interface.
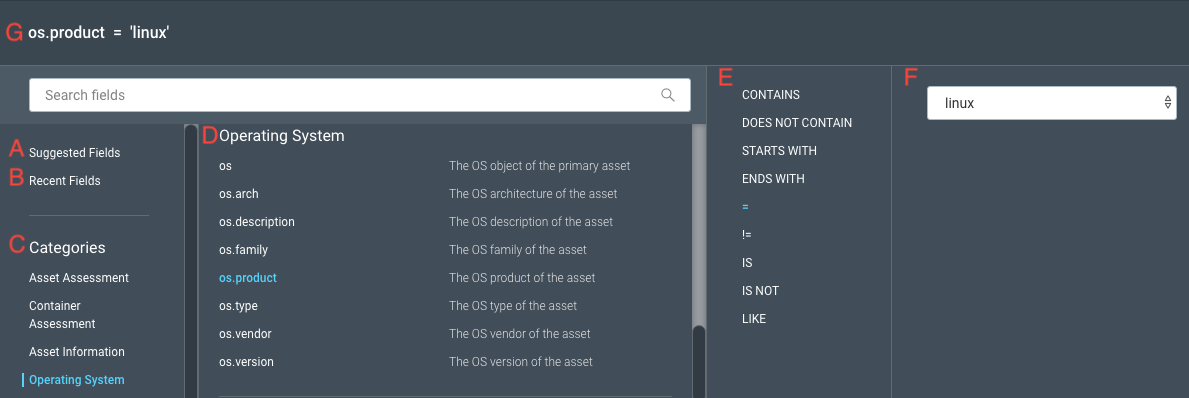
A. Suggested Fields - Click to display the most commonly used fields and their definitions B. Recent Fields - Click to display recently used fields C. Field Categories - Click any field category under “Categories” to automatically scroll to the relevant fields in the second panel (denoted as D) D. Fields - Displays field names and their descriptions E. Operators - Suggests operators (depends on the parameter you select beforehand) F. Value - Suggests values (depends on the parameter you select beforehand) or enter one manually G. Query Field - Displays fields and criteria as you build it
TIP
Type a keyword in the search bar to quickly find fields that contain that keyword.
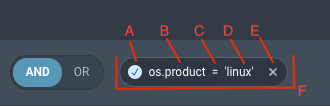
Let’s take a closer look at the structure of a pill.
A. Filter checkbox - Applies the contents of the pill to data. Unchecking will not apply pill to the data B. Field - Sorts data C. Operator - Controls and defines what the query parameter should yield D. Value - Defines the parameter E. “X” - Removes pill F. Criterion - The entire contents of a pill and can be used by itself to query or used with others to make a more targeted query
Create a Query
You can create queries composed of a single pill or multiple pills in Standard Mode. As you build queries, the data in the table will update accordingly.
To create a single pill query, follow these steps:
- Click Add Criteria.
- Select a category.
- Select a desired field from the field panel.
- Select an operator.
- Click Apply Criteria to complete your pill.
- Click Save to build your query.
To build a more targeted query, you can build a query composed of several pills:
- After creating the first pill, Add Criteria and build another pill.
- Chose between AND or OR to join your queries together.
Note - And or Or Operator Behavior
You can switch to AND or OR at any time, but your choice will apply to the rest of your query. You cannot mix AND or OR pills together in the same query.
- Click Save.
Build a Query in Expert Mode
If you are comfortable building queries from scratch or queries that contain parenthesis, use Expert Mode. Note that you must manually type your parameters into the filter fields.
To use expert mode, click Switch to Expert after opening the Query Builder. Refine the data scope by manually entering the filter fields.
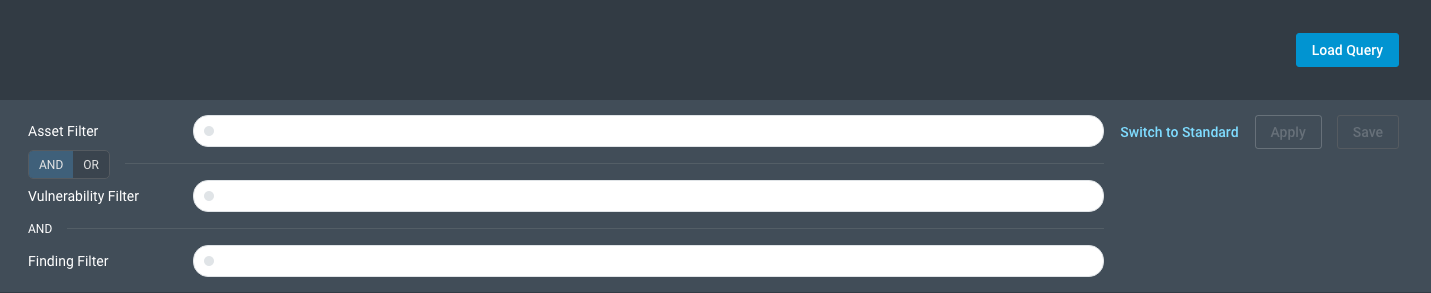
- Asset Filter - Narrows down assets
- Vulnerability Filter - Narrows down vulnerabilities
- Finding Filter - Narrows down vulnerability findings
Note - The Difference Between Vulnerabilities and Vulnerability Findings
A “vulnerability” is a unique weakness that can be exploited and is identified by a CVE code or other distinct identifier.
A “vulnerability finding” is a target asset that is identified as having a vulnerability after a scan or agent assessment. The vulnerability finding can appear once or multiple times on the same asset, but still counts as one vulnerability finding.
At a minimum, you need to enter one filter into a field, but if you add more parameters (either in each filter or use all three filter fields), your query will be more targeted.
Toggle AND/OR to apply the designated operator to all three filters. You can mix “and” or “or” operators in the same filter.
Note - Type “And” or “Or” in Filters
In a filter, in order to manually type the operators “and” or “or,” represent them by:
And - &&
Or - ||
“Or” is represented by two vertical bars, or pipes, not a lowercase “L.”
Keyboard Shortcuts
You can use keyboard shortcuts in the Query Builder in Standard and Expert modes to build queries without removing your hands from the keyboard. Keyboard shortcuts provide another option to perform an action where you normally would use a mouse.
This chart defines the keys and their associated action. All apply to Standard and Expert modes.
| Keyboard Key | Action |
|---|---|
| Tab | Moves focus forward to the next section |
| Shift + tab | Moves focus back to the previous section |
| ↑ (up arrow) | Moves up through a list |
| ↓ (down arrow) | Moves down through a list |
| Enter | Confirms button selection |
View Query-Specific Data
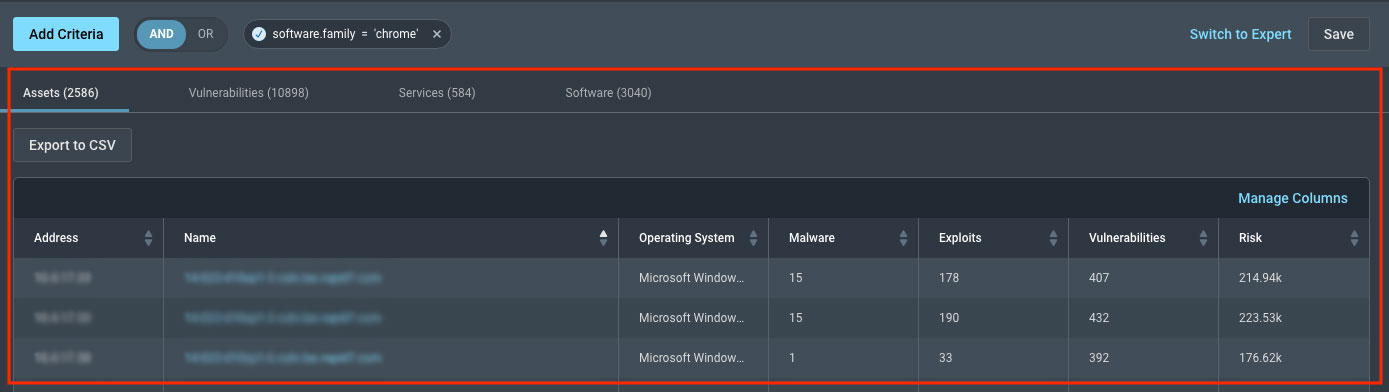
As you build queries in either mode, the data in the table will update accordingly as the query is applied to the data. Along the top of the table, you’ll see these tabs:
- Assets
- Vulnerabilities
- Services
- Software
To see how the query impacts other data types, click the respective tab. The numerical value in parenthesis next to each tab indicates the total number of that data type.
You can manage the data visible on each tab by clicking Manage Columns and show or hide the columns as required.

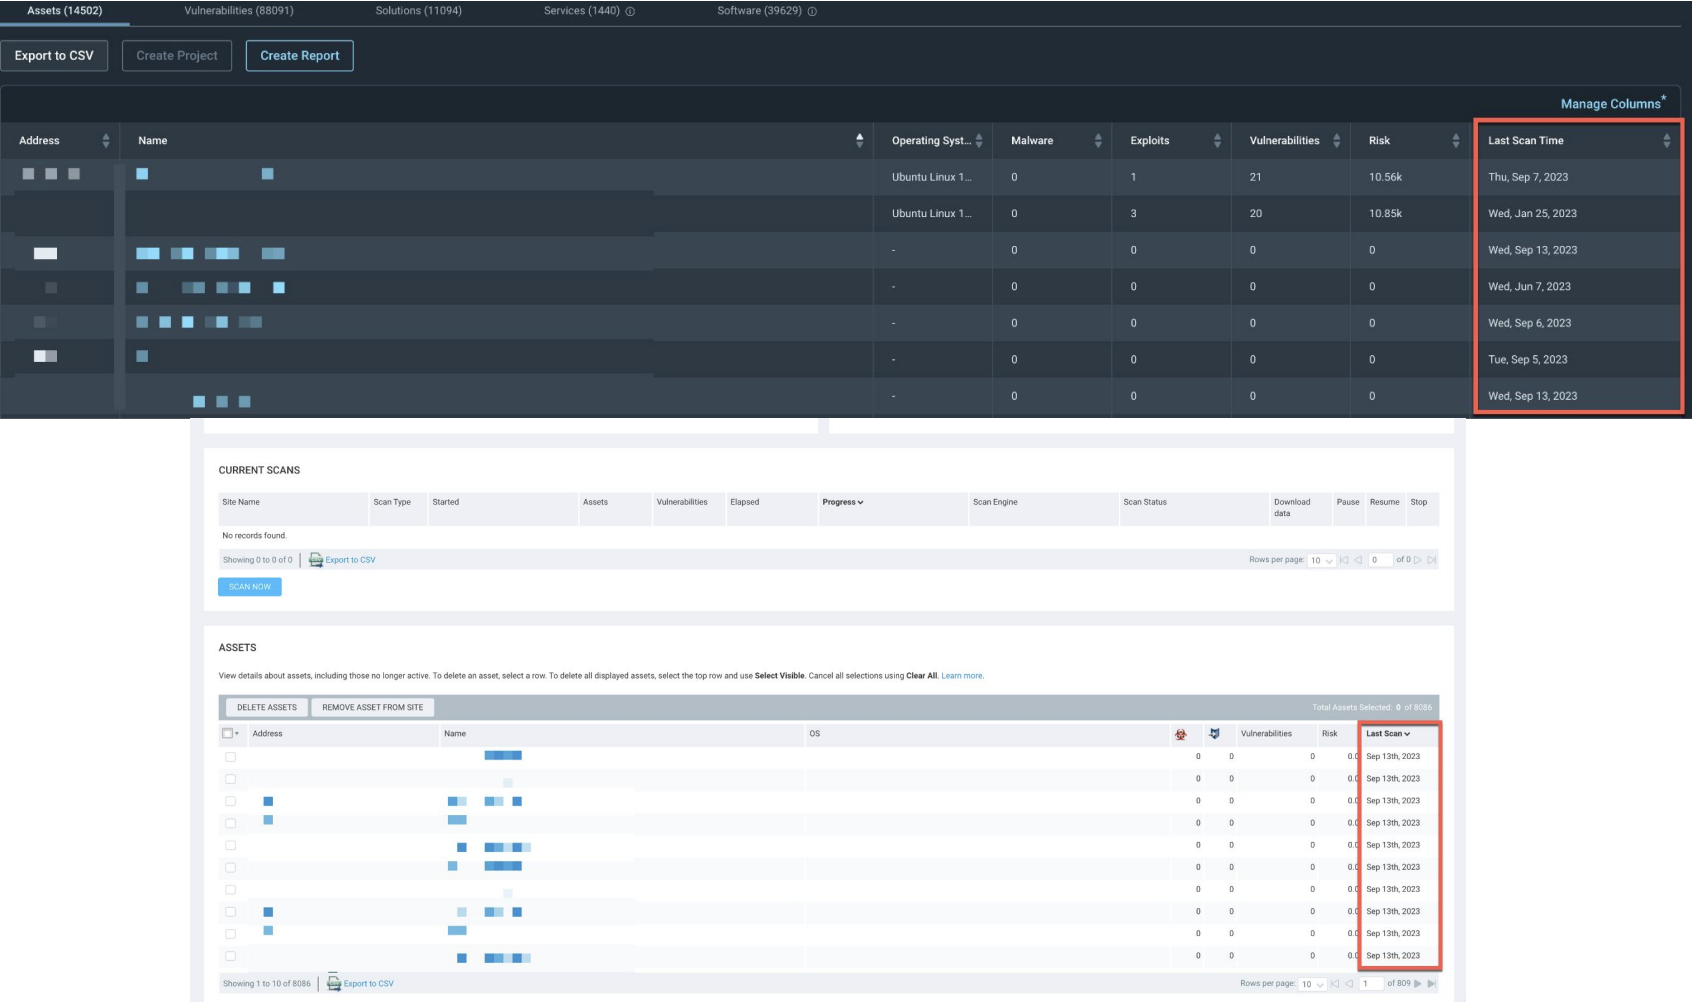
Last Scan Time vs. Last Scan
The Last Scan Time column available in the Query Builder specifically refers to the last time an asset was assessed by the Rapid7 Agent (Insight Agent). The Last Scan seen on the Sites detail page or Assets refers to the last time a discovery, vulnerability, or policy scan was run.
Save a Query
After you are satisfied with your queries, click Save and type a name for easy identification. Click Load Query to see your newly-created query in the dropdown menu.

Export Query Results
For easy reporting, you can export query results as a CSV file. Click the Export to CSV button to download a CSV file with the contents of your query.
Note - Epoch Dates Exported in CSV Files
Dates in CSV files exported from the Query Builder are in epoch format (in milliseconds). To convert these epoch dates into a standard date format, use the following formula in Google Sheets or Microsoft Excel:
=DATE(1970,1,1)+(K2/86400000)
Substitute the example K2 cell with the cell of the epoch data you want to convert.
Create a Project
After building a query, you can create a remediation project using the filtered assets or vulnerabilities data. Select the Assets or Vulnerabilities tab, and click the Create a Project button to open the wizard where you can create a remediation project. You can save your query before or after creating a remediation project.