Integrate a Splunk Enterprise Security On-Premises Device
Configure a Splunk Enterprise Security on-premises device to pull IOCs from Digital Risk Protection (Threat Command).
The following table shows device-specific integration characteristics:
| Characteristic | Description |
|---|---|
| IOC types | Domains, IP addresses, and URLs. |
| IOC group limitation | Each IOC group can contain only one type of IOC. For multiple types, create multiple IOC groups. |
| Device IOC limit | The device is limited to this amount of IOCs:- CSV: 500,000- TAXII: 40,000 |
To integrate the device, perform these steps (described in the following sections):
- Add the device to the Digital Risk Protection (Threat Command) virtual appliance.
- Configure the device to pull IOCs from Digital Risk Protection (Threat Command).
Add a Splunk Enterprise Security on-premises device
The procedure to add the device to Digital Risk Protection (Threat Command) is different depending on the version of the Digital Risk Protection (Threat Command) virtual appliance in your environment. To determine which version is running, see Determine the Version of Virtual Appliance.
Add the on-premises device
Add the device in virtual appliance v3.9
Prerequisites:
- The Digital Risk Protection (Threat Command) virtual appliance web interface is configured and you can access it.
- You have the credentials to access the device.
- You have administrative credentials to access Digital Risk Protection (Threat Command) with a subscription to the Automation and TIP modules.
To add the device to Digital Risk Protection (Threat Command):
- From an internet browser, navigate to https://<virtual appliance IP address>
- Log in to the virtual appliance using the web access username and password.
- From the Devices page, click Devices (Pull).
- Click Add new device.
- In the Devices (Pull) screen, set up the new device:
- Type a user-defined, unique device name.
- Select the device type.
- Click Create.
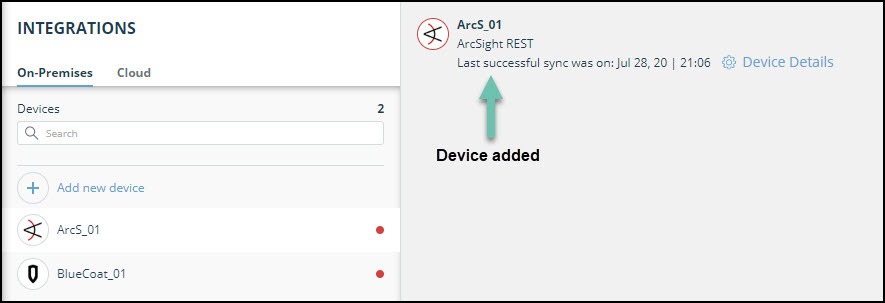
- Verify that the new device was added:
- Log in to Digital Risk Protection (Threat Command) at https://dashboard.ti.insight.rapid7.com
- From the main menu, select Automation > Integrations.
If this window is already open, refresh it by selecting Automation > Integrations from the menu.
The new device is displayed in the On-Premises tab.
Add the device in virtual appliance v4.0
Prerequisites:
- You have the credentials to access the Digital Risk Protection (Threat Command) virtual appliance web interface.
- You have the credentials to access the device.
- You have administrative credentials to access Digital Risk Protection (Threat Command) with a subscription to the Automation and TIP modules.
To add the device to Digital Risk Protection (Threat Command):
- Log in to Digital Risk Protection (Threat Command) at https://dashboard.ti.insight.rapid7.com
- From the main menu, select Automation > Integrations.
- From the Integrations page, click On-Premises.
- Click Add new device.
- In the Add New On-Premises Device dialog, type a user-defined name for the device.
The name can contain a maximum of 50 letters, spaces, numbers, and underscores. - Select the Device type.
The default device IOCs limit is displayed. - (Optional) You can change the IOCs limit.
- Click Add.
- To verify that the new device is added, refresh the Automation > Integrations page.
Next to the device name, there is a red dot, indicating that communication has not yet been established. The dot will change to green when the device is synchronized. If the device cannot synchronize for more than 48 hours, an email warning is sent to the account administrator.
When selecting the device in Step 6, it is important to select the CSV or TAXII device, according to your operating environment.
Configure a Splunk Enterprise Security device to pull IOCs
After a device has been added to the Digital Risk Protection (Threat Command) virtual appliance, you must enable it to pull IOCs from Digital Risk Protection (Threat Command).
Configuration for on-premises devices
When configuring an on-premises device, it is important to know which version of the Digital Risk Protection (Threat Command) virtual appliance is running in your environment. This will affect which Rapid7 URL is displayed in the Device Details screen and also which URL to copy into the device management console.
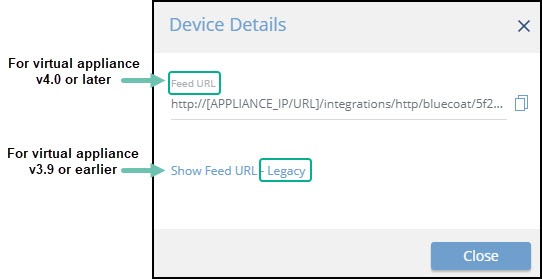
When running version 4.0 or later, the Legacy URL should be used only with Rapid7 support.
To determine which version of the virtual appliance is running, see Determine the version of virtual appliance.
Prerequisites
- You have the device login credentials.
- The device has been added.
- You have administrative credentials to access Digital Risk Protection (Threat Command) with a subscription to the Automation and TIP modules.
- An IOC group for this device exists in Digital Risk Protection (Threat Command).
Creating IOC groups is described in Create an IOC group
You must repeat the following procedure for each IOC group to pull into the device.
The procedure is different depending on whether the Splunk instance is using CSV or TAXII. Proceed to the relevant section:
-
Splunk ES – CSV
For CSV, you must know whether the IOC group contains IP addresses or URLs and domains. To determine this, click the IOC group name in the Digital Risk Protection (Threat Command) Integrations page. -
Splunk ES - TAXII
For TAXII, port 9000 is required.
When editing an IOC group for TAXII encoding, IOCs are only pulled from the time of the edit. To pull earlier IOCs, create a new IOC group.
Splunk Enterprise Security – CSV
-
From Digital Risk Protection (Threat Command), copy the Splunk Enterprise Security IOC group URL:
- From the Digital Risk Protection (Threat Command) main menu, select Automation > Integrations.
- From the On-Premises device list, select the Splunk Enterprise Security (CSV) device.
- From the far right on an IOC group row, click the link icon.
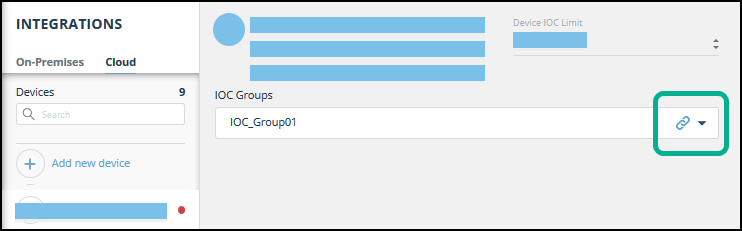
The IOC Group URL dialog is displayed. 4. From the IOC Group URL dialog, copy the URL:
- For virtual appliance v4.0 or later: Use the IOC Group URL.
- For virtual appliance v3.9 or earlier: Use the Legacy URL.
-
Log in to the Splunk Enterprise Security management console.
-
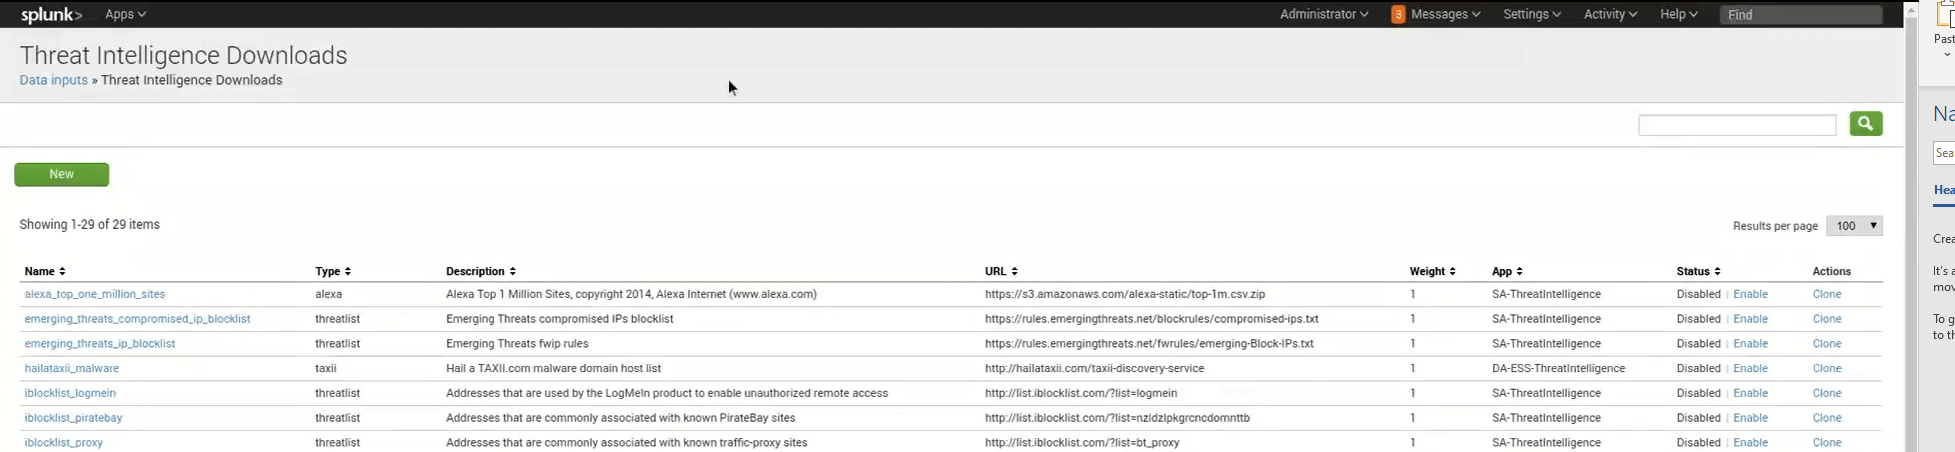
Navigate to Enterprise Security > Configure > Data Enrichment > Threat Intelligence Downloads. Current IOC pulls are displayed:
-
Click New.
-
In the Threat Intelligence Download Settings screen, type the following values:
Field Value to type Description Name A user-defined name This name is displayed in the Threat Intelligence screen. It can be used to search for IOCs. Type threatlist Type “threatlist” in lowercase letters. Description A user-defined description This description is displayed in the Threat Intelligence screen. URL URL of the IOC group with the real IP address of the Digital Risk Protection (Threat Command) virtual appliance.
For example: https://10.0.0.230:8080/splunkESGroupPaste this value from the Digital Risk Protection (Threat Command) Device Details screen.
For virtual appliance v4.0 or later: Use the IOC Group URL.
For virtual appliance v3.9 or earlier: Use the Legacy URL.
Be sure to replace [APPLIANCE_IP/HOST] with the actual IP address or hostname of the virtual appliance.Weight 1 Type the value 1. Interval 43200 Type the value 43200. Post arguments Leave blank. Maximum age Leave blank. -
In the Parsing Options section of the Threat Intelligence Download Settings screen, type the following values, depending whether the IOC group contains IP addresses or whether it contains URLs and domains:
Field Value to type if the IOC group contains IP addresses Value to type if the IOC group contains domains and URLs Description Delimiting regular expression , , Type a comma. Extracting regular expression Leave blank. Fields ip:$1 domain:$1,url:$2 Type this exact text. Ignoring regular expression (^# ^\s*$) (^# Skip header lines 0 0 Type the numeral zero. -
Click Save to deploy the changes.
-
If you have more than one IOC group, repeat this procedure for each IOC group.
Splunk Enterprise Security – TAXII
-
From Digital Risk Protection (Threat Command), open the Splunk IOC group Device Detailsscreen:
- From the Digital Risk Protection (Threat Command) main menu, select Automation > Integrations.
- From the On-Premises device list, select the Splunk Enterprise Security (TAXII) device.
- Click the link icon to the far right of the device IOC group.
The Device Details dialog is displayed:

-
Log in to the Splunk Enterprise Security management console.
-
Navigate to Enterprise Security > Configure > Data Enrichment > Threat Intelligence Downloads. Current IOC pulls are displayed:
-
Click New.
-
In the Threat Intelligence Download Settings screen, type the following values:
Field Value to type Description Name A user-defined name This name will be displayed in the Threat Intelligence screen. It can be used to search for IOCs. Type taxii Type “taxii” in lowercase letters. Description A user-defined description This description will be displayed in the Threat Intelligence screen. URL URL of the IOC group with the real IP address of the Digital Risk Protection (Threat Command) virtual appliance. - For example: https://10.0.0.230:8080/splunkESGroup/services/poll .
* For virtual appliance v4.0 or later, use theTAXII URL.
* For virtual appliance v3.9 or earlier, show and use theLegacy URL.Paste this value from the Digital Risk Protection (Threat Command) Device Details screen. Be sure to replace [APPLIANCE_IP/HOST] with the actual IP address or hostname of the virtual appliance. Weight 1 Type the value 1 Interval 43200 Type the value 43200. By default, IOCs are pulled once every 12 hours. Post arguments Post arguments value
* For virtual appliance v4.0 or later, use the Post arguments.
* For virtual appliance v3.9 or earlier, show and use the Legacy Post arguments.Copy the post arguments value exactly from the Digital Risk Protection (Threat Command)Device Details screen. This includes the username and password, so those do not need to be added separately. Maximum age NA -
In the Parsing Options section of theThreat Intelligence Download Settings screen, leave the default values.
-
Deploy the changes.
-
If you have more than one IOC group, repeat this procedure for each IOC group.
View pulled IOCs in Splunk ES
Viewing downloaded IOCs in the Threat Intelligence Downloads window can take a long time. You can view the data earlier in the following methods:
Splunk threat artifacts (recommended method)
This viewing method enables seeing all IOCs, including the Digital Risk Protection (Threat Command) enrichment (in TAXII).
- From the main menu, click Security Intelligence > Threat Intelligence > Threat Artifacts.
Splunk search function
This viewing method enables seeing only those IOCs that match the search terms.
- From the main menu, click Search and Reporting.
- In the search field, type:
|`http_intel` |`ip_intel` |`file_intel` | search threat\_key=\*Name\*Where:
-
The single apostrophe marks are all the same (on most keyboards, typed on the key to the left of the 1 numeral key).
-
Name is the exact, case-sensitive name that you configured in the Threat Intelligence Download Settings screen.
You can use any combination of these settings, surrounded and separated by a pipe sign: | Search text | Description | | --- | --- | |
http_intel| Return URLs found in Name | |ip_intel| Return IP addresses and domains found in Name | |file_intel| Return file hashes found in Name |
CURL access
You can use a CURL query to the virtual appliance, and get all of the IOCs in a terminal view. For information on how to use CURL, contact Customer Support.