Microsoft DNS
The Microsoft Domain Name Server (DNS) produces audit logs that identify resources from your company that are connected to the internet or your private network, and translate domain names to IP addresses.
DNS, along with firewall, web proxy, and other outbound traffic-based event sources, helps SIEM (InsightIDR) identify cloud services that your organization uses and provides additional context around outbound traffic and network activity.
You can configure this event source using two methods:
- Configure with a Domain Account: Use this method if you want to collect logs using a Domain account with read privileges on the remote share.
- Configure with NXLog: Use this configuration method if you don’t want to use a Domain Admin account to collect logs.
Configure with a Domain Account
Microsoft DNS will write its audit logs to a specific folder on your network. Make sure that this folder is available as a network share and has a read-only credential.
In order to collect the audit logs from Microsoft DNS, you must:
Step 1: Collect DNS Server Logs
In order to collect server logs, you must configure the destination folder and log file with logging abilities. Rapid7 recommends that the folder for DNS logging resides on the root (C) drive of the server that hosts the DNS. For example, C:\dnslogs
To allow the SIEM (InsightIDR) collector to incorporate logs from DNS:
- In your DNS server manager, set
C:\dnslogsas your folder name.
Recommended Directory
C:\dnslogs is the recommended directory for storing DNS logs.
- Right click the folder and select Properties from the drop-down menu.
- In Properties, visit Sharing. Select Advanced Sharing.
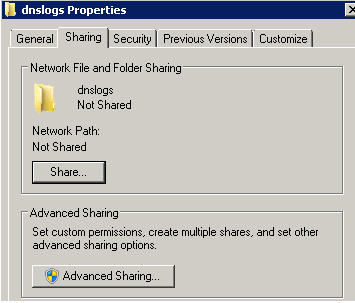
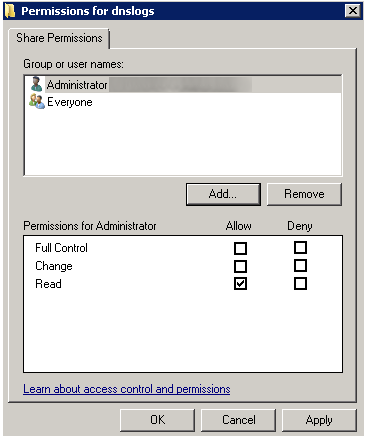
- In Advanced Sharing, select Share this folder and then click Permissions.

- In Share Permissions, select Everyone and remove from folder permissions
- Click Add to choose a user which will be used by SIEM (InsightIDR) to access this folder.
- Select Allow for all permissions on this account.
Take note of details
Make a note of this username and credential. These details will be required when configuring DNS in SIEM (InsightIDR).
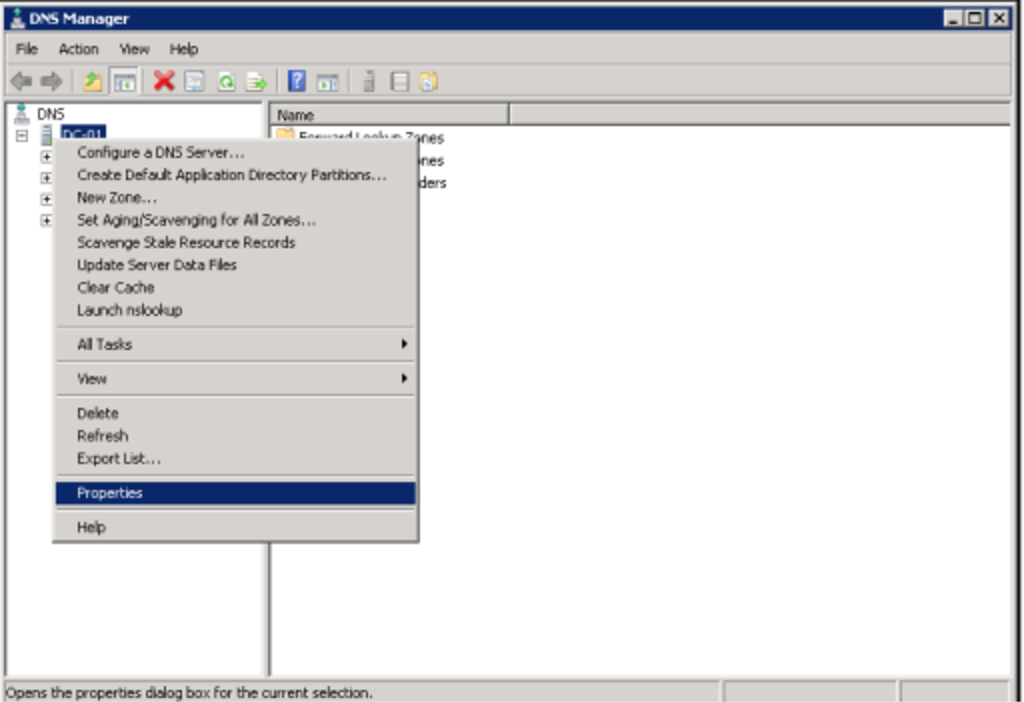
- To enable logging onto the DNS server, right click your DNS server in the DNS Manager and select the Properties option from the drop-down menu.
- In Debug Logging, ensure you check the Log packets for debugging box. The remaining checkboxes should match these settings:

- In Log file, enter the shared directory that you created in previous steps. For example,
c:\dnslogs\dns.log - Click Apply to save the configuration. Click OK finish.
Step 2: Choose a Collection Method
After configuring your DNS logs on the network share, you can collect the audit logs in one of two ways with SIEM (InsightIDR):
Rapid7 recommends Watch Directory or NXLog
We recommend collecting Microsoft DNS logs using the Watch Directory method or the NXLog method with log file rotation instead of the Tail File method. Microsoft DNS logging writes to a single file and is considered legacy. The newer Microsoft Analytical logging method writes to multiple files and requires the Watch Directory method. In most environments, the Watch Directory and NXLog methods provide more reliable log collection.
To check if your DNS server is using Analytical logging, run the following command in PowerShell:
wevtutil gl Microsoft-Windows-DNS-Server/AnalyticalWatch Directory
After you have completed the instructions to Collect DNS Server Logs, you can enable log file rotation and log retention as well as collect the logs with Watch Directory. To do this, you must complete the following tasks:
Enable log file rotation
To enable log file rotation on your DNS server:
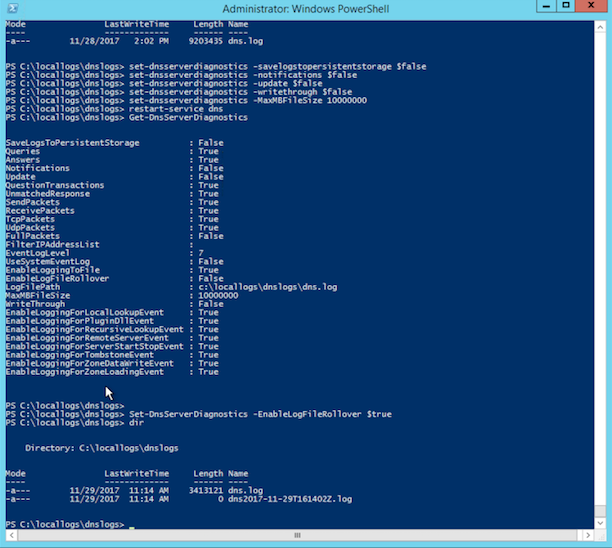
- Open a PowerShell command prompt as Administrator on the DNS server.
- Run the command:
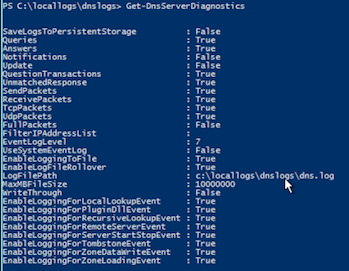
Set-DNSServerDiagnostics -EnableLogFileRollover $true - Verify that the DNS logging settings are correct by using the command:
Get-DnsServerDiagnostics
Instead of a single dns.log file in the original location, you will see a new DNS log file with a timestamp inserted into the name.
If the logs have retention set up and are set to roll over properly, you should expect to see DNS Logs generated within the shared directory created in previous steps.
The final configuration should look similar to this:
Enable Log File Deletion (Optional)
You may also want to enable the deletion of the old DNS logs so that they do not fill up the hard drive of the DNS server. This command will need to be set up with a Scheduled Task or Cron Job to run on a periodic basis as this is a single task command that must run on a schedule. The following command will delete anything that is two days or older within the directory: Get-ChildItem C:\locallogs\dnslogs | where LastWriteTime -lt ((Get-Date).AddDays(-2)) | Remove-Item
Configure DNS in SIEM (InsightIDR)
Add an event source to collect DNS audit logs using the Watch Directory collection method in SIEM (InsightIDR).
To configure the new event source in SIEM (InsightIDR):
- From the left menu, go to Data Collection and click Setup Event Source > Add Event Source.
- Do one of the following:
- Search for Microsoft DNS in the event sources search bar.
- In the Product Type filter, select DNS.
- Select the Microsoft DNS event source tile.
- Choose your collector. You can also name your event source if you want.
- Choose the timezone that matches the location of your event source logs.
- Optionally, choose to send unparsed logs.
- Select Watch Directory as your collection method.
- Provide the folder path to the network share you configured.
- Enter a scan interval in seconds.
- Optionally, specify the file pattern for SIEM (InsightIDR) to watch for. The file pattern
dns*.logshould suffice, or you can leave the file pattern box empty for full visibility. - Click the Save button.
Tail File
Add an event source to configure SIEM (InsightIDR) to collect DNS audit logs using the Tail File method, after completing the setup on your DNS server.
To configure the new event source in SIEM (InsightIDR):
- From the left menu, go to Data Collection and click Setup Event Source > Add Event Source.
- Do one of the following:
- Search for Microsoft DNS in the event sources search bar.
- In the Product Type filter, select DNS.
- Select the Microsoft DNS event source tile.
- Choose your collector. You can also name your event source if you want.
- Choose the timezone that matches the location of your event source logs.
- Optionally, choose to send unfiltered logs.
- Select Tail File as your collection method.
- Provide the folder path to the network share you configured, using UNC notation and including the filename for the tail file, such as
\\dns1.mycompany.cpm\dnslogs\dns.log. - Click the Save button.
Configure With NXLog
If you do not wish to create a file share on your DNS server, collecting and sending the logs with NXLog is an option. To use NXLog, you install it on the DNS server. NXLog will read the DHCP logs and send them to your SIEM (InsightIDR) Collector using Syslog.
To configure with NXLog:
- Download and install NXLog. For instructions on how to do this, see the NXLog page.
- Enable Log File Rotation on your DNS server. For instructions on how to do this, see the Enable Log File Rotation section of the Microsoft DNS page.
- From the left menu, go to Data Collection and click Setup Event Source > Add Event Source.
- Do one of the following:
- Search for Microsoft DNS in the event sources search bar.
- In the Product Type filter, select DNS.
- Select the Microsoft DNS event source tile.
- Choose your collector.
- Give the event source a descriptive name.
- Choose the time zone that matches the location of your event source logs.
- Click Listen on Network Port.
- In the Port field, enter in a port you wish to use for this event source. You cannot use a port that you already use for another event source.
- For Protocol, use either UDP or TCP. Although this event source supports both protocols, be aware that NXLog must be configured to send logs using the protocol you select.
- Click Save.
- Follow the instructions in the Microsoft DNS section of the NXLog page to edit the
nxlog.conffile to collect the Security Log and forward it to SIEM (InsightIDR).