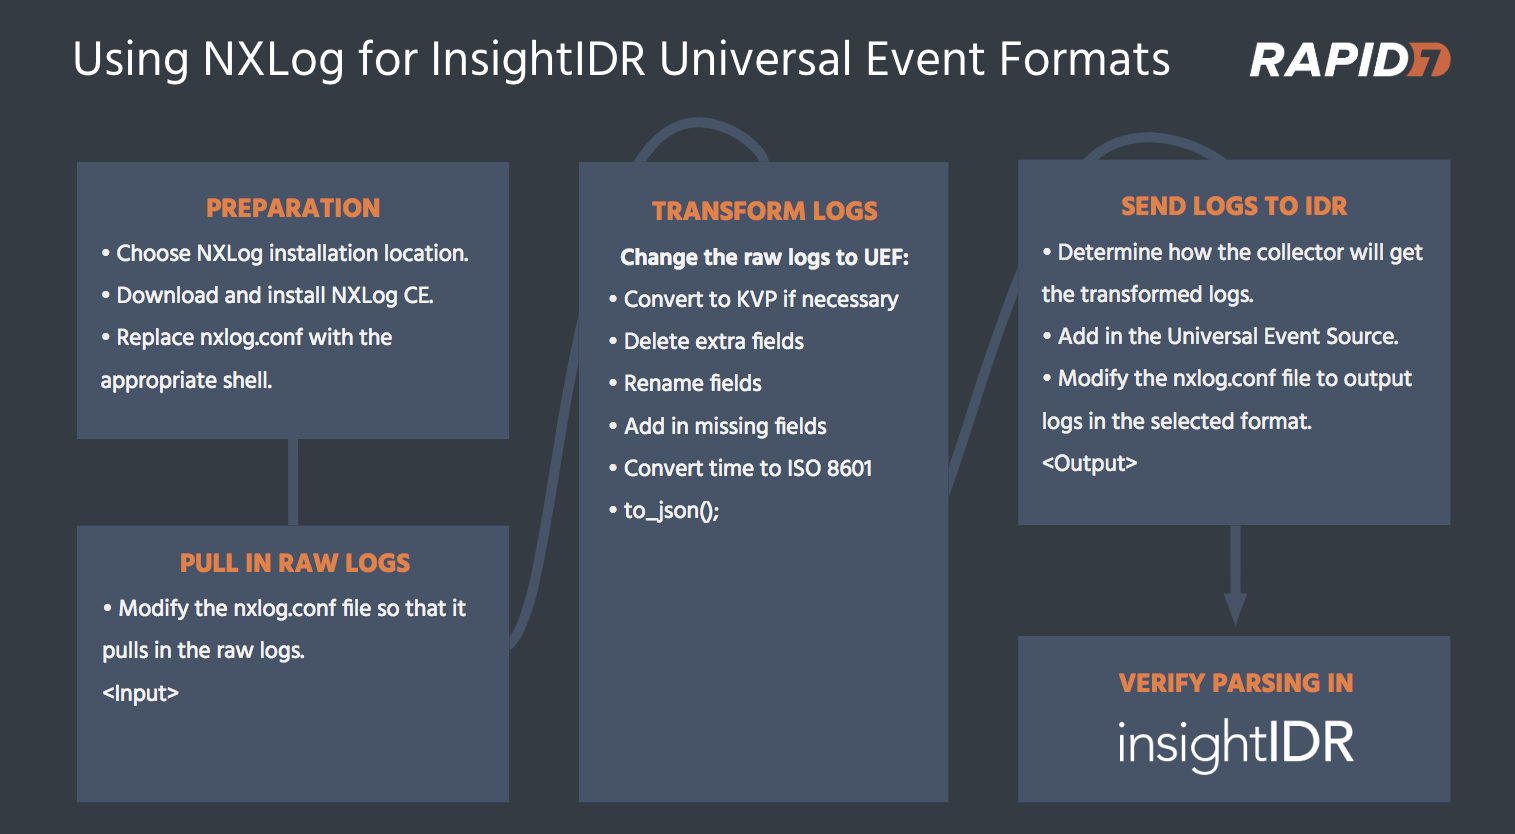
Transform Logs to Universal Event Format
If you want to use SIEM (InsightIDR)‘s Rapid7 Universal Event Sources, you’ll need to convert your logs into the exact UEF contract.
Format Violations
SIEM (InsightIDR) will only process UEF events that meet the exact format stipulated for a given event_type and version. If the logs do not contain the required information or violate the contract of the UEF, SIEM (InsightIDR) will not parse the logs and they will not be processed by the SIEM (InsightIDR) analytics engine or appear in log search.
To convert your logs into the accepted format:
- Prepare for log collection using a log manipulation tool.
- Pull in raw logs by editing conf files.
- Transform your logs into UEF.
- Send to SIEM (InsightIDR) as a Universal Event Source.
- Verify Log Parsing.
Interested in more information?
Read more about using NXLog to convert your logs from this Rapid7 blog post .
Prepare for Log Collection
This guide will be using NXLog as the log manipulation tool. Read detailed information and documentation about NXLog here: https://nxlog.co/documentation
To prepare for log collection, take the following steps:
- Open services.msc. Stop the service before testing. Restart the service for each test.
- Install NXLog in the default location on the same system from which you want to collect logs.
- For NXLog, this location is C:\Program Files (x86)\nxlog\
- This folder contains a subfolder called
conf. Make a copy of the original nxlog.conf file for editing purposes and keep the original as a backup. - Create a diagnostic log for testing. Call it nxlog.log and write to a folder, or its typical location: C:\Program Files (x86)\nxlog\data
- Periodically check the nxlog.log file for errors that may potentially accumulate while you are testing.
- Open nxlog.conf file in your preferred text editor.
Edit the NXLog Conf File
Specific that logs will come in, convert to the Rapid7 Universal Event Format, and send to SIEM (InsightIDR) Collector.
The NXLog configuration file has three main parts: global directives, Input and Output blocks, and a Route block.
- The global directives section defines what NXLog can do.
- The Input block is used to read in the source logs and the Output block is used to define how the logs will be forwarded.
- The Route block tells NXLog the order in which to process the Input and Output blocks.
The default shell for NXLog looks like this:
## This is a sample configuration file. See the nxlog reference manual about the
## configuration options. It should be installed locally and is also available
## online at http://nxlog.org/docs/

## Please set the ROOT to the folder your nxlog was installed into,
## otherwise it will not start.

#define ROOT C:\Program Files\nxlog
define ROOT C:\Program Files (x86)\nxlog

Moduledir %ROOT%\modules
CacheDir %ROOT%\data
Pidfile %ROOT%\data\nxlog.pid
SpoolDir %ROOT%\data
LogFile %ROOT%\data\nxlog.log

<Extension _json>
    Module  xm_json
</Extension>

#Add in required extensions here

<Input in>
#Add in input method here
 </Input>

 <Output out>
#Add in output method here
</Output>

 <Route 1>
	 Path		 in => out
</Route>
To edit the conf file to produce the desired UEF:
- If you haven’t already, stop the service.
- Decide on an input method. You can read about input methods in the [NXlog Guides].
- Decide on an output method, which are the three ways that SIEM (InsightIDR) can collect data from the Universal Event Source.
- In this example, NXLog is converting the logs to Universal Ingress Authentication, so the output methods are: syslog, tail file, and watch directory.
- Define extensions used in the NXLog file, such as
xm_syslogandxm_json. - Restart the service and test the configuration file.
- Watch for errors in the diagnostic conf file using the Log Tail tool.
- Fix any issues before continuing.
- Stop the service again.
- If necessary, add an extension into the nxlog.conf to read and reformat the logs. Add this modification to the input method of step 2 and output method of step 3.
- Remove all the extra fields from the logs that the UEF does not need.
- Rename fields in the logs to match what the UEF expects.
- Add in additional fields that the UEF expects.
- If applicable, convert timestamps to ISO 8601 extended format.
Transform to UEF
Once NXLog has properly converted your logs, convert them to JSON.
- Add the to_json procedure to the bottom of the input block.
- Save the file and restart the service.
- Test the nxlog.conf file to make sure it is the proper JSON object according to Rapid7 Universal Ingress Authentication.
It should look like this:
{"time":"2018-09-29T01:25:31Z","source_ip":"36.7.19.12","authentication_target":"CracklingBean","account":"jfrost","authentication_result":"SUCCESS","version":"v1","event_type":"INGRESS_AUTHENTICATION"}
{"time":"2018-09-29T01:26:31Z","source_ip":"71.64.8.111","authentication_target":"CracklingBean","account":"mbolo","authentication_result":"FAILURE","version":"v1","event_type":"INGRESS_AUTHENTICATION"}
How to Configure This Event Source
Take the following steps to configure the event source:
- From your dashboard, select Data Collection on the left hand menu.
- When the “Data Collection” page appears, click the Setup Event Source dropdown and choose Add Event Source.
- From the “Security Data” section, click the icon for the UES you are converting. The “Add Event Source” panel appears.
- Choose your collector and event source. You can also name your event source if you want.
- Choose the collection method you specified in your output method.
- Enter the required information for that collection methods.
- When using syslog, optionally choose to encrypt by choosing TCP and downloading the Rapid7 Certificate.
- Click Save.
It may take a few minutes for logs to begin appearing. To check, go to Data Collection > Event Sources tab. Find the Universal Event Source and click View Raw Log in the bottom right.
Verify Parsing
After SIEM (InsightIDR) successfully ingests the transformed logs, you must verify that they are parsing. Parsed logs will appear in Log search.
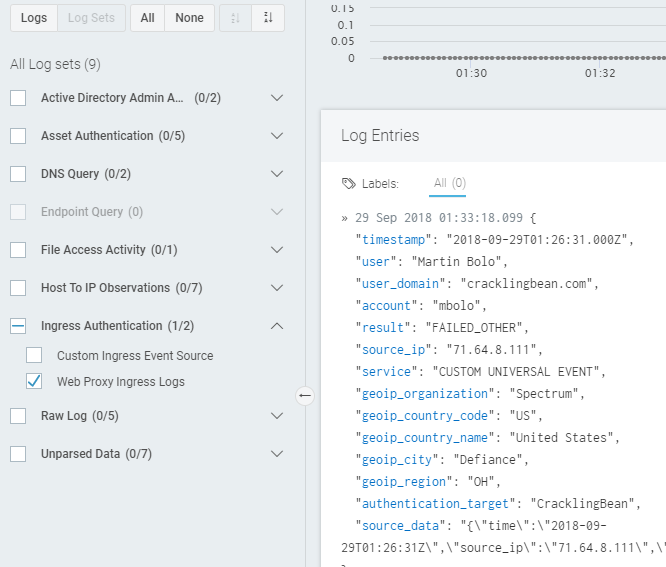
For Universal Ingress Authentication, logs will also appear in the ingress map.