Creating a basic report
Start a new report configuration
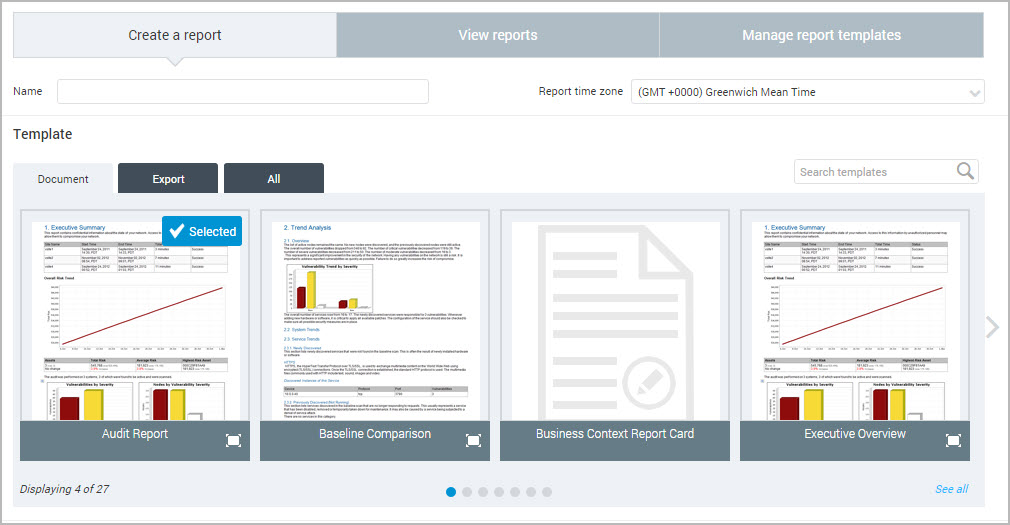
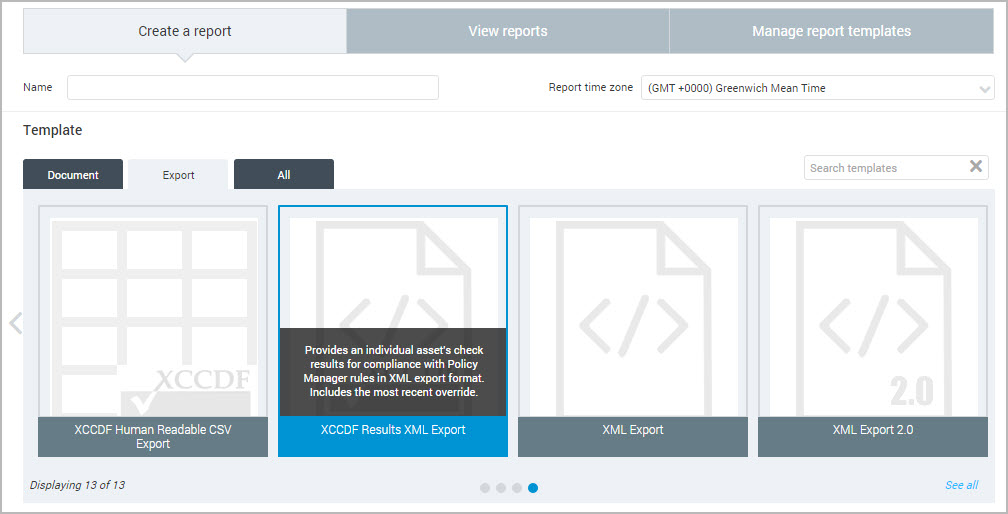
- Click the Reports icon. OR Click the Create tab at the top of the page and then select Report from the drop-down list. The Security Console displays the Create a report panel.
-
Enter a name for the new report. The name must be unique in the application.
-
Select a time zone for the report. This setting defaults to the local Security Console time zone, but allows for the time localization of generated reports.
-
(Optional) Enter a search term, or a few letters of the template you are looking for, in the Search templates field to see all available templates that contain that keyword or phrase. For example, enter pci and the display will change to display only PCI templates.
Search results are dependent on the template type, either Document or Export templates. If you are unsure which template type you require, make sure you select All to search all available templates.
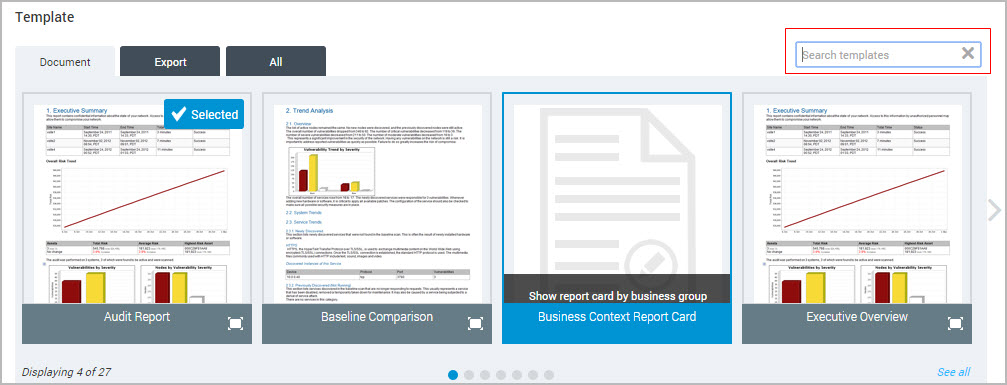
Resetting the Search templates field by clicking the close X displays all templates in alphabetical order.
- Select a template type:
- Document templates are designed for section-based, human-readable reports that contain asset and vulnerability information. Some of the formats available for this template type—Text, PDF, RTF, and HTML—are convenient for sharing information to be read by stakeholders in your organization, such as executives or security team members tasked with performing remediation.
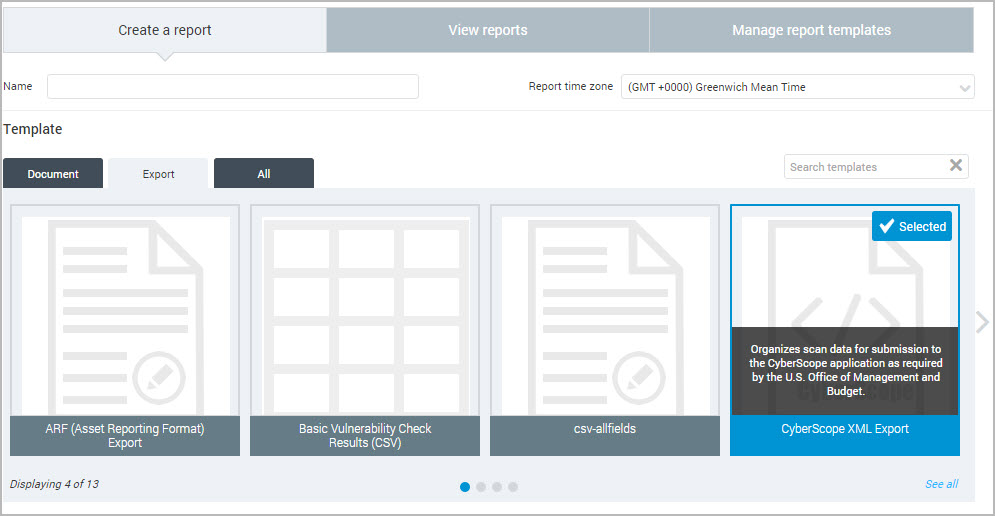
- Export templates are designed for integrating scan information into external systems. The formats available for this type include various XML formats, Database Export, and CSV. For more information, see Working with report formats.
- Click Close on the Search templates field to reset the search or enter a new term. The Security Console displays template thumbnail images that you can browse, depending on the template type you selected.
- If you selected the All option, you will be able to browse all available templates. Click the scroll arrows on the left and the right to browse the templates.
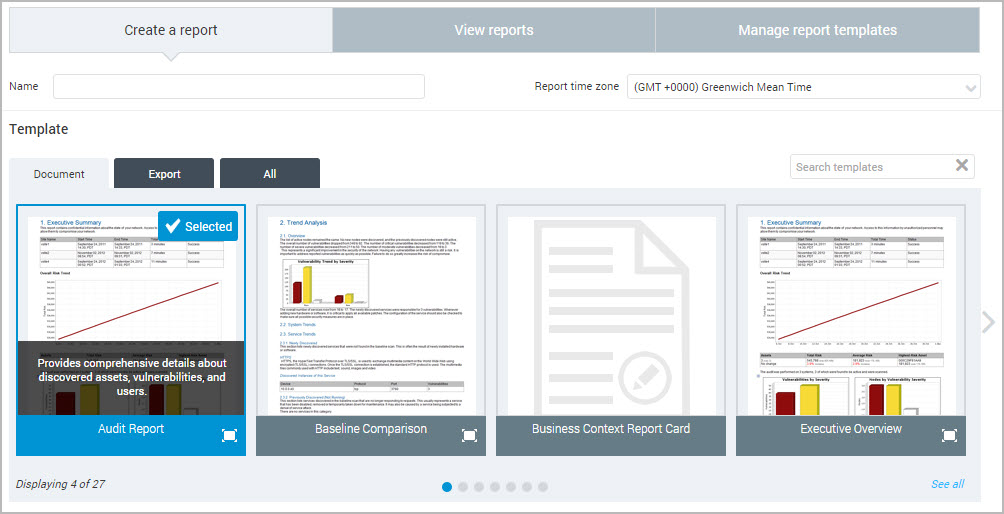
- You can hover over the name of any template to view a description.
- You also can click the Preview icon in the lower right corner of any thumbnail (highlighted in the preceding screen shot) to enlarge and click through a preview of template. This can be helpful to see what kind of sections or information the template provides.
- When you see the see the desired template, click the thumbnail. It becomes highlighted and displays a Selected label in the top, right corner.
-
Select a format for the report. Formats not only affect how reports appear and are consumed, but they also can have some influence on what information appears in reports. For more information, see Working with report formats.
Tip: See descriptions of all available report templates to help you select the best template for your needs.
If you are using the PCI Attestation of Compliance or PCI Executive Summary template, or a custom template made with sections from either of these templates, you can only use the RTF format. These two templates require ASVs to fill in certain sections manually.
-
(Optional) Select the language for your report: Click Advanced Settings, select Language, and choose an output language from the drop-down list. To change the default language of reports, click your user name in the upper-right corner, select User Preferences, and select a language from the drop-down list. The newly selected default will apply to reports that you create after making this change. Reports created prior to the change retain their original language, unless you update them in the report configuration.
-
If you are using the CyberScope XML Export format, enter the names for the component, bureau, and enclave in the appropriate fields. For more information see Entering CyberScope information. Otherwise, continue with specifying the scope of your report.
Enter CyberScope information
When configuring a CyberScope XML Export report, you must enter additional information, as indicated in the CyberScope Automated Data Feeds Submission Manual published by the U.S. Office of Management and Budget. The information identifies the entity submitting the data:
- Component refers to a reporting component such as
Department of Justice, Department of TransportationorNational Institute of Standards and Technology. - Bureau refers to a component-bureau, an individual Federal Information Security Management Act (FISMA) reporting entity under the component. For example, a bureau under Department of Justice might be
Justice Management DivisionorFederal Bureau of Investigation. - Enclave refers to an enclave under the component or bureau. For example, an enclave under Department of Justice might be
United States Mint. Agency administrators and agency points of contact are responsible for creating enclaves within CyberScope.
Consult the CyberScope Automated Data Feeds Submission Manual for more information.
You must enter information in all three fields.
Configure an XCCDF report
If you are creating one of the XCCDF reports, and you have selected one of the XCCDF formatted templates on the Create a report panel take the following steps:
You cannot filter vulnerabilities by category if you are creating an XCCDF or CyberScope XML report.
- Select an XCCDF report template on the Create a report panel.
- Select the policy results to include from the drop-down list. The Policies option only appears when you select one of the XCCDF formats in the Template section of the Create a report panel.
- Enter a name in the Organization field.
- Proceed with asset selection. Asset selection is only available with the XCCDF Human Readable CSV Export.
As described in Selecting Policy Manager checks, the major policy groups regularly release updated policy checks. The XCCDF report template will only generate reports that include the updated policy. To be able to run a report of this type on a scan that includes a policy that just changed, re-run the scan.
Configure an Asset Reporting Format (ARF) export
Use the Asset Reporting Format (ARF) export template to submit policy or benchmark scan results to the U.S. government in compliance with Security Content Automation Protocol (SCAP) 1.2 requirements. To do so, take the following steps:
To run ARF reports you must first run scans that have been configured to save SCAP data. See Selecting Policy Manager checks for more information.
- Select the ARF report template on the Create a report panel.
- Enter a name for the report in the Name field.
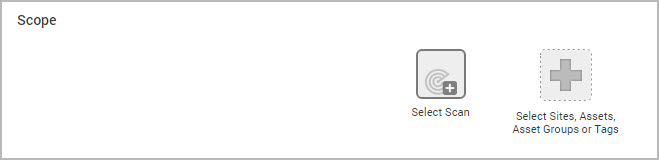
- Select the site, assets, or asset groups to include from Scope section.
- Specify other advanced options for the report, such as report access, file storage, and distribution list settings.
- Click Run the report. The report appears on the View reports page.
Select assets for the report
- Click Select sites, assets, asset groups, or tags in the Scope section of the Create a report panel. The tags filter is available for all report templates except Audit Report, Baseline Comparison, Executive overview, Database export and XCCDF Human Readable CSV Export.
- To use only the most recent scan data in your report, select Use the last scan data only check box. Otherwise, the report will include all historical scan data in the report.

Tip: The asset selection options are not mutually exclusive. You can combine selections of sites, asset groups, and individual assets.
-
Select Sites, Asset Groups, Assets, or Tags from the drop-down list.
-
If you selected Sites, Asset Groups, or Tags, click the check box for any displayed site or asset group to select it. You also can click the check box in the top row to select all options.
-
If you selected Assets, the Security Console displays search filters. Select a filter, an operator, and then a value.
For example, if you want to report on assets running Windows operating systems, select the operating system filter and the contains operator. Then enter Windows in the text field.
To add more filters to the search, click the + icon and configure your new filter.
Select an option to match any or all of the specified filters. Matching any filters typically returns a larger set of results. Matching all filters typically returns a smaller set of results because multiple criteria make the search more specific.
Click the check box for any displayed asset to select it. You also can click the check box in the top row to select all options.

- Click OK to save your settings and return the Create a report panel. The selections are referenced in the Scope section.
Filtering report scope with vulnerabilities
Filtering vulnerabilities means including or excluding specific vulnerabilities in a report. Doing so makes the report scope more focused, allowing stakeholders in your organization to see security-related information that is most important to them. For example, a chief security officer may only want to see critical vulnerabilities when assessing risk. Or you may want to filter out potential vulnerabilities from a CSV export report that you deliver to your remediation team.
You can also filter vulnerabilities based on category to improve your organization’s remediation process. For example, a security administrator can filter vulnerabilities to make a report specific to a team or to a risk that requires attention. The security administrator can create reports that contain information about a specific type of vulnerability or vulnerabilities in a specific list of categories.
Reports can also be created to exclude a type of vulnerability or a list of categories. For example, if there is an Adobe Acrobat vulnerability in your environment that is addressed with a scheduled patching process, you can run a report that contains all vulnerabilities except those Adobe Acrobat vulnerabilities. This provides a report that is easier to read as unnecessary information has been filtered out.
You can manage vulnerability filters through the API. See the API guide for more information.
If a vulnerability is in more than one category, all categories for that vulnerability must be excluded, otherwise the vulnerability will still be reported on.
For example, if vulnerability X is in both category A and category B, but the user only excludes category A, vulnerability X will still be in the report.
Organizations that have distributed IT departments may need to disseminate vulnerability reports to multiple teams or departments. For the information in those reports to be the most effective, the information should be specific for the team receiving it. For example, a security administrator can produce remediation reports for the Oracle database team that only include vulnerabilities that affect the Oracle database. These streamlined reports will enable the team to more effectively prioritize their remediation efforts.
A security administrator can filter by vulnerability category to create reports that indicate how widespread a vulnerability is in an environment, or which assets have vulnerabilities that are not being addressed during patching. The security administrator can also include a list of historical vulnerabilities on an asset after a scan template has been edited. These reports can be used to monitor compliance status and to ensure that remediation efforts are effective.
The following document report template sections can include filtered vulnerability information:
- Discovered Vulnerabilities
- Discovered Services
- Index of Vulnerabilities
- Remediation Plan
- Vulnerability Exceptions
- Vulnerability Report Card Across Network
- Vulnerability Report Card by Node
- Vulnerability Test Errors
Therefore, report templates that contain these sections can include filtered vulnerability information. See Fine-tuning information with custom report templates.
The following export templates can include filtered vulnerability information:
- Basic Vulnerability Check Results (CSV)
- Nexpose™ Simple XML Export
- QualysGuard™ Compatible XML Export
- SCAP Compatible XML Export
- XML Export
- XML Export 2.0
Vulnerability filtering is not supported in the following report templates:
- Cyberscope XML Export
- XCCDF XML
- XCCDF CSV
- Database Export
Filter vulnerability information
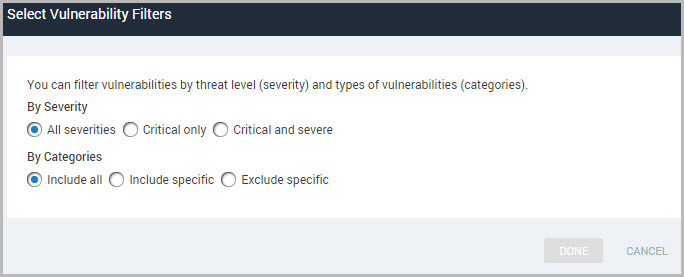
- Click Filter report scope based on vulnerabilities on the Scope section of the Create a report panel. Options appear for vulnerability filters.
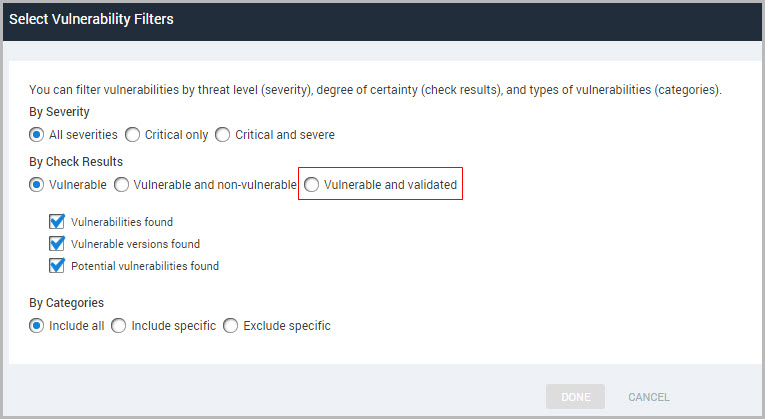
Certain templates allow you to include only validated vulnerabilities in reports: Basic Vulnerability Check Results (CSV), XML Export, XML Export 2.0, Top 10 Assets by Vulnerabilities, Top 10 Assets by Vulnerability Risk, Top Remediations, Top Remediations with Details, and Vulnerability Trends. Learn more about Working with validated vulnerabilities.
-
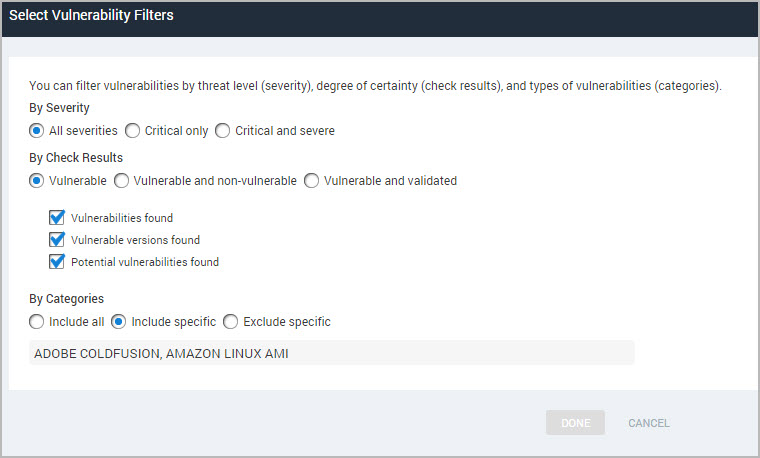
To filter vulnerabilities by severity level, select the Critical vulnerabilities or Critical and severe vulnerabilities option. Otherwise, select All severities.
These are not PCI severity levels or CVSS scores. They map to numeric severity rankings that are assigned by the application and displayed in the Vulnerability Listing table of the Vulnerabilities page. Scores range from 1 to 10: 1-3=Moderate; 4-7=Severe; and 8-10=Critical. 3. If you selected a CSV report template, you have the option to filter vulnerability result types. To include all vulnerability check results (positive and negative), select the Vulnerable and non-vulnerable option next to Results. If you want to include only positive check results, select the Vulnerable option.
You can filter positive results based on how they were determined by selecting any of the check boxes for result types:
- Vulnerabilities found: Vulnerabilities were flagged because asset-specific vulnerability tests produced positive results. Vulnerabilities with this result type appear with the
ve(vulnerable exploited) result code in CSV reports. - Vulnerable versions found: Vulnerabilities were flagged because versions of the scanned services or software are known to be vulnerable. Vulnerabilities with this result type appear with the
vv(vulnerable version) result code in CSV reports. - Potential vulnerabilities found: Vulnerabilities were flagged because checks for potential vulnerabilities were positive. Vulnerabilities with this result type appear with the
vp(vulnerable potential) result code in CSV reports.
- Vulnerabilities found: Vulnerabilities were flagged because asset-specific vulnerability tests produced positive results. Vulnerabilities with this result type appear with the
-
If you want to include or exclude specific vulnerability categories, select the appropriate option button in the Categories section. If you choose to include all categories, skip the following step.
Tip: Categories that are named for manufacturers, such as Microsoft, can serve as supersets of categories that are named for their products. For example, if you filter by the Microsoft category, you inherently include all Microsoft product categories, such as Microsoft Path and Microsoft Windows. This applies to other “company” categories, such as Adobe, Apple, and Mozilla.To view the vulnerabilities in a category see Configuration steps for vulnerability check settings.
-
If you choose to include or exclude specific categories, the Security Console displays a text box containing the words Select categories. You can select categories with two different methods:
- Click the text box to display a window that lists all available categories. Scroll down the list and select the check box for each desired category. Each selection appears in a text field at the bottom of the window.
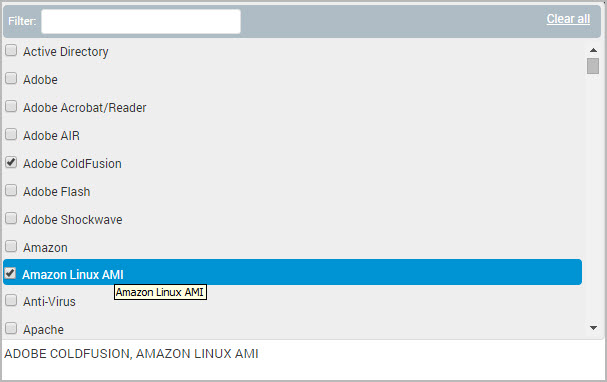
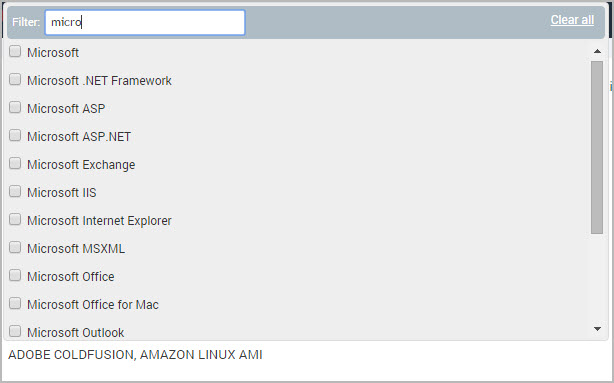
- Click the text box to display a window that lists all available categories. Enter part or all a category name in the Filter: text box, and select the categories from the list that appears. If you enter a name that applies to multiple categories, all those categories appear. For example, you type Adobe or ado, several Adobe categories appear. As you select categories, they appear in the text field at the bottom of the window.
If you use either or both methods, all your selections appear in a field at the bottom of the selection window. When the list includes all desired categories, click outside of the window to return to the Scope page. The selected categories appear in the text box.
Existing reports will include all vulnerabilities unless you edit them to filter by vulnerability category.
- Click the OK button to save scope selections.
Configuring report frequency
You can run the completed report immediately on a one-time basis, configure it to run after every scan, or schedule it to run on a repeating basis. The third option is useful if you have an asset group containing assets that are assigned to many different sites, each with a different scan template. Since these assets will be scanned frequently, it makes sense to run recurring reports automatically.
Configure report frequency
- Go to the Create a report panel.
- Click Configure advanced settings…
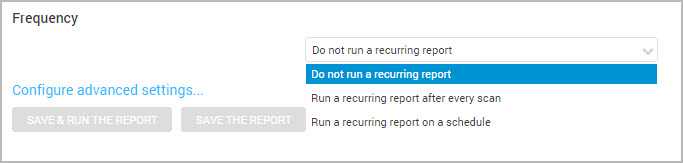
- Click Frequency.
- Select a frequency option from the drop-down list:
- Select Do not run a recurring report to generate a report immediately, on a one-time basis.
- Select Run a recurring report after each scan to generate a report every time a scan is completed on the assets defined in the report scope.
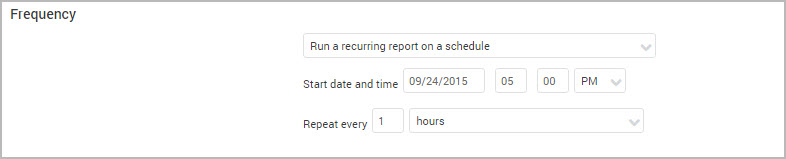
- Select Run a recurring report on a repeated schedule if you wish to schedule reports for regular time intervals. If you selected either of the first two options, ignore the following steps. If you selected the scheduling option, the Security Console displays controls for configuring a schedule.
- Enter a start date using the mm/dd/yyyy format. OR Select the date from the calendar widget.
- Enter an hour and minute for the start time, and click the Up or Down arrow to select AM or PM.
- Enter a value in the field labeled Repeat every and select a time unit from the drop-down list to set a time interval for repeating the report.
- If you select months on the specified date, the report will run every month on the selected calendar date. For example, if you schedule a report to run on October 15, the report will run on October 15 every month.
- If you select months on the specified day of the month, the report will run every month on the same ordinal weekday. For example, if you schedule the first report to run on October 15, which is the third Monday of the month, the report will run every third Monday of the month.
Best practices for scheduling reports
The frequency with which you schedule and distribute reports depends your business needs and security policies. You may want to run quarterly executive reports. You may want to run monthly vulnerability reports to anticipate the release of Microsoft hotfix patches. Compliance programs, such as PCI, impose their own schedules.
The amount of time required to generate a report depends on the number of included live IP addresses the number of included vulnerabilities—if vulnerabilities are being included—and the level of details in the report template. Generating a PDF report for 100-plus hosts with 2500-plus vulnerabilities takes fewer than 10 seconds.
The application can generate reports simultaneously, with each report request spawning a new thread. Technically, there is no limit on the number supported concurrent reports. This means that you can schedule reports to run simultaneously as needed. Note that generating a large number of concurrent reports—20 or more—can take significantly more time than usual.
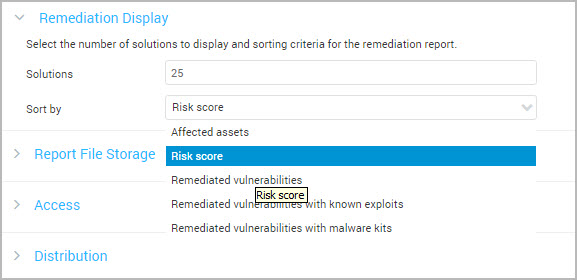
Best practices for using remediation plan templates
The remediation plan templates provide information for assessing the highest impact remediation solutions. You can use the Remediation Display settings to specify the number of solutions you want to see in a report. The default is 25 solutions, but you can set the number from 1 to 1000 as you require. Keep in mind that if the number is too high you may have a report with an unwieldy level of data and too low you may miss some important solutions for your assets.
You can also specify the criteria for sorting data in your report. Solutions can be sorted by Affected asset, Risk score, Remediated vulnerabilities, Remediated vulnerabilities with known exploits, and Remediated vulnerabilities with malware kits.
Best practices for using the Vulnerability Trends report template
The Vulnerability Trends template provides information about how vulnerabilities in your environment have changed have changed over time. You can configure the time range for the report to see if you are improving your security posture and where you can make improvements. To ensure readability of the report and clarity of the charts there is a limit of 15 data points that can be included in the report. The time range you set controls the number of data points that appear in the report. For example, you can set your date range for a weekly interval for a two-month period, and you will have eight data points in your report.
Ensure you schedule adequate time to run this report template because of the large amount of data that it aggregates. Each data point is the equivalent of a complete report. It may take a long time to complete.
To configure the time range of the report, use the following procedure:
- Click Configure advanced settings…
- Select Vulnerability Trend Date Range.
- Select from pre-set ranges of Past 1 year, Past 6 months, Past 3 months, Past 1 month, or Custom range. To set a custom range, enter a start date, end date, and specify the interval, either days, months, or years.

- Configure other settings that you require for the report.
- Click Save & run the report or Save the report, depending on what you want to do.
Saving or running the newly configured report
After you complete a basic report configuration, you will have the option to configure additional properties, such as those for distributing the report. You can access those properties by clicking Configure advanced settings…
If you have configured the report to run in the future, either by selecting Run a recurring report after every scan or Run a recurring report in a schedule in the Frequency section (see Configuring report frequency, you can save the report configuration by clicking Save the report or run it once immediately by clicking Save & run the report. Even if you configure the report to run automatically with one of the frequency settings, you can run the report manually any time you want if the need arises. See Viewing, editing, and running reports.
If you configured the report to run immediately on a one-time basis, you will also see buttons allowing you to either save and run the report, or just to save it. See Viewing, editing, and running reports .
Select a scan as a baseline
Designating an earlier scan as a baseline for comparison against future scans allows you to track changes in your network. Possible changes between scans include newly discovered assets, services and vulnerabilities; assets and services that are no longer available; and vulnerabilities that were mitigated or remediated.
You must select the Baseline Comparison report template in order to be able to define a baseline. See Starting a new report configuration.
- Go to the Create a report panel.
- Click Configure advanced settings…
- Click Baseline Scan selection.

- Click Use first scan, Use previous scan, or Use scan from a specific date to specify which scan to use as the baseline scan.
- Click the calendar icon to select a date if you chose Use scan from a specific date.
- Click Save & run the report or Save the report, depending on what you want to do.