Microsoft Remote Web Access
You can configure your Windows Server 2012 R2 Essentials or Windows Server 2016 Essentials to allow for remote access while on the VPN. You can then capture the authentication events as audit logs for SIEM (InsightIDR) to ingest.
To start capturing VPN logs with these Windows Essential Servers:
Configure Remote Web Access
The Microsoft community provides detailed instructions on how to configure remote web access here: https://techcommunity.microsoft.com/t5/Windows-Server-Essentials-and/Configuring-and-Customizing-Remote-Web-Access-on-Windows-Server/ba-p/398904
Alternatively follow the directions below to install the remote access server:
- On your Windows server, click Start or Home > Windows Server Essential Dashboard.
- On the “Get Started” page, click Set up Anywhere Access > Click to configure Anywhere Access.
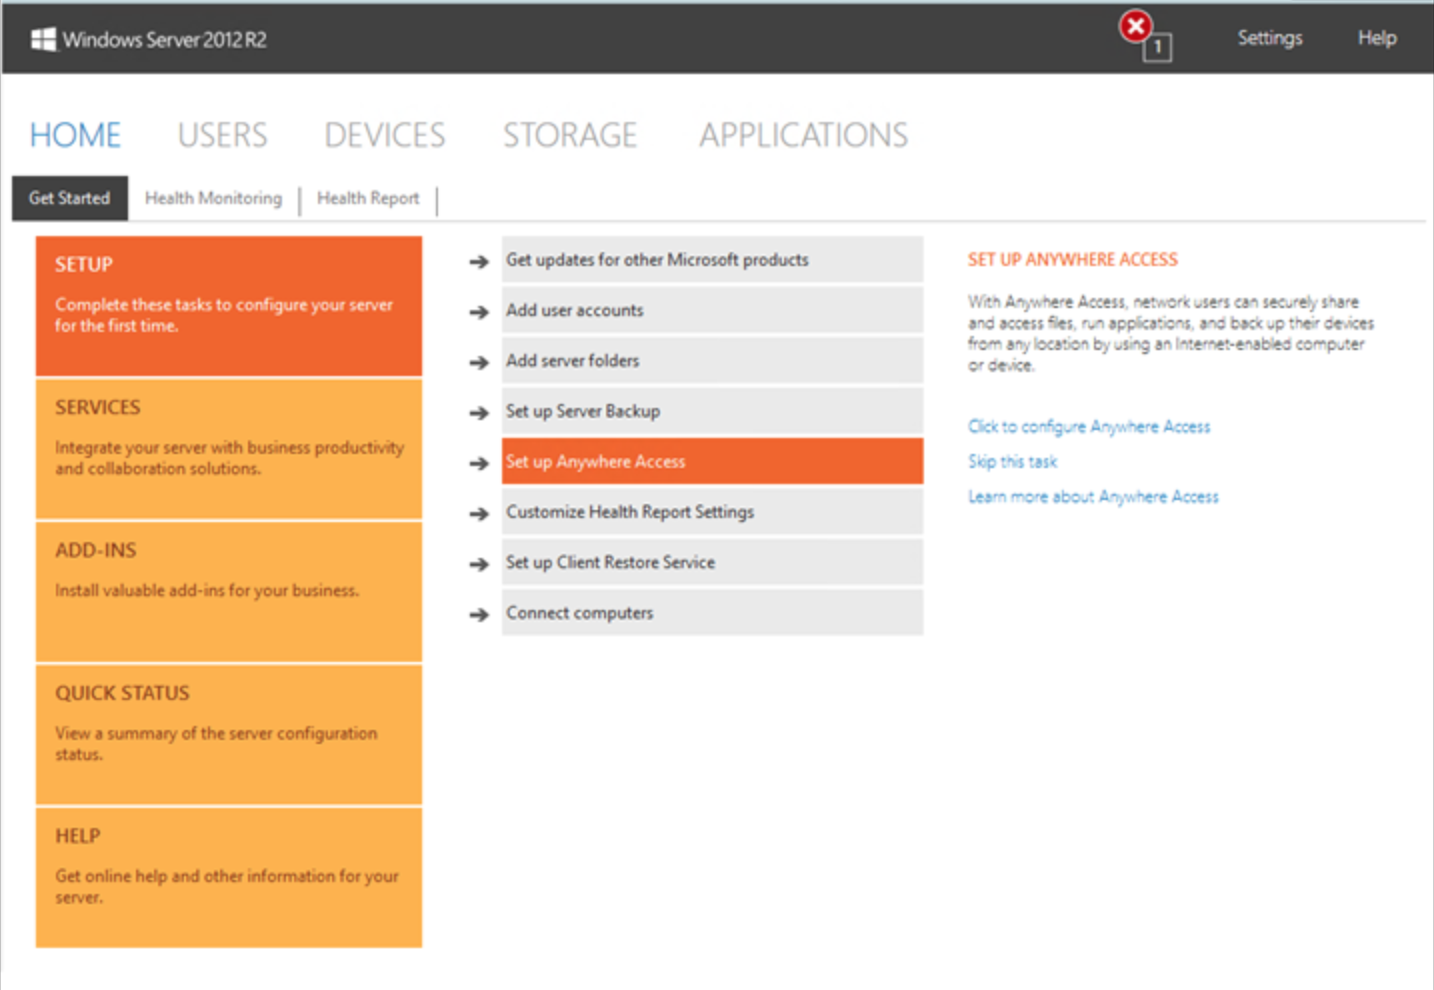
- The “Set up Anywhere Access” window appears. Check the box if you want to skip router setup, and then click the Next button.
- In the “Set Up Your Domain Name” section, provide your domain information or choose to set up a new domain name. Click the Next button.
- Finish any following steps for configuring a domain name and click Next or Set Up.
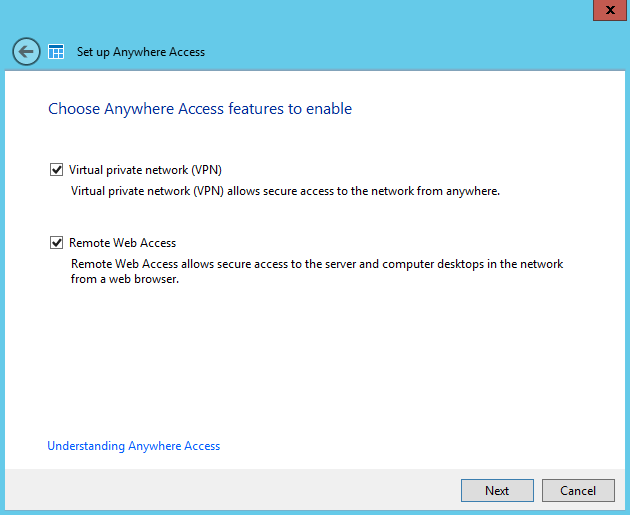
- In the “Set Up Anywhere Access” section, check both boxes to configure a VPN and Remote Web Access. Click the Next button.
The installation of the remote access server and the VPN will execute in the background. 7. Click the Finish button when it is complete.
Configure Microsoft VPN
The Microsoft community provides detailed documentation on setting up the VPN for remote access here: https://techcommunity.microsoft.com/t5/Windows-Server-Essentials-and/Understanding-VPN-configuration-in-Windows-Server-2012-R2/ba-p/398928
Alternatively follow the directions below to configure the VPN:
- On your Windows server, navigate to “Routing and Remote Access” which should be available after the installation of the VPN and remote access server.
- Right click on your new remote server and click the Properties option.
- In the “General” tab, check the IPv4 Remote Access Server box. Click the Apply button.

- In the “Security” tab, click on the Authentication Methods button and then check on the options for Extensible Authentication Protocol (EAP) and Microsoft encrypted authentication version 2 (MS-CHAPv2). Then click the OK button.
- Click the Apply button.
- On the “IPv4” tab, you can choose whether or not you want your VPN clients to receive a static IP address or receive an assigned IP from DHCP.
- Click the Apply button.
- On the “Logging” tab, select the Log All Events radio button and check the Log Additional Routing and Remote Access information check box.
- Click the OK button.
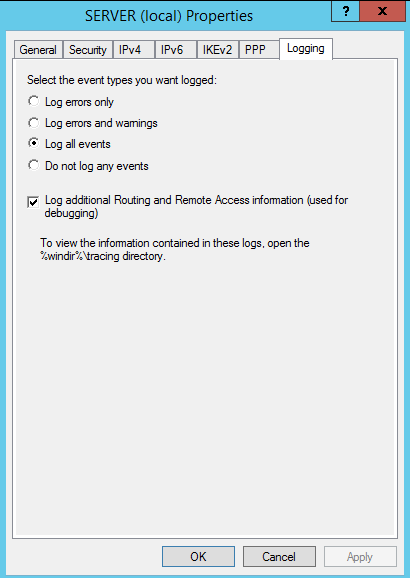
The VPN logs are available in the C:\Windows\Tracing directory.
Configure SIEM (InsightIDR) to collect data from the event source
After you complete the prerequisite steps and configure the event source to send data, you must add the event source in SIEM (InsightIDR).
To configure the new event source in SIEM (InsightIDR):
- From the left menu, go to Data Collection and click Setup Event Source > Add Event Source.
- Do one of the following:
- Search for Microsoft Remote Web Access in the event sources search bar.
- In the Product Type filter, select VPN.
- Select the Microsoft Remote Web Access event source tile.
- Choose your collector and select Microsoft Remote Web Access as your event source. You can also name your event source if you want.
- Choose the timezone that matches the location of your event source logs.
- Optionally choose to send unparsed logs.
- Configure your default domain and any advanced settings.
- Select Watch Directory as your data collection method and then check the box to Watch shared remote directory.
- Select an existing credential for your Windows server or optionally create a new credential.
- Enter the default folder path for the VPN logs,
C:\Windows\Tracing - Enter the scan interval for how often SIEM (InsightIDR) should check the file path.
- Optionally choose to include the file pattern of your log file.
- Click the Save button.