Configure Okta as an SSO source for the Command Platform
This article covers how to configure a Command Platform single sign-on (SSO) source for use with Okta.
Create the Command Platform application in Okta
To create a new application in Okta:
- Navigate to Applications.
- Click Create App Integration.
- Click SAML 2.0 as the Sign-In method.
- Click Create your own application.
- Name the application.
Rapid7 Command Platformis recommended.
- Click Next.
Add the Okta certificate to the Command Platform
To download the certificate from Okta, click Download Okta Certificate to the right of the SAML Settings section. After you download the certificate, navigate to the Command Platform.
To add the IdP certificate to the Command Platform:
- From the left menu of the Rapid7 Command Platform Home page, click the Administration link.
- In the left menu of the Administration page, click Settings.
- Click the SSO Settings tab in the Authentication Settings section.
- From the Select your identity provider (IdP) dropdown, select Okta.
- In the section titled Add your IdP certificate, drag and drop your Okta certificate, or click the Browse button to search for it on your local machine.
Configure SAML settings in Okta
Once the certificate is uploaded, the next step is to configure SAML settings in Okta.
To configure these settings:
- From the section titled Copy the following data into your external IdP on the Command Platform, copy the single sign-on URL.
- Paste it into the corresponding field in the SAML Settings section in Okta.
- Next, copy the Audience URI and paste this into Okta.
- Finally, copy the Default Relay State and paste this into Okta.
Attribute statements
Attribute statements are mandatory for authentication to the Command Platform.
To configure attribute statements:
- Navigate to the Attribute Statements section in Okta.
- In the Name field, enter
FirstName. In the Value field, select user.firstName, then click Add Another. - In the Name field, enter
LastName. In the Value field, select user.lastName, then click Add Another. - In the Name field, enter
Email. In the Value field, select user.email.
Now that the attribute statements are configured, you can finish the SAML configuration on Okta. At the bottom of the page, click Next, then Finish.
Configure the Command Platform
You should now be on the Sign On tab for the Command Platform app you just created in Okta.
To finish configuring SSO Settings on the Command Platform:
- In the section in Okta with a yellow bar, select View Setup Instructions.
- Copy the field labeled Identity Provider Single Sign-On URL and paste it into the corresponding field in the SSO Settings tab in the Command Platform.
- Copy the field labeled Identity Provider Issuer and paste it into the corresponding field in the SSO Settings tab in the Command Platform.
Set up a default access profile
A default access profile allows you to define the products and roles that are automatically assigned to new users provisioned in Okta. See our default access profile documentation for instructions.
Group Synchronization
Group Synchronization allows you to control user group assignment from within your IdP.
This capability is made possible by including an attribute in your SAML response that contains the name(s) of the Command Platform User Groups for each user. Your users will be automatically assigned to the corresponding groups in the Command Platform and will inherit the product, role, and resource access associated with those groups.
With Group Sync enabled, IdP users will be removed from any Command Platform groups not included in their SAML assertion. IdP Users will retain any roles or permissions assigned directly to them, including those from a default access profile.
Configure user groups
As Group Synchronization requires the use of Command Platform User Groups, it is important that you have configured groups before activating. Read our Command Platform User Groups documentation for details on how to do this.
Adding the Group Attribute
In Okta, you need to ensure your users are assigned to user groups with the same name as the corresponding Command Platform user group. If you have not already created these groups, follow these steps:
- In the Okta Admin Console, navigate to Directory > Groups.
- Click Add group.
- Give it the same name as the corresponding Command Platform user group, then click Save.
- Open your new group.
- In the People tab, click Assign people.
- Click + beside the users you want to assign to this group.
- Click Done when finished.
Once your groups are configured, you need to add an attribute to the SAML assertion containing the names of the groups each user is assigned to.
To add the attribute to your SAML assertion in Okta:
- In the Okta Admin Console, navigate to Applications and select your Rapid7 application.
- In the General tab, click Edit in the SAML Settings section.
- Click Next to continue to the Configure SAML section.
- At the bottom of the SAML Settings section, you’ll find Group Attribute Statements.
- In the Name field, enter
rbacGroups. - Name Format remains Unspecified.
- In the Filter dropdown, select Matches regex and enter
.*in the provided field.
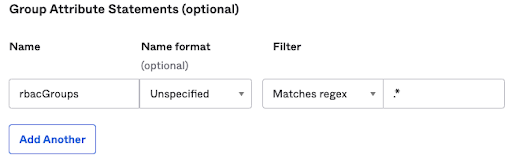
- Click Next, then click Finish.
All the information we require from your IdP to synchronize users to Command Platform user groups will now be included when users authenticate using SSO.
Activate Group Synchronization
If you have your Command Platform user groups configured with corresponding IdP user groups included in the SAML configuration, you are ready to activate Group Synchronization.
Once Group Synchronization is activated, users will have their group memberships synced on each sign-in. This means that changes to group membership in your IdP will not be reflected in the Command Platform until the user next signs in.
The Command Platform does not support SCIM provisioning, so users removed from your IdP will need to manually deleted in the Command Platform.