Configure the Azure vTAP
After you provision the Network Sensor host and enable virtual network peering (if applicable), create the vTAP.
The vTAP is created with the Virtual network terminal access points service in Azure, which you can find by searching for vTAP or Virtual network TAP in the Azure portal search bar.
Create the vTAP
- In the Virtual network terminal access points menu, click Create.
- In the vTAP configuration menu, set a descriptive name such as
Network Sensor vTAP. - Click Select destination resource. The destination resource can be either a Network Interface or a Load Balancer. This article uses a Network Interface as an example.
- Select the Network Interface previously created for the Network Sensor host.
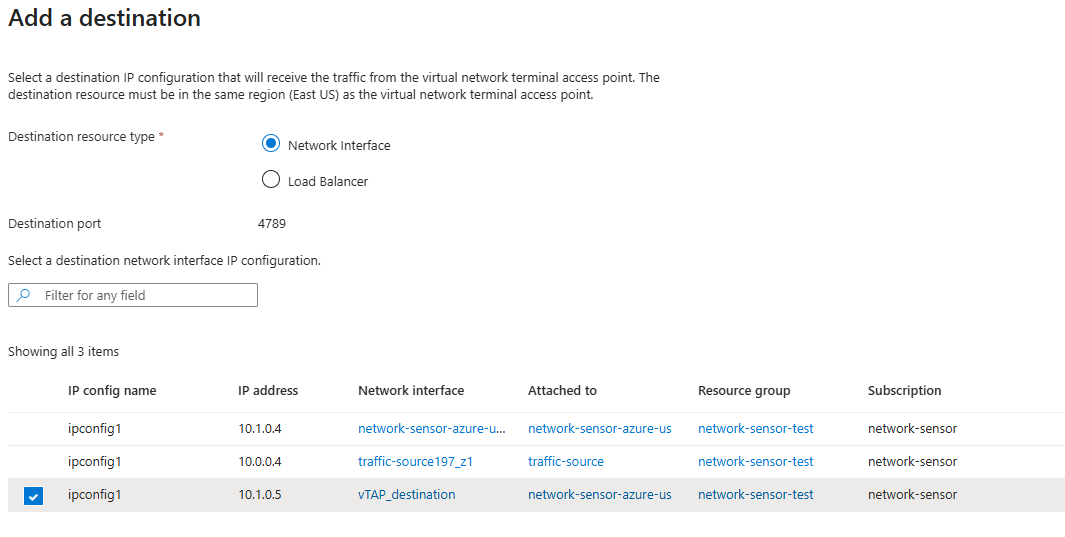
- Save the destination, then click Next. Do not add traffic sources yet.
- Review the vTAP configuration and create the vTAP.
Restart the Traffic Source VMs
After you create the vTAP, stop (deallocate) and then start each VM whose traffic you want to monitor. You must restart the source VMs before you add their Network Interfaces to the vTAP. Otherwise, Azure may report that the Network Interface is not on fastpath, and the traffic is not mirrored.
Stop and start, not reboot
Use Stop and then Start in the Azure portal, which deallocates the VM. The Restart option, or rebooting from inside the guest operating system, does not deallocate the VM and is not sufficient.
Add the Traffic Sources
- Open the vTAP you created and go to its Sources menu.
- Click Add and select all relevant Network Interfaces to be monitored.
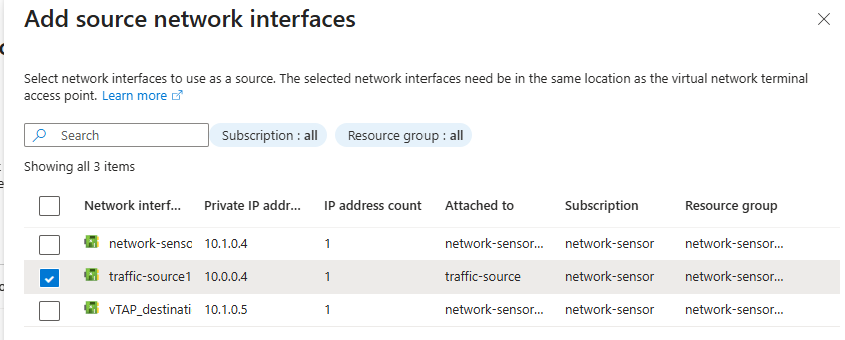
- Save the traffic sources.
Confirm the vTAP Configuration
Capture traffic on the Network Sensor host to verify that the vTAP sends VXLAN traffic to it.
To confirm the vTAP configuration:
- Connect to the Network Sensor host VM using SSH.
- Run
ip addron the VM and find the IP address associated with the vTAP destination network interface. The interface is often listed aseth1or similar. - In Azure, go to the Network Settings for the VM and compare the IP address of the interface to the IP address from the previous step.
- Run
tcpdumpon the vTAP destination network interface. - Review the
tcpdumpoutput.
Once tcpdump is running, you should see VXLAN traffic in the output if everything is working as expected. If there was an issue with the configuration, little or no traffic will be seen in the output.
Install the Network Sensor
After you confirm that the Network Sensor host receives traffic, download and install the Network Sensor.
Configure the VXLAN traffic type
After installation, the Network Sensor must be configured with the VXLAN traffic type on the Sensor Management page. Without this, the sensor will not decapsulate the mirrored traffic.