Integrations
See the following sections for instructions on how to deploy the Rapid7 Agent (Insight Agent) via supported software integrations:
Microsoft Azure
NOTE
This procedure details agent deployment on a per asset basis. If you would like to mass deploy the agent on all your existing and future Azure VMs, see our Azure Security Center integration page.
Complete the following procedure to deploy the Rapid7 Agent (Insight Agent) to your Azure virtual machines and connect them to the Insight platform:
- Download the desired agent installation package. See the installation guide for instructions.
- Apply the agent to a virtual machine through either the Azure portal or the command line.
Azure portal method
- In your Azure portal, navigate to Virtual Machines → [Your VM name] → Extensions.
- Click the Add button.
- Select Rapid7 Agent (Insight Agent).
Command line method
- Set up the Azure CLI to access the extension details .
- Log in with
az login. - Browse Rapid7 extension versions with:
az vm extension image list --publisher "Rapid7.InsightPlatform"
[{
    "name": "InsightAgentLinux",
    "publisher": "Rapid7.InsightPlatform",
    "version": "2.0.0.2"
},
{
    "name": "InsightAgentWindows",
    "publisher": "Rapid7.InsightPlatform",
    "version": "2.0.0.2"
},
...
PowerShell
To add the Rapid7 Rapid7 Agent (Insight Agent) extension to a virtual machine using PowerShell, first make sure you have the latest version of PowerShell installed.
NOTE
Switching between classic and resource manager in the same PowerShell window frequently results in an error:
Missing type map configuration or unsupported mapping
When using both types, it is recommended to use separate PowerShell windows.
- Base64 encode the configuration zip file:
$filepath = C:\tmp\config.zip
$binary = Get-Content -Path $filepath -Encoding Byte
$base64 = [Convert]::ToBase64String($binary)- Apply extension:
Classic:
Login: Add-AzureAccount
List VMs: Get-AzureVM
$params = "{`"configzip`": `"$base64`" }"
$vmobj = Get-AzureVM -ServiceName {your_vm_service_name} \
-Name {your_vm_name}
$vmobj | Set-AzureVMExtension -ExtensionName
'InsightAgentWindows' \
-Publisher 'Rapid7.InsightPlatform' \
-Version 2.0 \
-PrivateConfiguration $params
$vmobj | Update-AzureVM   # This applies the extension
$vmobj | Get-AzureVMExtension
Resource Manager:
Login: Login-AzureRmAccount
List VMs: Get-AzureRmVM
$params = @{"configzip" = "$base64"; };
Set-AzureRmVMExtension -Publisher Rapid7.InsightPlatform \
-ExtensionName InsightAgentWindows \
-ExtensionType InsightAgentWindows \
-Version 2.0 \
-ProtectedSettings $params \
-VMName {your_vm} \
-Location {your_location} \
-ResourceGroupName {your_resource_group}
Azure 2.0 CLI
To add the Rapid7 Rapid7 Agent (Insight Agent) extension to a resource manager virtual machine using the Azure CLI, first make sure you have the latest version of the Azure 2.x CLI installed.
az login
base64=$(base64 ~/config.zip)
az vm extension set --protected-settings "{\"configzip\":\"$base64\"}" --vm-name
{your_windows_vm} --name InsightAgentWindows --publisher Rapid7.InsightPlatform
--resource-group {vm-resource-group} --version 2.0
Azure 1.0 CLI
To add the Rapid7 Rapid7 Agent (Insight Agent) extension to a classic virtual machine using the Azure CLI, first make sure you have the latest version of the Azure 1.x CLI installed.
azure login
azure config mode asm
base64=$(base64 ~/config.zip)
azure vm extension set -t "{\"configzip\":\"$base64\"}" "{your_windows_vm}"
InsightAgentWindows Rapid7.InsightPlatform 2.0
McAfee ePolicy Orchestrator
Installing the McAfee Agent allows McAfee ePO users to deploy and manage the Rapid7 Agent (Insight Agent) via McAfee ePO software management.
This process assumes that the McAfee ePolicy Orchestrator is already configured to monitor the Windows systems in your environment, and these target systems have the McAfee Agent installed.
To begin, download the following:
- The Rapid7 ePO extension (https://download2.rapid7.com/download/NeXpose-v4/epo-extension/Rapid7Nexpose.zip )
- The Rapid7 Manager plugin (https://download2.rapid7.com/download/NeXpose-v4/epo-extension/R7AgentDeployment_0409.zip )
- The Rapid7 Agent (Insight Agent) installer (see the installation guide for instructions). These installer files are accessible from the ePO server.
Next, install the Rapid7 Extension on the ePO Server, Install the Rapid7 Manager Plugin on Target Systems, and then Install the Rapid7 Agent (Insight Agent).
Installing the Rapid7 Extension on the ePO Server
You can install the Rapid7 ePO extension by obtaining the installation zip archive from the Rapid7 Support team. You can install the extension on ePO using the following steps:
- Extract the Rapid7Nexpose.zip file. You fill find the ePO extension folder and the Rapid7.zip archive in the target extraction folder’s contents.
- From the main menu of ePO under the Software category, click on Extensions.
- The Extensions screen appears. Click on the Install Extension button and then browse the location of the
Rapid7.zipfile location. Follow all of the steps of the installation process. - After the installation is complete, you will be returned to the Extensions screen. Ensure that Rapid7 is visible in the list of extensions and the state is Running.
Configure Policy Catalogue
The Rapid7 Manager is responsible for installing the Rapid7 Agent (Insight Agent) on your systems. The following steps will help you configure the Agent installation.
- From the main menu, click Server Settings under the Configuration category.
- In the Server Settings screen, select Rapid7 Settings. The right pane will have four text fields for agent-related configuration data - client.crt, config.json, client.key and cafile.pem. Complete these fields using the contents of similarly named files in the Rapid7 Agent (Insight Agent) installation package. The contents of these files can be viewed by opening them in Notepad.
- Return to the main menu and under the Policy category, click on Policy Catalog. The Policy Catalog page will look like this:
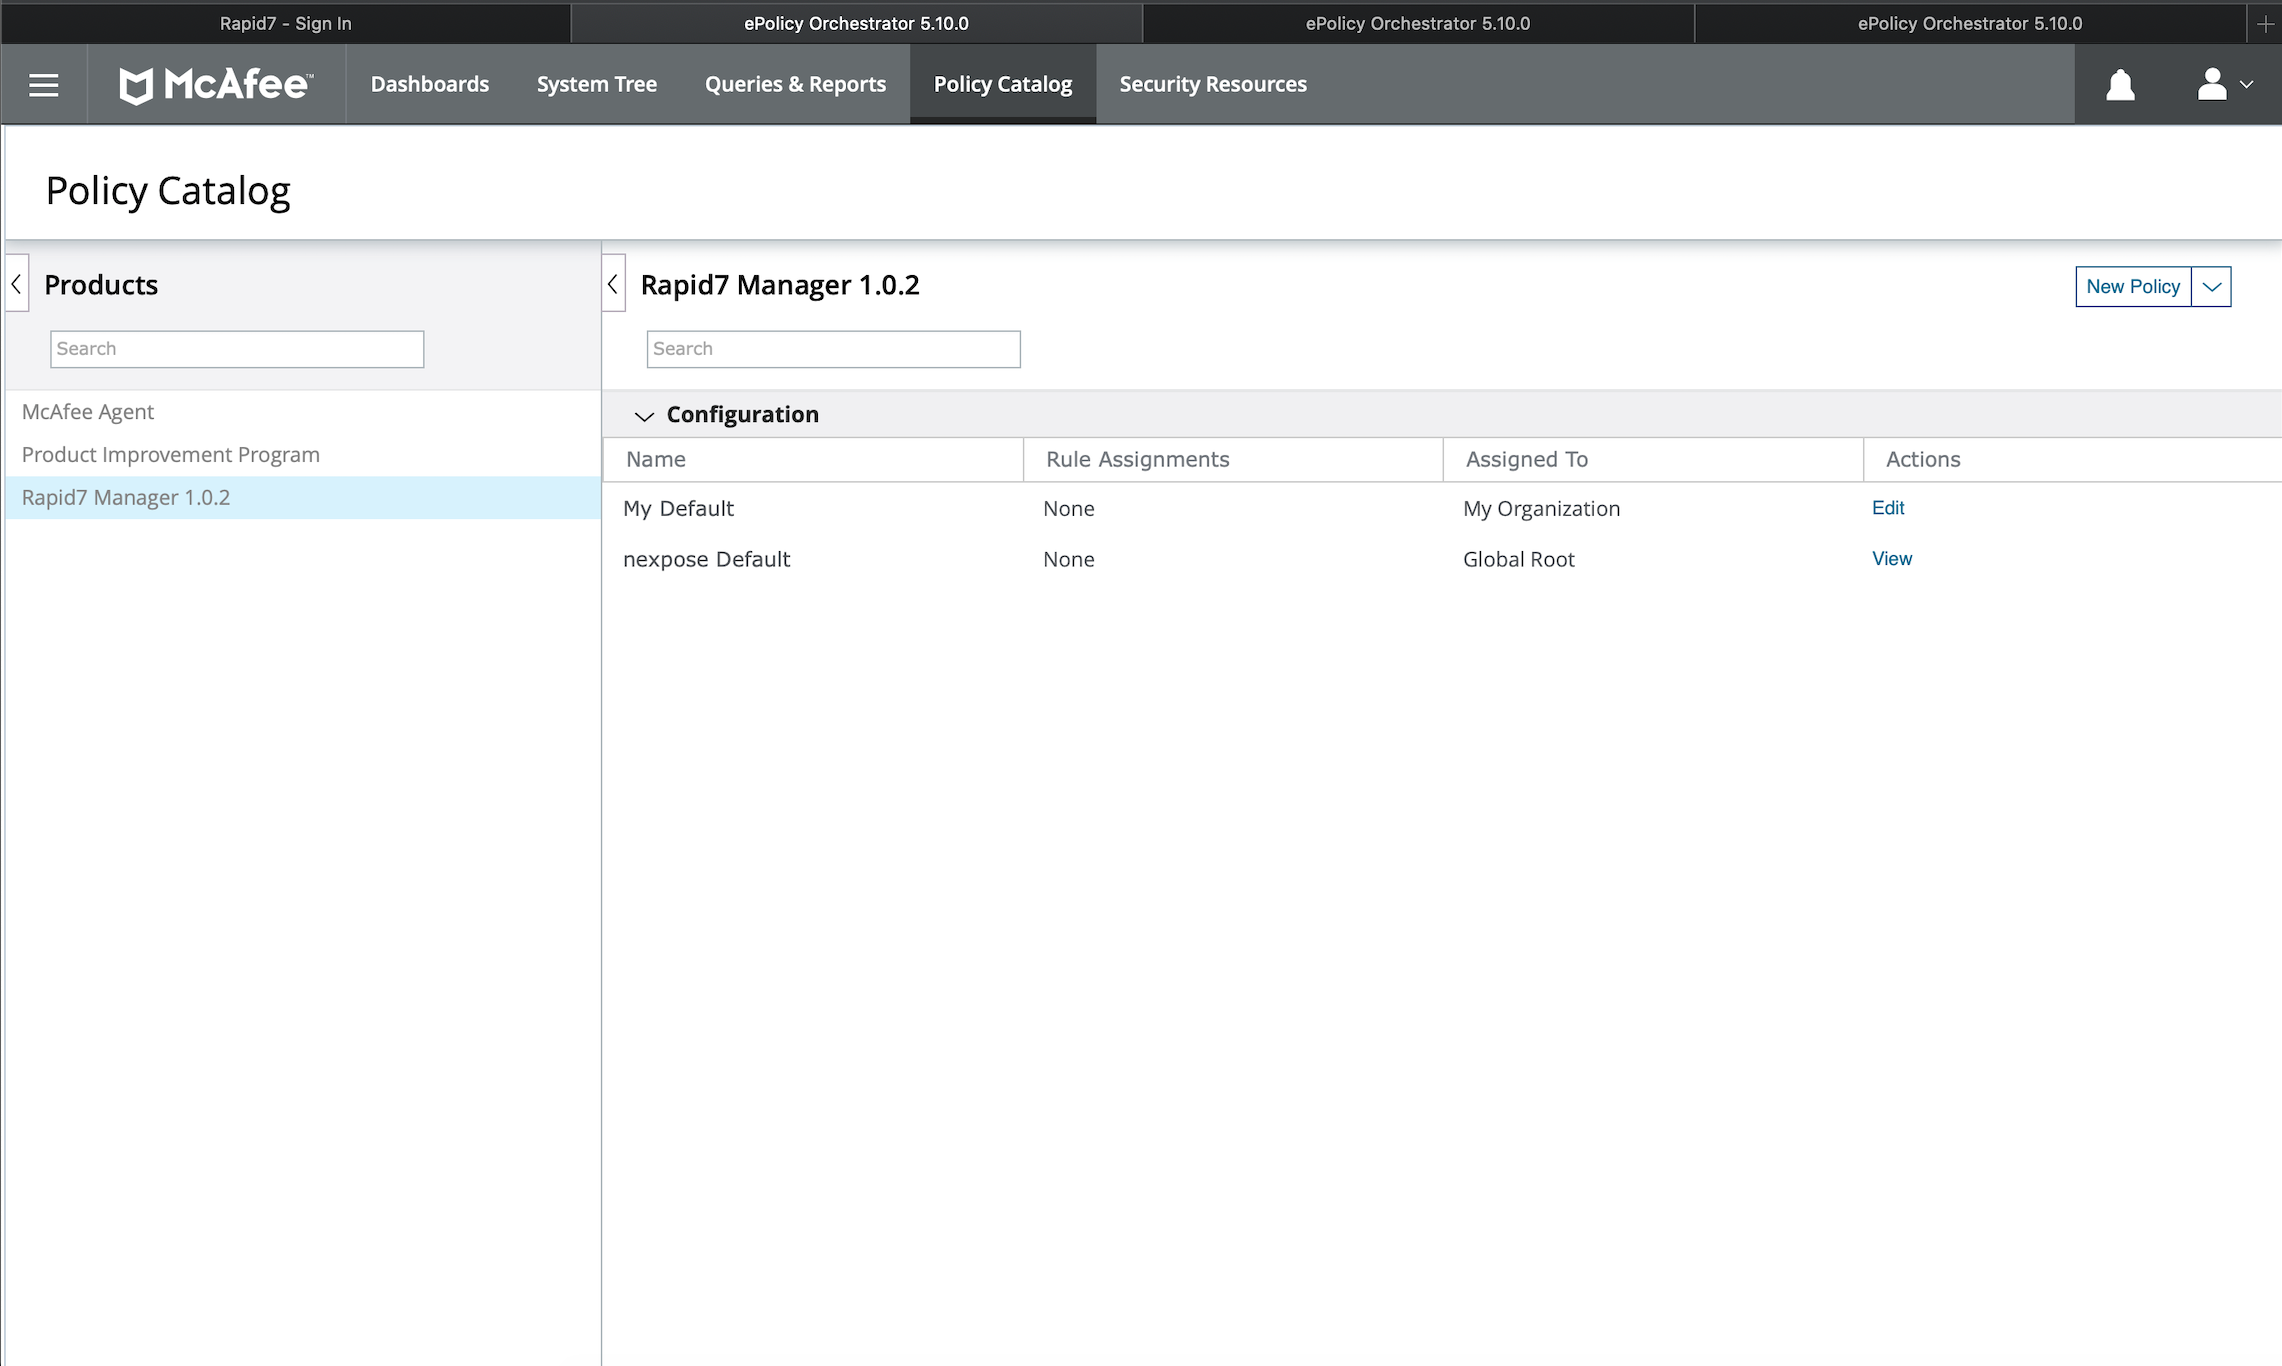
- On the Policy Catalog page, either duplicate the built-in Default (in the case of this screenshot, the Default policy is nexpose_Default) policy, or click New Policy. Give this policy a suitable name, such as “Install Rapid7 Rapid7 Agent (Insight Agent)”. To duplicate an existing policy, click on the policy name to open the side panel. Click on the arrow near the View button to duplicate the policy.
- Click on the newly created policy and then click on Edit in the panel on the right side of the screen.
- On the policy configuration page, select the recommended option - Don’t reinstall the Rapid7 Agent (Insight Agent) if already present.
- Select the Installation Package URLs tab. Replace the default URLs shown with these URLs for the 64-bit and Windows ARM64 installer types:
64-bit
https://s3.amazonaws.com/com.rapid7.razor.public/endpoint/agent/latest/windows/x86_64/PyForensicsAgent-x64.msiWindows ARM64
https://s3.amazonaws.com/com.rapid7.razor.public/endpoint/agent/latest/windows/arm64/PyForensicsAgent-arm64.msiIMPORTANT
The default URLs included with this plugin point to a legacy version of the Rapid7 Agent (Insight Agent). If these URLs are left unchanged, all agents deployed using this plugin will automatically initiate a software update to the latest version after installation. To avoid this update condition, make sure you replace these legacy URLs with the current URLs listed above.
- Visit the System Tree screen through the main menu. On the System Tree screen, select a system group and open the Assigned Policies tab. On the right side, in the “Action” column, there is an “Edit assignment” link.
- In the Policy Assignment wizard, select install Rapid7 Agent (Insight Agent) as the policy to assign.
Installing the Rapid7 Manager Plugin on Target Systems
The Rapid7 Manager coordinates communication between the Rapid7 extension and the Rapid7 Agents (Insight Agents) on the target systems. It is also responsible for enforcing the policies related to Rapid7 on the target systems. The following steps are required for installing the Rapid7 Manager on your systems.
- From the main menu, under the Software category, click on Master Repository.
- On the Master Repository screen, click the Check In Package button, and browse to the R7AgentDeployment zip file.
- Click the Next button. Ensure to install the current version.
- Click the Save button located towards the bottom of the window.
- Ensure that the application Rapid7 Manager appears in the package list in the Master Repository screen.
- From the main menu, under the Client Task category, select Client Task Catalog.
- On the Client Task Catalog screen, click on the New Task button and then select the Product Deployment task type.
- In the Client Task Creation wizard, set the product as Rapid7 Manager and the action as Install. Complete the rest of the fields in the installation wizard based on your preferences.
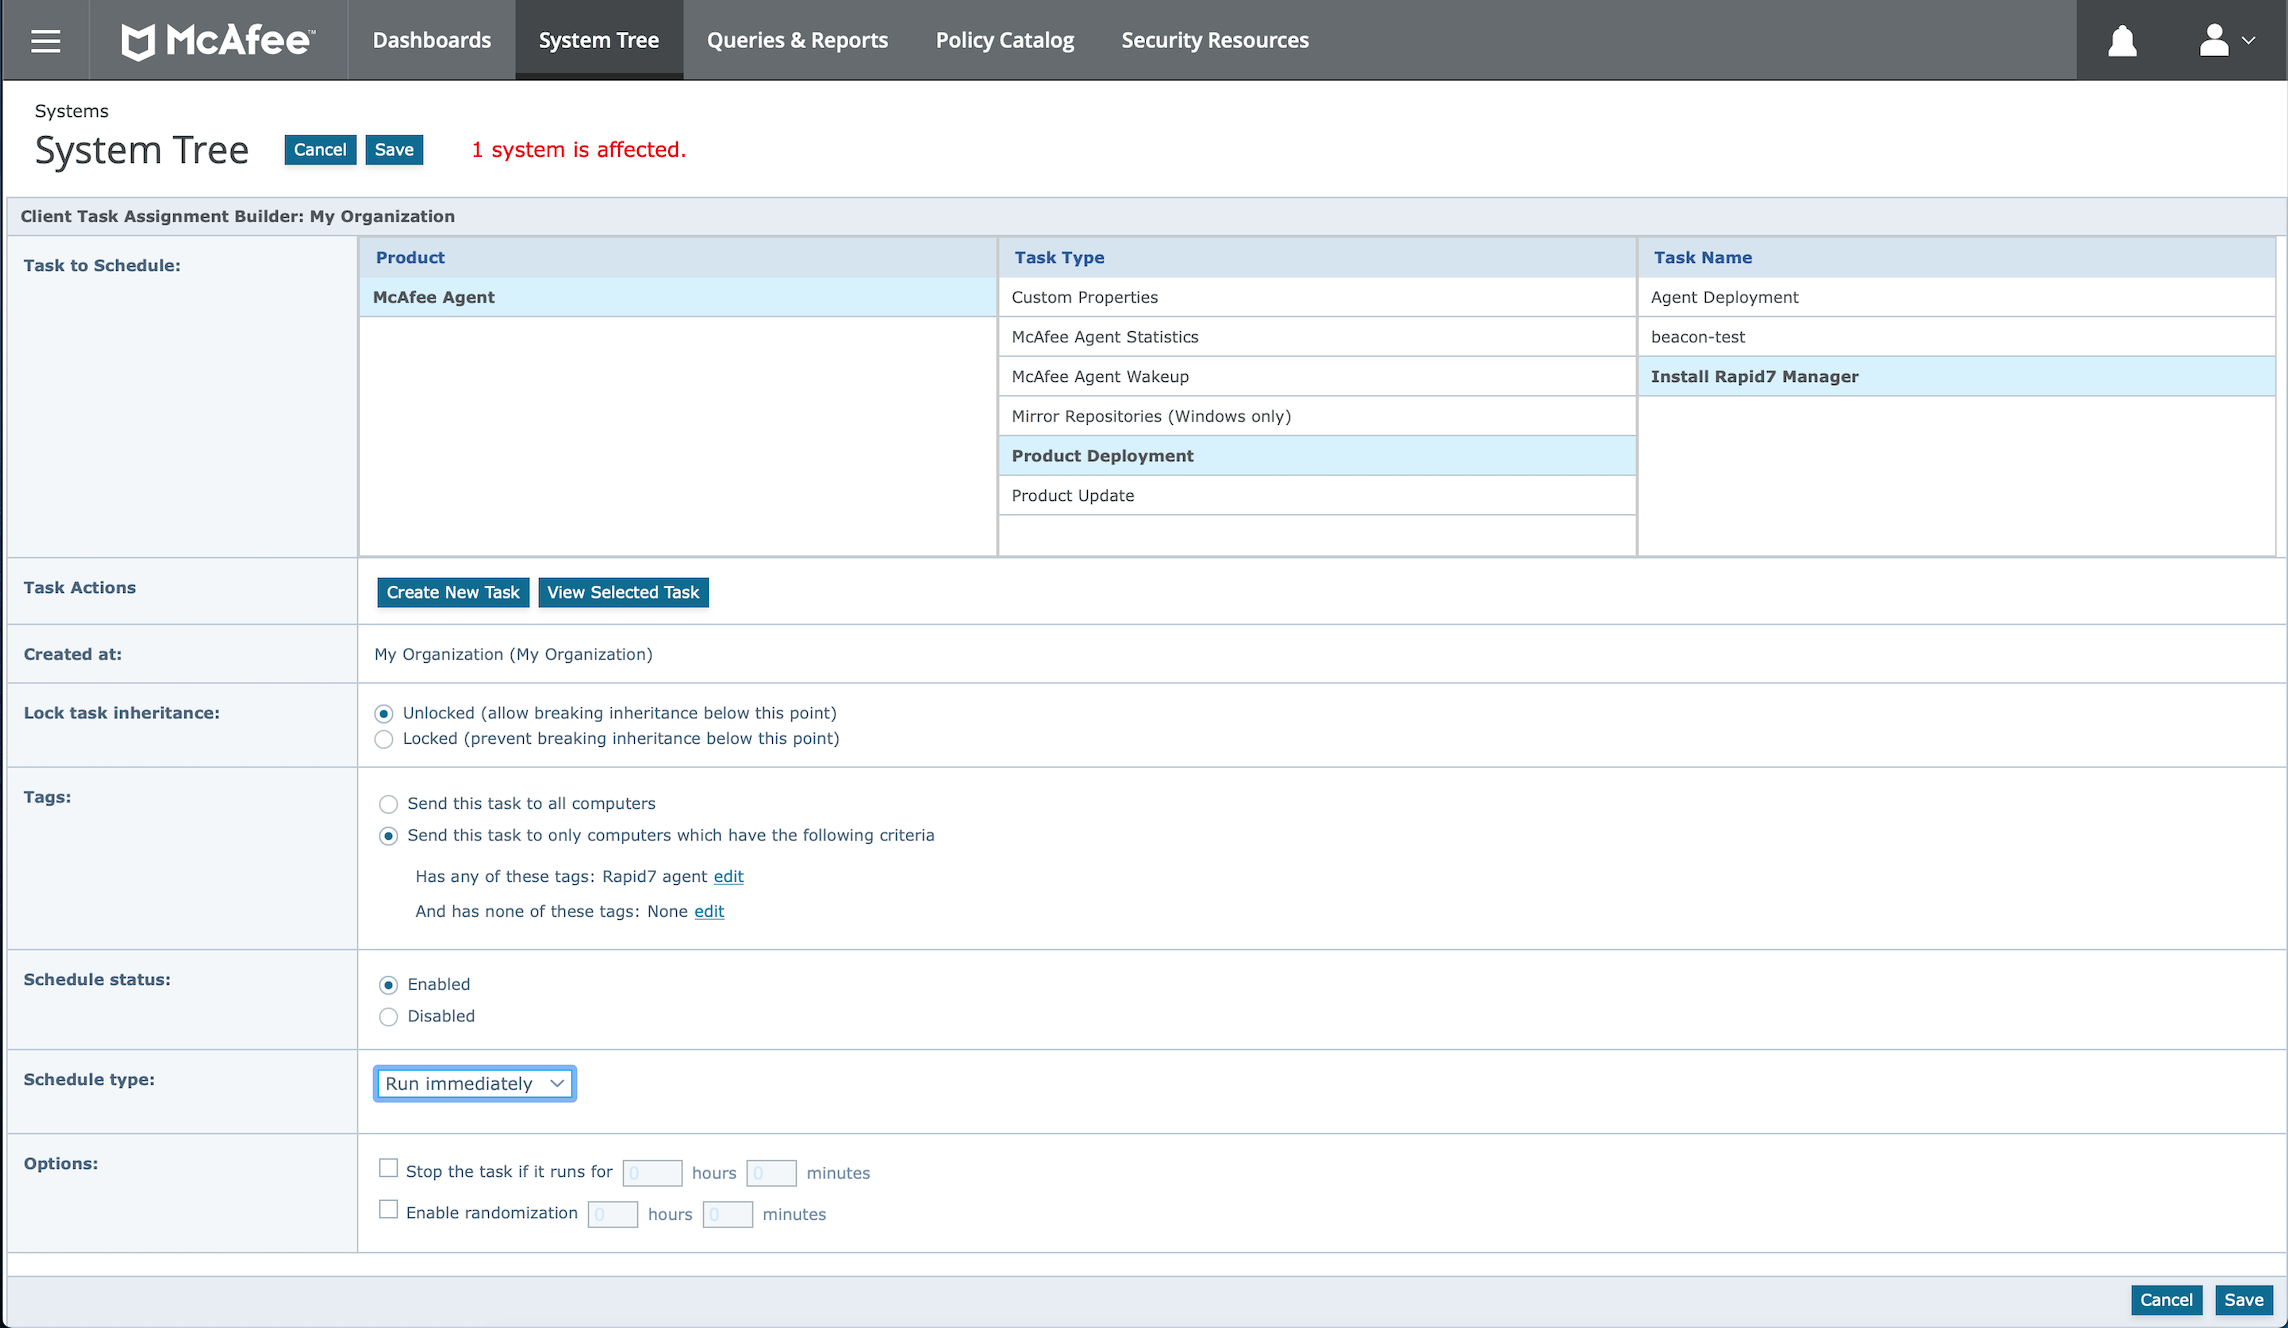
- Now that the installation task is created, you can apply it to the systems in your network. For this, you will need to return to the main menu. Under the Systems category, select System Tree.
- On the System Tree screen, select a system group and open the Assigned Client Tasks tab, then select New Client Task Assignment.
- In the New Client Task Assignment wizard, select the Install Rapid7 Manager task created in the previous step. Based on your selections, the final screen of the wizard looks something like this:
When this Client Task is assigned to your systems, the Rapid7 Manager is installed the next time ePO syncs with those systems. By default, this synchronization process occurs once every hour.
When the Rapid7 Manager on your target system syncs up with the ePO server, it is notified about the new policy assigned to the system. It then downloads the configuration files from the ePO server and the Rapid7 Agent (Insight Agent) hosted on the Rapid7 Command Platform (Insight Platform). You can confirm the installation of the Rapid7 Agent (Insight Agent) on your target systems by visiting the Program Files > R7Agent path.