Proxy Configuration
NOTE - Log Management (InsightOps) and Proxy Support
Log Management (InsightOps) does not currently support the agent-based proxy configuration procedure detailed here. As an alternative, Log Management (InsightOps) does support a logging.json proxy definition with additional key-value pairs. See the Log Management (InsightOps) - Configure the Rapid7 Agent (Insight Agent) to Send Logs page for instructions.
You can specify a Collector as your proxy
If you’ve already deployed one or more Collectors in your environment, you can target one of them to use as a proxy for this use case. The Rapid7 Agent (Insight Agent)’s collection tasks do not distinguish between a Collector or another proxy type. Specifying either achieves the same goal of reaching the internet.
The proxy-port must be set to 8037 in accordance with Collector requirements.
Rapid7 Agent (Insight Agent) versions 2.3 and later are proxy-aware and comply with proxy routing definitions for the purpose of communicating with the Insight platform at https://endpoint.ingress.rapid7.com:443 and its various subdomains. The agent follows the highest priority proxy definition found, whether configured at the operating system level or in the file structure of the agent, according to an obedience hierarchy.
Requirements
The Rapid7 Agent (Insight Agent) can only communicate through proxies that meet the following protocol requirements and authentication schemes.
Supported HTTPS Proxies
Your proxy must support the Request For Comments (RFC) 2817 standard , which specifies the HTTP CONNECT verb.
Authentication Schemes
Currently, only BASIC authentication is supported.
Agent Behavior With Proxies
If an HTTPS proxy is detected, the Rapid7 Agent (Insight Agent) adds it as an additional communication route. Existing routes to any deployed Collectors or standard direct communication routes to the Insight platform are not removed in the process. Although the agent automatically determines the most efficient route through a calculated efficiency metric, proxy routes are always used if they can reach the Insight platform at the time of transmission.
NOTE
Higher priority proxy definitions will override lower priority definitions.
| Priority | Proxy Definition Source |
|---|---|
| 1 | proxy.config file - manual configuration applied to the Rapid7 Agent (Insight Agent) installation directory |
| 2 | HTTPS_PROXY environment variable |
| 3 | Operating system configuration - “Internet Options” and WinHTTP for Windows. “Network Settings” for Mac |
Priority 1: proxy.config File
You can automatically configure the proxy.config file during a command line installation of the Rapid7 Agent (Insight Agent) or manually after the agent has been installed.
TIP
The command line argument method works with both the certificate package installer and the token installer.
To configure the proxy.config file at install time with the command line:
- Download the Rapid7 Agent (Insight Agent) installer for the operating system of your choice.
- Open a command line interface or terminal.
- Run one of the following installation or post-installation commands according to your endpoint operating system and include the proxy argument as shown (
10.1.2.3:8443appears here as an example IP address and port combination). For Windows, substitute<installerType>withx86_64for most Windows architectures orarm64for Windows ARM64.
- Windows -
msiexec /i agentInstaller-<installerType>.msi HTTPSPROXY=10.1.2.3:8443 - Linux -
sudo ./configure_agent.sh --https-proxy=10.1.2.3:8443 - Mac -
sudo ./configure_agent.sh --https-proxy=10.1.2.3:8443
If you want to configure proxy.config during a token-based agent installation, make sure your install command also contains the following token and region attributes. In the command, specify this information where indicated:
<target-directory-for-dependencies>- Specify your custom path.<regionalID:UUID>- Specify your custom token.<installerType>(Windows only) - Specifyx86_64for most Windows architectures orarm64for Windows ARM64.
Windows - msiexec /i agentInstaller-<installerType>.msi CUSTOMTOKEN=<regionalID>:<UUID> HTTPSPROXY=10.1.2.3:8443
Linux - sudo ./configure_agent.sh --token=<regionalID>:<UUID> --https-proxy=10.1.2.3:8443
Mac - sudo ./configure_agent.sh --token=<regionalID>:<UUID> --https-proxy=10.1.2.3:8443
Alternatively, you can configure proxy awareness on individual agents that you have already installed by manually creating the proxy.config file in the agent installation directory.
To manually create and configure the proxy.config file:
- Browse to the following folder in your agent installation directory according to your operating system:
- Linux -
/opt/rapid7/ir_agent/components/bootstrap/common/ - Windows -
C:\Program Files\Rapid7\Insight Agent\components\bootstrap\common\ - Mac -
/opt/rapid7/ir_agent/components/bootstrap/common/
- Linux -
- Create a new file named
proxy.config..configis the necessary file extension.
- Open
proxy.configin a text editor and define your proxy address according to this example syntax:
{ "https": "10.1.2.3:8443" }This JSON string stipulates that the agent must tunnel all HTTPS traffic to the address and port that you specify.
If you want to specify your proxy address with basic authentication, you can do so by modifying the proxy declaration string to include a username and password. Substitute <username> and <password> with the appropriate values according to this example:
{ "https": "<username>:<password>@10.1.2.3:8443" }Priority 2: Environment Variable
While lower in priority than the manual proxy.config file configuration method, the agent regards the HTTPS_PROXY environment variable as the highest priority system-level proxy definition. Additionally, the agent also obeys any destinations excluded by the NO_PROXY environment variable.
NOTE - This method is intended for Linux assets
Configuring the HTTPS_PROXY environment variable is not necessary for Windows or Mac assets, nor do we recommend it given its constraints and procedural complexity. If you need to configure proxy rules at the system level for these operating systems, follow the instructions detailed in the Priority 3: Operating System Configuration section of this article.
However, the HTTPS_PROXY environment variable is the only system-level proxy definition source available on Linux assets. If you need to configure proxy rules at the system level for a Linux host, you must set the HTTPS_PROXY environment variable according to the instructions detailed in this section.
Linux HTTPS_PROXY Environment Variable Procedure
The HTTPS_PROXY environment variable must be configured in the Rapid7 Agent (Insight Agent) service file in order to save properly and persist as the host is powered on and off. The agent service file is located in /etc/systemd/system/ir_agent.service.
To set the HTTPS_PROXY environment variable using the agent service file on a Linux host:
- Open a terminal on the Linux host.
- Navigate to your
ir_agent.servicefile and open it with a text editor, such asvi:
vi /etc/systemd/system/ir_agent.service- The output displays a series of categorical tags with variables under each tag. Under the
[Service]tag, add the following line as shown and specify your desired IP address and port (10.1.2.3:8443appears here as an example IP address and port combination):
Environment="HTTPS_PROXY=10.7.1.219:3128"- Save and close your changes.
- To finish, reload
systemctland restart the agent service:
systemctl daemon-reload
service ir_agent restart
Priority 3: Operating System Configuration
If higher priority proxy definitions do not exist, the agent obeys proxy rules defined by the standard proxy configuration tools featured by the Windows and Mac operating systems.
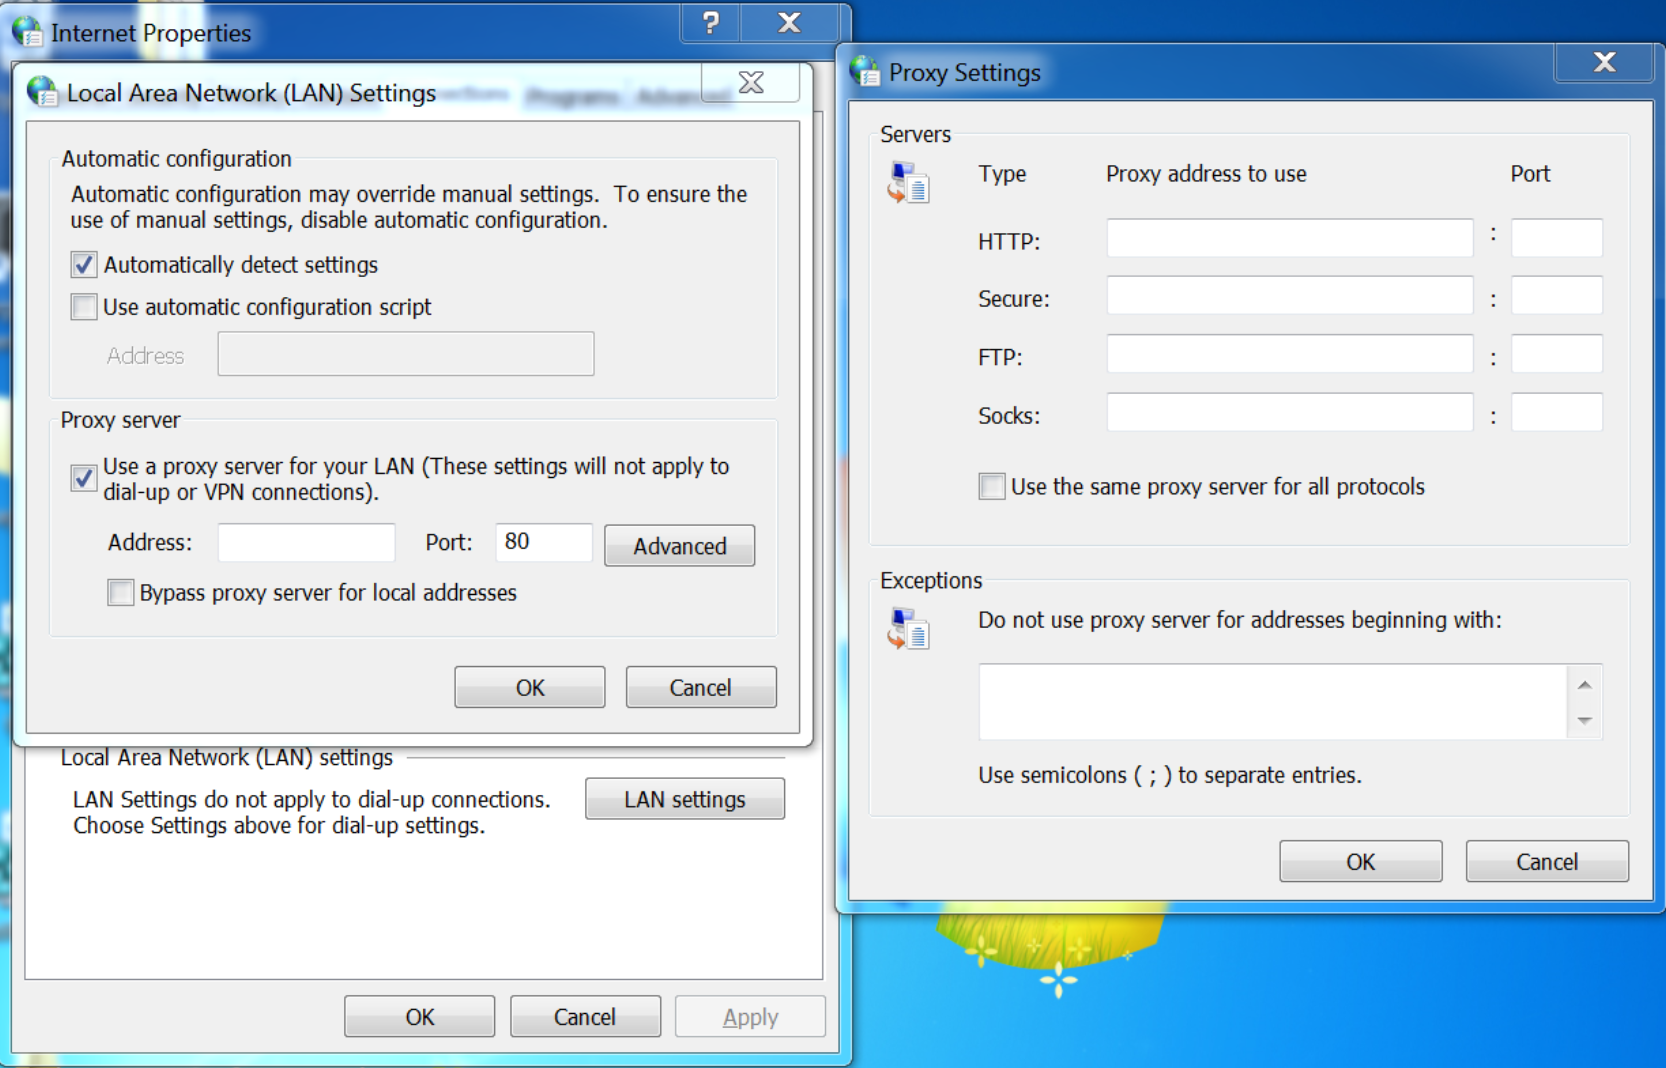
Windows
The agent supports both the Automatically detect settings and Use automatic configuration script options shown in the following “Local Area Network (LAN) Settings” window.
You can manually configure proxy definitions in the “Proxy Settings” window:
- Browse to the “Internet Properties” window.
- Click LAN settings.
- On the “Local Area Network (LAN) Settings” window, check the box under “Proxy server” to enable the proxy configuration fields.
- Click Advanced.
- Specify your proxy address in the “Secure” field.
- Specify any exceptions as necessary.
NOTE
Since Rapid7 Agent (Insight Agent) runs as the SYSTEM user, the following registry value must be used when using any of the above settings:
HKEY_USERS\S-1-5-18\Software\Microsoft\Windows\CurrentVersion\Internet Settings\Connections\DefaultConnectionSettings
Additionally, the agent references WinHTTP settings if no proxy definitions are found in the previous Windows system configuration options. Run the following command in a command prompt to set a WinHTTP proxy definition. Substitute <ip_address_or_domain> and <port> with the necessary values as shown:
netsh winhttp set proxy <ip_address_or_domain>:<port>If you need to specify exclusions, append the previous command with an exclusion list according to the following syntax. Substitute instances of <exclusion> with the necessary values and delimit multiple exclusions with a ; as shown:
netsh winhttp set proxy <ip_address_or_domain>:<port> "<exclusion1>;<exclusion2>"TIP
You can also mass-deploy WinHTTP proxy definition settings with a Group Policy. See the following Microsoft TechNet blog post for more information and instructions:
https://blogs.technet.microsoft.com/netgeeks/2018/06/19/winhttp-proxy-settings-deployed-by-gpo/
Given all these system-level proxy configuration options, the agent also follows a Windows-specific obedience hierarchy:
| Priority | Windows Proxy Definition Source |
|---|---|
| 1 | Automatically detect settings checkbox |
| 2 | Use automatic configuration script checkbox and field |
| 3 | Use a proxy server for your LAN checkbox and fields |
| 4 | In “Proxy Settings” window, “Secure” fields and “Exceptions” field |
| 5 | WinHTTP proxy-server and bypass-list settings |
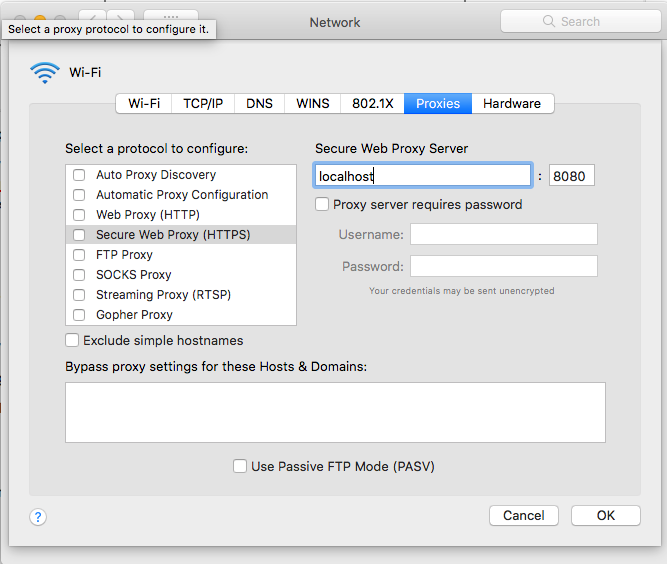
Mac
Configure proxy definitions in the “Proxies” tab:
- Click System Preferences.
- In the “System Preferences” window, click Network.
- In the “Network” window, click Advanced.
- Click the Proxies tab.
- Select the Secure Web Proxy (HTTPS) option.
- Specify an address in the “Secure Web Proxy Server” field.
- Specify any exceptions as necessary.