Deploy Prebuilt NGINX Agent Image
Background
tCell agents were designed with the goal of being easy to install and having low footprint, such that deploying in applications is generally a fast process. However, there are certain systems, such as a blog deployed on Wordpress, in which modifying the production application at all is impossible. Rapid7 tCell has a simple solution for this use case, by using a preconfigured NGINX server with tCell NGINX agent deployed, running inside a docker container. This tutorial provides end-to-end steps needed to implement this use case.
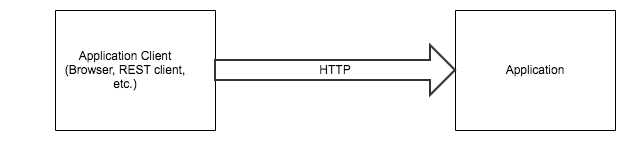
Here is a sample customer deployment with existing application:
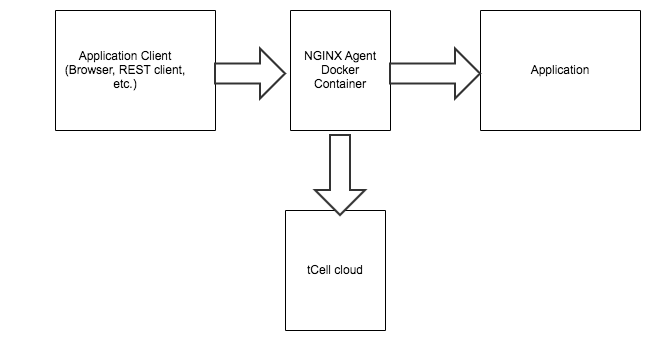
New deployment will be as follows:
Prerequisites
This use case assumes you already have a tCell application and tCell application API Key configured for use with this preconfigured agent. For instructions on how to configure and download the agent configuration with this information, see Server Agent Config documentation and Quickstart guide.
The steps included are only supported in NGINX agent 2.2.4 and above.
Docker. For details on installing docker, see https://docs.sevenbridges.com/docs/install-docker.
NGINX relies on an nginx.conf file for many configuration options, including server and location directives to determine how the NGINX server should forward requests to backend applications. As such, this tutorial assumes you have a configured nginx.conf setup to route requests to legacy applications. For details on how to configure this, see https://www.digitalocean.com/community/tutorials/understanding-nginx-server-and-location-block-selection-algorithms.
The deployment methodology we want to use is a Reverse-Proxy-based configuration as explained at https://linuxize.com/post/nginx-reverse-proxy/.
We assume the nginx.conf file is located at /host/path/nginx.conf for the purposes of the tutorial.
Steps
The nginx.conf must have the tcell module enabled. This is done by adding
load_module modules/ngx_http_tcell_agent_module.so;before the events section in the nginx.conf file mentioned in Prerequisites. An example of the beginning of nginx.conf file is:1user nginx;2worker_processes auto;34error_log /var/log/nginx/error.log warn;5pid /var/run/nginx.pid;678load_module modules/ngx_http_tcell_agent_module.so;910events {11worker_connections 1024;12}Start a docker container from Docker Hub hosted image using the following docker run template.
Docker execution template1docker run -d -p 8090:80 -e "TCELL_AGENT_APP_ID=APIID" -e "TCELL_AGENT_API_KEY=APIKEY" -v /host/path/nginx.conf:/etc/nginx/nginx.conf:ro -t rapid7/nginx-tcellMore detailed information about the flags and usage are provided below. All flags marked required must be passed to docker run or the agent will not work correctly.
Flag Description Required -d Run in detached mode. No -p 8090:80 Expose port 80, standard HTTP port, within the container to the host as port 8090. If, for example, one wants to expose port 443 within the container to the host as port 443, one would use -p 443:443."Yes -e "TCELL_AGENT_APP_ID=APIID" This tells the tCell agent what App ID the agent should use to send data to the tCell cloud. In this example, it is using appid "APPID". Yes -e "TCELL_AGENT_API_KEY=APIKEY" This tells the tCell agent what API Key to use when authenticating the agent with the tCell cloud. Yes -v /host/path/nginx.conf:/etc/nginx/nginx.conf:ro This is used to provide the nginx.conf custom configuration file, described in Prerequisites section and NGINX Beginner's Guide, which is used to configure the NGINX server. The configuration file is passed to the docker container using the docker volume mounting framework. In this example, the nginx.conf file is located in the host machine in the /host/pathfolder.Yes -t rapid7/nginx-tcell This specifies the docker image to run. In this case, the image is the tCell NGINX agent docker image pulled from Docker Hub. Yes Update any DNS servers to resolve to new NGINX docker exposed machine/port instead of legacy backend. We recommend testing the legacy app through non-DNS before updating DNS in case of a problem.
Congratulations! You are now deployed with a tcell agent protecting and monitoring your legacy backend application!
Validation
The easiest way to validate an agent is online is to log into the tcell console as documented in Quick Start.
Troubleshooting
No data show up in the tcell console while validating. In this case, it is likely that when doing the docker run command, either the appid/API Key was not passed in or is invalid. Check the tcell.log file to see if errors occurred while sending data.
Next Steps
The above steps are meant to be a minimal quick deployment. For a more robust, highly available deployment, we recommend you do a clustered deployment. See https://docs.docker.com/ee/ucp/admin/configure/join-nodes/join-linux-nodes-to-cluster/ or https://kubernetes.io/docs/setup/production-environment/tools/kubeadm/high-availability/ for details on how to achieve this.