⚠️
This product is no longer sold. We no longer update these help pages, so some information may be out of date.
Create Tags and Alerts
Step 3: Create Tags and Alerts
Tags can help you quickly spot important issues in your logs and are the building blocks for generating alerts in Log Management (InsightOps). With tags and alerts, you can:
- Filter for events that matter the most to your business.
- Easily recognize keywords or patterns in your data.
- Receive real-time alerts of known issues or critical events.
- Get notified when anticipated events don’t occur as expected.
Create a Tag
- Click the Manage Alerts icon on the left-side navigation bar.
- Note: You need to create tags before setting up alerts.
- Click the Add tag/alert button.
- Select Basic tag.
- Enter a tag name (e.g. “500 error” or “critical”).
- Enter a pattern to be matched. For example, you can match a basic keyword, a regular expression, or an advanced calculation (e.g. CPU>70).
- Select a label for your tag from the pre-populated list or create a new label. Note: Labels are how the tag will display in your logs.
- Choose the logs to which the tags will apply.

Learn more about Tags.
Create an Alert
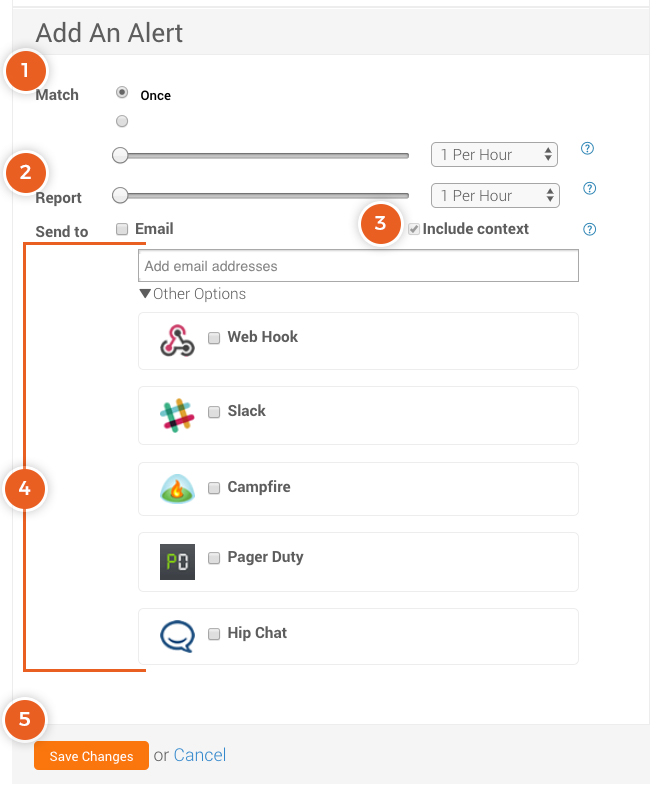
Once you’ve created a tag, you can configure its alert settings.
- Specify how many times a pattern must match a log entry before an alert is triggered.
- Specify how often you would like to receive alert reports.
- Check the “Include context” box if you want your alert to include entries that were logged at the same time as the entry that generated the alert.
- Specify how you would like to be notified. Options include email address(es), Web Hook, Slack, Campfire, Pager Duty, and Hip Chat.
- Click Save Changes.
Learn more about Alerts.