(Not Supported) Bamboo Integration
This integration is no longer supported
As of June 2024, Atlassian no longer supports integration between Bamboo and Rapid7. The information in this section is preserved as an archive. For further assistance, contact Rapid7 Support.
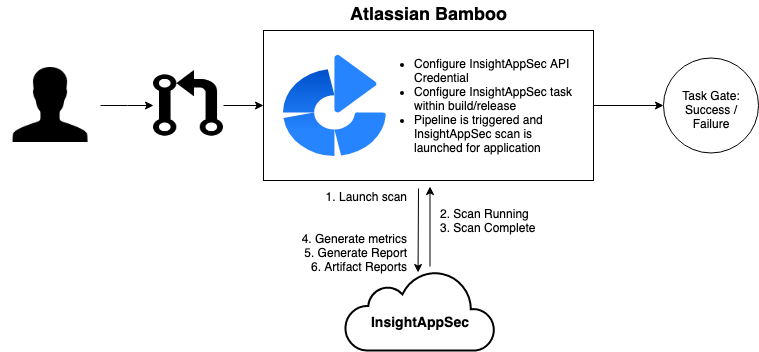
Application Security (InsightAppSec) integrates with Atlassian Bamboo build and release pipelines to empower development teams to autonomously test the integrity of an application in run-time within their own CI/CD workflow. Using the Application Security (InsightAppSec) Bamboo plugin within a Bamboo pipeline gives security teams essential feedback regarding a web application’s security posture and risk status as part of an integrated CI/CD task and allows development teams to pass/fail and fix fast.
Overview
The Application Security (InsightAppSec) Bamboo Plugin utilizes the Application Security (InsightAppSec) RESTful API to dynamically retrieve applications, launch scans, monitor their progress, and generate reports based upon scan results. This plugin can be leveraged as both a Build and Release task within Atlassian Bamboo.
Key Capabilities
The extension is designed with the following capabilities:
- Launch a new Application Security (InsightAppSec) scan during build or release
- Perform scan monitoring
- Provide a metrics report of scan results
- Provide raw scan results
- Enforce scan gating based on vulnerability query filtering
Scan gating provides an automated way to fail tasks as part of a build should scan results meet a defined vulnerability query, stopping certain risk from being promoted into production.

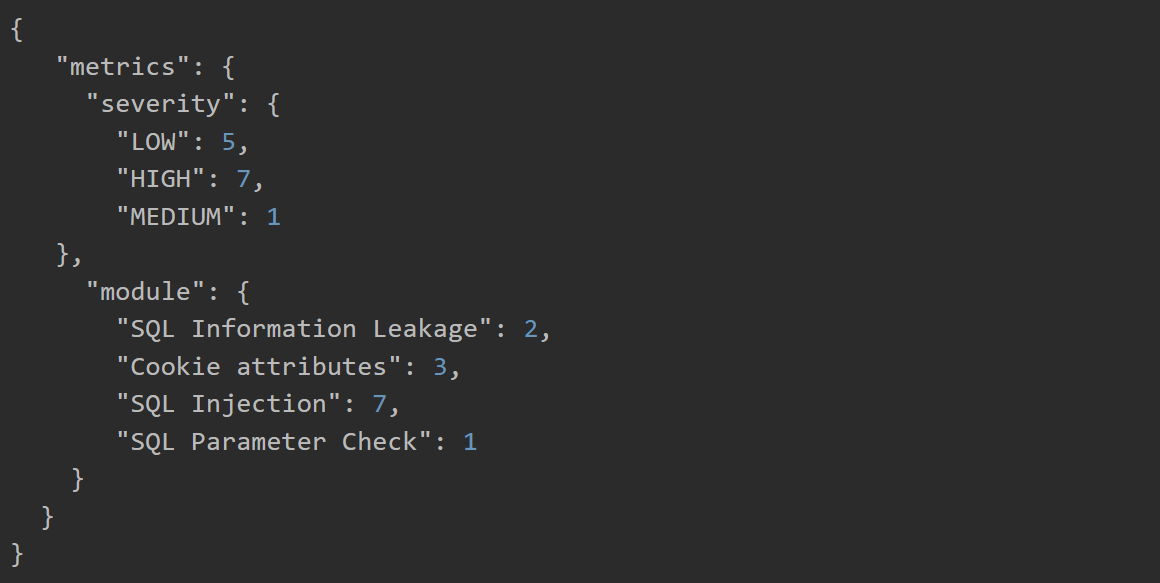
Metrics Report Output
Once the scan within the build or deploy plan has been completed, a report will be generated and added as an artifact to the Bamboo job. It contains metrics on vulnerability severity and attack modules retrieved from the scan.
Get Started
By integrating Application Security (InsightAppSec) into your CI solution, quality gates can be enforced to proactively secure applications before being released into production. The Application Security (InsightAppSec) Bamboo Plugin is a way to make security teams smarter while keeping development teams efficient. Visit the Atlassian Marketplace Listing to get the Application Security (InsightAppSec) Bamboo Plugin.
Install the Application Security (InsightAppSec) Bamboo Plugin
Before utilizing the plugin as part of a build or deploy plan, it must first be installed within the Bamboo environment. There are two ways to accomplish this, from the Atlassian Marketplace or within Bamboo.
Install the Application Security (InsightAppSec) Bamboo Plugin from Atlassian Marketplace
- Navigate to the Atlassian Marketplace Listing or search for “Rapid7 Application Security (InsightAppSec)” from the Marketplace home.
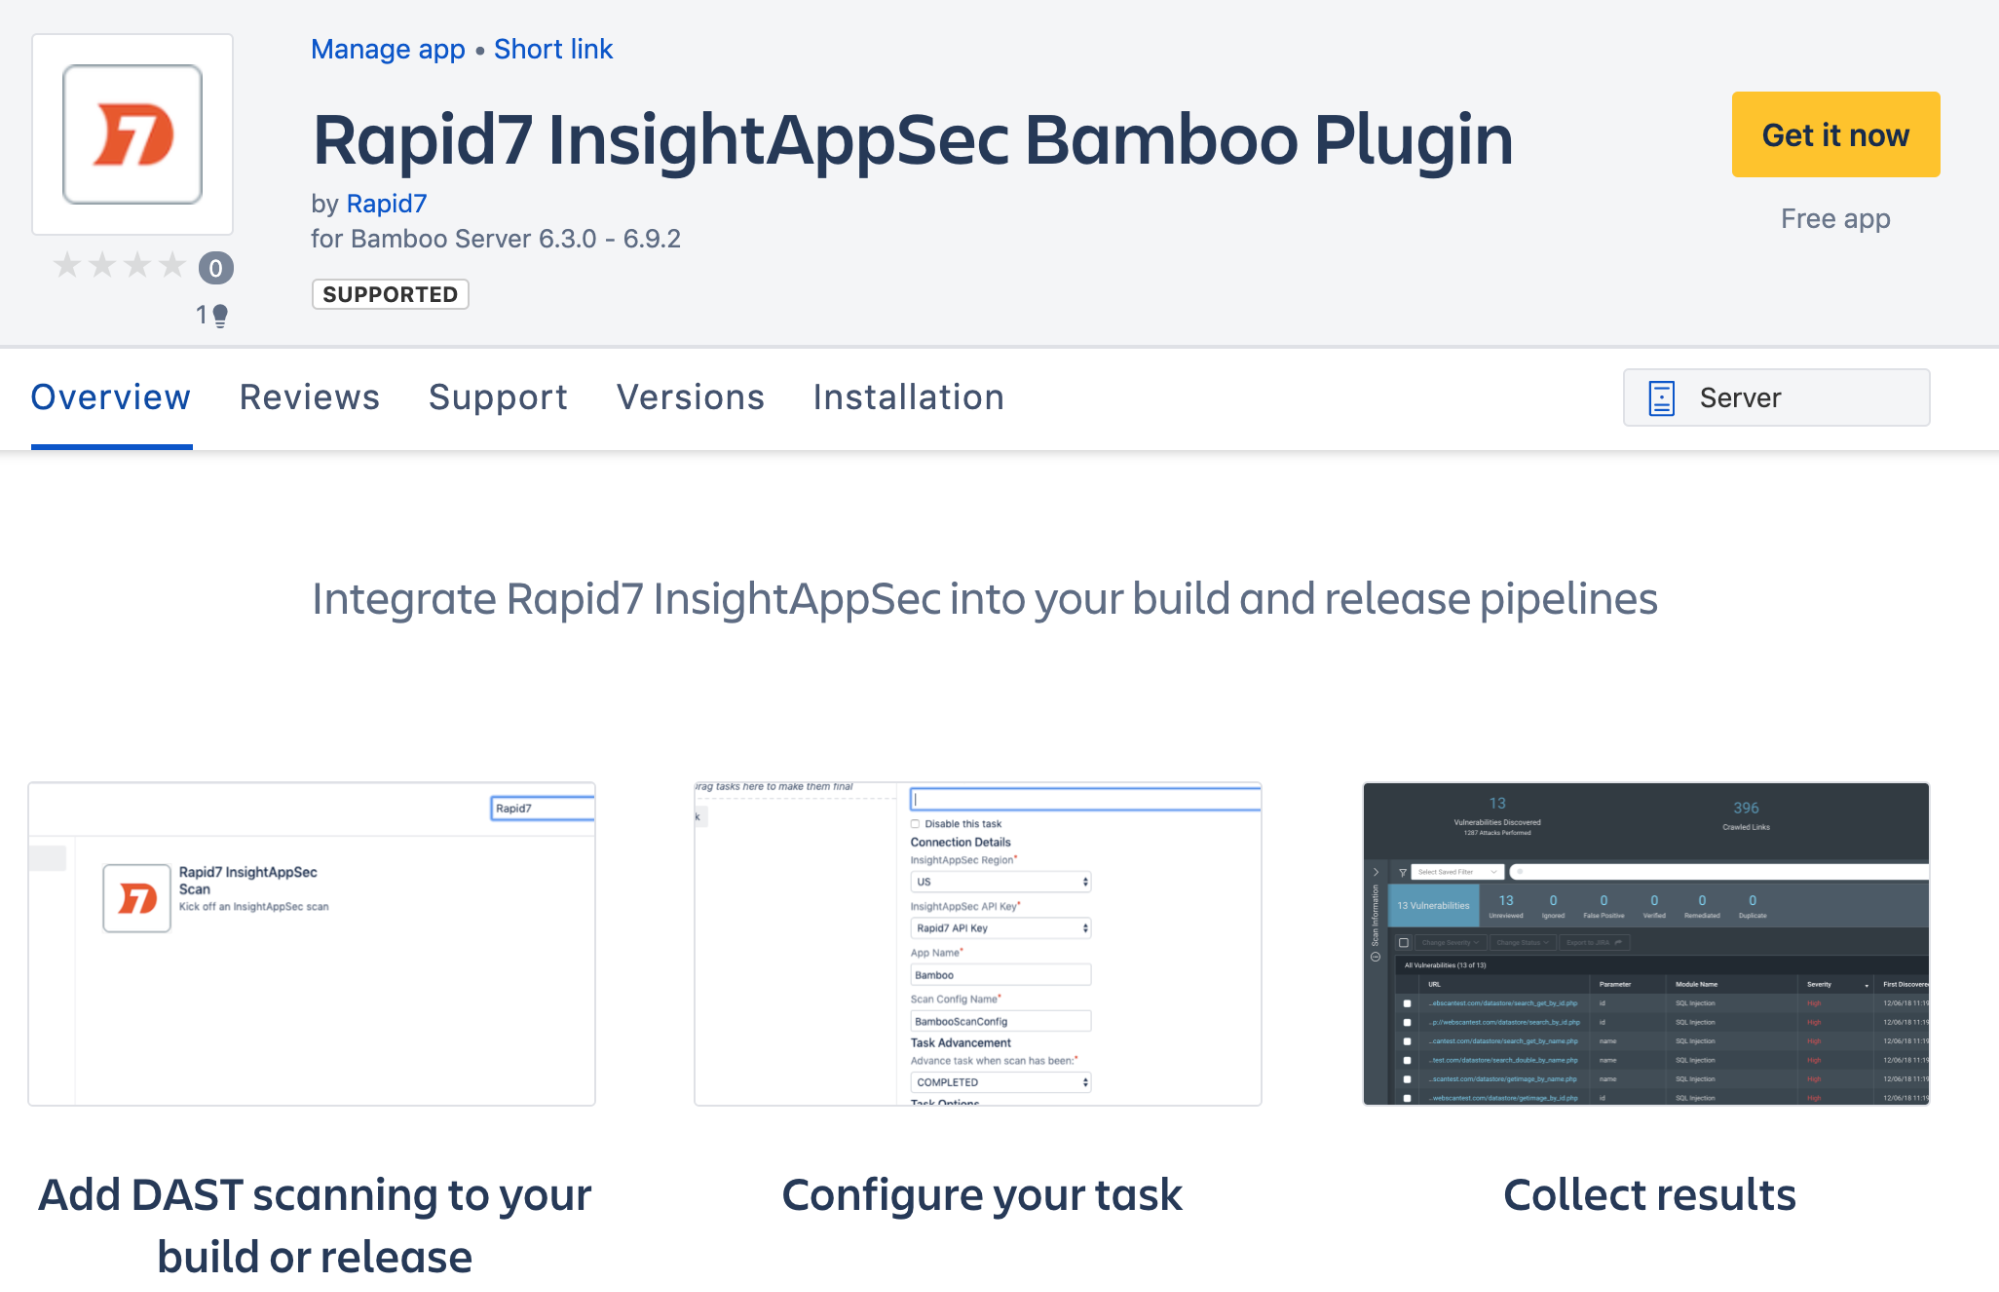
- Click the Get it now button to download the plugin in JAR format.
- Manually install the plugin within Bamboo Administration.
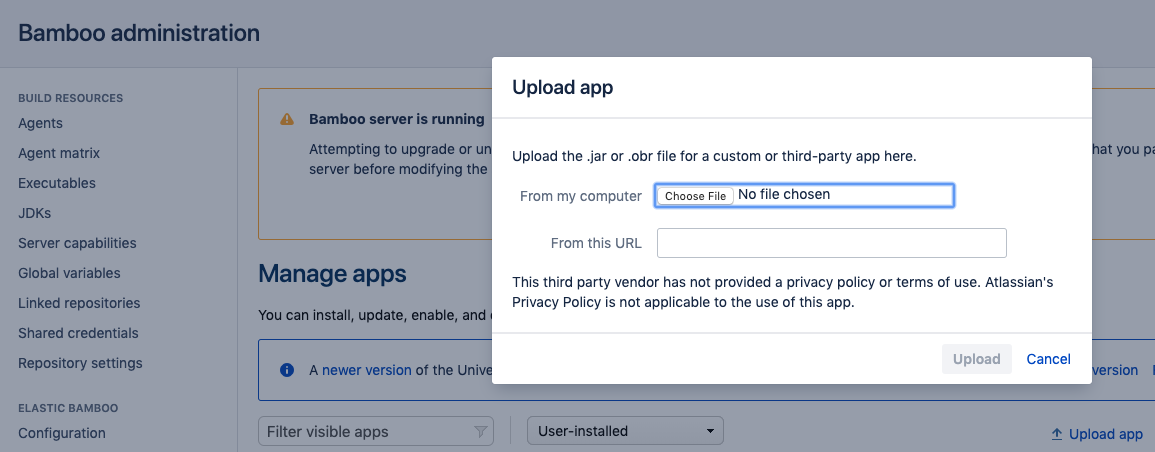
Install the Application Security (InsightAppSec) Bamboo Plugin from within Bamboo
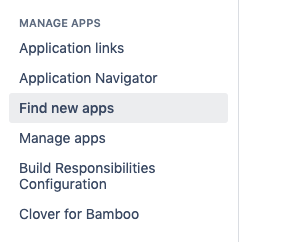
- In Bamboo Administration, click on Find new apps on the left panel of the administration page. this will open the Atlassian Marketplace for Bamboo.
- Search the marketplace for “Rapid7 Application Security (InsightAppSec)”.
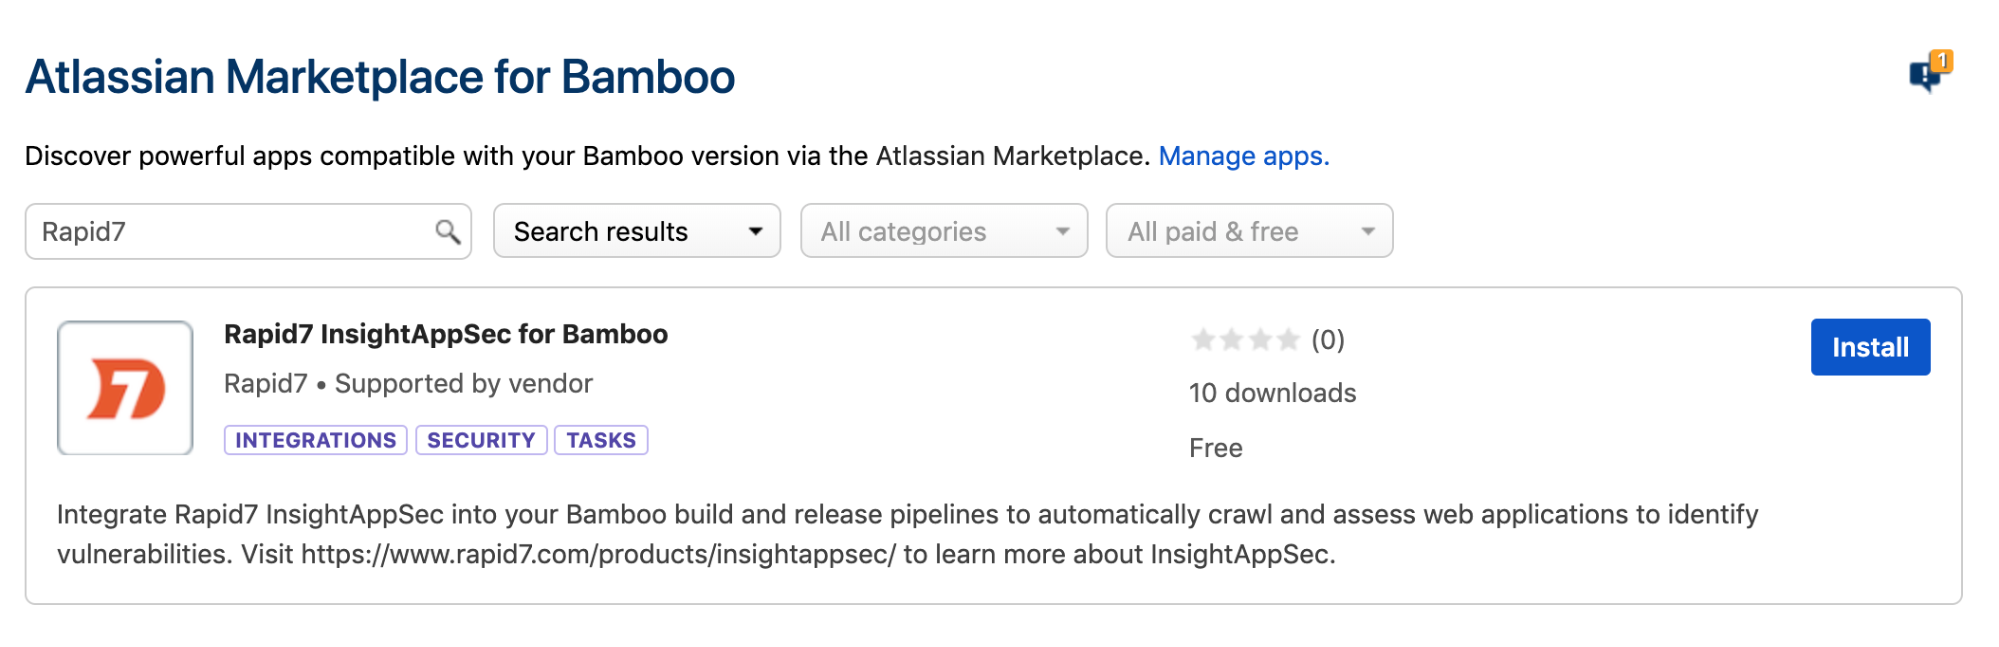
- Click the Install button and agree to the terms of use. This will then install the plugin and make it available for use without any manual steps.
With installation complete, you can now move on to plugin and task configuration.
Create a Bamboo Plan with Application Security (InsightAppSec) Plugin
This plugin utilizes the Application Security (InsightAppSec) RESTful API to perform actions, such as retrieving applications and launching scans. To allow for this, we must first configure a connection to this API so all extension functionality can proceed accordingly.
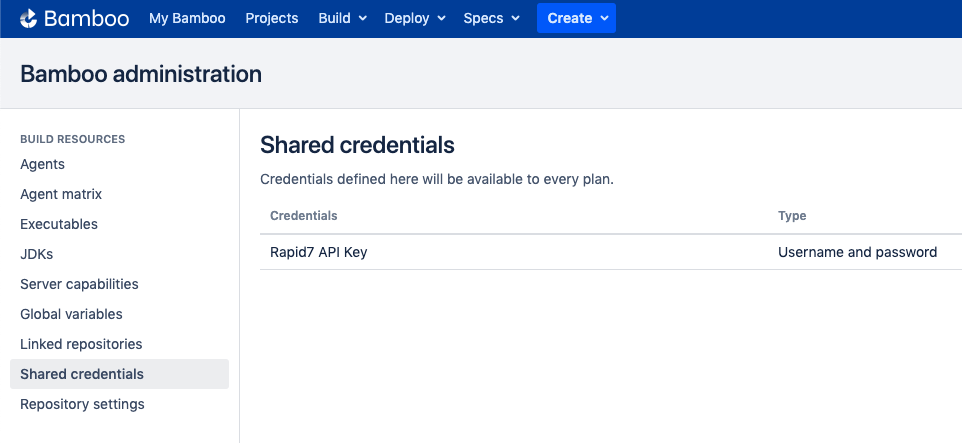
- From within Atlassian Bamboo, navigate to Bamboo Administration. In the left hand panel, select Shared Credentials.

- Select the “Add new credentials” dropdown followed by choosing the “Username and password” option to begin with creating a credential to be used by the plugin.
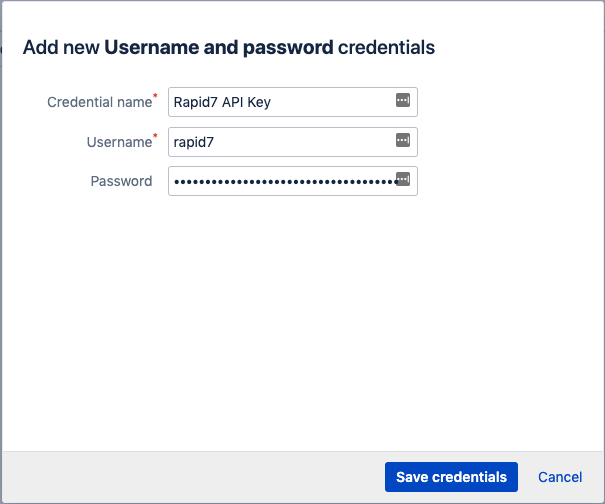
- Provide a “Credential name” that begins with “Rapid7” for this credential.
Note
If the credential is not prefixed with “Rapid7” it will not appear as an option within the Bamboo task configuration for the plugin.
- The “Username” field should be populated with a human readable field; however, this field is not used. Finally, the “Password” is used to store the API Token which is a unique key that is provided by Rapid7 and serves as an identifier for API authentication.
- Click “Save credentials” and the credential will be created and listed under Shared credentials, should you ever need to edit it.
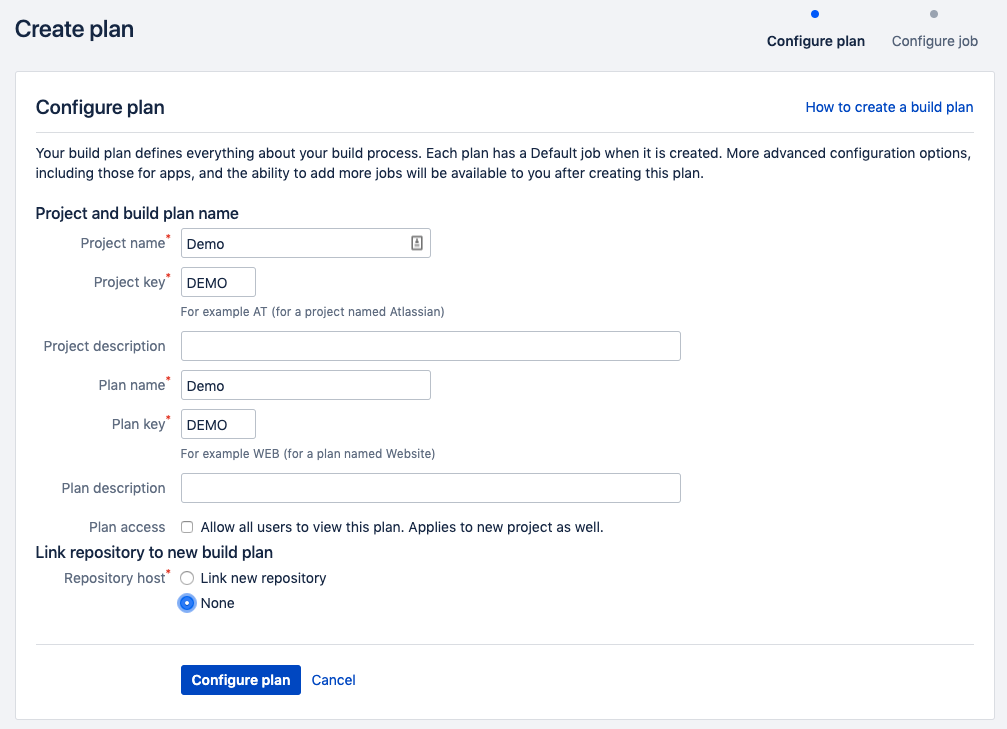
- With the shared credential configured, the next step is to create a build or deploy plan that will utilize the new plugin. If a Build or Deploy plan already exists, navigate to it and edit the plan. If a new plan needs created for use with the Application Security (InsightAppSec) plugin, use the “Create plan” option in the top navigation of Bamboo.
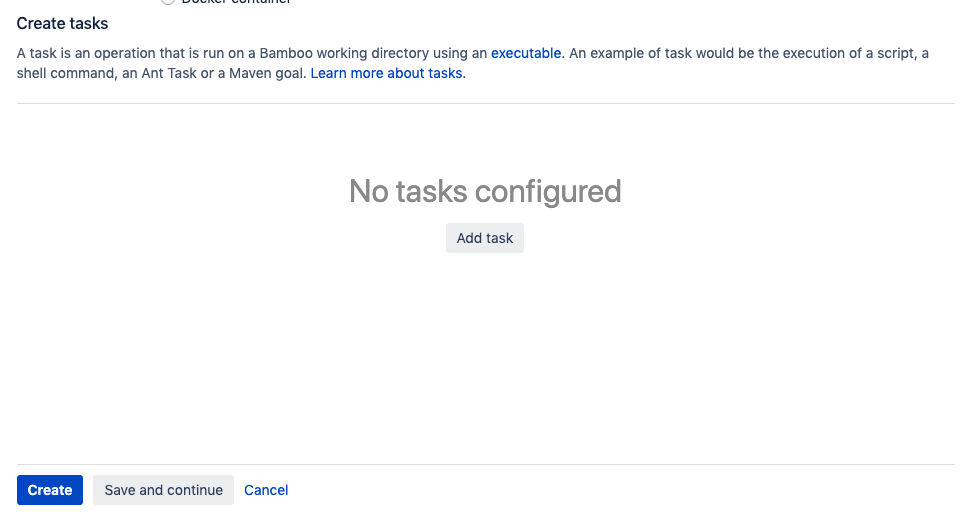
- Once a new Build or Deploy plan exists, a new Task can be added to it. Select “Add task” and then search for “Rapid7” or Application Security (InsightAppSec)”.

- Select the “Rapid7 Application Security (InsightAppSec) Scan” task, which will then provide prompts for configuring the task for the specific App and Scan Configuration in scope.
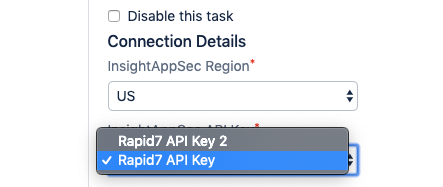
- The base configuration of the task will require the Region and API Key to be chosen. Ensure the proper region is chosen for your Rapid7 organization.
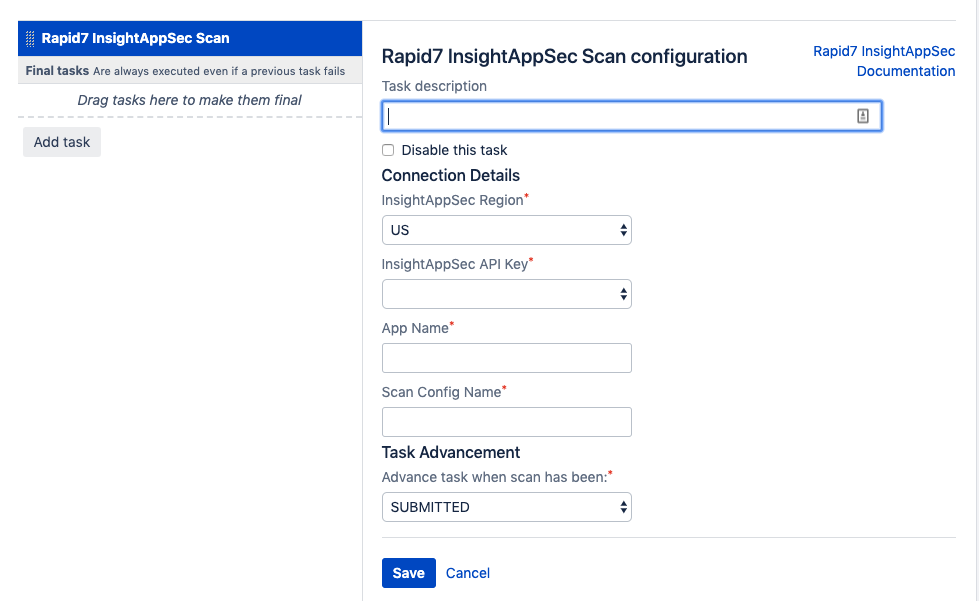
This is also where the proper API Key will be selected as configured previously. It is important to remember that depending on the API key used, different permissions will be provided when running scans.
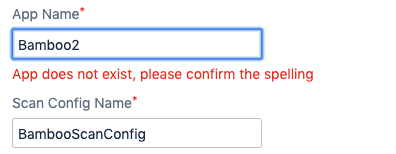
When configuring the task, you will also be required to provide the “App Name” and “Scan Config Name” to identify what to run the scan for. These names should already exist within Application Security (InsightAppSec) as a previously created App and Scan Config. While saving the task, a validation will be made against the Application Security (InsightAppSec) API to ensure these items exist. If they do not, an error prompt will be provided to inform the user.
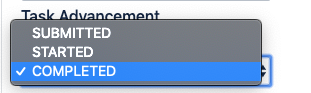
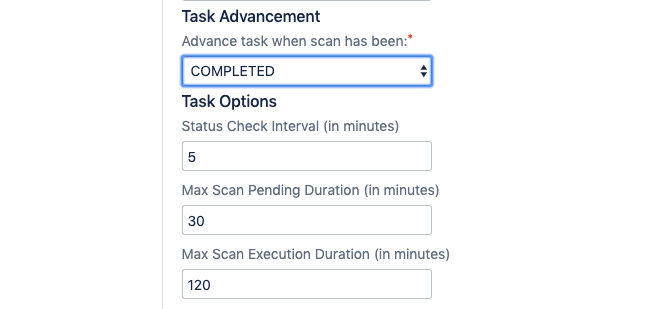
- It is possible to configure “Task Advancement” in three different ways. This allows for flexibility with what to do after triggering a scan as part of the Build or Deploy plan:
- COMPLETED - Move on from task after the initiated scan has completed
- STARTED - Move on from task once the scan has been submitted and started
- SUBMITTED - Move on from task immediately after submitting scan
Depending on the advancement option selected, additional settings will be provided to further configure the task.
- Finally, an optional “Vulnerability Query Enforcement” setting is provided in order to do gating based on scan results. This option is only visible when “Task Advancement” is set to “COMPLETED”. When selecting this option, it is important to define a query which is used to fail the scan if any vulnerability findings are returned that match the query for the specific scan.
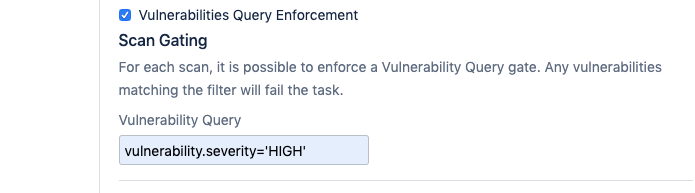
In this example, the scan will fail if any findings are returned with a severity of HIGH. This is a simple way to gate Application Security (InsightAppSec) scans as part of the CI/CD pipeline. It is possible to configure multiple query conditions as long as they match the API documentation. Review the “Useful Examples” for assistance: https://help.rapid7.com/insightappsec/en-us/api/v1/docs.html#tag/Search Here is a list of all the settings in greater detail:
- Task Description - The description of the task as it will appear in the plan.
- Application Security (InsightAppSec) Region - Dropdown of Application Security (InsightAppSec) regions for connecting to the API.
- Application Security (InsightAppSec) API Key - A drop-down menu to select the Rapid7 API Key to be used.
- App Name - A text field to input the Application Security (InsightAppSec) application name that will be utilized in the scan.
- Scan Config Name - A text field to input the Application Security (InsightAppSec) scan configuration that will be utilized in the scan.
- Advance task when scan has been - A drop-down menu to dictate when to move on from task; options: COMPLETED, STARTED, SUBMITTED.
- Status Check Interval - The frequency (in minutes) that the scan’s status will be checked. Dependent on task advancement set to COMPLETED or STARTED.
- Max Scan Pending Duration - The time (in minutes) to wait for the scan to be started. Task will be marked a failure if pending duration is reached.
- Max Scan Execution Duration - The time (in minutes) to wait for the scan to be completed. Task will be marked a failure if max execution duration is reached.
- Findings Report Generation - Option used to determine whether a raw JSON findings report will be generated and added as an artifact for the build.
- Vulnerability Query Enforcement - Option used to determine whether the build will fail if the provided query returns results.
- Vulnerability Query - The query executed against the completed scan’s findings to retrieve any matching vulnerabilities. Dependent on the option Vulnerabilities Query Enforcement being checked.
Once you have configured the settings for the Rapid7 Application Security (InsightAppSec) task, as well as completed any additional tasks you want in the plan, Save the task and the plan.
Execution
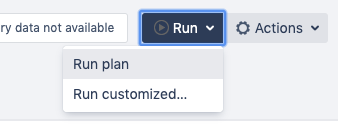
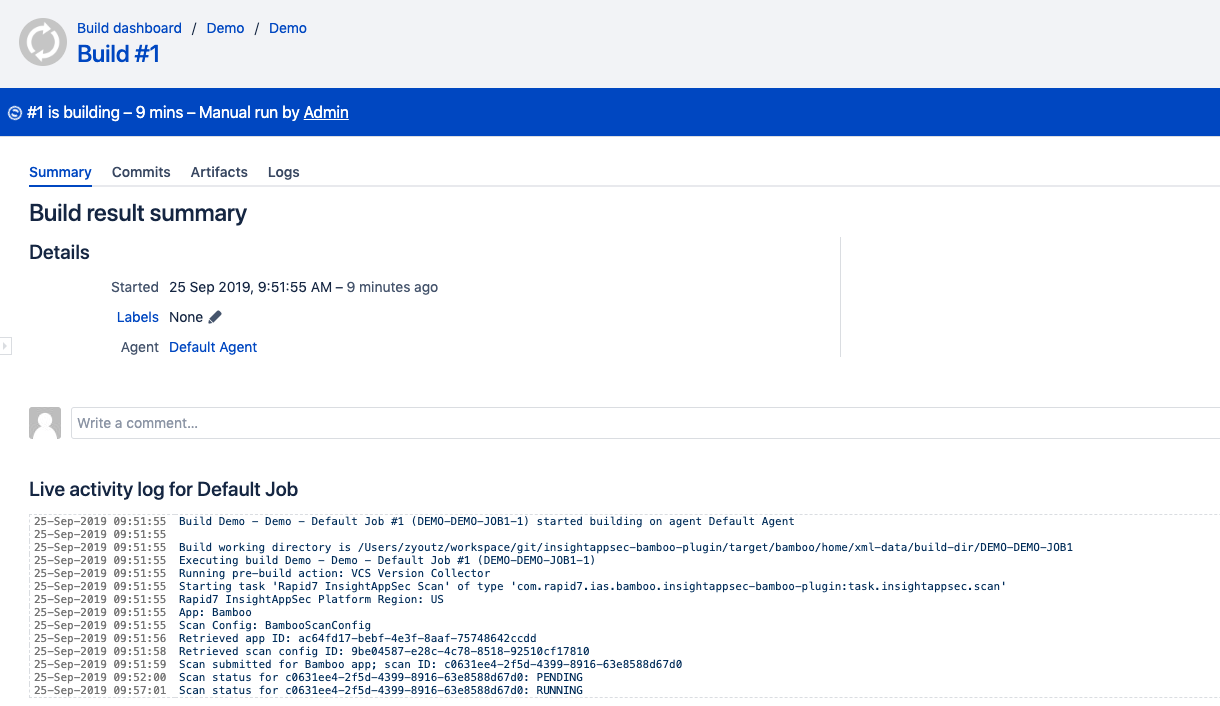
Once the plugin and task have been configured, the plan can be run to initiate all the tasks. Once the Application Security (InsightAppSec) Scan task is reached, a scan will be triggered within Application Security (InsightAppSec) and then the task will continue based on the configurations set. To run the plan, navigate to the Plan and select “Run plan”.
Once the Application Security (InsightAppSec) task is reached within the run, logs of its status will be found in the job output. This can be helpful to know when the job moves from Pending to Running state.
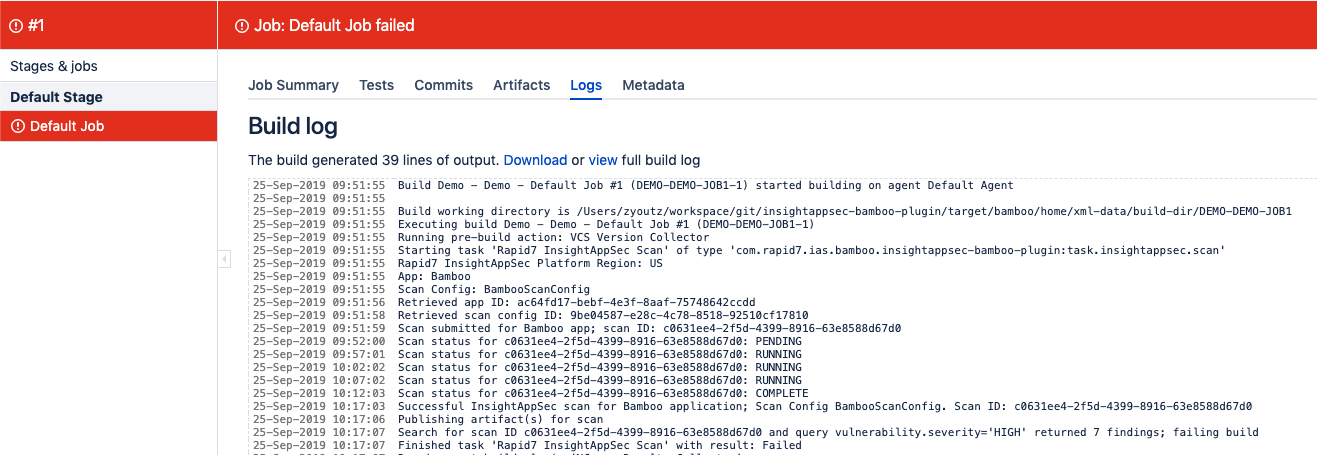
In the scenario where vulnerability query gating is enforced, the build may fail if any findings meet the query criteria. This will result in the task and plan failing with details of the number of findings meeting the criteria.
Reports Artifacts
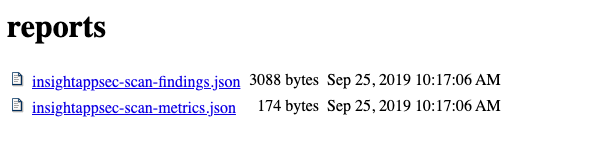
Whether a successful or failed build, report artifacts will be provided and archived for the job.

There are two possible reports that will be generated. The first is a metrics report with a rollup of counts regarding vulnerability severity and modules.

The second is a raw report of scan findings. This report will only be generated if “Findings Report Generation” is enabled during task configuration.
These two reports can be used for more sophisticated gating, trending of scan findings, or even generation of tickets based on the content. While those functions are not implemented in the plugin, providing the reports should make it that much easier to ingest that data if additional functionality is needed based on scan results.
Troubleshooting
The Rapid7 Application Security (InsightAppSec) Scan task doesn’t appear when I search for it while creating a plan
The plugin must first be installed in your Bamboo environment in order for it to be available for usage in a Build or Deploy plan. Go to “Manage Apps” from within Bamboo Administration and then search for “Rapid7 Application Security (InsightAppSec)” in order to install the plugin. The plugin can also be found on the Atlassian Marketplace . Settings, then select Extensions. Check to see if the extension is listed under the Installed tab. If not, then you can find it under its
My API Key is not available in the credential dropdown
You must first create a shared credential under Bamboo Administration in order for API keys can be made available for setting up a task. Ensure any API keys that have been created for use by the Application Security (InsightAppSec) Plugin begin with “Rapid7” as part of the shared credential name.
The job or task failed and I’m not sure why
There are logs available within the Bamboo job that runs the Rapid7 Application Security (InsightAppSec) task of the plan. Go to the running plan job and select “Summary” for any running jobs or “Logs” for previously completed jobs to historical logs.
There are API errors occurring in the logs when running the pipeline
API errors are most likely due to an issue with the API key or region that was setup to be used with the configured task. In the Rapid7 Application Security (InsightAppSec) Scan task that you added, double check the Region and API Key are correct for your Application Security (InsightAppSec) environment.
I didn’t get any artifacts saved for the job on completion
This could occur for a few reasons:
- The “Task Advancement” option is configured for “SUBMITTED” or “STARTED”. In each scenario, the task will not wait for scan completion which is necessary to generate the artifacts.
- The scan was considered a “failed scan” for any number of reasons, and reports are not generated for a failed scan. Check the logs for the Application Security (InsightAppSec) task to find out why the scan failed.
- The “Findings Report Generation” option was not selected so only the metrics report will be generated.
The scan gating didn’t seem to work and my build was successful
Double check the query that was input in the Vulnerability Query field. This requires a specific type of formatting that could result in the query not returning any results if not adhered to. Here’s an example of scan gating based on severity. Note the single quotes used.
vulnerability.severity=‘HIGH’
Additional query options can be found in the Application Security (InsightAppSec) API documentation . Only filters for the Vulnerability Resource Type should be leveraged.
The plan immediately went to the next step upon launching the scan, without giving any scan status updates
To receive logging with scan status updates, you must set “Task Advancement” to “COMPLETED” along with a “Scan Status Interval” defined. Otherwise the plan will proceed to the next task immediately after submitting or starting the scan in Application Security (InsightAppSec).
Immediately moving on to the next task can be helpful in environments where no gating or feedback to Atlassian Bamboo is necessary and teams only want to trigger scans when new changes are deployed.
The logs say that my scan timed out
Failing the scan on timeout is an option included in the extension. If it timed out, then the scan is taking longer than expected to complete based on this configuration. You will need to adjust the “Max Scan Execution” setting to a timeout that is appropriate for the environment and application.
Support
Need help? We’ve got you covered. Sign into the Customer Portal for our top recommended help articles, and to connect with our awesome Support Team.
Create and manage your cases with ease and get routed to the right product specialist. CUSTOMER PORTAL SIGN IN Introducing the Scheduler: Customers can now schedule time with a support engineer, directly in the Customer Portal. Learn how .