Configure Scan Scope
You can use scan scope to decide which URLs are attacked or crawled. You can set the app level URLs within the app or set the scan config URLs from within the scan config. This will go over how to set the scan scope to decide how your app is scanned.
Set the following options to control the app scan.
Scan URLs
In the Scan URLs subsection, you can add URLs that you want to scan with this config including those already specified in the app itself.
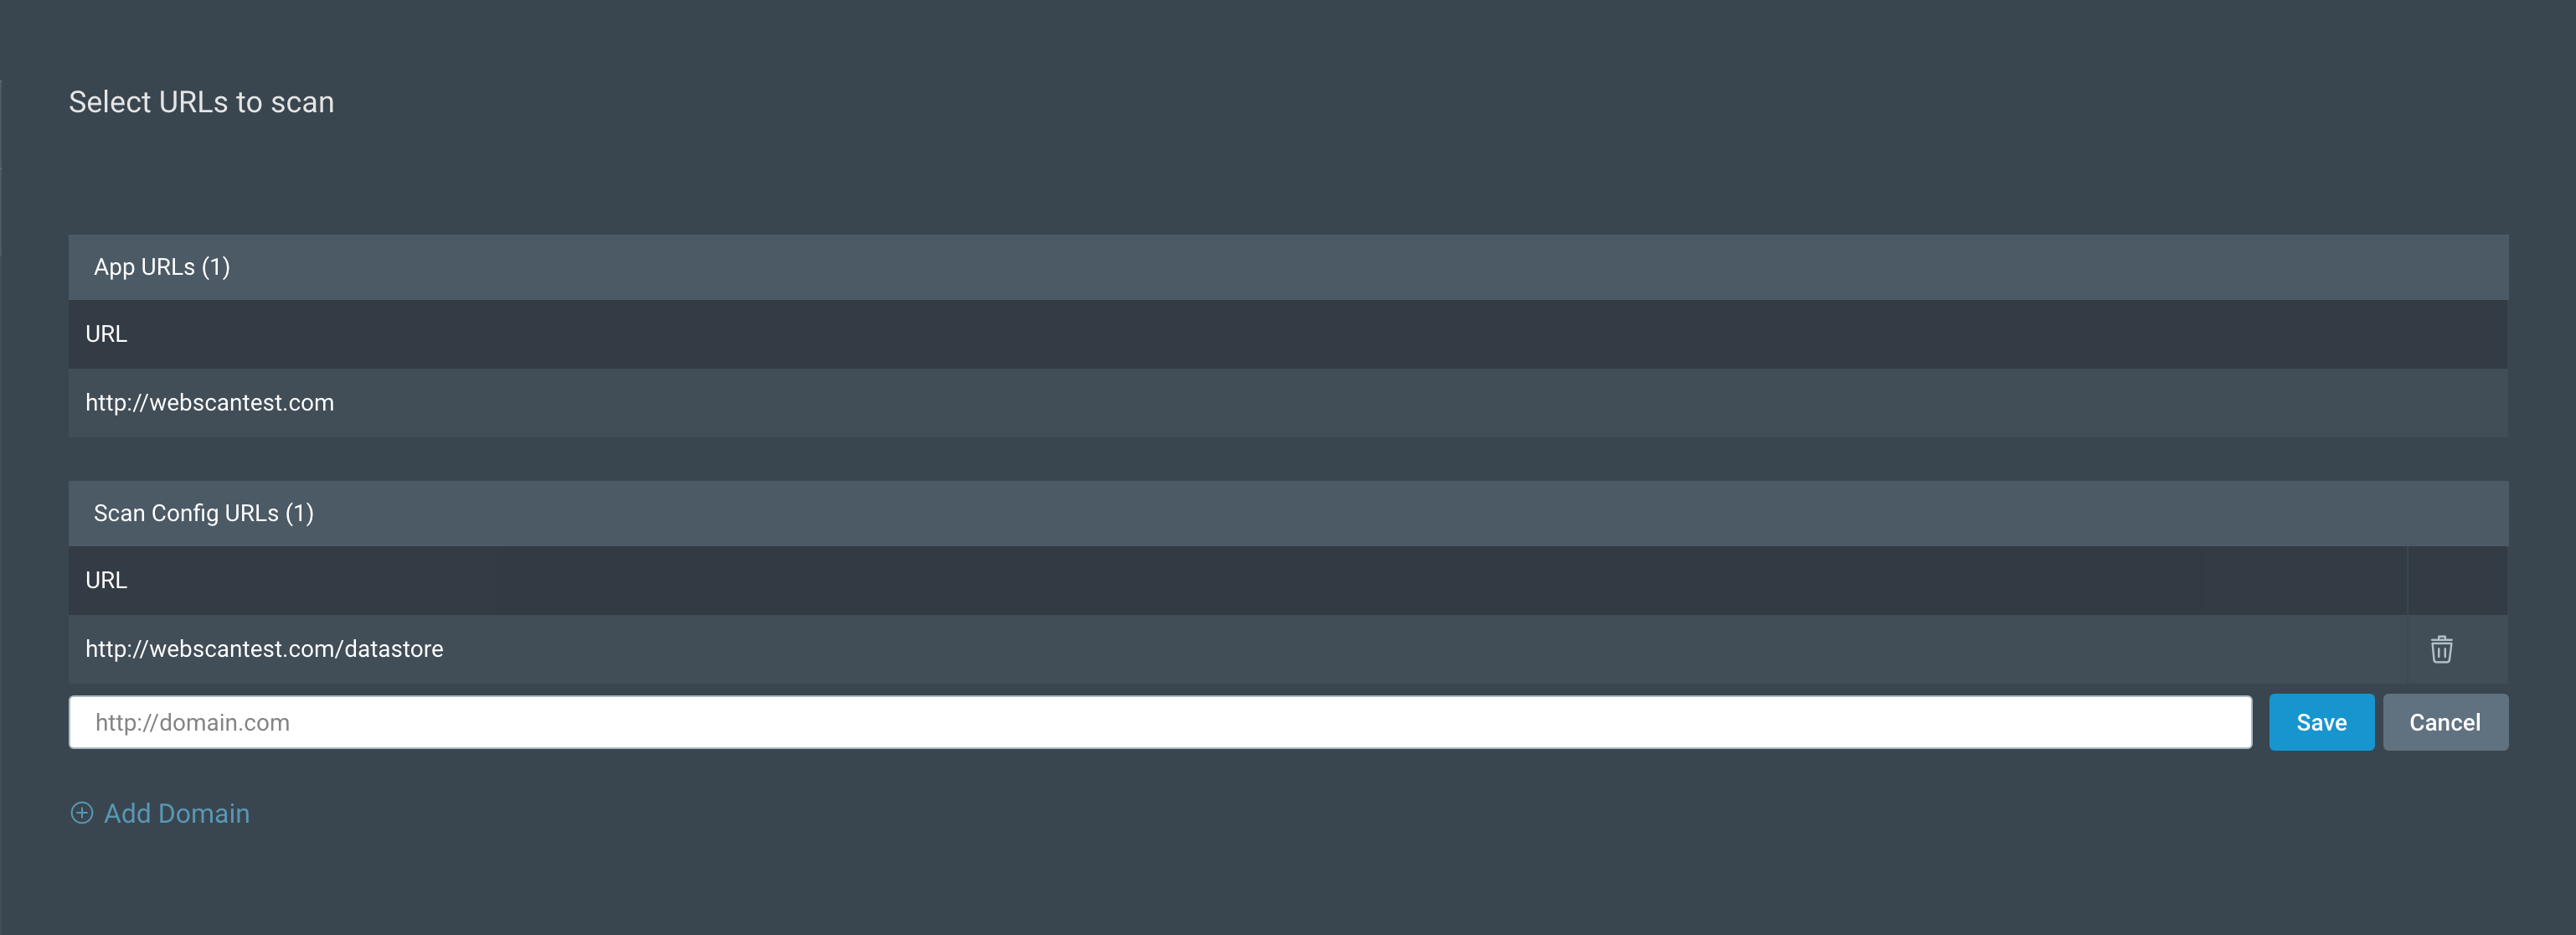
The URLs specified for the entire app appear in the App URLs listing. These are inherited into all scan configs created under that app. The inheritance relates to the seed URLs used when scanning. Seed URLs dictate what URLs are used as the base for a scan. Any scans on an app will use the app level URLs as seed URLs.
In the Scan Config URLs listing, you can add more seed URLs that only apply to this config. You can choose a protocol (HTTP or HTTPS), subdomain (such as www or API), and sub-pages. You can add 1 URL at a time, or select the Bulk Add URLs option and paste or type in a list of URLs.
Crawling restrictions
In the Crawling Restrictions subsection, you can restrict what will be crawled in scans run on this config.
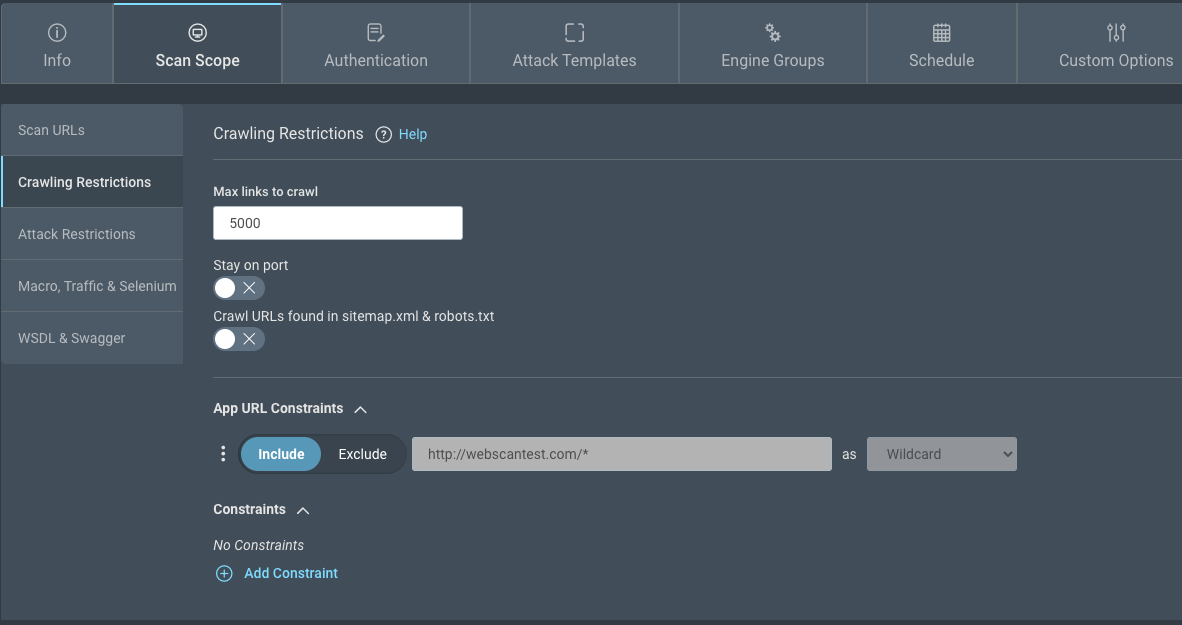
Max links to crawl
You can limit the number of URLs to crawl. The scan engine works in 2 phases: crawling and attacking.
During the crawling phase, the seed URLs (a combination of app-level URLs and scan config URLs) are used as starting points for an algorithm that requests the content at each URL and then interrogates the response for additional URLs.
The additional URLs are then recursively used for the crawling process again. The crawling process occurs until the total number of URLs discovered reaches the Max links to crawl setting. Some resources, such as .js, and .css (an autoload resource needed to populate the web page in a browser), maybe requested even after the max links limit has been reached.
Stay on port
The Stay on port setting forces the scan to crawl only URLs which are defined as using the same ports as those specified in the seed URLs.
Crawl URLs
For broader scan coverage, enable crawling of URLs in robots.txt and any sitemaps found on your site.
Security Tip: Robots.txt doesn't prevent crawling
Attackers won’t respect a robots.txt file when targeting your site, so why train your scanner to ignore part of your attack surface? It’s a common misconception that having robots.txt stops scanners and search engines from crawling sites. Even though the robots.txt file tells search engine crawlers not to request the listed pages or files, this only helps avoid overloading the site with requests, but does not prevent attacks.
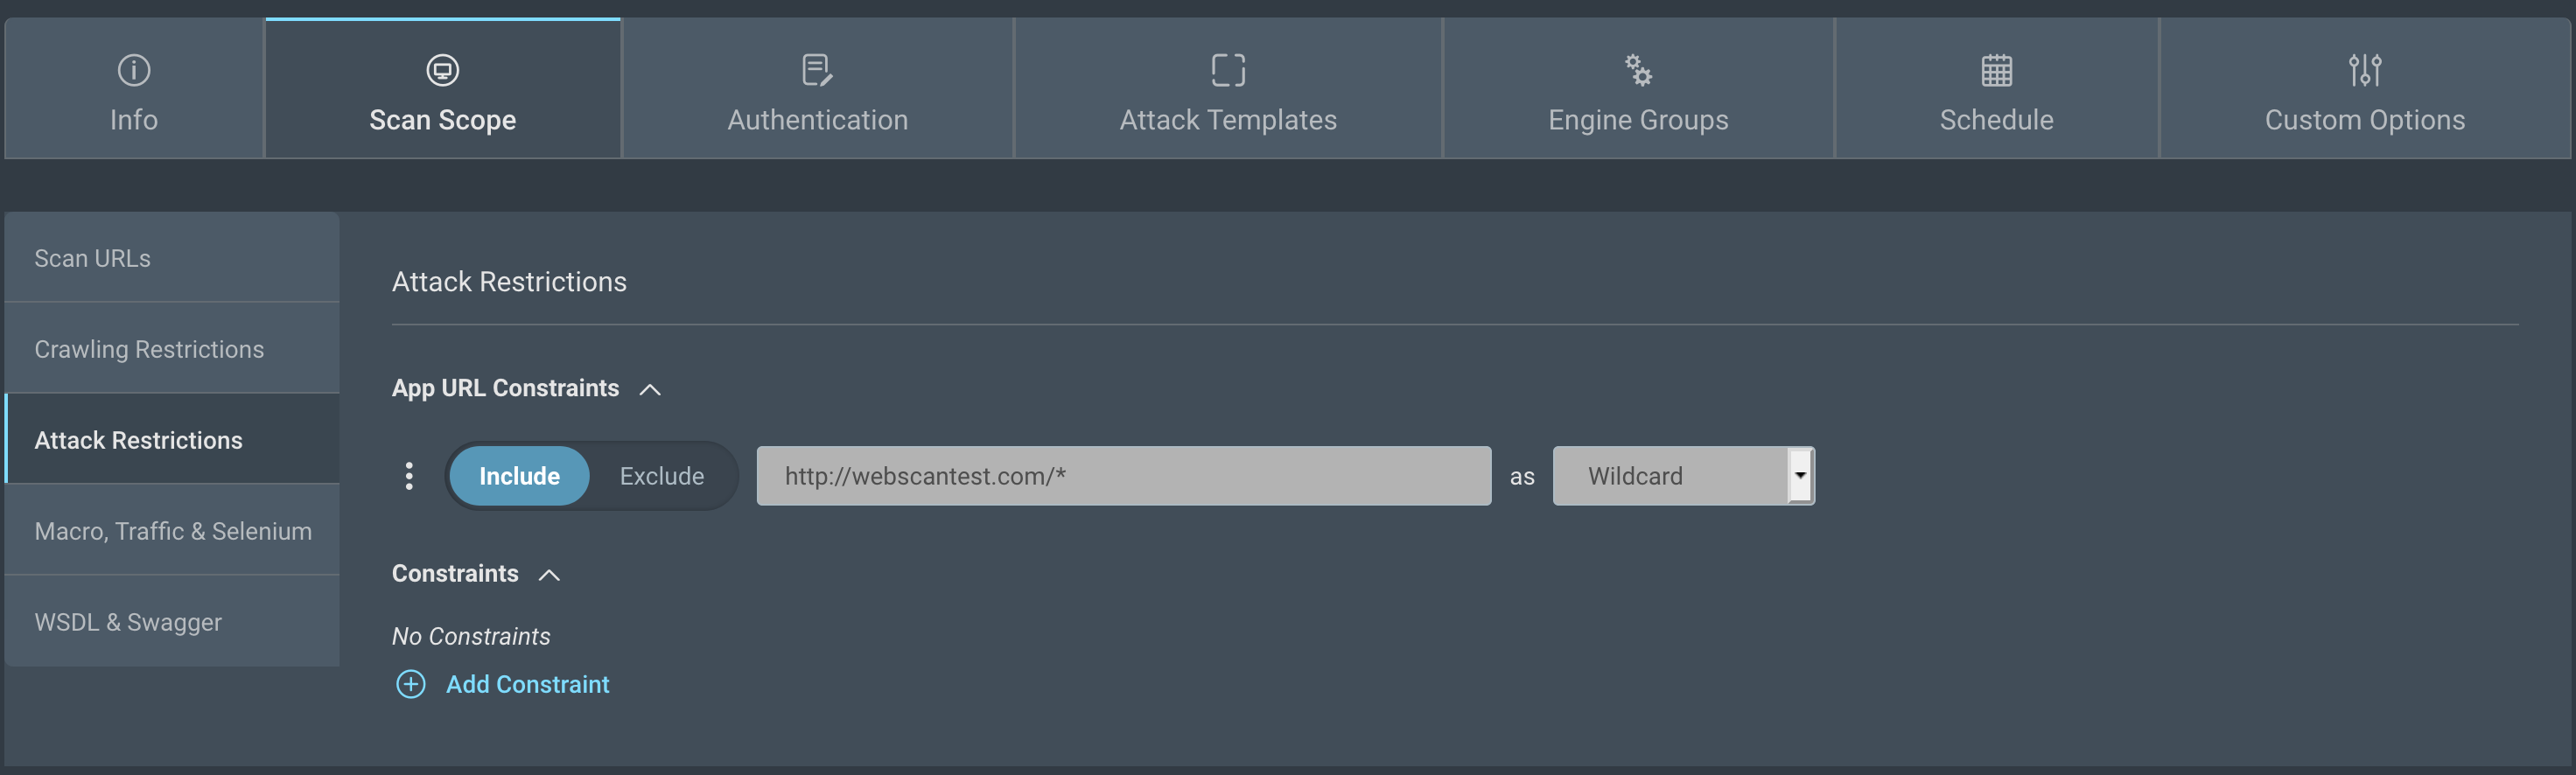
App URL Constraints
The crawling restrictions are automatically generated for App URL constraints. The default is domain and subdomain level. To view the auto generated constraints, expand the App URL Constraints section.
You can also specify additional constraints. You can use literals, wildcards, or regular expressions to formulate the specific constraints to apply.
For example:
-
Wildcard: Include http://www.example.com/folder/ * Expected behavior - includes all files within folder in the scan scope.
-
Regular expression: Include http://www.example.com/folder/ .* Expected behavior - includes all files within folder in the scan scope.
-
Regular expression: Exclude http://www.example.com/.*action=delete Expected behavior - excludes all pages that have the action delete parameter, for example http://www.example.com/folder/test.html?action=delete
Regular Expressions
In some cases, with regular expressions, it may be more effective to provide character classes rather than shortcuts.
Examples:
[ ]+rather than\s+- escape / : /
Attack restrictions
The Attack Restrictions subsection is similar to Crawling Restrictions, but also allows you to specify a Denylist Regex which can help you denylist parameters from getting attacked. The benefit of this field is that the setting can be applied to every URL in the application.
Regex Example:
id|action|date- Denylists the parameters id, action, and date from getting attacked on any URL included in that scan.
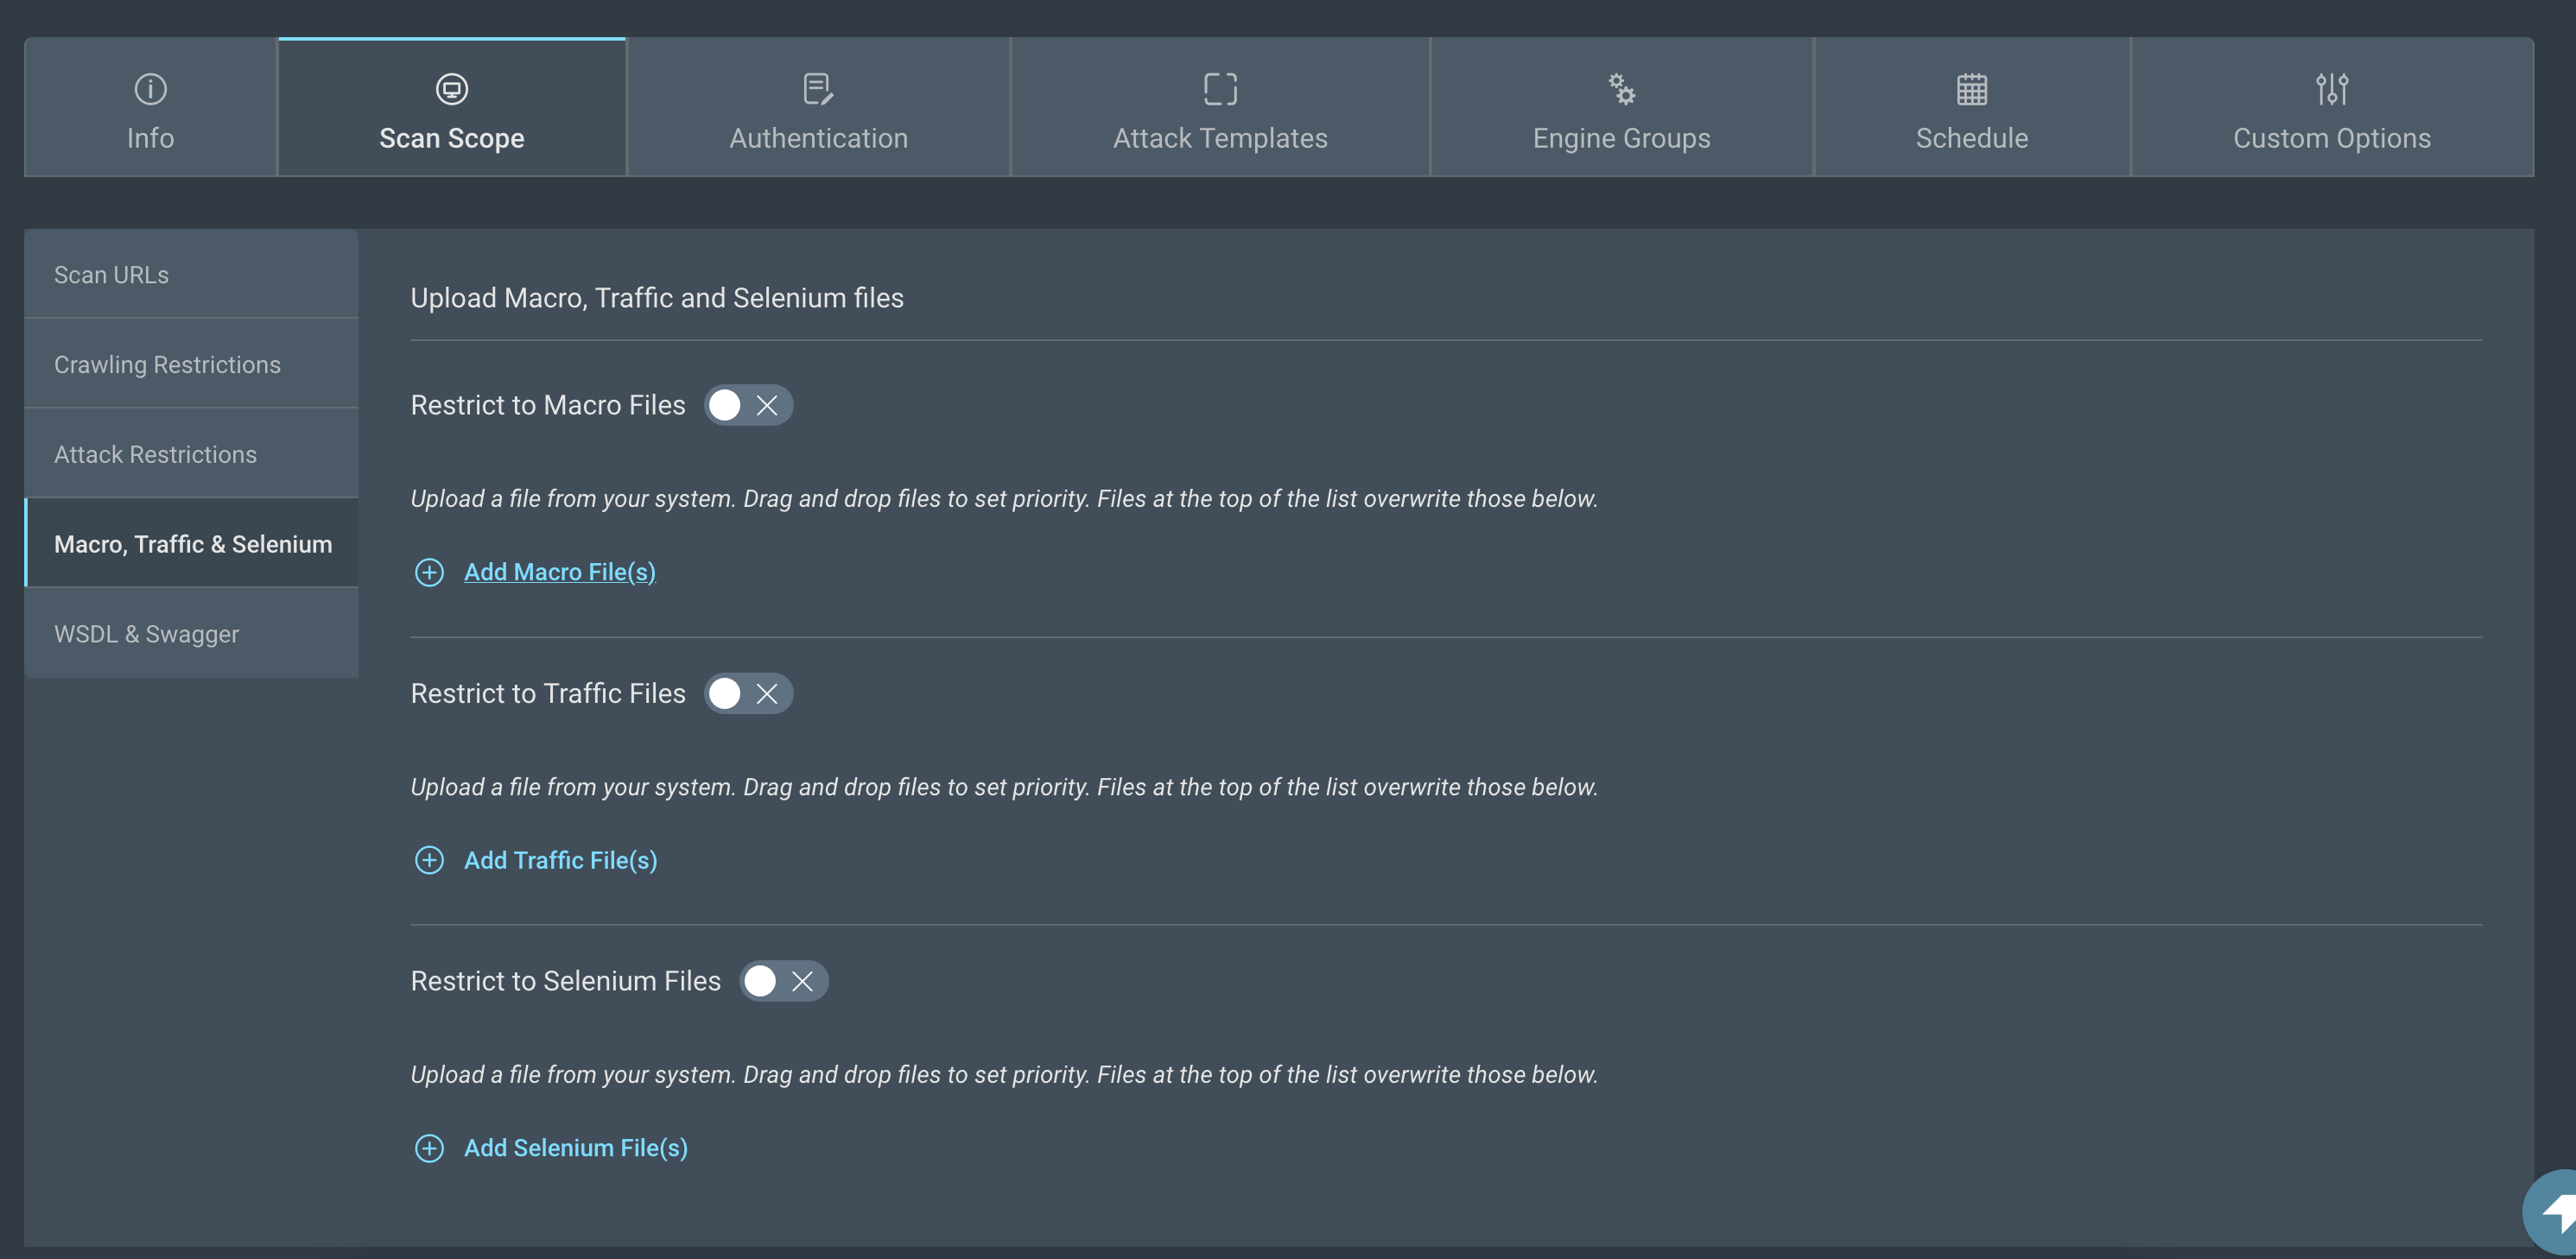
Macro, traffic and selenium
You may sometimes run into situations where you are trying to scan a hard to crawl website, or an application built with a technology that the Application Security (InsightAppSec) scanner does not understand. The Macro, traffic and selenium options can help you in these situations.
Chrome is required for selenium and macro files
If you use selenium or macro files in an on-premise engine, you must install Chrome on the same server as the engine.
Macro files
The Macro configuration allows users to create a sequence of requests that perform an action on a website. A typical use case would be a shopping cart sequence where a user first selects an item to buy, then adds it to the shopping cart, then proceeds to the checkout, enters a home address, payment option, and finally submits all the collected data to the website to process the purchase of the item. There is no way to reach the Purchase web page using a direct URL or by simply crawling the site. Usually, accessing this web page involves a very specific set of actions such as clicking of certain buttons, checking boxes, and entering information in fields, and the website will throw an error if the actions are performed out of sequence.
Macro files can record all your interactions with a website in a .rec file, and Application Security (InsightAppSec) can use this file to attack the sequence. You can use the following steps to scan a macro file:
- Record a new macro using the Rapid7 AppSec Toolkit or AppSpider Pro and save the resulting .rec file on your computer.
- Open the Scan Scope > Macro, Traffic & Selenium screen and click the Add Macro File(s) link.
- Click the Choose File button. This will open the Choose File popup.
- Click the Upload File button and upload the macro from your computer.
- Select the newly uploaded file or an existing macro from the All my Files tab in the popup.
- Click the Use 1 Selected File(s) button. The macro file will now appear above the Add Macro File(s) link. Repeat the previous steps to add multiple macro files.
- Use the vertical ellipsis icon (⋮) to set the order in which the macro files will be executed.
- Click the Use Sequence checkbox if the entire macro needs to be run before an attack can be executed. For example, if you are testing the ‘Purchase’ page, attacks should not be run on the initial checkout steps.
- Running attacks within a sequence can be slow. Enable the Restrict to Macro Files switch to ensure that the scan is limited to this sequence only.
Traffic files
You may run into Web applications built with technologies that are not supported by the Application Security (InsightAppSec) crawler. You can test the security of such applications by using a Web Proxy tool such as the Traffic Recorder in the Rapid7 AppSec toolkit. Using the proxy tool, you can record the interactions (e.g. HTTP GET and POST requests and responses) between the front end application and the back end server in a Traffic File. Application Security (InsightAppSec) can use these interactions to run attacks against the back-end of your application. This approach is also useful if you have not built the front-end of your web application and want to begin testing early in the development process.
Use the following steps to scan a Traffic file:
- Complete the steps in your app that you wish to test, and record the interactions in a traffic file on your computer. Traffic files can be of the following formats:
- AppSec toolkit Traffic Files (*.trec)
- Burp Files (*.xml)
- Paros Files (*.txt)
- WebScarab Files (conversationlog)
- HAR (HTTP Archive) Files (*.har)
- Fiddler Files (*.saz)
- Open the Scan Scope > Macro, Traffic & Selenium screen and click the Add Traffic File(s) link.
- Click the Choose File button. This will open the Choose File popup.
- Click the Upload File button and upload the traffic file from your computer.
- Select the newly uploaded file or an existing traffic file from the All my Files tab in the popup.
- Click the Use 1 Selected File(s) button. The traffic file will now appear above the Add Traffic File(s) link. Repeat the previous steps to add multiple traffic files.
- Use the vertical ellipsis icon (⋮) to set the order in which the traffic files will be tested.
- Enable the Restrict to Traffic Files switch to ensure that the scan is limited to the URLs in the traffic files.
Selenium files
Selenium is a framework for automated testing of web applications that enables users to record sequences of actions like entering data in forms and clicking buttons. Users can replay these Selenium recordings on demand to ensure that the web application behaves as desired.
Consider the use case mentioned in the previous section where a user selects an item to buy, proceeds through the shopping cart, checkout, and payment option screens to finally process the purchase of the item. There is no way to reach the Purchase web page using a direct URL or by simply crawling the site.Organizations can create Selenium test suites for all the use cases of their product, and ensure that difficult to reach pages such as the Purchase page are tested correctly.
Application Security (InsightAppSec) can use these Selenium files to scan the pages that are important for your use cases. To scan a selenium file:
- Record a Selenium script and save the resulting
.htmlor.sidefile on your computer.
Note
Selenium files in this section should assume that the user is already authenticated. Selenium files for authentication should be recorded separately and uploaded to the Authentication tab of the scan config.
- Open the Scan Scope > Macro, Traffic & Selenium screen and click the Add Selenium File(s) link.
- Click the Choose File button. This will open the Choose File popup.
- Click the Upload File button and upload the Selenium file from your computer.
- Select the newly uploaded file or an existing Selenium file from the All my Files tab in the popup.
- Click the Use 1 Selected File(s) button. The Selenium file will now appear above the Add Selenium File(s) link. Repeat the previous steps to add multiple macro files.
- Use the vertical ellipsis icon (⋮) to set the order in which the Selenium files will be executed.
- Click the Use Sequence checkbox if all the Selenium files need to be run before an attack can be executed. For example, if you are testing the ‘Purchase’ page, attacks should not be run on the initial checkout steps.
- Running attacks within a sequence can be slow. Enable the Restrict to Selenium Files switch to ensure that the scan is limited to this sequence only.
WSDL and Swagger
You can test your SOAP and REST web services by adding WSDL or Swagger files to InsightAppsec. WSDL and Swagger files define a standard interface to APIs that is agnostic to programming languages. Application Security (InsightAppSec) parses these documents to generate function calls to your API and create test values for the expected parameters. These function calls are then executed against your API and the interactions are checked for vulnerabilities.
You can provide a URL to a WSDL or Swagger file for scanning. If this URL is only available on your internal network, you will have to install a scan engine within the same network and ensure that the engine is able to access the file.
Swagger/OpenAPI file compatibility
AppSpider only supports Swagger/OpenAPI files that are parsable through https://editor.swagger.io/
Files that are rejected by https://editor.swagger.io/ are not compatible with our engine.
Scan SOAP APIs using WSDL Files
You can scan SOAP APIs using the following steps:
- Open the Scan Scope > WSDL & Swagger screen.
- In the Content Type field, enter the content-type of the WSDL file. This is similar to setting the “content-type” header while making an HTTP SOAP request.
- If the target app hosts WSDL files that you would like to use for testing, set the regular expression to match the WSDL files in the RegEx field.
- If your API utilizes the Web Services Enhancements add-on for .NET, check the Web Services Enhancements option.
- If your API requires authentication, enter the user name and password in the respective fields.
- Click Add WSDL File(s) to provide a WSDL file for scanning. If the file is hosted online, click the URL button and provide the URL in the adjacent text field. If the file exists on your computer, click the FILE button and upload the WSDL file to Application Security (InsightAppSec).
- Enable the Restrict to WSDL Files switch to ensure that the scan is limited to the API functionality described in the WSDL file.
Scan RESTful APIs using Swagger files
You can scan REST APIs using the following steps:
- Open the Scan Scope > WSDL & Swagger screen.
- Click Add Swagger File(s) to provide a Swagger file for scanning. If the file is hosted online, click the URL button and provide the URL in the adjacent text field. If the file exists on your computer, click the FILE button and upload the JSON or YAML file to Application Security (InsightAppSec).
- Enable the Restrict to Swagger Files switch to ensure that the scan is limited to the API functionality described in the Swagger file.
- If the API requires authentication, you can set the credentials in the Authentication tab. If the API requires an API key or other special headers, add them to the Extra Headers field of the Custom Options > HTTP Headers screen.