AppSpider Pro Quick Start Guide
AppSpider Pro is a desktop solution that scans web and mobile applications for vulnerabilities. AppSpider dynamically assesses these applications for vulnerabilities across all modern technologies, provides tools that speed remediation, and monitors applications for changes.
How AppSpider Scans work
AppSpider requires basic information about their target applications, such as the name and the base URL. AppSpider then visits the target application and performs the following actions:
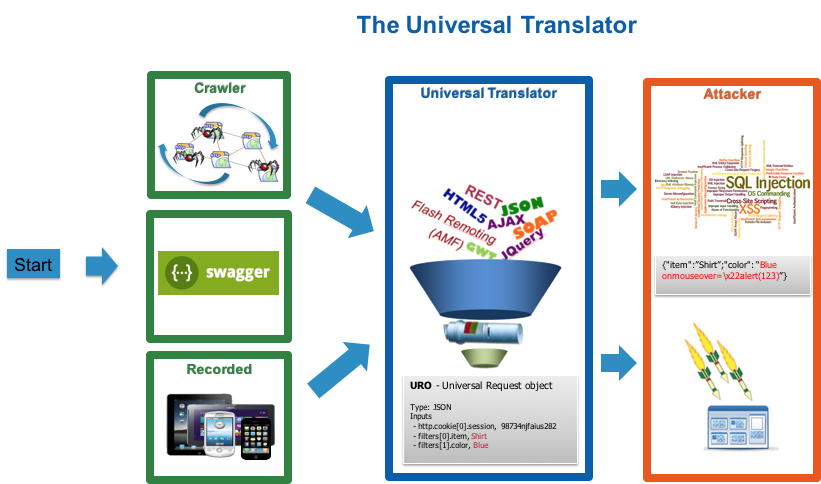
- Crawls the application - The first phase of the test makes an inventory of pages, links, directories, and parameters in the application. This process is called “Crawling”. AppSpider can’t test what it can’t crawl or understand. In order to understand the web front-end of the application, AppSpider conducts a comprehensive crawl (HTML, Javascript) and analyzes this information to understand expected inputs for each URL in the application.
Note
Crawling all possible pages on a real world app would involve a lot of redundancy, and be extremely time consuming. For example, after crawling the id=1001 and id=1002 pages, crawling page id=1003 would produce little value. Hence, AppSpider crawls a sample of pages that provide a good representation of the website functionality.
- Records the traffic - There may be some modern technologies used in the app that AppSpider cannot crawl. In order to understand the “uncrawlable” sections of the application like web services and REST APIs, AppSpider requires users to record the network traffic generated while using these sections of the application. This traffic can be recorded by tools like Burp, Paros, or AppSpider’s Traffic Recorder. AppSpider consumes the recorded traffic and uses this information to identify variables/parameters in these faceless portions of the application.
- Translates the data - AppSpider normalizes all of the data obtained in the Crawl and Record stages into atomic web requests of a common schema called the Universal Request Object.
- Launches attacks - AppSpider analyzes each universal request object and launches over 45 different simulated attack types that penetrate the back-end systems where vulnerabilities and threats exist.
Now that you have a high-level understanding of AppSpider Pro, you can install it on your system.
Step 1: Install
First, ensure that your system meets the system requirements . Next, follow the instructions in the installation guide to download and install AppSpider Pro to your system. During the installation, you will be asked to choose the components you would like to install. As a new user, you will primarily use the AppSpider Graphical User Interface (GUI) to manage AppSpider and scan your applications. In later articles, whenever we instruct you to take an action in AppSpider Pro, assume that we are talking about the AppSpider Pro GUI.
Step 2: Understand Some Scanning Concepts
The scan configuration, or scan config, is the basic building block of AppSpider’s scanning capabilities. A scan config is a group of settings you can use to scan a particular web application. The scan config contains all the required details, such as URL, login credentials, and scan settings for the application to be scanned.
You can use scan settings to:
- Specify the browser preference in the scan config if your web pages have been optimized for a particular browser.
- Crawl your entire website to gain an understanding of the site structure, but only attack the public-facing components. You can specify this preference in the scan config.
- Attach automation tests made with Selenium to a scan config, and AppSpider will automatically generate attacks to target those use cases.
If you wish to scan smaller portions of your application, or target specific sections, you can create separate scan configs for different sections of the application. By creating a scan config, you can save a particular configuration of options, and reuse it to scan that application with those options again.
Step 3: Configure & Run a Scan
As soon as your installation is complete, you can begin scanning. Note that you can only run one scan at a time. If you wish to scan multiple applications in parallel, you can use AppSpider Enterprise.
- Open AppSpider Pro and take a tour of the main screen.
- In order to help you learn the product quickly, AppSpider Pro comes with a built-in scan config called “webscantest”. This scan config uses default settings and targets a known vulnerable website created by Rapid7 at www.webscantest.com . If you want to use the built-in scan config, select it in the Scan Config Table and press the Run button. OR
- To scan your own application, click New Configuration under the Actions Panel. The Scan Config wizard will open and the Main Settings screen will be visible.
- Name your scan, add the base URL for your application, and press enter.
- Enter the maximum number of links to crawl and optionally restrict your scan to seed URLs. If you test AppSpider on a customer facing application, it’s useful to either use a low number of links to crawl or restrict your testing to a small subsection of the site using wildcards.
- Select your browser and then click Next.
- Select the options available in the Questionnaire. Configure required settings from the questionnaire, and optionally skip the rest.
- When you are done, click the Save & Run button to start the scan.