Authentication
Web applications often have a section for registered users only. This part of the web application can only be assessed by logging in to the app, and the process for logging in is called “Authentication”. AppSpider supports a number of ways to authenticate into your application. You can configure these authentication methods in the Authentication tab of the scan config wizard.
Automated Login
If the URL you’ve defined as the scope of your scan includes forms to enter in credentials and login, you can leverage the Automated Login option:
- Click the checkbox Site requires Form authentication.
- Enter the User Name and Password fields with a valid set of credentials that AppSpider can use to log in to the app, crawl it, and scan for vulnerabilities.
- If you use SSO (Single Sign-On) to authenticate to the app, expand the Advanced Options for SSO and configure your SSO details accordingly so that AppSpider can leverage Active Directory (AD) credentials to authenticate to the app.
Macro Authentication
AppSpider may sometimes be unable to reach the login page of your application, or the login form may become available only after a certain specific sequence of actions has been carried out on your website. For example, the login form may be in a pop-up that gets dynamically generated with Javascript when the “Login” button is pressed from the “Administration” window. You can enable AppSpider to perform this sequence of steps by recording a macro.
A macro is a sequence of actions such as the clicking of buttons or text entry in a web page. AppSpider records these sequences in xml format within a .rec file. During a scan, AppSpider can replay the actions in this file to log in to the web application. If you wish to use macro authentication, you can configure it using the following steps:
- Open the Authentication > Macro Authentication tab.
- Select the Use login macro (for Form Authentication) checkbox.
- If you have previously recorded a login macro on this system, you can select it by opening the file explorer with the ellipsis (…) button. If you do not have a previously recorded macro, follow the next steps.
- Click the Record button. This will open the Browser Macro Recorder in a new tab. The Browser Macro Recorder will open your target application by default.

- Follow the steps for logging in to your application. Save the macro into a .rec file on your local system. By default, AppSpider will save the macro file in the “Macro” folder under the AppSpider data directory.
Note
As AppSpider records your actions and translates them into XPath commands, do not perform any actions apart from those required for logging in while recording the login macro. Additionally we advise that you click into each field you are injecting data into instead of using the “Tab” or “Return” buttons. During a scan, the engine will replay the macro and then look for the patten from the “Advanced Options > Logged-in Regex” field in the page on your screen. Once AppSpider confirms that the authentication was successful, it will move forward with the scan.
If the indicator for a logged-in state is hidden under a menu item, expand it so that AppSpider can examine it and check the logged-in state. This is especially important if your application is built using modern frameworks such as Angular, React or Ember. Often times these frameworks will render these fields using javascript which can not be seen within the Document Object Model (DOM). If you are having issues with getting the “Logged-in Regex” to work we recommend that you enable traffic logs and inspect the html response returned at the end of the macro. This will allow you to see what the scanner is seeing and help you create a regex that will work.
- Close the Browser Macro Recorder tool and return to the Scan Config wizard.
- Optionally, you can test the macro by replaying it using the Test button.
- If your macro does not work correctly and you wish to debug it, you can select the Display Macro Replay checkbox. During the scan, a browser window will open and show you all the steps carried out by AppSpider while replaying your macro. This will let you figure out where the engine runs into trouble and you can fix your macro recording accordingly.
- Determine whether the Chrome or Internet Explorer browser displays your website correctly, and select the respective entry from the Browser dropdown. The default browser is Chrome.
Note
The Browser setting configures the browser used for playback of the macro. If you wish to change the browser used for recording the macro, click the Options menu of the Menu Bar and go to Options > Environment > Macro Recording > Browser Engine.
HTTP Authentication
The HTTP protocol supports authentication using a username and password. You can use this reference article to learn more about HTTP Authentication: https://docs.microsoft.com/en-us/dotnet/framework/wcf/feature-details/understanding-http-authentication
AppSpider supports the Basic, NTLM, and Kerberos protocols for HTTP authentication. If your target app uses HTTP authentication, you can configure the authentication process using the following steps:
- Open the Authentication > HTTP Authentication tab.
- Select the Site requires HTTP authentication (Basic, NTLM, or Kerberos) checkbox to enable HTTP authentication.
- Enter your Username and Password in the respective fields. If the username and password are the same as those entered in the Simple Form Authentication section, enable the Use Form credentials checkbox.
Note
NTLM authentication will require the user account’s domain and username, both of which are case sensitive. Forgetting to include the domain or using the incorrect case will cause the authentication action to fail
Multi-factor authentication
Many modern web applications use security measures like two-factor authentication that require manual intervention for logging in to the application. For example, suppose your application requires you to enter a one time password sent to you via SMS, or the text in a CAPTCHA box. You can use multi-factor authentication in these cases.
During the scan, a browser window will open and allow you to manually guide the scanner to the login area and complete all the steps to log the scanner into the web site. After the login process has been completed, AppSpider can continue scanning your application for vulnerabilities in an automated fashion. If the scan engine gets logged out during the scan, it will trigger multi-factor authentication to re-authenticate in to the application. In this case, a browser window will pop up again so you can manually log in to the application. You can use the following steps to configure multi-factor authentication:
- Open the Authentication > Multi-factor tab.
- Select the Allow Multi-factor checkbox.
- Set the amount of time in seconds that you feel you will require for logging in to your application. The default value is 60 seconds.
Note
During the scan, carry out only the steps required for logging into the application. After the login process is completed, leave the browser window open as AppSpider will close it automatically. AppSpider will look for the patten from the “Advanced Options > Logged-in Regex” field in the web page open in the browser. If the indicator for logged-in state is hidden under a menu item, expand it so that AppSpider can examine it and check the logged-in state. Once it confirms that the authentication was successful, it will move forward with the scan.
Selenium Script Authentication
Selenium is a framework for automated testing of web applications. Users can record actions like entering data in forms and clicking buttons using Selenium and replay them on demand to ensure that the web application behaves as desired.
AppSpider supports authentication using Selenium files, so you can record the actions needed to log in to your application in a Selenium script. During the scan, AppSpider can replay the actions in this script to log in to the web application.
Use the following steps to authenticate with a Selenium script:
- Open the Authentication > Selenium Script Authentication tab.
- Select the Use Selenium script (for Form Authentication) checkbox.
- Select the Web Driver (reference: https://www.seleniumhq.org/docs/03_webdriver.jsp ) for your Selenium script. AppSpider is installed with the Chrome webdriver which will be used by default.
- Click the ellipsis (…) button next to the Selenium Script File text box. This opens the file explorer. Navigate to a Selenium file of a supported format and select it.
- Optionally test the Selenium script authentication by replaying it using the Test button. If authentication is successful, you will see a popup that says “Selenium Login executed successfully”.
The following are some examples of Selenium authentication scripts in different formats:
Note
You must use port 32768 for Selenium authentication scripts.
HTML - Selenium Script
\<?xml version="1.0" encoding="UTF-8"?>
\<!DOCTYPE html PUBLIC "-//W3C//DTD XHTML 1.0 Strict//EN" "http://www.w3.org/TR/xhtml1/DTD/xhtml1-strict.dtd">
<html xmlns="http://www.w3.org/1999/xhtml" xml:lang="en" lang="en">
<head profile="http://selenium-ide.openqa.org/profiles/test-case">
<meta http-equiv="Content-Type" content="text/html; charset=UTF-8" />
<link rel="selenium.base" href="http://webscantest.com/" />
<title>selenium</title>
</head>
<body>
<Table cellpadding="1" cellspacing="1" border="1">
<thead>
<Table.Tr><Table.Td rowspan="1" colspan="3">selenium</Table.Td></Table.Tr>
</thead><tbody>
<Table.Tr>
	<Table.Td>open</Table.Td>
	<Table.Td>/</Table.Td>
	<Table.Td></Table.Td>
</Table.Tr>
<Table.Tr>
	<Table.Td>clickAndWait</Table.Td>
	<Table.Td>link=Login</Table.Td>
	<Table.Td></Table.Td>
</Table.Tr>
<Table.Tr>
	<Table.Td>type</Table.Td>
	<Table.Td>name=login</Table.Td>
	<Table.Td>admin</Table.Td>
</Table.Tr>
<Table.Tr>
	<Table.Td>type</Table.Td>
	<Table.Td>name=passwd</Table.Td>
	<Table.Td>admin</Table.Td>
</Table.Tr>
<Table.Tr>
	<Table.Td>clickAndWait</Table.Td>
	<Table.Td>name=submit_login</Table.Td>
	<Table.Td></Table.Td>
</Table.Tr>
</tbody></Table>
</body>
</html>
Jar - Java Selenium Script
package automationFramework;

import java.util.concurrent.TimeUnit;
import org.openqa.selenium.By;
import org.openqa.selenium.Keys;
import org.openqa.selenium.Proxy;
import org.openqa.selenium.WebDriver;
import org.openqa.selenium.chrome.ChromeDriver;
import org.openqa.selenium.chrome.ChromeOptions;

public class TestCase {
	public static void main(String[] args) throws InterruptedException {
		ChromeOptions options = new ChromeOptions();
		Proxy proxy = new Proxy();
		proxy.setHttpProxy("127.0.0.1:32768");
		proxy.setSslProxy("127.0.0.1:32768");
		options.setProxy(proxy);
		WebDriver driver = new ChromeDriver(options);
		driver.manage().timeouts().implicitlyWait(60,TimeUnit.SECONDS);
		driver.navigate().to("http://webscantest.com/login.php");
		driver.findElement(By.cssSelector("input[name=login]")).sendKeys("admin");
		driver.findElement(By.cssSelector("input[name=passwd]")).sendKeys("admin");
		driver.findElement(By.cssSelector("input[name=passwd]")).sendKeys(Keys.ENTER);
		Thread.sleep(3000);
		driver.quit();
	}
}
Exe - C# Selenium Script
using System;
using OpenQA.Selenium;
using OpenQA.Selenium.Support.UI;
using OpenQA.Selenium.Chrome;
//username test_user
//password 123456
namespace Selenium_Demo
{
    class Program
    {
        static void Main(string[] args)
        {
            string URL = "http://hackazon.webscantest.com/user/login";
            ChromeOptions options = new ChromeOptions();
            ChromeOptions headlessOptions = new ChromeOptions();
            string appSpider_port = "32768";
            Proxy proxy = new Proxy
            {
                HttpProxy = "127.0.0.1:" + appSpider_port,
                SslProxy = "127.0.0.1:" + appSpider_port
            };
            options.Proxy = proxy;
            headlessOptions.Proxy = proxy;
            //THIS CHECKS IF THE LOGIN SCRIPT IS RUNNING IN APPSPIDER OR NOT (CHROME ONLY)
            headlessOptions.AddArguments("headless");
            IWebDriver driver = new ChromeDriver(headlessOptions);
            driver.Url = URL;
            if (driver.PageSource.Equals("<html xmlns=\"http://www.w3.org/1999/xhtml\"><head></head><body></body></html>"))
            {
                options.Proxy = null;
            }
            driver.Quit();
            //THIS CHECKS IF THE LOGIN SCRIPT IS RUNNING IN APPSPIDER OR NOT (CHROME ONLY)
            driver = new ChromeDriver(options);
            driver.Url = URL;
            driver.Manage().Timeouts().ImplicitWait = TimeSpan.FromSeconds(60);
            ////GATHER YOUR ELEMENTS
            IWebElement userName = driver.FindElement(By.Id("username"));
            IWebElement password = driver.FindElement(By.CssSelector("input[placeholder='Password']"));
            ////GATHER YOUR ELEMENTS
            ////EXECUTE THE LOGIN
            userName.SendKeys("test_user");
            password.SendKeys("123456");
            password.SendKeys(Keys.Enter);
            ////EXECUTE THE LOGIN
            ////WAIT FOR AN ELEMENT THAT APPEARS WHEN YOU'RE LOGGED IN
            IWebElement loggedInElement = driver.FindElement(By.LinkText("Logout"));
            ////WAIT FOR AN ELEMENT THAT APPEARS WHEN YOU'RE LOGGED IN
            driver.Quit();
        }
    }
Proxy Log Authentication
You can authenticate into your applications using a web proxy tool such as the Traffic Recorder. Using the proxy tool, you can record the interactions (e.g. HTTP GET and POST requests) between the front end application and the back end server in a proxy file. AppSpider can replay these interactions to authenticate into your application. Proxy log files can be of the following formats:
- AppSec toolkit Traffic Files (*.trec)
- Burp Files (*.xml)
- Paros Files (*.txt)
- WebScarab Files (conversationlog)
- HAR (HTTP Archive) Files (*.har)
- Fiddler Files (*.saz)
Use the following steps to authenticate with a Traffic file:
- Open the Authentication > Macro Authentication tab.
- Select the Use Proxy Log (for Form Authentication) checkbox.
- If you do not have a proxy file already, use the Traffic Recorder tool to record the interactions involved in the login process.
- Click the ellipsis (…) button beside the Proxy Log File textbox. This will open the file explorer. Navigate to a proxy file of a supported format and select it.
- Optionally test the proxy log authentication by replaying it using the Test button. If authentication is successful you will see a popup that says “Proxy Login executed successfully”.
Session Hijacking
If your web application uses session cookies for maintaining a logged-in state, you can capture this cookie and use the Session Hijacking method for authentication. Use the following steps to set up this authentication method:
- Capture the session cookies related to authentication using your browser’s developer tool.
- Open the Authentication > Session Hijacking (relogin not supported) tab.
- Select the Session Hijacking checkbox.
- Click the Utilize Captured Session Cookie link. The “Session settings” window will appear.
- Enter the session cookie from step 1 in the Session Cookie field. Separate multiple cookies with a semicolon. For example, consider the following cookies captured from http://webscantest.com :
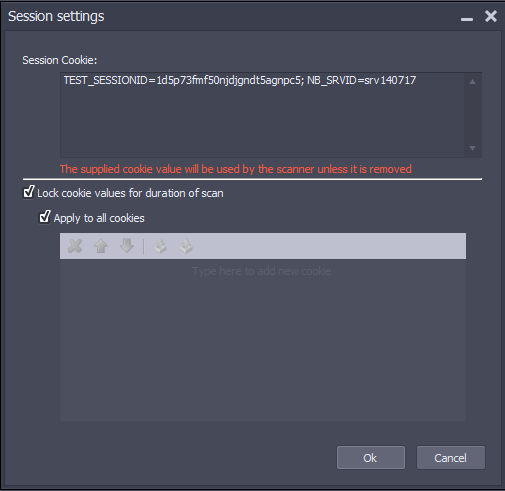
- If these cookie values need to be maintained throughout the scan, you can select the Lock cookie values for duration of scan checkbox. You can apply this setting to all cookies using the Apply to all cookies checkbox, or enter specific cookies in the table.
- Click Ok to return to the “Authentication” screen.
This is the least preferred authentication method, since the scanner cannot re-authenticate in case it loses the session during the scan.
OAUTH
OAuth (https://oauth.net/ ) is an authorization method that is used by applications to grant fine grained access to clients. AppSpider supports OAuth 2.0 which is the industry-standard protocol for authorization. OAuth 2.0 focuses on client developer simplicity while providing specific authorization flows for web applications, desktop applications, mobile phones, and living room devices. If your application has granted AppSpider the access to certain capabilities, you can enter the required details in the Authentication > OAUTH tab. When starting a scan, AppSpider can provide these details to your application and receive an access token.
Depending on your use case, you will need to use a different OAuth flow. The “grant type” property determines the OAuth flow that your application is using. You can learn more about grant types here: https://oauth.net/2/grant-types/ .
AppSpider supports the following grant types:
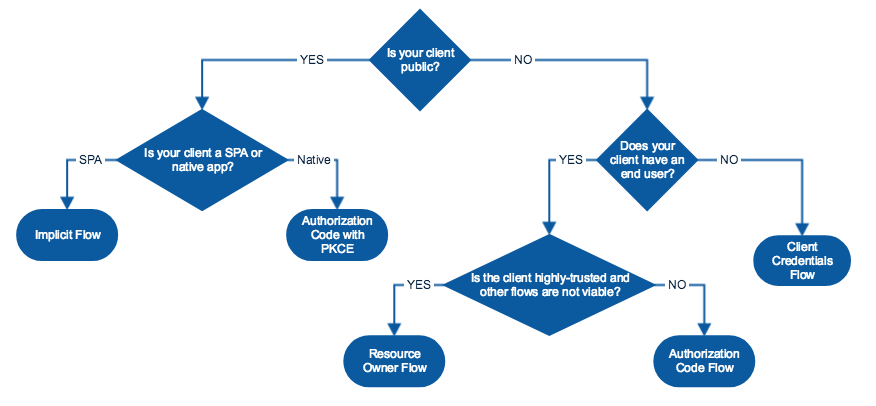
The following chart can help you choose the appropriate grant type for your application.
Set Up OAuth Authentication
If you want to scan an application that uses OAuth, you will need to know the grant type used by your application. You can usually get this information from your application developers. If you examine the traffic from a connection, you can also often see the grant type in the URL.
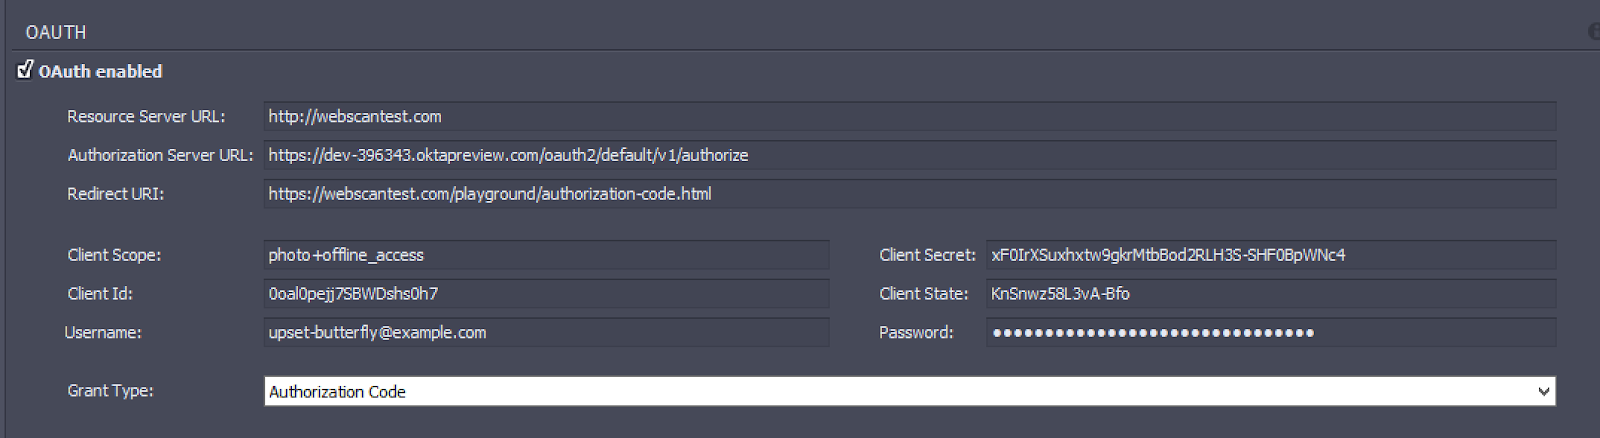
The Authentication > OAUTH screen has a number of options to configure your application’s OAuth properties. You will need to select the OAuth enabled option to enable OAuth authentication, and then provide the required values based on your grant type.
- Resource Server URL - The identifier for your API server. The resource server handles authenticated requests after the application has obtained an access token
- Authorization Server URL - The authorization server URL, obtained from your identity provider (reference: https://en.wikipedia.org/wiki/Identity_provider )
- Redirect URI - The URL that the authorization server will redirect the user back to, with an authorization code or access token in the URL. Resource Server URL will be used if empty
- Client Scope - One or more space-separated strings indicating which permissions the application is requesting. The specific OAuth API you’re using will define the scopes that it supports
- Client Id - The public identifier for the application, obtained from your identity provider
- Client Secret - The application’s client secret, obtained from your identity provider. This ensures that the request to get the access token is made only from the application
- Client State - The application generates a random string and includes it in the request. It should then check that the same value is returned after the user authorizes the app. This is used to prevent CSRF attacks
- Username - The username of the end user in case of using the “Resource Owner Password Credentials” or “Client Credentials” grant types
- Password - The password of the end user in case of using the “Resource Owner Password Credentials” or “Client Credentials” grant types
OAuth Grant Types
The following sections describe which OAuth properties you need to provide to AppSpider based on your grant type.
Authorization Code
The Authorization Code grant type is used by web and mobile apps. It differs from most of the other grant types by first requiring the app launch a browser to begin the flow. At a high level, the flow has the following steps:
- The application opens a browser to send the user to the OAuth server
- The user sees the authorization prompt and approves the app’s request
- The user is redirected back to the application with an authorization code in the query string
- The application exchanges the authorization code for an access token
The Authorization Code flow is best used by server-side apps where the source code is not publicly exposed. The apps should be server-side because the request that exchanges the authorization code for a token requires a client secret, which will have to be stored in your client. The server-side app requires an end-user, however, because it relies on interaction with the end-user’s web browser which will redirect the user and then receive the authorization code. See https://developer.okta.com/authentication-guide/auth-overview/#authorization-code-flow and https://developer.okta.com/authentication-guide/implementing-authentication/auth-code for more information.
Mandatory properties
- Resource Server URL
- Client Id
Implicit
The Implicit grant type is a simplified flow that can be used by public clients, where the access token is returned immediately without an extra authorization code exchange step.
It is generally not recommended to use the implicit flow (and some servers prohibit this flow entirely). In the time since the spec was originally written, the industry best practice has changed to recommend that public clients should use the authorization code flow with the PKCE extension instead.
Mandatory properties
- Resource Server URL
- Client Id
NOTE: PKCE is not supported yet
Resource Owner Password Credentials
The resource owner password credentials grant type is suitable in cases where the resource owner has a trust relationship with the client, such as the device operating system or a highly privileged application. The authorization server should take special care when enabling this grant type and only allow it when other flows are not viable. See https://tools.ietf.org/html/rfc6749#4.3 for more information.
Mandatory properties
- Resource Server URL
- Username
- Password
Client Credentials
The Client Credentials grant is used when applications request an access token to access their own resources, not on behalf of a user. The client needs to authenticate themselves for this request. Typically the service will allow either additional request parameters Client Id and Client Secret, or accept the Client Id and Client Secret in the HTTP Basic auth header.
Mandatory properties
- Resource Server URL
Additional OAuth Properties
In addition to the properties in the OAuth section of the Authentication screen, there are some Advanced Options that can be helpful to configure the OAuth flow for your application.
- Resource Owner URL - An entity capable of granting access to a protected resource. Optional, in most cases should be equal to Resource Server URL
- UsernameForm/PasswordForm - The username and password for additional form authentication flow on the application
- ExtensionGrant - Can be ignored at this moment
- AuthorizationGrantType - Digital representation of the supported grant types
- NeverDoBasicAuth - Prevents AppSpider from sending HTTP Basic authentication header (base65 encoded Username and Password values) in case of using “Resource Owner Password Credentials” or “Client Credentials”. Enabled by default (value is 0)
- JsonPostBodies - To support JSON format on OAuth Authorization Server requests and responses
- Azure* - All properties with Azure at the beginning are obsolete and should not be used
- OAuthCustomField - To support any additional parameters that should be sent to the Authorization Server
Note
In most cases, except the Implicit grant type, OAuth authentication can be bypassed using a macro. If you are having trouble configuring OAuth with AppSpider, you should try Macro authentication.
SSL Certificates
You may need to authenticate your application on the client side so you can scan pages found behind your SSL. This authentication method can be used with both cloud and on-premise scan engines.
PFX Certificate Format
The SSL Certificate must be a .pfx file.
Configure SSL authentication
- Go to Authentication > SSL.
- In the Type dropdown, choose Certificate.
- Choose your SSL .pfx file.
- Optional: If a password is required, enter it in the provided box.
ADAL
You can authenticate your Application Security (InsightAppSec) scans using the Azure Active Directory Authentication Library (ADAL).
Configure ADAL
To configure ADAL authentication, you must go to Authentication > ADAL screen in the scan config wizard, and set the following options:
- Resource ID - This will depend on your Azure Active Directory (AD) usage. If you are using an Azure Native AD, this should be one of two defaults, either graph.windows.net or graph.microsoft.com. If you are not using a native Azure AD, your AD admin may be able to help you get the correct ID for your instance.
- Tenant - The domain name of your Azure AD tenant, such as example.onmicrosoft.com. This can be found on the Azure Active Directory overview screen.
- Client ID - The Application (client) ID under the app that you have registered.
- Authority URL - Defaults to https://login.microsoftonline.com/ so if left blank this is what will be passed up.
- Username - If you are using the Client ID, Username, and Password authentication flow, this will be the username for your account.
- Password - The password is not the password of your user account, instead it’s the secret key that is created under the ‘Certificate & secrets’ section. You can use ADAL in conjunction with OAuth as your authentication protocol (Reference: https://docs.microsoft.com/en-us/azure/active-directory/develop/v1-oauth2-implicit-grant-flow ).
HMAC
HMAC is a MAC (Message Authentication Code) that uses a cryptographic hash function and a secret key to authenticate. To learn more about HMAC, see https://en.wikipedia.org/wiki/HMAC .
Configure HMAC authentication
- Go to the Authentication > HMAC.
- Use the toggle button to Enable HMAC.
- Enter the following information:
-
Username - The username for your hash algorithm.
-
Secret Key - A unique code used to compute the HMAC. It is known by both the sender and receiver.
-
Hash Algorithm - Choose the hash algorithm type.
- Md5
- Sha1
- Sha256
-
Header Generation DLL Filename - A user created DLL file , which contains the cryptographic hash function. This is only needed if using an on-premise engine. If you don’t provide a file, they system will use the DLL provided by the engine.
-
HMAC Header Generation
The HMACHeaderGenerator.dll that ships with AppSpider is the default one used for HMAC header generation. It is coded as a .dll so that 3rd parties who want to use a custom scheme for generating HMAC headers can write a custom .DLL for that purpose and then configure AppSpider to use it instead of the default HMACHeaderGenerator.dll.
In an HMAC configured scan, AppSpider uses the HMAC .dll to generate headers that are included in every request it generates.
The following 3 data structures are necessary for passing data in/out of the HMAC functions. They are coded specifically to be as simple as possible with regard to minimising disparities in memory allocation between the main process and the .dll:
template <typename T> struct FUNCTORIZER
{
    bool    (*m_pfnCompareOrOrder)(const T& o1, const T& o2);
    // ---
    inline FUNCTORIZER(bool (*pfnCompareOrOrder)(const T& o1, const T& o2)) :
        m_pfnCompareOrOrder(pfnCompareOrOrder)
    {
    }
    inline bool operator()(const T& o1, const T& o2) const
    {
        return m_pfnCompareOrOrder(o1, o2);
    }
};
template <typename T> struct SIMPLELIST
{
template <typename T> inline static void PlacementDestructor(T& p)
{
p.~T();
}
// ---
SIMPLELIST<T> *m_plNext;
T m_tObject;
// ---
inline SIMPLELIST<T>() :
m_plNext(nullptr)
{
}
inline SIMPLELIST<T>(const SIMPLELIST<T>& o) :
m_plNext(nullptr)
{
operator=(o);
}
inline SIMPLELIST<T>(const T& tObject) :
m_plNext(nullptr),
m_tObject(tObject)
{
}
inline ~SIMPLELIST<T>()
{
Reset();
}
inline void Reset()
{
SIMPLELIST<T> *plCurrent,
*plNext;
plNext = m_plNext;
while (plNext)
{
plCurrent = plNext;
plNext = plCurrent->m_plNext;
plCurrent->m_plNext = nullptr;
// ---
PlacementDestructor<SIMPLELIST<T> >(*plCurrent);
free(plCurrent);
}
m_plNext = nullptr;
}
inline SIMPLELIST<T>* First()
{
return m_plNext;
}
inline SIMPLELIST<T>* Next()
{
return m_plNext;
}
inline bool Add(const T& tObjectToCopy)
{
SIMPLELIST<T> *plThat;
plThat = this;
while (plThat->m_plNext)
{
plThat = plThat->m_plNext;
}
plThat->m_plNext = new SIMPLELIST<T>(tObjectToCopy);
if (plThat->m_plNext)
{
plThat = plThat->m_plNext;
// ---
return true;
}
// ---
return false;
}
inline T* AddAtHead(const T& tObjectToCopy)
{
SIMPLELIST<T> *plThat;
plThat = m_plNext;
m_plNext = (SIMPLELIST<T>*)malloc(sizeof(SIMPLELIST<T>));
new(m_plNext) SIMPLELIST<T>(tObjectToCopy);
if (m_plNext)
{
m_plNext->m_plNext = plThat;
// ---
return &m_plNext->m_tObject;
}
m_plNext = plThat;
// ---
return nullptr;
}
inline T* AddUnique(const T& tObjectToCopy, bool (*pfnCompare)(const T& o1, const T& o2), bool bFailIfExists = false)
{
return AddUnique(tObjectToCopy, FUNCTORIZER<T>(pfnCompare), bFailIfExists);
}
template <typename FUNCTOR> inline T* AddUnique(const T& tObjectToCopy, FUNCTOR& pfnCompare, bool bFailIfExists = false)
{
SIMPLELIST<T> *plThat;
plThat = this;
while (plThat->m_plNext && !pfnCompare(plThat->m_plNext->m_tObject, tObjectToCopy))
{
plThat = plThat->m_plNext;
}
if (plThat->m_plNext)
{
if (!bFailIfExists)
{
// Leave the old one alone and return pointer to it.
return &plThat->m_plNext->m_tObject;
}
}
else
{
plThat->m_plNext = (SIMPLELIST<T>*)malloc(sizeof(SIMPLELIST<T>));
new(plThat->m_plNext) SIMPLELIST<T>(tObjectToCopy);
if (plThat->m_plNext)
{
return &plThat->m_plNext->m_tObject;
}
}
// ---
return nullptr;
}
}; struct STRINGPAIR
{
TCHAR m_szFirst[1024],
m_szSecond[1024];
// ---
STRINGPAIR()
{
}
STRINGPAIR(LPCTSTR szFirst, LPCTSTR szSecond)
{
_tcscpy_s<sizeof(m_szFirst)/sizeof(*m_szFirst)>(m_szFirst, szFirst);
_tcscpy_s<sizeof(m_szSecond)/sizeof(*m_szSecond)>(m_szSecond, szSecond);
}
};Replacing the default DLL
The following functions must be implemented in any .dll that will replace the default HMACHeaderGenerator.dll.
Get last error
Any error or exceptional condition that is informative to the user generated by the following functions should be stored in a global variable and returned by this function. AppSpider will report the error the same way it does with any errors.
extern "C" int __declspec(dllexport) WINAPI GetLastHMACError(IN int nSizeofError, OUT LPSTR szError)
{
    // nSizeofError = size limit of szError.
    // szError = pointer to character buffer to receive the error.
}
Generate header
This is the core function for generating the HMAC HTTP headers.
extern "C" bool __declspec(dllexport) WINAPI GenerateHMACHeader(IN ALG_ID eHashAlgorithm, IN LPCWSTR wszHttpVerb, IN DATE dtExpireDate, IN LPCWSTR wszUrl, IN LPCWSTR wszUsername, IN LPCWSTR wszSecretKey, IN BYTE* pbtContent, IN DWORD dwContentLength, OUT SIMPLELIST<STRINGPAIR>& lpszHeaders)
{
    // Here is a code sample for populating lpszHeaders:
    lpszHeaders.Add(STRINGPAIR("CustomHMACField1", szValue1));
    lpszHeaders.Add(STRINGPAIR("CustomHMACField2", szValue2));
    // If szValue1 = "foo" and szValue2 = "bar" then resulting HTTP requests will
    // be something like this:
    GET /somepage.html HTTP/1.1
    Host: server.example.com
    CustomHMACField1: foo
    CustomHMACField2: bar
    <other headers>
}
ALG_ID is from wincrypt.h and specifies the crypto hash algorithm to use. In a custom implementation, it can be whatever is desired including ignoring it, e.g. a scenario in which MD5 is always used. The rest of the input parameters are combined in the standard HMAC way in HMACHeaderGenerator.dll to generate headers “Authorization” and “Date” and their values in lpszHeaders. Similarly, any custom scheme would take the input parameters (algorithm, date, the string parameters and optionally, binary content (pbtContent, dwContentLength) and combine them as prescribed by the custom approach to create however many name-value pairs in lpszHeaders are desired, which AppSpider will then include in the request headers when crawling and attacking.
Clear headers list
extern "C" void __declspec(dllexport) WINAPI FreeTheHeadersList(IN SIMPLELIST<STRINGPAIR>& lpszHeaders)
{
    // Free lpszHeaders using the same scheme GenerateHMACHeader() used
    // to allocate it.  Likely simply lpszHeaders.Reset().
}
Generate arbitrary headers (NOT USED)
extern "C" bool __declspec(dllexport) WINAPI GenerateArbitraryHeaders(IN SIMPLELIST<STRINGPAIR>& lpszInputs, OUT SIMPLELIST<STRINGPAIR>& lpszHeaders)
  {
    // This function is currently not used.  It was written in anticipation
    // of future functionality.  The stub should however be included in any
    // custom HMAC .dll.
  }
Advanced Settings
While attempting authenticated scanning of an app, AppSpider needs a way to learn that authentication has been successful. It attempts to deduce the logged-in state of the app by examining the headers and body of web pages. The fields in the Authentication > Advanced tab can be used to train AppSpider to recognize the logged-in state of your application. You can use the Regex Builder to test your regular expressions before using them in AppSpider.
- Configure SSL certificate link - Opens SSL configuration window where user may configure the SSL certificate
- Logged-in Regex - If the text on your page matches this regular expression, AppSpider assumes that you are still logged in. This regex usually matches the “Sign out” link, since the sign-out option is only available if the user is still logged in.
- Assume Good Login - You may sometimes be unable to find a regex that matches the logged-in state of the app. There may be multiple login links leading to different areas of the product, and AppSpider might be attempting the same credentials everywhere leading to account lockouts. You can enable the Assume Good Login checkbox to instruct AppSpider not to check for logged-in state after the initial log in.