Access Explorer - Configuration and Settings
This page assumes you have completed the set up required to launch Access Explorer. If you are looking for guidance on the first-time setup process, check out the page for the Access Explorer - Setup. This page includes details on each of the configuration options available for Access Explorer. Refer to the in-page Table of Contents to the right to view the details around any specific configuration element.
IAM license
The Access Explorer is only available to users with the IAM license (contact us via the Customer Support Portal for more information).
From the Cloud Security (InsightCloudSec) main navigation menu, select Security > Access Explorer to launch Access Explorer and locate the settings options.
Additional Settings for IAM & LPA
There are additional configuration options available under IAM Settings, which is accessed from the main Settings menu.
Details on LPA are available through the following individual pages:
Azure Least Privileged Access (LPA)
AWS Least-Privileged Access (LPA)
Explorer Application Settings
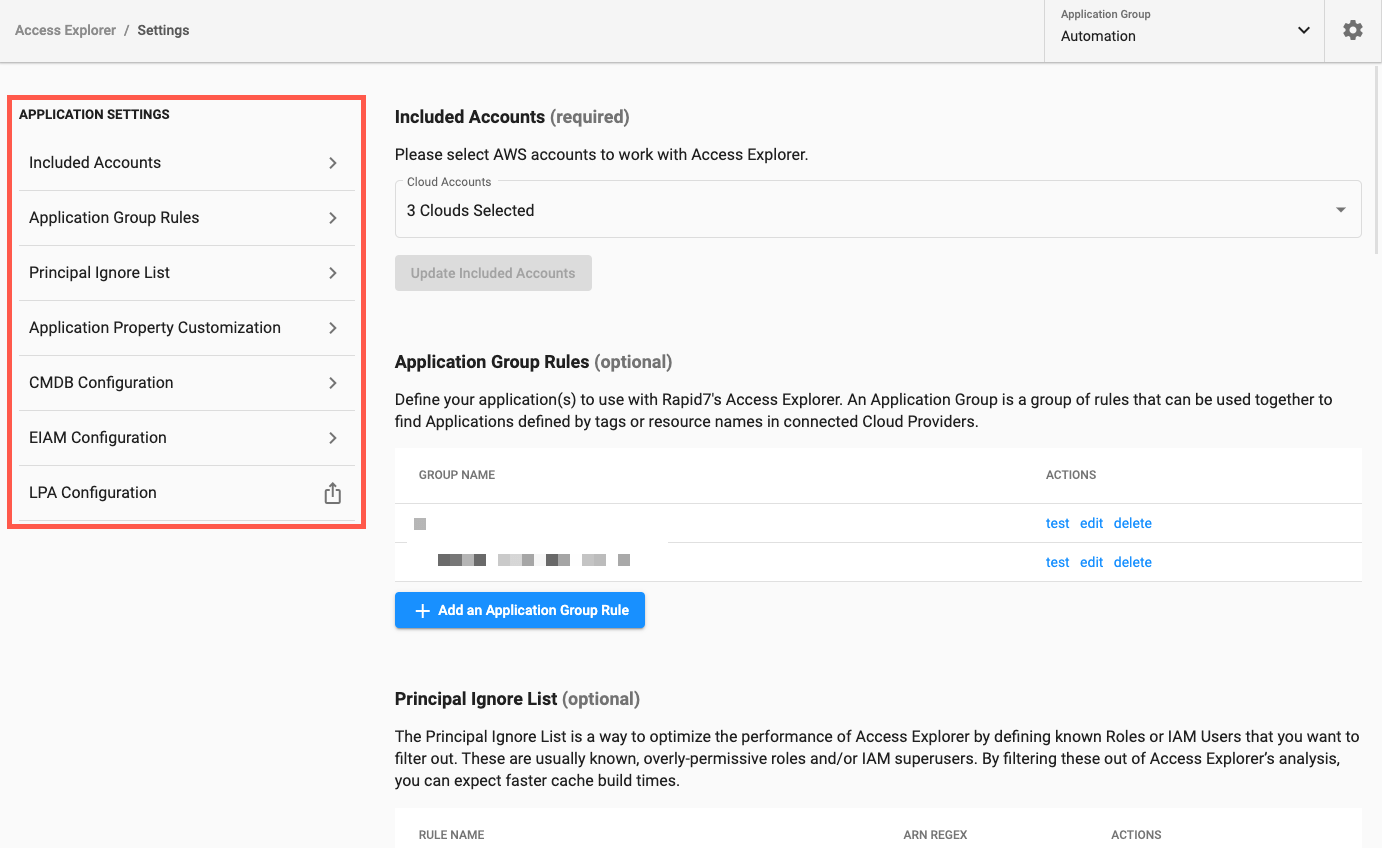
In the Explorer Application Settings you have access to settings for the following: Included Accounts, Application Group Rules, Principal Ignore List, Application Property Customization, CMDB Configuration, EIAM Configuration, and LPA Configuration.
If you have modified any settings the cache must have time to rebuild to reflect those changes. See IAM Settings for more information.

Included Accounts
Included Accounts allows you to select the cloud accounts you would like to connect to Access Explorer. This can include some, or all, of the cloud accounts you have connected to your existing Cloud Security (InsightCloudSec) platform. Access Explorer will analyze any account you select.
For details on connecting a new Cloud account, check out our Cloud Account Setup documentation.
Modify Included Accounts
To revise the cloud accounts included in Access Explorer modify your selections from the drop-down list provided (this includes any AWS cloud accounts that are connected to your existing Cloud Security (InsightCloudSec) platform) and then click Update Included Accounts.
The cache must be rebuilt to reflect any changes made to the settings. See IAM Settings for more information.
Application Groups (Rules, Configuration, Browsing)
To inspect IAM resources in Access Explorer by application you will need to configure Cloud Security (InsightCloudSec) to understand your tagging and naming configurations. By understanding your tagging or naming schema, we can dynamically group resources into applications through Application Groups.
Application Groups are a collection of rules you define to create an application.
- Application groups can contain multiple rules.
- Access Explorer can support multiple applications (though only one at a time will display).
Why Explore by Application?
Many operational and security teams view cloud resources by resource names or resource IDs. This approach limits the visibility of relationships between the resources and organization. In most enterprises cloud resources are logically grouped together under a common purpose (an application, a service, a micro-service), and this is usually configured using a tagging or naming convention.
By allowing Access Explorer to understand your tagging and naming conventions, we can dynamically group resources to their corresponding applications. This configuration will enable you to explore the resources that are part of an application and the users that have access to the application’s resources.
Setting Up an Application Group
Refer to the steps below to configure an Application Group.
- From your Cloud Security (InsightCloudSec) main navigation menu locate Security > Access Explorer and click to open Access Explorer.
- On the top right of the page, click the gear (Settings).
- Click Add an Application Group Rule to add a new Application name or tag pattern.
- Give your application a name in Application Group Name and then select the appropriate Group Rules (either Tags that have a key of… or Resource names that match the regex).
- There are two ways that Application Groups can resolve applications: tagging and naming conventions. Regex is useful for scenarios where your organization does not have an established naming or tagging convention and/or when your organization may have resources that do not support tagging.
- If you have a defined naming convention for applications in your environment, where resources are tagged with the key of App and the corresponding value is the name of the application, you would add a rule Tags that have a key of… - App,.
- Click Add Another Rule to add additional rules to your Application Group. Repeat this step for any rules you want to include.
- Click Save Application Group to create a new application.
Browsing Applications
Once you have created your applications (via Application Group), they will be visible on the main Access Explorer page under the Applications section. Applications with zero resources will display but be disabled.
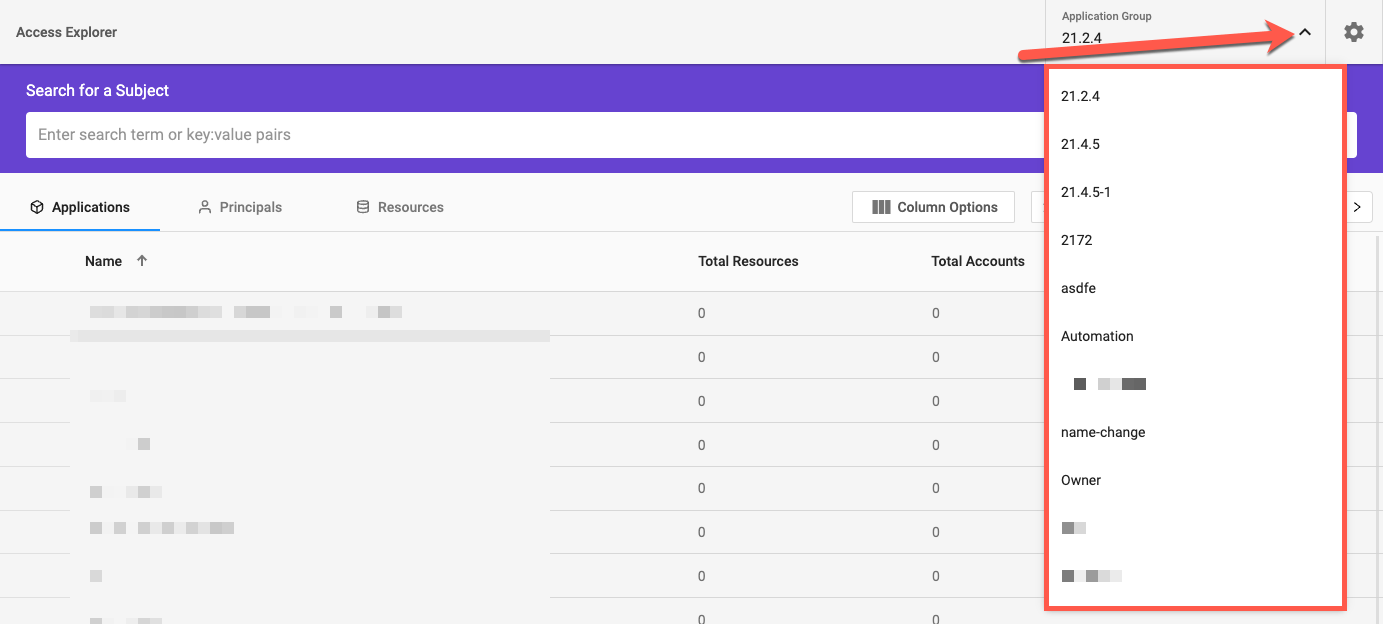
An Application Group can have multiple rules and you can have multiple application groups. However, only one Application Group can be active at a time for exploration. The Application Group can be selected from the “Application Group” widget at the top of the page.

Principal Ignore List
The Principal Ignore List (optional) is available under the Explorer Application Settings. This setting allows you to optionally define principals you would like to exclude from analysis and cache building in Access Explorer.
Calculating the access between principals and resources can be a potentially time-consuming process. When the Cloud Security (InsightCloudSec) IAM Governance module automatically builds the cache, it examines actions a principal can perform against accessible resources. For example, let’s say you have the following classifications of Admin - Level users provisioned in each one of your AWS accounts:
| Principal Name | Number of Accounts Where Principle Exists | Number of Accessible Managed AWS Resources Per Account |
|---|---|---|
| SecOpsAdmin | 1000 | 1000 |
| OperationsAdmin | 1000 | 100 |
In this example above the calculations needed to be performed are as follows:
- To understand what 1,000 SecOpsAdmin user has access to across all 1000 accounts is 1000*1000 = 1,000,000.
- For the Operations Admin it is 1000 * 100 = 100,000.
Since the user types in the example above are typically provisioned into accounts with automation, and are well known to security and operational staff, it may not make sense to iterate what they have access to every time the cache builds.
Adding an Ignore Principal Rule
From the Access Explorer landing page, click the gear (Settings) in the top right corner, then click Principal Ignore List.
- You can view any existing rules and then test, edit, or delete those rules.
- To add a new rule, click + Add Rule and provide a name and regular expression, then optionally test the rule. When finished, click Add to Principal Ignore List.
For example, the following regular expression will ignore any roles in accounts named CloudAdmin: arn:aws:iam::[0-9]{12}:role/CloudAdmin
Application Property Customization
Application Property Customization (optional) is available under the Explorer Application Settings. This setting allows you to optionally create memorable or friendly names for the fields that you have imported from your CMDB file. These can optionally displayed in Access Explorer.
By default, the Display Name is the same as the name in the field exported in the CMDB file you provided.
CMDB Configuration
Many enterprises maintain a Configuration Management Database (CMDB) that contains a lot of useful data, including information about applications. This information may include reporting structure details, information-classification requirements, compliance requirements, business units, etc.
Unfortunately, that information is often locked inside the CMDB and not available to other tools. By enabling the CMDB configuration for Access Explorer, that data is associated with applications and their associated resources. It allows you to view that data alongside the applications and resources in Access Explorer.
Some Examples of CMDB data in Access Explorer:
- Finding principals that have access Applications that require HIPAA compliance
- Finding S3 buckets that require PCI compliance and who has access to those buckets
- Find users who can access PCI-compliant RDS instances the Machine Learning organization owns.
Configuring the CSV Import File
Access Explorer includes two options for importing your CMDB configuration. Both options rely on a specifically formatted CMDB file in a comma-separated value (CSV) format. The CMDB CSV file requires 2 fields, all others are optional. The required fields are as follows:
- APPLICATION NAME: an ID or short name of your application.
- APPLICATION LABEL: human friendly version of your Application Name that will be displayed in Access Explorer.
The above columns MUST be present somewhere in the CSV file (the order doesn’t matter), named exactly as listed above.
All other fields are optional and can be shown in the Access Explorer UI.
Example CMDB File
APPLICATION NAME,APPLICATION LABEL,DESCRIPTION,CROWN JEWEL, PORTFOLIO,COMPLIANCE
1245,Records Processing,Processes healthcare records.,TRUE,Health Care Management,HIPAA
RM,Records Management,Maintains healthcare records,TRUE,Health Care Management,HIPAA
Deployment Manager,Deployment Manager,Handles system deployments.,None,Devops Tooling,None
Configuring the CMDB Import
For Access Explorer to understand your applications and any metadata you may have regarding those applications, you will need to import your CMDB data.
You have two options for configuring the CMDB Import: You can upload the file directly or point to the file hosted in an S3 Bucket.
Any changes to the CMDB file automatically trigger a cache rebuild.
Upload a CMDB File
Users can select and upload a file to share their CMDB data with Access Explorer.
Simply Choose a File and select Upload to upload your properly formatted CSV file.
Fetch CMDB File
Users can share the required CMDB file via S3 Bucket. This can be done with an existing S3 Bucket or a newly created one. Information on creating a new bucket can be found here .
Whether you are creating a new S3 Bucket or using an existing one, the Authorization Type you select during CMDB configuration must have access to the bucket.
S3 Bucket Permissions
You must ensure that both the bucket policy and the identity policies associated with the Authorization Type allow the appropriate access. At a minimum the associated policies must explicitly or implicitly allow s3:GetObject permission to the configuration file.
To add a CMDB configuration after your initial setup refer to the following steps:
- Navigate to Security > Access Explorer and click on Access Explorer to launch.
- Click the gear (Settings) in the top right to open the Settings page and navigate to “CMDB Configuration.”
- Under the CMDB Configuration section select the “Fetch CMDB File” option and complete the form with your desired options.
- CMDB File Location
- Bucket Name - The AWS S3 Bucket name where your CSV file is located
- File Name - Name of the CSV file inside of the S3 Bucket you have specified
- CMDB File Authentication
- Authentication Type - Select from Use Cloud Credentials or Assume Role.
- Options vary based on the Authentication Type you select, as outlined in the table below.
| Authentication Type | Field Name | Description |
|---|---|---|
| Use Cloud Credentials | Cloud | Select applicable cloud from drop-down list. |
| Assume Role | Cloud | Select applicable cloud from drop-down list. |
| Assume Role | Role ARN | The Role ARN from the target AWS IAM Role. |
| Assume Role | Session Name | Provide a unique name to identify a session. (In AWS this applies when IAM principals, federated identities, and applications assume the same IAM role.) |
| Assume Role | Minimum Role Duration | Minimum duration before the role is re-authenticated. In AWS, the session duration is set to 1 hour (in seconds) by default. |
| Assume Role | External ID | A unique, auto-generated External ID for all IAM AssumeRole operations. This ID is generated for your specific Cloud Security (InsightCloudSec) organization. |
- Select Save CMDB Configuration Changes once you have supplied your details. Optionally you may select Test Settings to verify that your S3 Bucket can communicate with Access Explorer.
EIAM Configuration
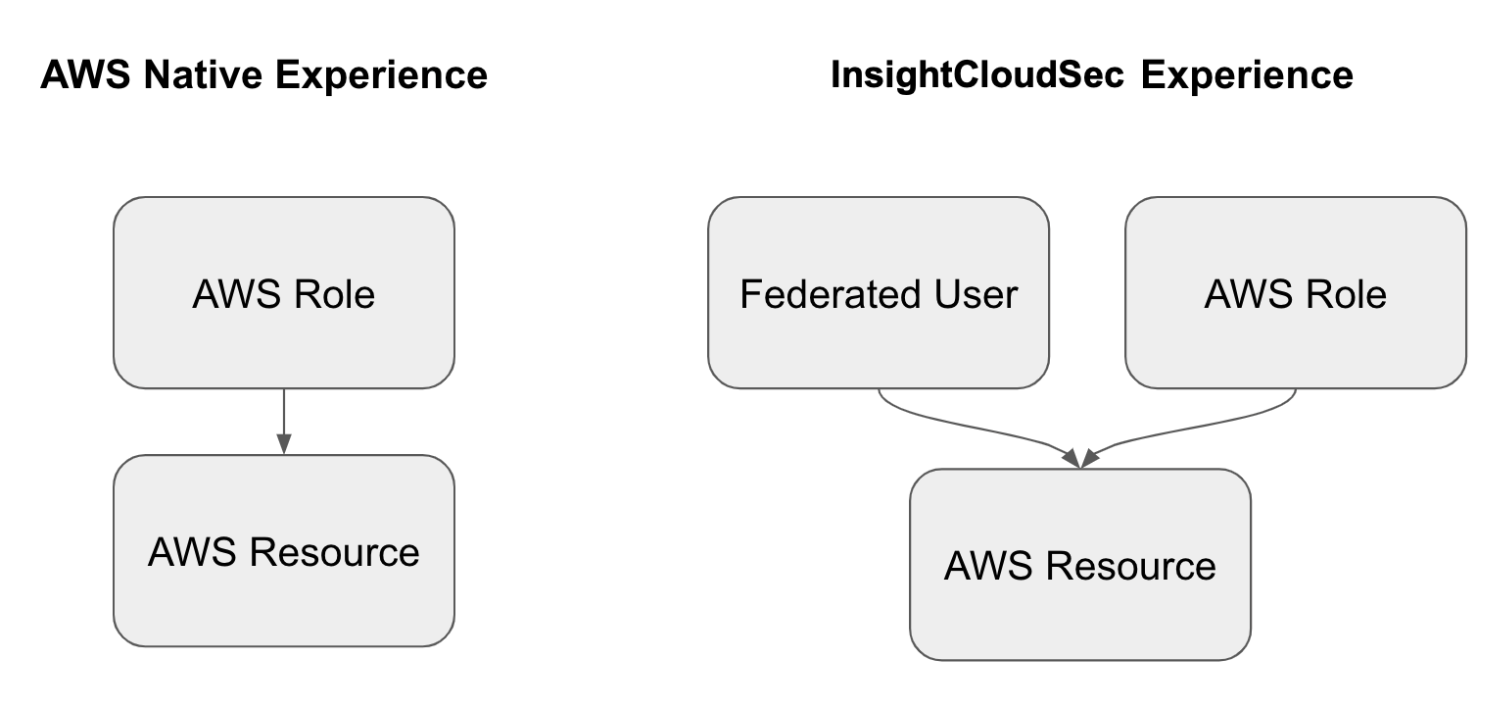
A common scenario for enterprise users logging in to AWS is through SAML Federation with Active Directory. A user logs in to the AWS console by providing their Active Directory credentials and assuming a role that gives them access. Although the user does not directly authenticate to AWS with their credentials, the SAML Federation configuration with Active Directory is able to provide AWS with details on the roles the authenticated user can assume. The actions the federated user can perform are defined primarily by the policies of the role they are assuming and the policies of their associated resources.
Access Explorer can identify which resources a given principal (including a role a federated user assumes) can access. However, tracking access back to the federated user can be time consuming. You would have to look at the role —> map that role back to the Active Directory (AD) Group —> verify Group Membership to determine that the federate user has the privileges granted by the associated role.
The purpose of EIAM integration is to shorten this process. For example, in Active Directory there is a group named AWS_123456789101_Developer
In that group there are a number of different Active Directory users. Given the proper Active Directory SAML configuration, each one of those users can assume an IAM role with the ARN of arn:aws:iam::123456789101:role/Developer
When you configure Access Explorer to fetch your enterprise group/user information as well as how those groups are mapped to AWS Roles, Access Explorer allows you to browse access by the federated principal. Refer to the image below for a comparison.

EIAM Configuration Data
Configuring the EIAM or enterprise identity data (EID) import is exactly the same as the CMDB import aside from the import data format. Any changes to the EIAM file automatically trigger a cache rebuild.
For EID, we use a JSON data format. The JSON file is a list of every user that you may want to explore in Access Explorer along with the AWS roles they can access in AWS.
[
   {
       "displayName": "Catherine Laine",
       "name": "Aurélie Legendre",
       "uid": "43d00bfc-cf0a-43da-xx1234-4936427xxxxx",
       "assumableRoles": [
           "arn:aws:iam::123456789101:role/cherry_role_sns_allow",
           "arn:aws:iam::123456789101:role/redoak_role_s3_deny_list"
       ]
   },
   {
       "displayName": "Maryse Aubert",
       "name": "Raymond Tanguy",
       "uid": "19855a44-8993-4780-123a-c543141xxxxx",
       "assumableRoles": [
           "arn:aws:iam::123456789101:role/silvermaple_role_sns_allow",
           "arn:aws:iam::123456789101:role/redoak_role_s3_deny",
           "arn:aws:iam::123456789101:role/redoak_role_s3_allow"
       ]
   }
]EIAM Import Script
We have created a script in Python and in PowerShell that can fetch the EIAM information from your Active Directory system.
These are just starting points and must be customized for your environment. These scripts are available through support, reach out us through the Customer Support Portal for details.
Configuring the EIAM Import
You have two options for configuring the EIAM Import: You can upload the file directly or point to the file that is hosted in an S3 Bucket.
Upload an EIAM File
Users can select and upload a file to share their EIAM data with Access Explorer.
Simply Choose a File and select Upload to provide your properly formatted JSON file.
Fetch EIAM File
Users can also share the EIAM file via S3 Bucket. This can be done with an existing S3 Bucket or a newly created one. Information on creating a new bucket can be found here .
Whether you are creating a new S3 Bucket or using an existing one, the Authorization Type you select during CMDB configuration must have access to the bucket.
S3 Bucket Permissions
You must ensure that both the bucket policy and the identity policies associated with the Authorization Type allow the appropriate access. At a minimum the associated policies must explicitly or implicitly allow s3:GetObject permission to the configuration file.
To add an EIAM configuration after your initial setup refer to the following steps:
- Navigate to Security > Access Explorer and click on Access Explorer to launch.
- Click the gear (Settings) in the top right to open the Settings page and navigate to EIAM Configuration.
- Under the EIAM Configuration section, select the Fetch EIAM File option and complete the form with your desired options.
-
EIAM File Location
- Bucket Name - The AWS S3 Bucket name where your CSV file is located
- File Name - Name of the JSON file inside of the S3 Bucket you have specified
-
EIAM File Authentication
- Authentication Type - Select from Use Cloud Credentials or Assume Role.
- Options vary based on the Authentication Type you select, as outlined in the table below.
-
| Authentication Type | Field Name | Description |
|---|---|---|
| Use Cloud Credentials | Cloud | Select applicable cloud from drop-down list. |
| Assume Role | Cloud | Select applicable cloud from drop-down list. |
| Assume Role | Role Name | The Role ARN from the target AWS IAM Role. |
| Assume Role | Session Name | Provide a unique name to identify a session. (In AWS this applies when IAM principals, federated identities, and applications assume the same IAM role.) |
| Assume Role | Minimum Role Duration | Minimum duration before the role is re-authenticated. In AWS, the session duration is set to 1 hour (in seconds) by default. |
| Assume Role | External ID | A unique, auto-generated External ID for all IAM AssumeRole operations. This ID is generated for your specific Cloud Security (InsightCloudSec) organization](doc:organizations). |
- Select Save EIAM Configuration Changes once you have supplied your details. Optionally you may select Test Settings to verify that your S3 Bucket can communicate with Access Explorer.
LPA Configuration
Clicking LPA Configuration has been updated to redirect to the new IAM Settings page (also available under the settings menu in the main navigation.)
- For details on AWS LPA, check out our AWS Least-Privileged Access (LPA) documentation
- For details on Azure LPA, check out our Azure Least Privileged Access (LPA) documentation.