Self-Hosted AWS Cloud Setup - Single Cloud
🚧 New AWS Onboarding
As of InsightCloudSec version 23.4.11, a new AWS onboarding experience is available. This experience will replace the old setup experience and you will not be able to access it. This page and associated pages have been archived to prevent confusion. Review AWS - Onboarding for more details on the new experience.
As usual, if you have issues or need support reach out to us through the Customer Support Portal with any questions.
Once your InsightCloudSec instance is up and running the first thing you’ll want to do is integrate an AWS cloud account to take advantage of the security Insights that apply to your cloud footprint. If you have any issues or questions with this setup, reach out to the support team through the Customer Support Portal .
🚧 Deployment Method Assumptions
These instructions assume that you have deployed InsightCloudSec to AWS using the recommended production deployment method: AWS - EC2 or ECS Fargate - Terraform. If your deployment method was different, reach out to the support team through the Customer Support Portal .
If you need to add multiple accounts grouped under an AWS organization to a Self-Hosted version of InsightCloudSec, review Self-Hosted AWS Cloud Setup (Organizations).
Setup Overview
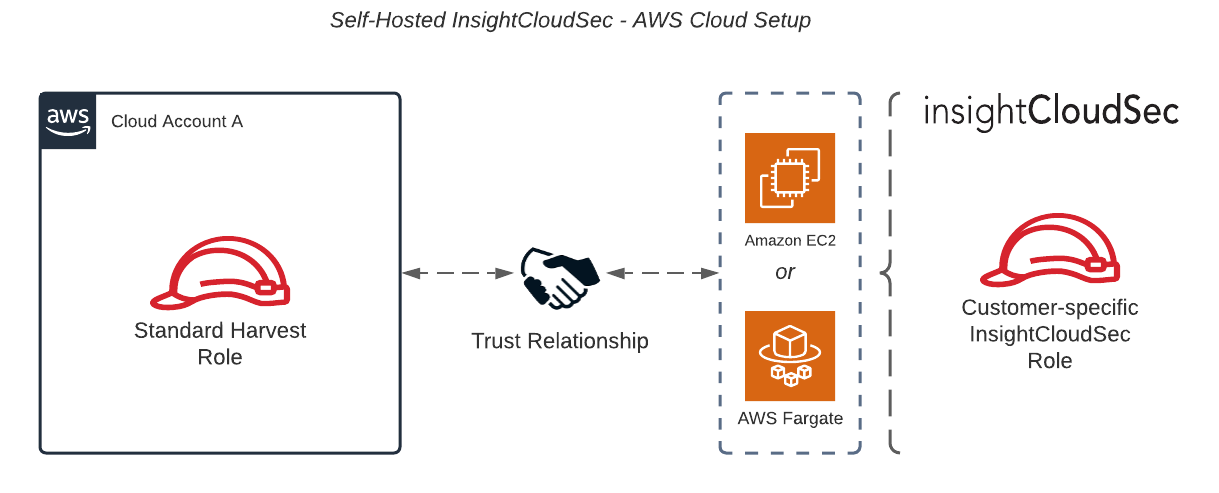
For InsightCloudSec to securely access the information contained within your AWS cloud account, you’ll need to create and set up a role, policy, and trust relationship. Review AWS’ IAM documentation for more information on these concepts. To achieve proper harvesting for InsightCloudSec, you will complete the following within your AWS and InsightCloudSec environments:
-
Step 1: Generate an External ID — Login to InsightCloudSec and generate a unique External ID that will be associated with the trusted entity used to harvest data in your AWS Cloud Account.
-
Step 2: Create a CloudFormation Stack for Account Harvesting — Using the
Harvest-Role-MemberCFT, create a *CloudFormation Stack* that creates a role and policy for harvesting the various AWS resources for a given cloud account. -
Step 3: Configure InsightCloudSec — Setup your AWS cloud account harvesting within InsightCloudSec and begin receiving resource data.
The diagram below outlines the setup required:
Prerequisites
Product name to be replaced
You may observe that some components, screen captures, or examples use our former product name, DivvyCloud. This doesn’t affect the configuration or the product’s functionality, and we will notify you as we replace these component names.
Before you configure anything in your AWS environment, you’ll need the following:
- Admin access to the AWS cloud account you want to harvest
- The unique Amazon Resource Name (ARN) for your InsightCloudSec instance. Your unique InsightCloudSec ARN could look something like this (if you used the default deployment values):
arn:aws:iam::123456789123:role/DivvyCloud-Install-Role, with the 12-digit account ID value being replaced with the ID of the account where InsightCloudSec is hosted- Note: If you followed the AWS - EC2 or ECS Fargate - Terraform deployment instructions, this role will be created automatically alongside the InsightCloudSec instance inside the desired account.
- Domain Admin permissions within InsightCloudSec
- InsightCloudSec IAM CloudFormation Templates (CFTs) (see below) and the permissions to use AND implement CFTs
Note: We recommend that you review the AWS Additional Configuration documentation, particularly the additional steps to support Opt-in regions.
CloudFormation Templates
🚧 Using CFTs
If you are unwilling or unable to use the CFTs required for setup, contact the support team through the Customer Support Portal .
Our team maintains the following template to help automate policy and role setup for your cloud account:
- Divvy-CFT-IAM-Harvest-Role-Member.yaml — Deploys a standard harvesting role to a given cloud account to harvest AWS resource data. Note: This CFT is also used in the Organization setup instructions, but it can be used on just one account instead of multiple organization member accounts.
Step 1: Generate an External ID
An External ID is generated for your specific InsightCloudSec organization when you initiate the process to add a cloud account within InsightCloudSec. The External ID will be the same for every individual cloud account or AWS Organization. Note: This process supports AWS best practices and prevents the confused deputy problem from occurring. The confused deputy problem is a security issue where an entity that doesn’t have permission to perform an action can coerce a more-privileged entity to perform the action.
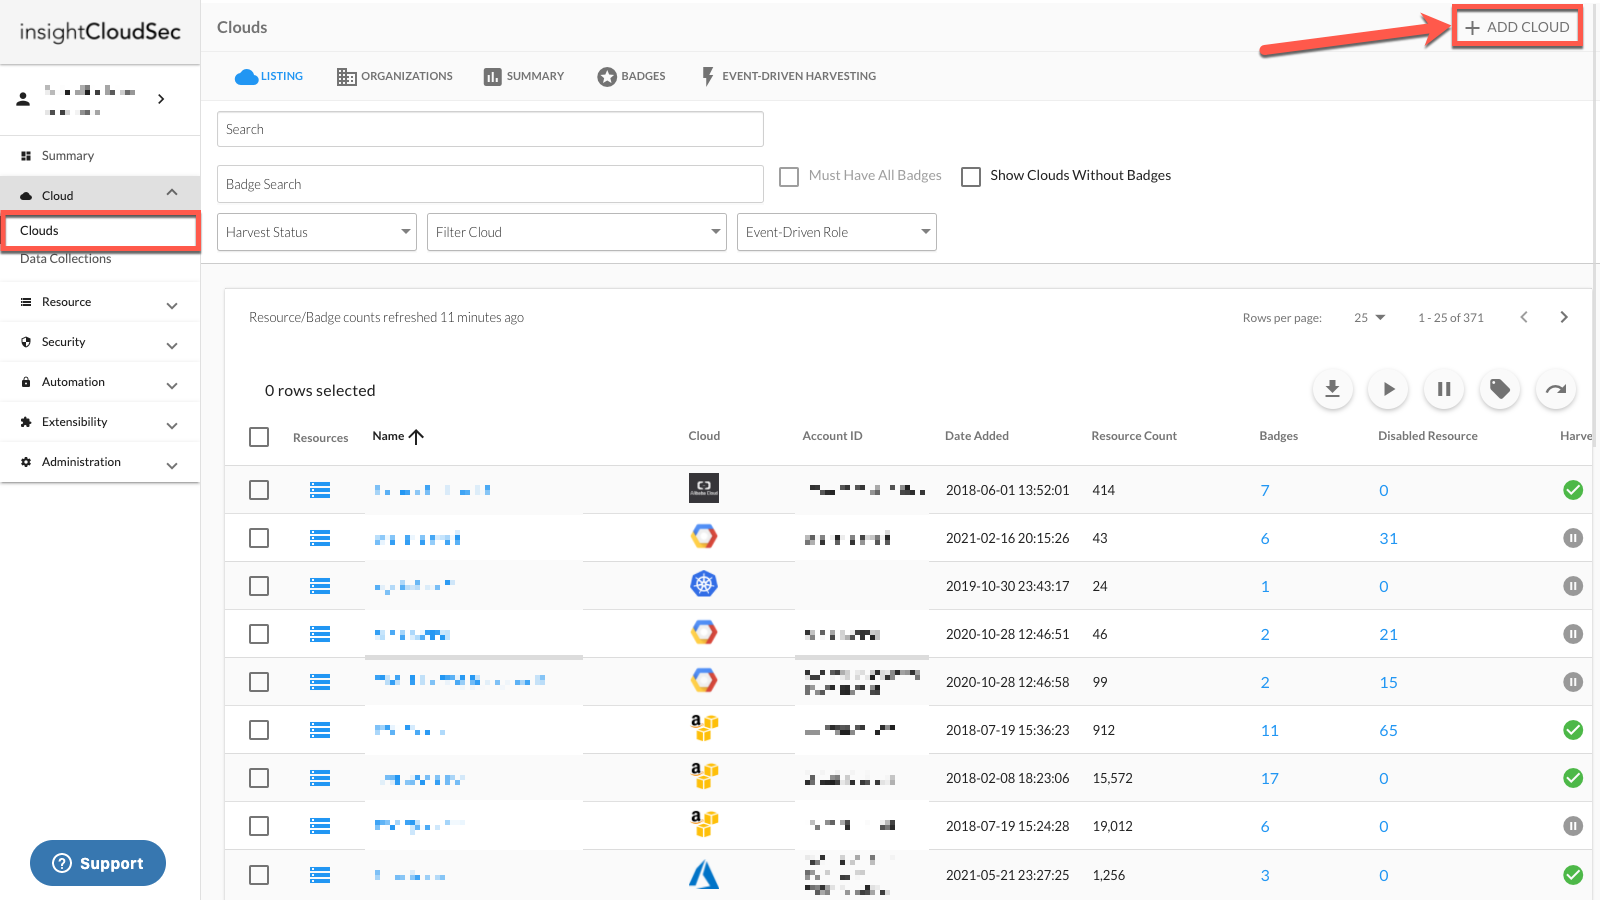
1. Login to your InsightCloudSec platform and click “Clouds” in the left-hand navigation menu.
- Click “Add Cloud” in the top right-hand corner.
- Click “Amazon Web Services”.
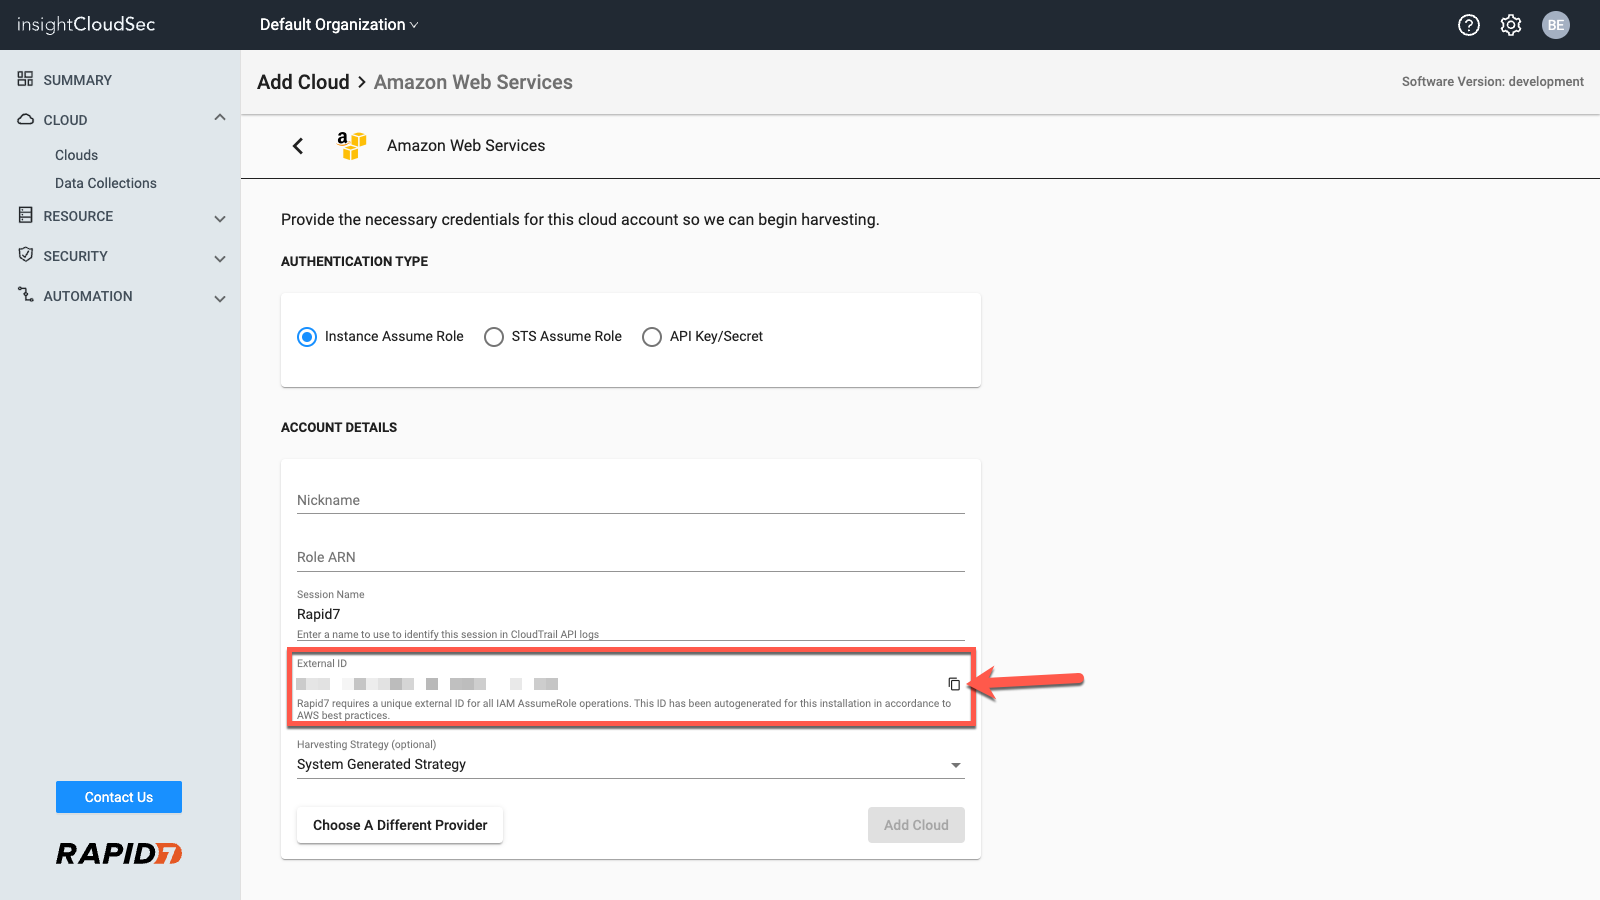
2. Click “Instance Assume Role”, then provide a nickname for the account. This creates a system Badge containing the nickname that can be searched or referenced throughout InsightCloudSec.
3. Under Account Details locate and copy the External ID.
- Keep the ID on hand for the next step where you will be creating a role.
- Keep this browser window open, as you’ll return to this setup page later.
Step 2: Create a CloudFormation Stack for Account Harvesting
Your AWS cloud account needs a standard harvesting role and policy to ensure proper integration with InsightCloudSec. This requires creating another *CloudFormation Stack* using the provided Harvest-Role-Member CFT that will configure the account for the additional role and policy.
🚧 Prerequisites
Before you can successfully create a harvesting role/policy, you will need the following on hand:
- The External ID associated with the InsightCloudSec organization (generated in step 1)
1. Login as an Admin to the AWS account you want to harvest and access the CloudFormation service.
- This service can be found on the Services main page under Management & Governance. You can also enter “CloudFormation” into the search bar.
- From the CloudFormation dashboard, click “Stacks” in the left-hand menu.
2. In the top right corner of the Stacks table, click “Create stack —> With new resources (standard)”.
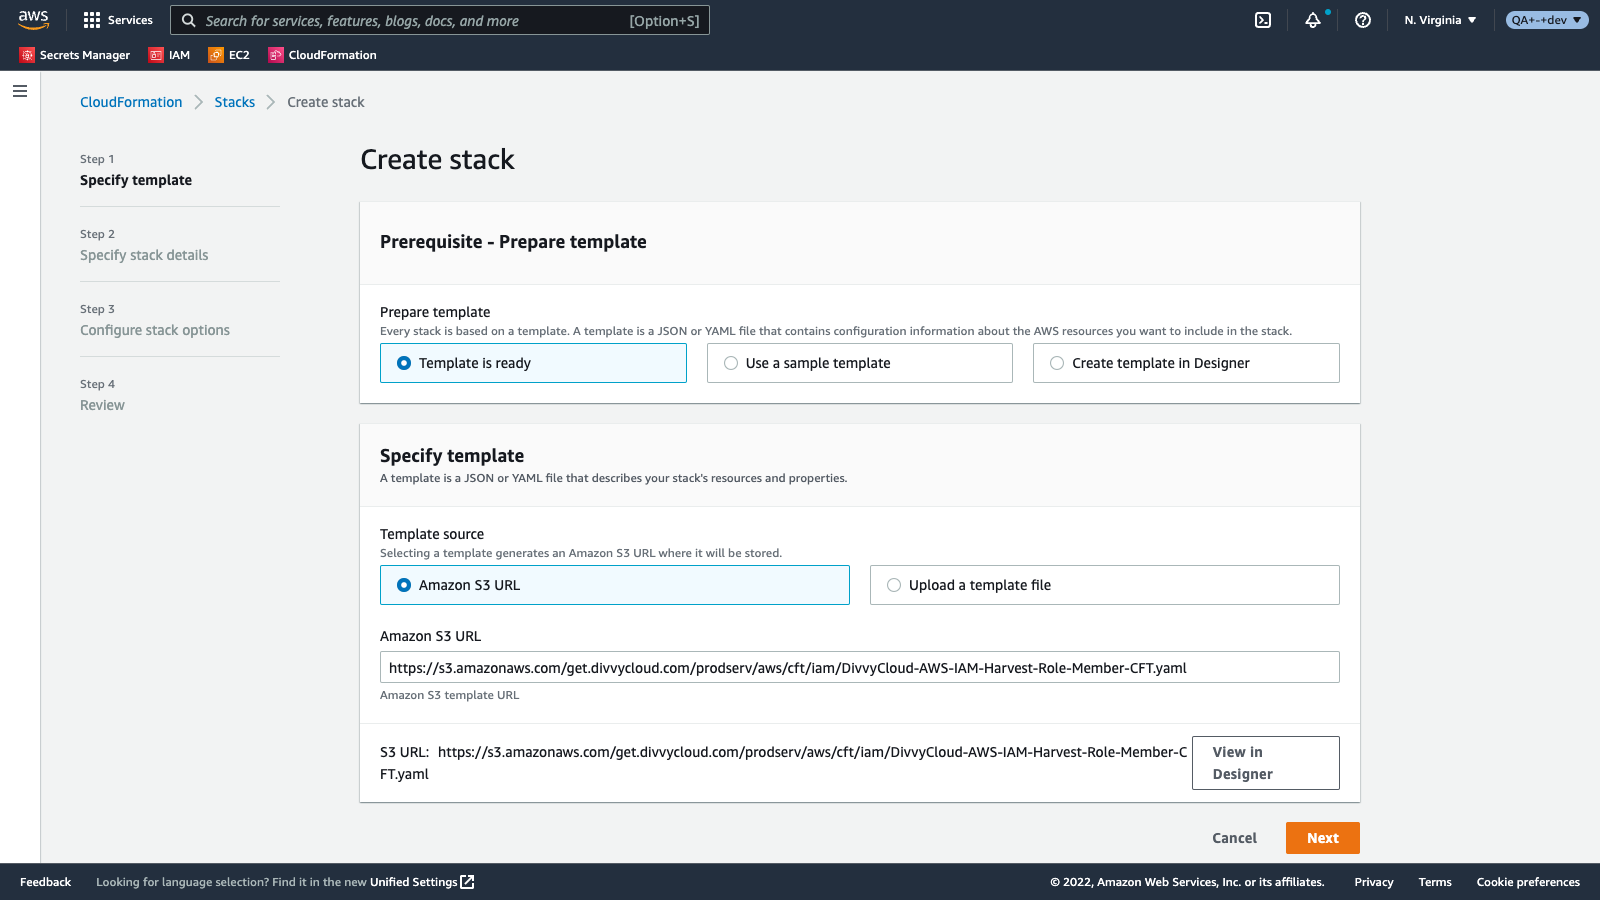
3. Configure the template.
- Click “Template is ready”.
- Click “Amazon S3 URL”.
- Input the Harvest Member Role CFT URL:
https://s3.amazonaws.com/get.divvycloud.com/cft/Divvy-CFT-IAM-Harvest-Role-Member.yaml - Click “Next”.
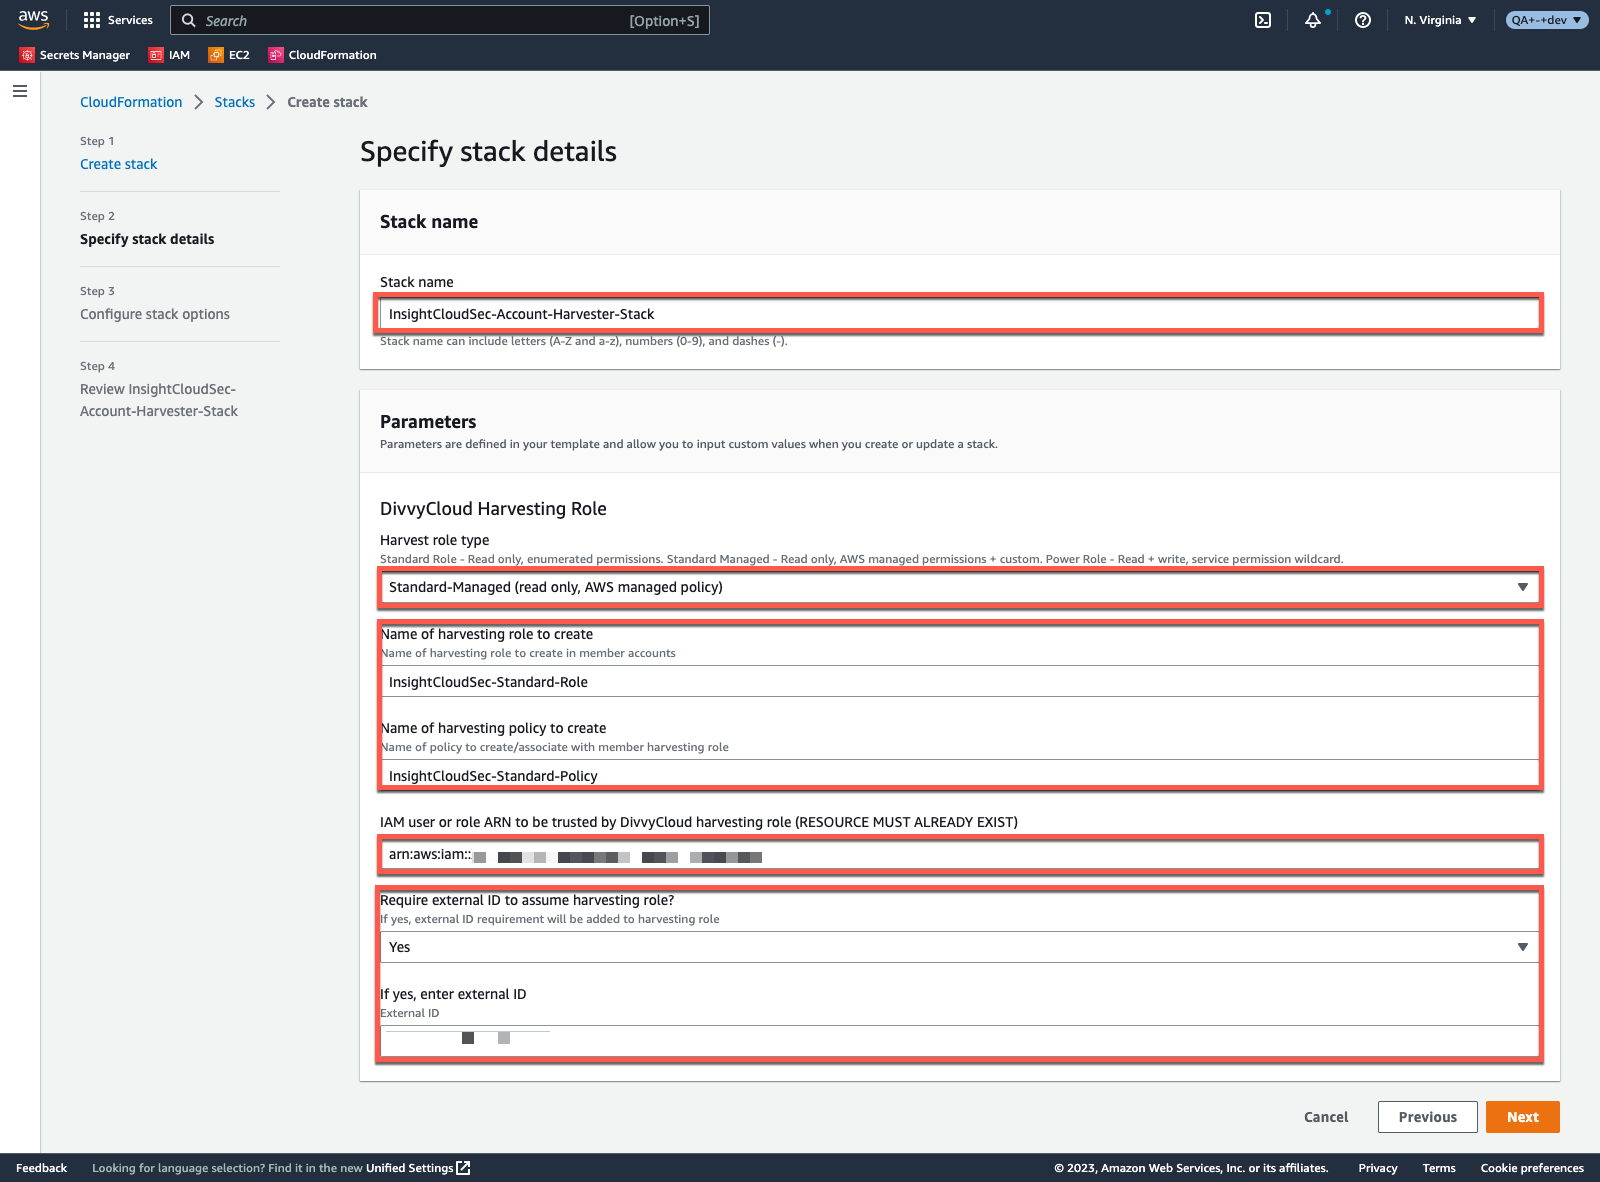
4. Specify stack details.
- Provide a name for the Stack. For example:
InsightCloudSec-Account-Harvester-Stack - Edit the parameters:
- Select the “Standard-Managed (read only, AWS managed)” Harvest role type. Review AWS-Managed Supplemental Policy for more information about this policy.
- Optionally, update the default role and/or policy name. For example:
InsightCloudSec-Standard-Role,InsightCloudSec-Standard-Policy - Input the ARN for your InsightCloudSec instance (contains your unique AWS account ID and role name).
- Contact your Customer Success Advisor or the support team through the Customer Support Portal if you do not have this information.
- Select “Yes” to create an external ID, then provide the external ID generated in step 1
- Click “Next”.
5. Configure stack options.
- Optionally, provide tags to help identify the stack and/or update the execution configuration.
- Optionally, provide an IAM admin role to perform all the operations in the Stack within your account(s) and adjust the IAM execution role name as necessary.
- Optionally, update the stack failure and/or advanced options.
- Click “Next”.
6. Review and create the stack.
- Review the Stack’s configuration to ensure everything is accurate.
- Acknowledge the warning about IAM capabilities toward the bottom of the page.
- Click “Submit”.
- Verify the Stack is created successfully.
Step 3: Configure InsightCloudSec
Now that the AWS account has been configured for harvesting, it’s time to enable harvesting within InsightCloudSec.
🚧 Prerequisites
Before you can successfully add an account to InsightCloudSec, you will need the following on hand:
- The ARN for the account harvesting role (created in step 2)
1. Return to your InsightCloudSec platform and the in-progress cloud account setup page.
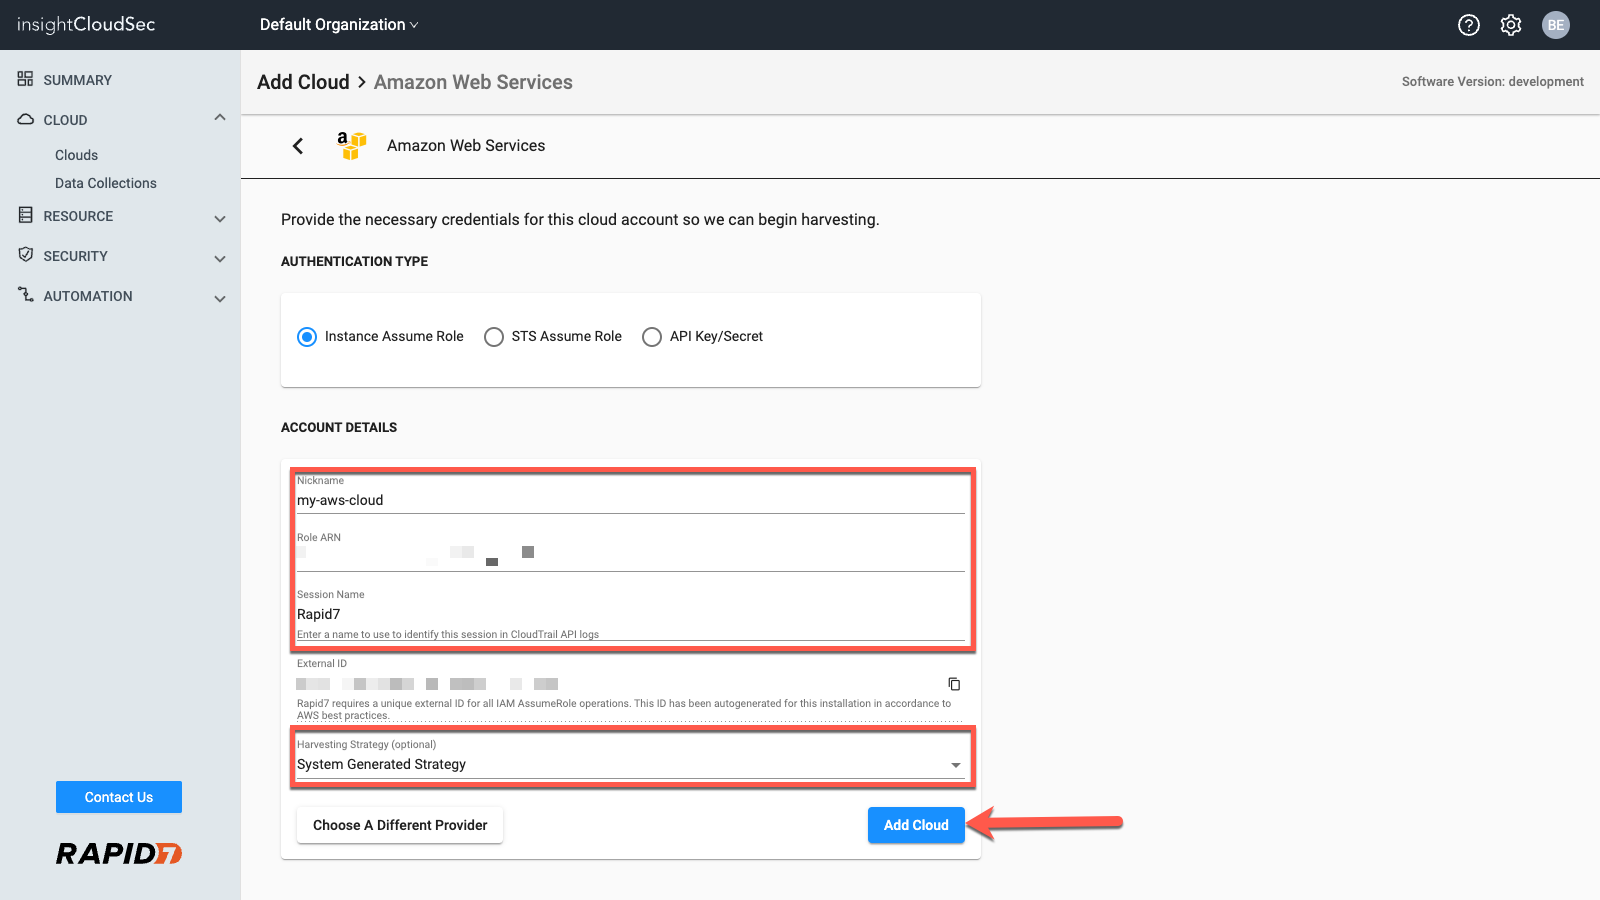
2. Provide credentials for harvesting the account’s data.
- Provide a nickname for the account.
- Provide the Role ARN for the harvesting role (created in step 2). For example:
arn:aw:iam::123456789012:role/InsightCloudSec-Standard-Role - Provide a session name.
- The session name is what will display in any CloudTrail logs and is useful for auditing purposes.
3. Optionally, select a Harvesting Strategy.
4. Click “Add Cloud”.
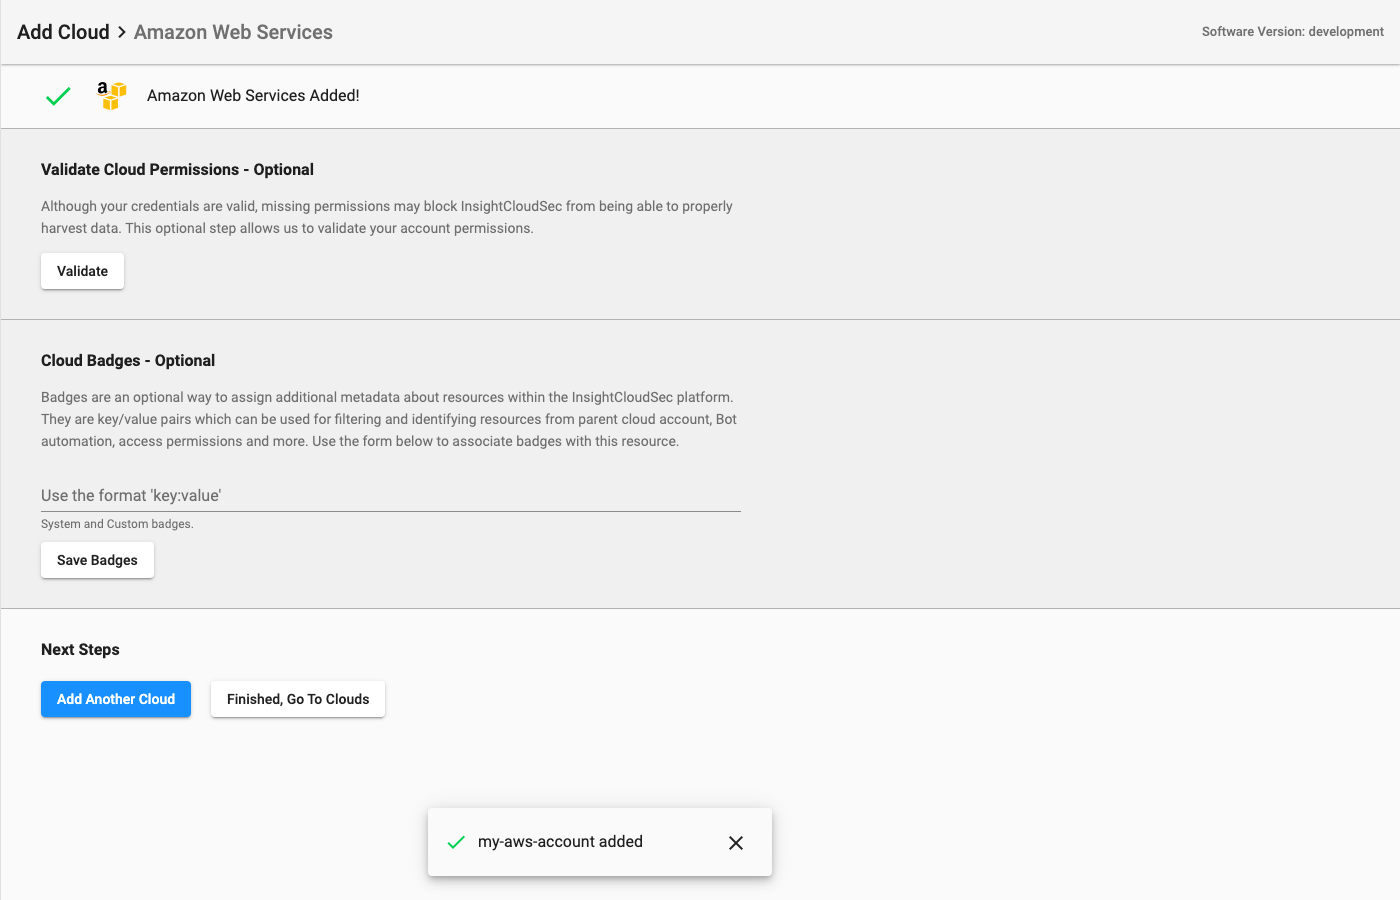
After successful submission, a background job is enqueued that will fetch and synchronize all of your accounts. Depending on the number of accounts, this may take a few minutes. At this point, you have the option of validating the permissions on the provided harvesting role to ensure successful harvest, adding cloud Badges, adding another cloud, or returning to the Clouds page.
