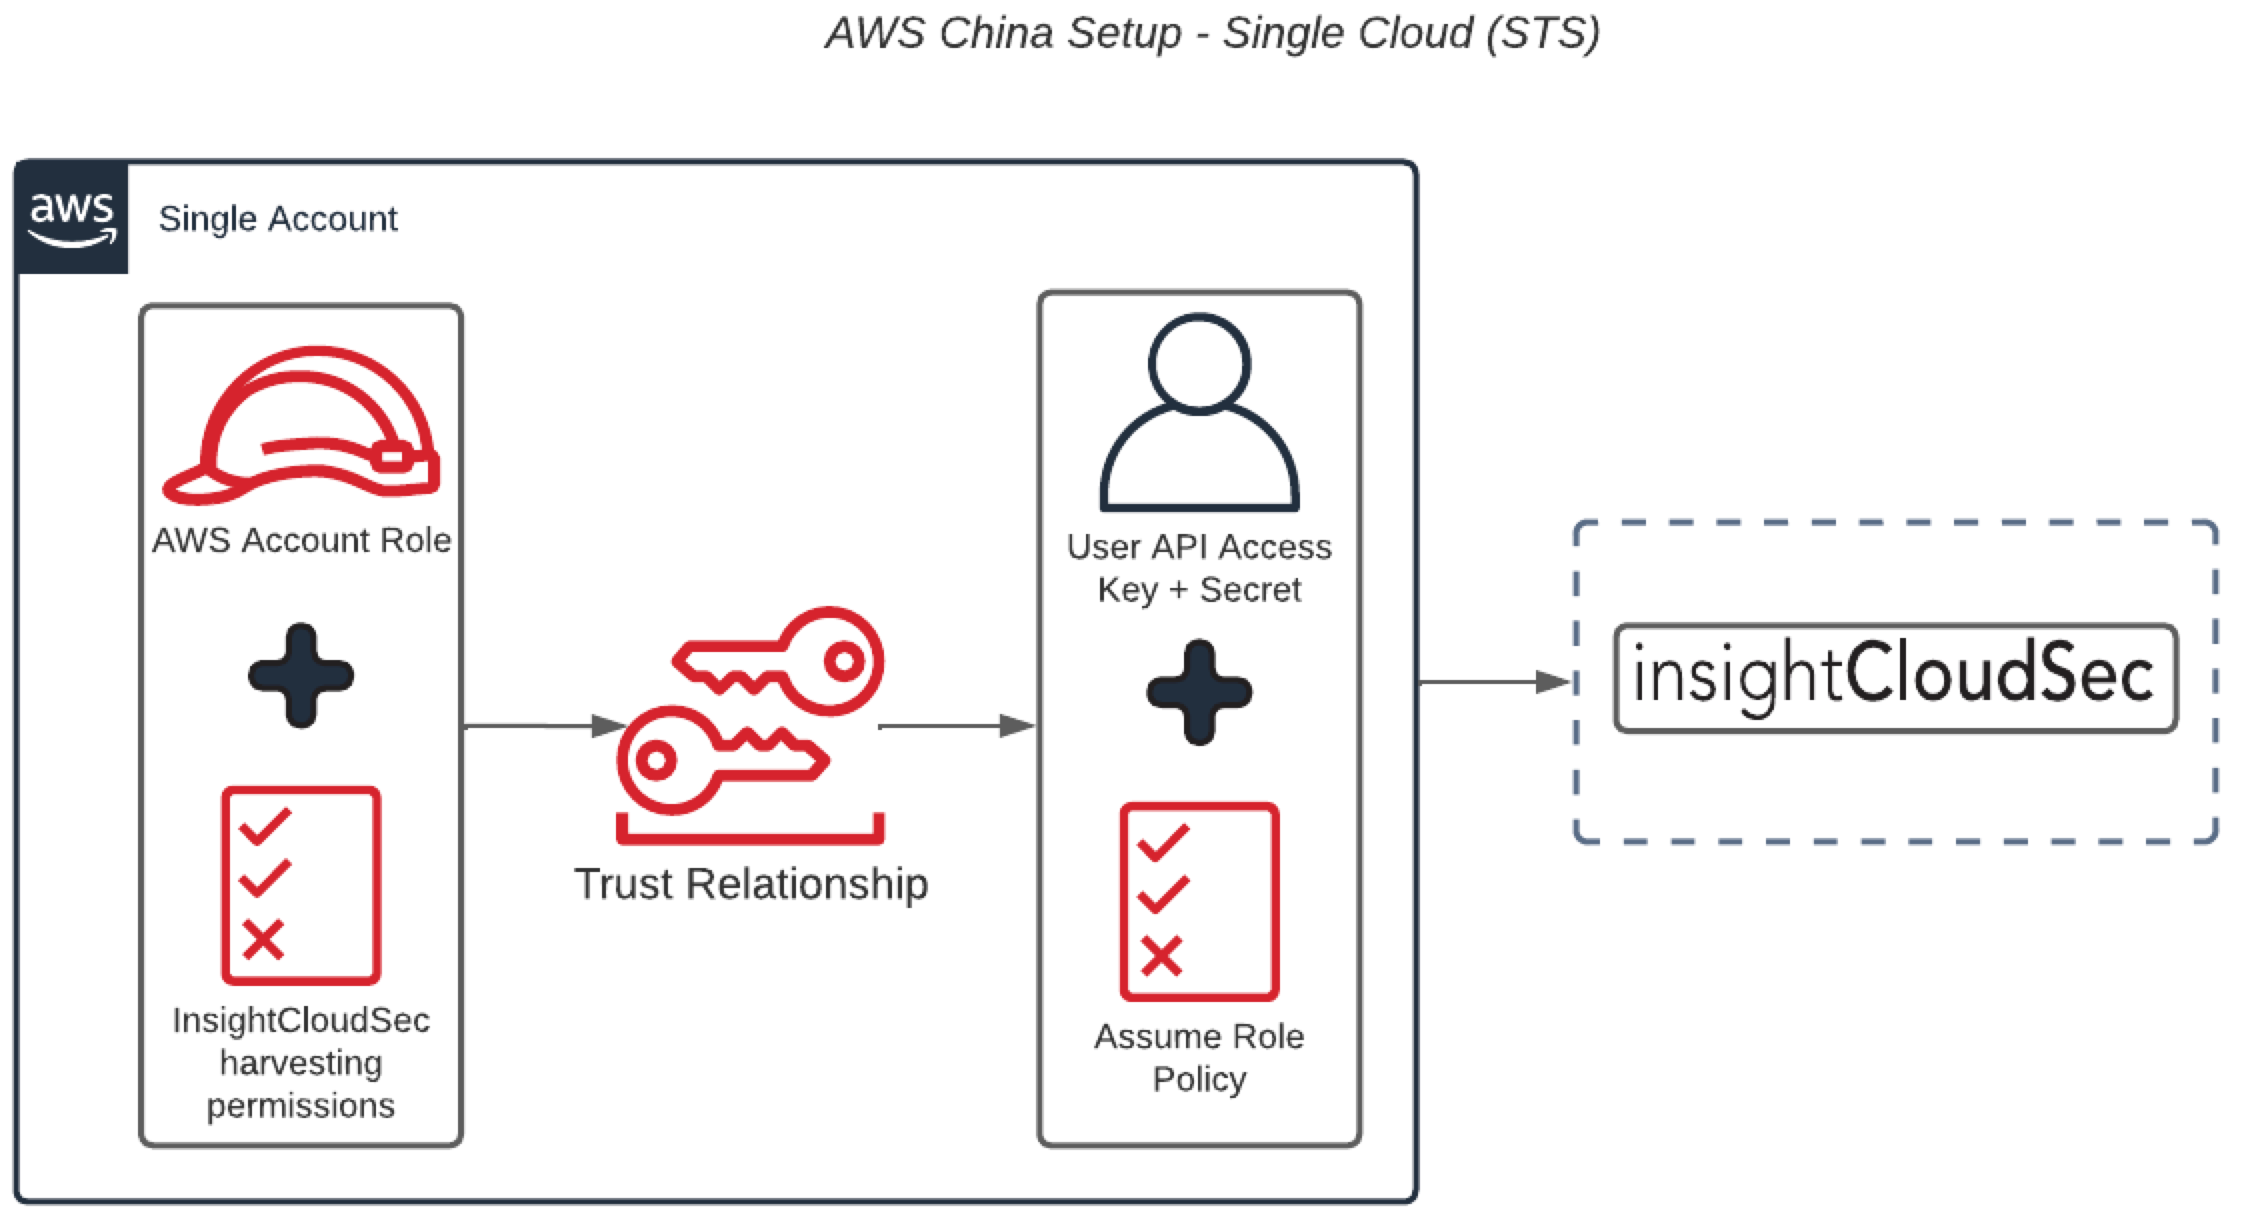
AWS China Setup - Single Cloud (STS)
🚧 New AWS Onboarding
As of InsightCloudSec version 23.4.11, a new AWS onboarding experience is available. This experience will replace the old setup experience and you will not be able to access it. This page and associated pages have been archived to prevent confusion. Review AWS - Onboarding for more details on the new experience.
As usual, if you have issues or need support reach out to us through the Customer Support Portal with any questions.
Once InsightCloudSec is up and running the first thing you’ll want to do is connect an AWS China cloud account to take advantage of the security Insights that apply to your cloud footprint. This page describes how to connect an AWS China cloud account with InsightCloudSec using the Secure Token Service, which relies on an intermediary user that InsightCloudSec will login as and use to securely access AWS services and data. After you’ve finished with this set of instructions, you’ll have added an AWS account to InsightCloudSec and your environment’s services and data will be harvested.
These instructions are specifically for AWS China. If you need to add a non-China AWS (Commercial) account or organization, review AWS Overview & Support for more information.
Setup Overview
For InsightCloudSec to securely access the information contained within your AWS China cloud account, you’ll need to create and setup a user, role, policy, and trust relationship.
Review AWS China’s IAM documentation for more information on these concepts. To achieve proper harvesting for InsightCloudSec, you will complete the following within your AWS and InsightCloudSec environments:
-
Step 1: Generate an External ID — Login to InsightCloudSec and generate a unique External ID that will be associated with the trusted entity used to harvest data in your AWS Cloud Account.
-
Step 2: Setup Policies — Setup the harvesting and assume role policies.
-
Step 3: Setup User — Setup a user with the assume role policy, attach a harvesting role to it, and update its trust relationship.
-
Step 4: Configure InsightCloudSec — Setup your AWS cloud account harvesting within InsightCloudSec and begin receiving resource data.
The diagram below outlines the setup required:
Prerequisites
Before you configure anything in your AWS environment, you’ll need the following:
- Admin access to the AWS China cloud account you want to harvest
- Domain Admin permissions within InsightCloudSec
Step 1: Generate an External ID
An External ID is generated for your specific InsightCloudSec organization when you initiate the process to add a cloud account within InsightCloudSec. The External ID will be the same for every individual cloud account or AWS Organization. Note: This process supports AWS best practices and prevents the confused deputy problem from occurring. The confused deputy problem is a security issue where an entity that doesn’t have permission to perform an action can coerce a more-privileged entity to perform the action.
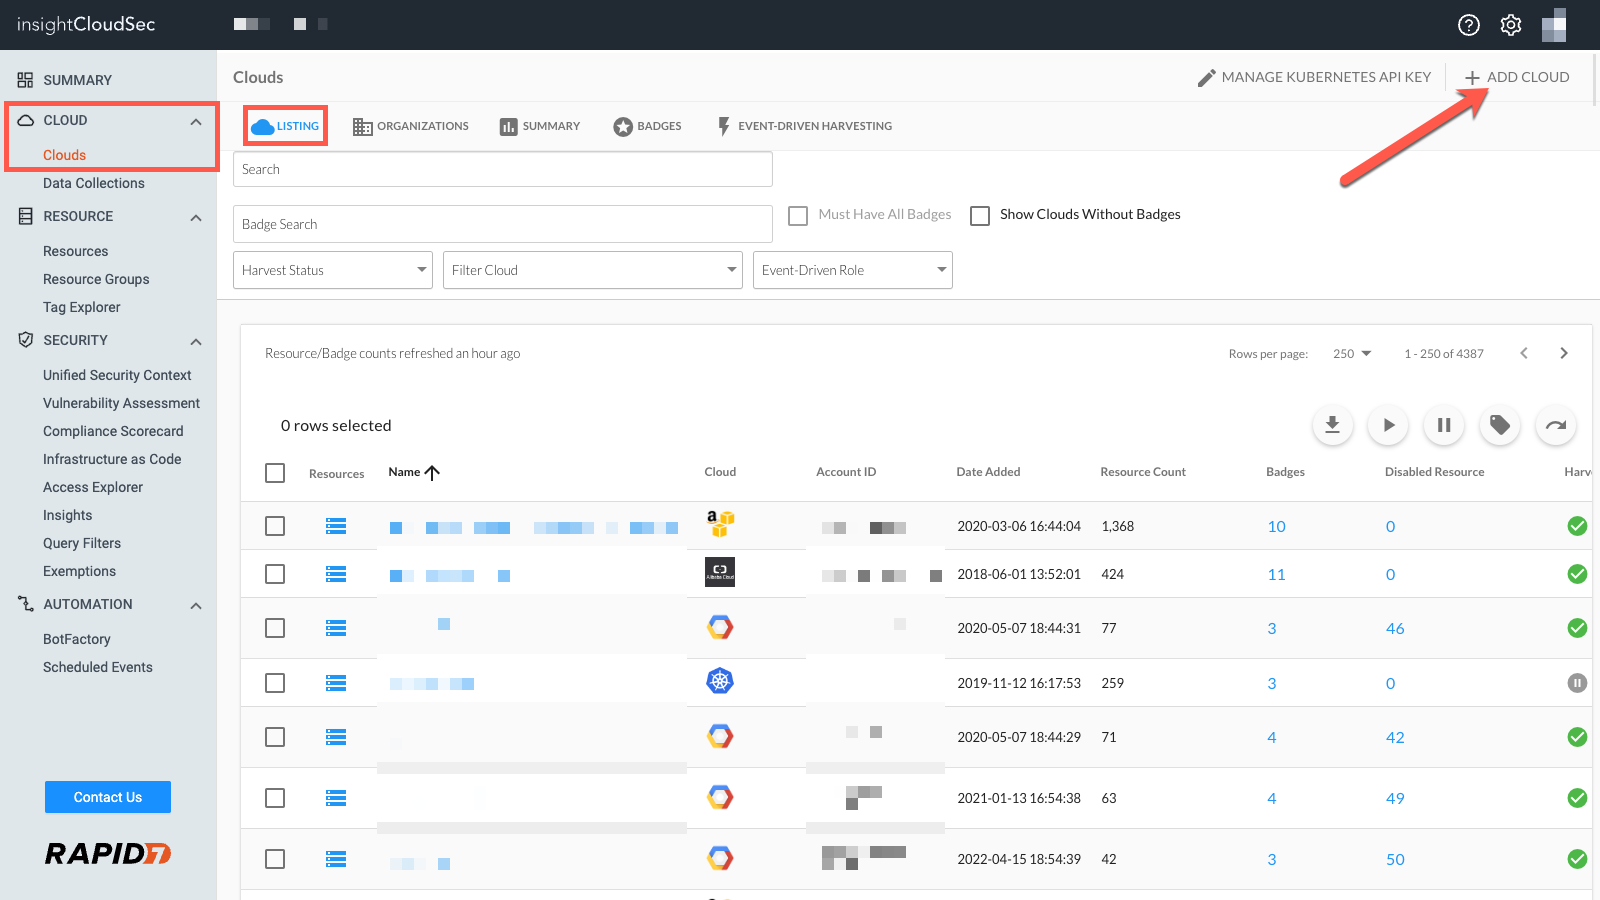
1. Login to InsightCloudSec and click “Clouds” in the left-hand navigation menu.
- Click “Add Cloud” in the top right-hand corner.
- Click “SEE MORE” to expose additional cloud providers.
- Click “Amazon Web Services (China)”.
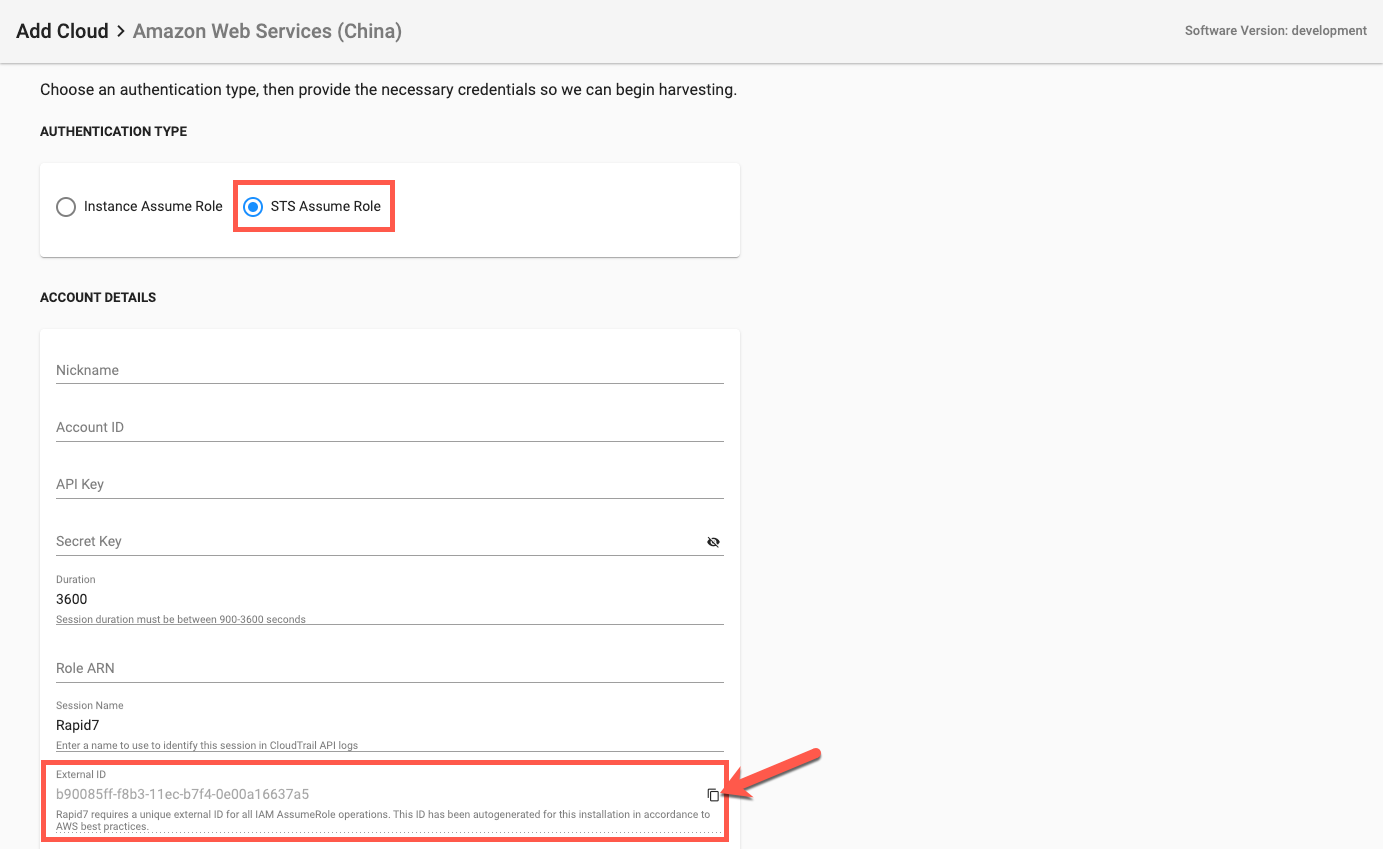
2. Click “STS Assume Role”.
3. Under Account Details locate and copy the External ID and keep it on hand for later instructions.
- Keep this browser window open, as you’ll return to this setup page in step 4.
Step 2: Setup Policies
Before configuring the user and role that InsightCloudSec will use to harvest your AWS data, two policies will need to be created: one to access the AWS services that InsightCloudSec supports harvesting for (“harvesting policy”) and one to allow InsightCloudSec to assume a role (“assume role policy”) within your AWS environment.
Harvesting Policy
1. Login as an Admin to the AWS account you would like to harvest and access the Identity & Access Management (IAM) service.
- This service can be found on the Services main page under Security, Identity, & Compliance. You can also enter “IAM” into the search bar.
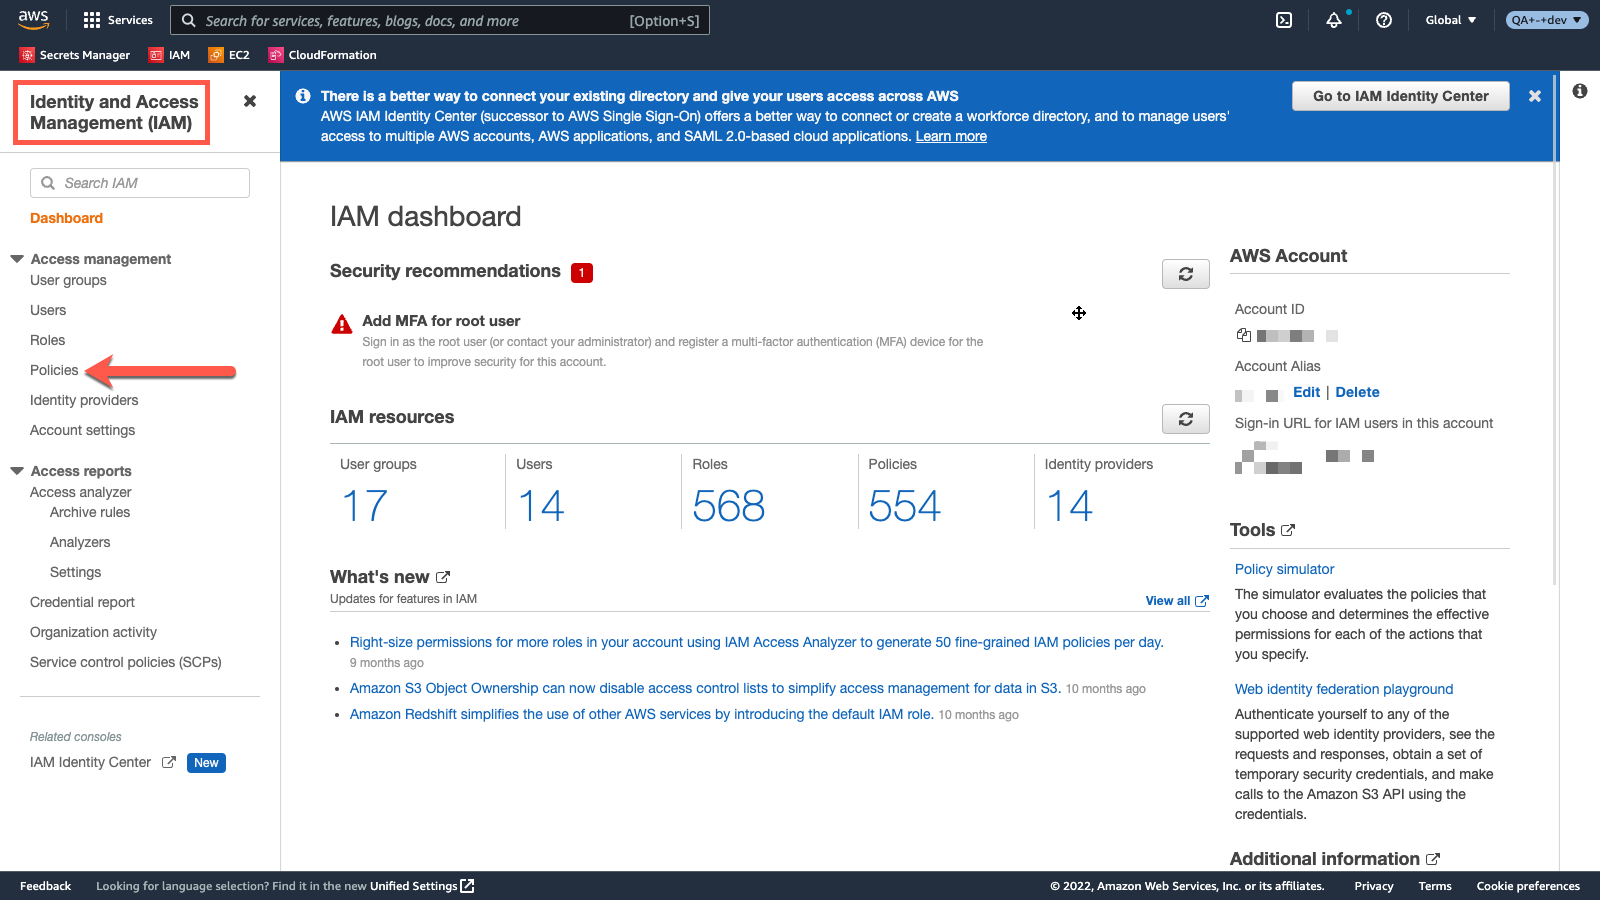
- Once at the IAM dashboard, click “Policies”.
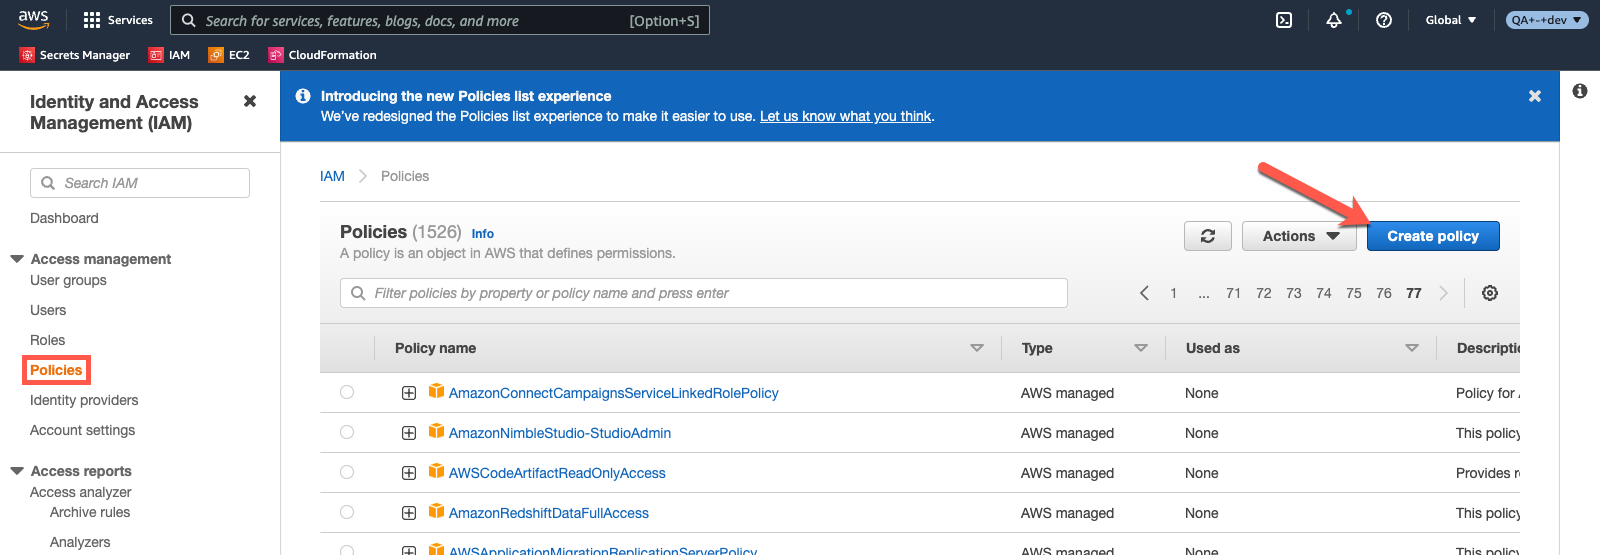
2. Click “Create Policy”.
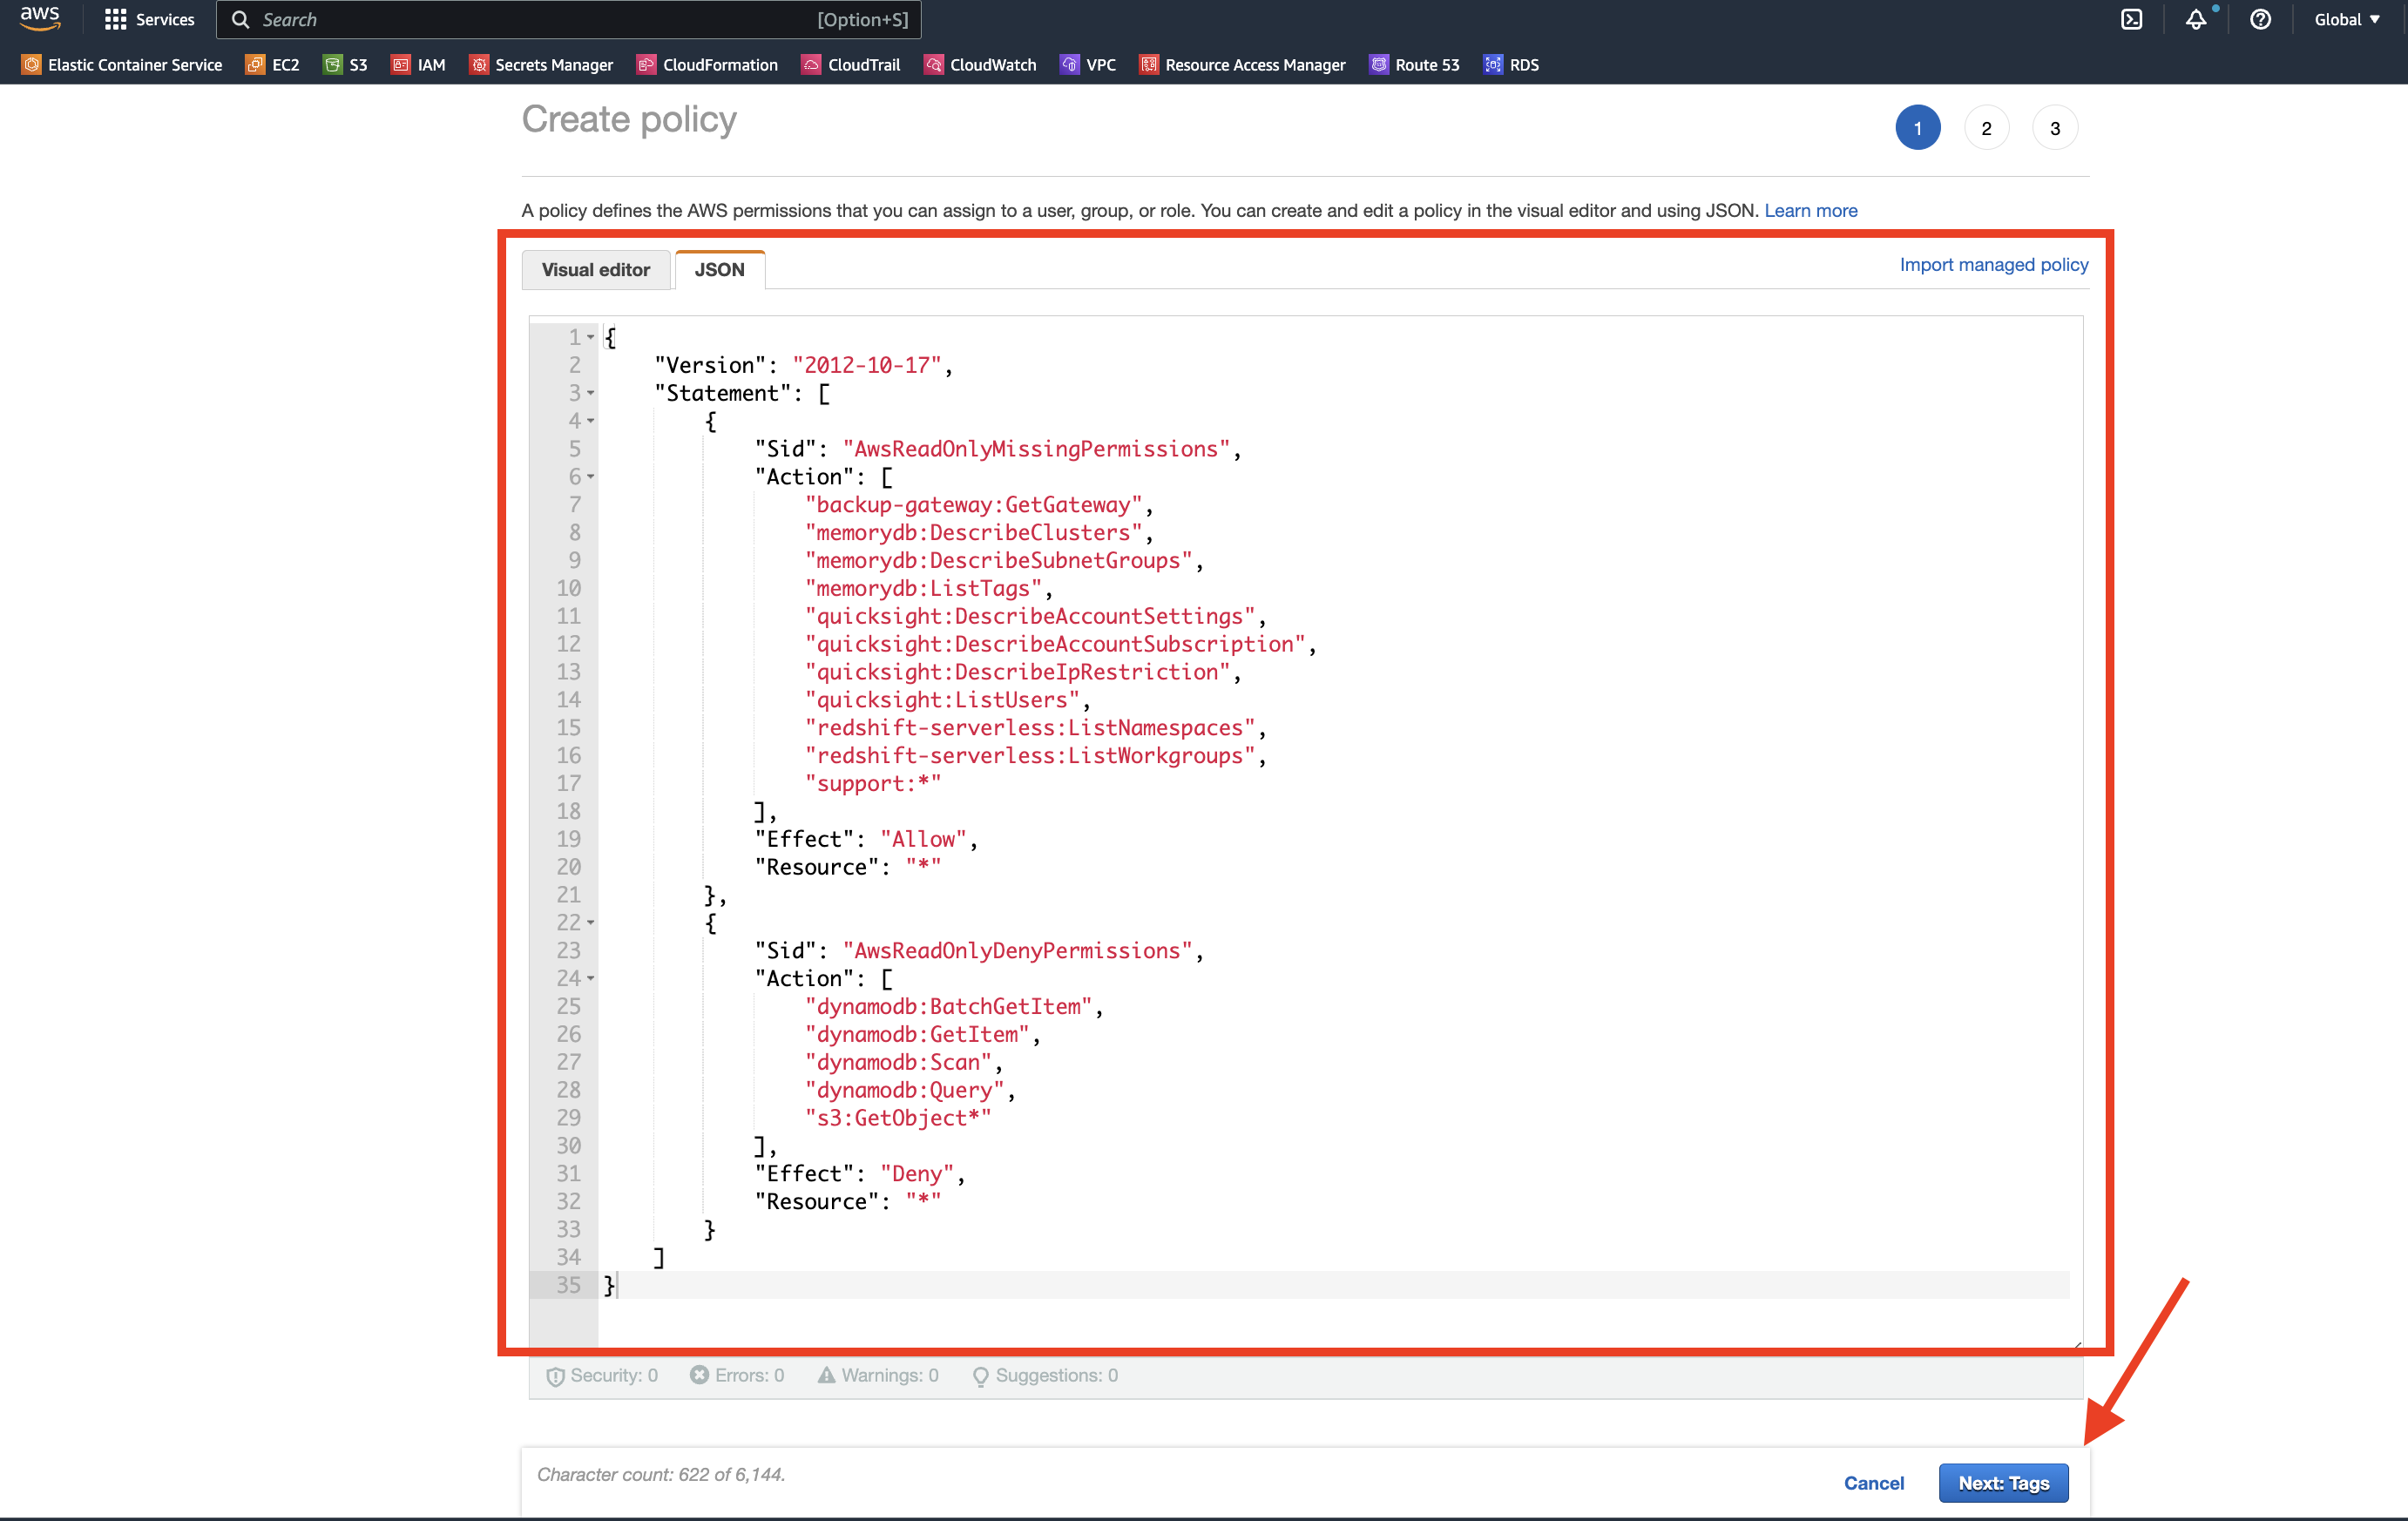
3. Click “JSON” and paste in the AWS China Managed Read-Only Supplement policy .
- Select the existing JSON and delete it.
- Open the AWS China Managed Read-Only Supplement Policy in a new tab.
- Back in the AWS console, copy and paste the policy into the JSON text window.
- The example in the picture will look similar to the AWS China Managed Supplemental policy.
- Click “Next: Tags”.
4. Optionally, add tags to help identify, organize, or search for the policy.
- Click “Next: Review” when finished adding tags.
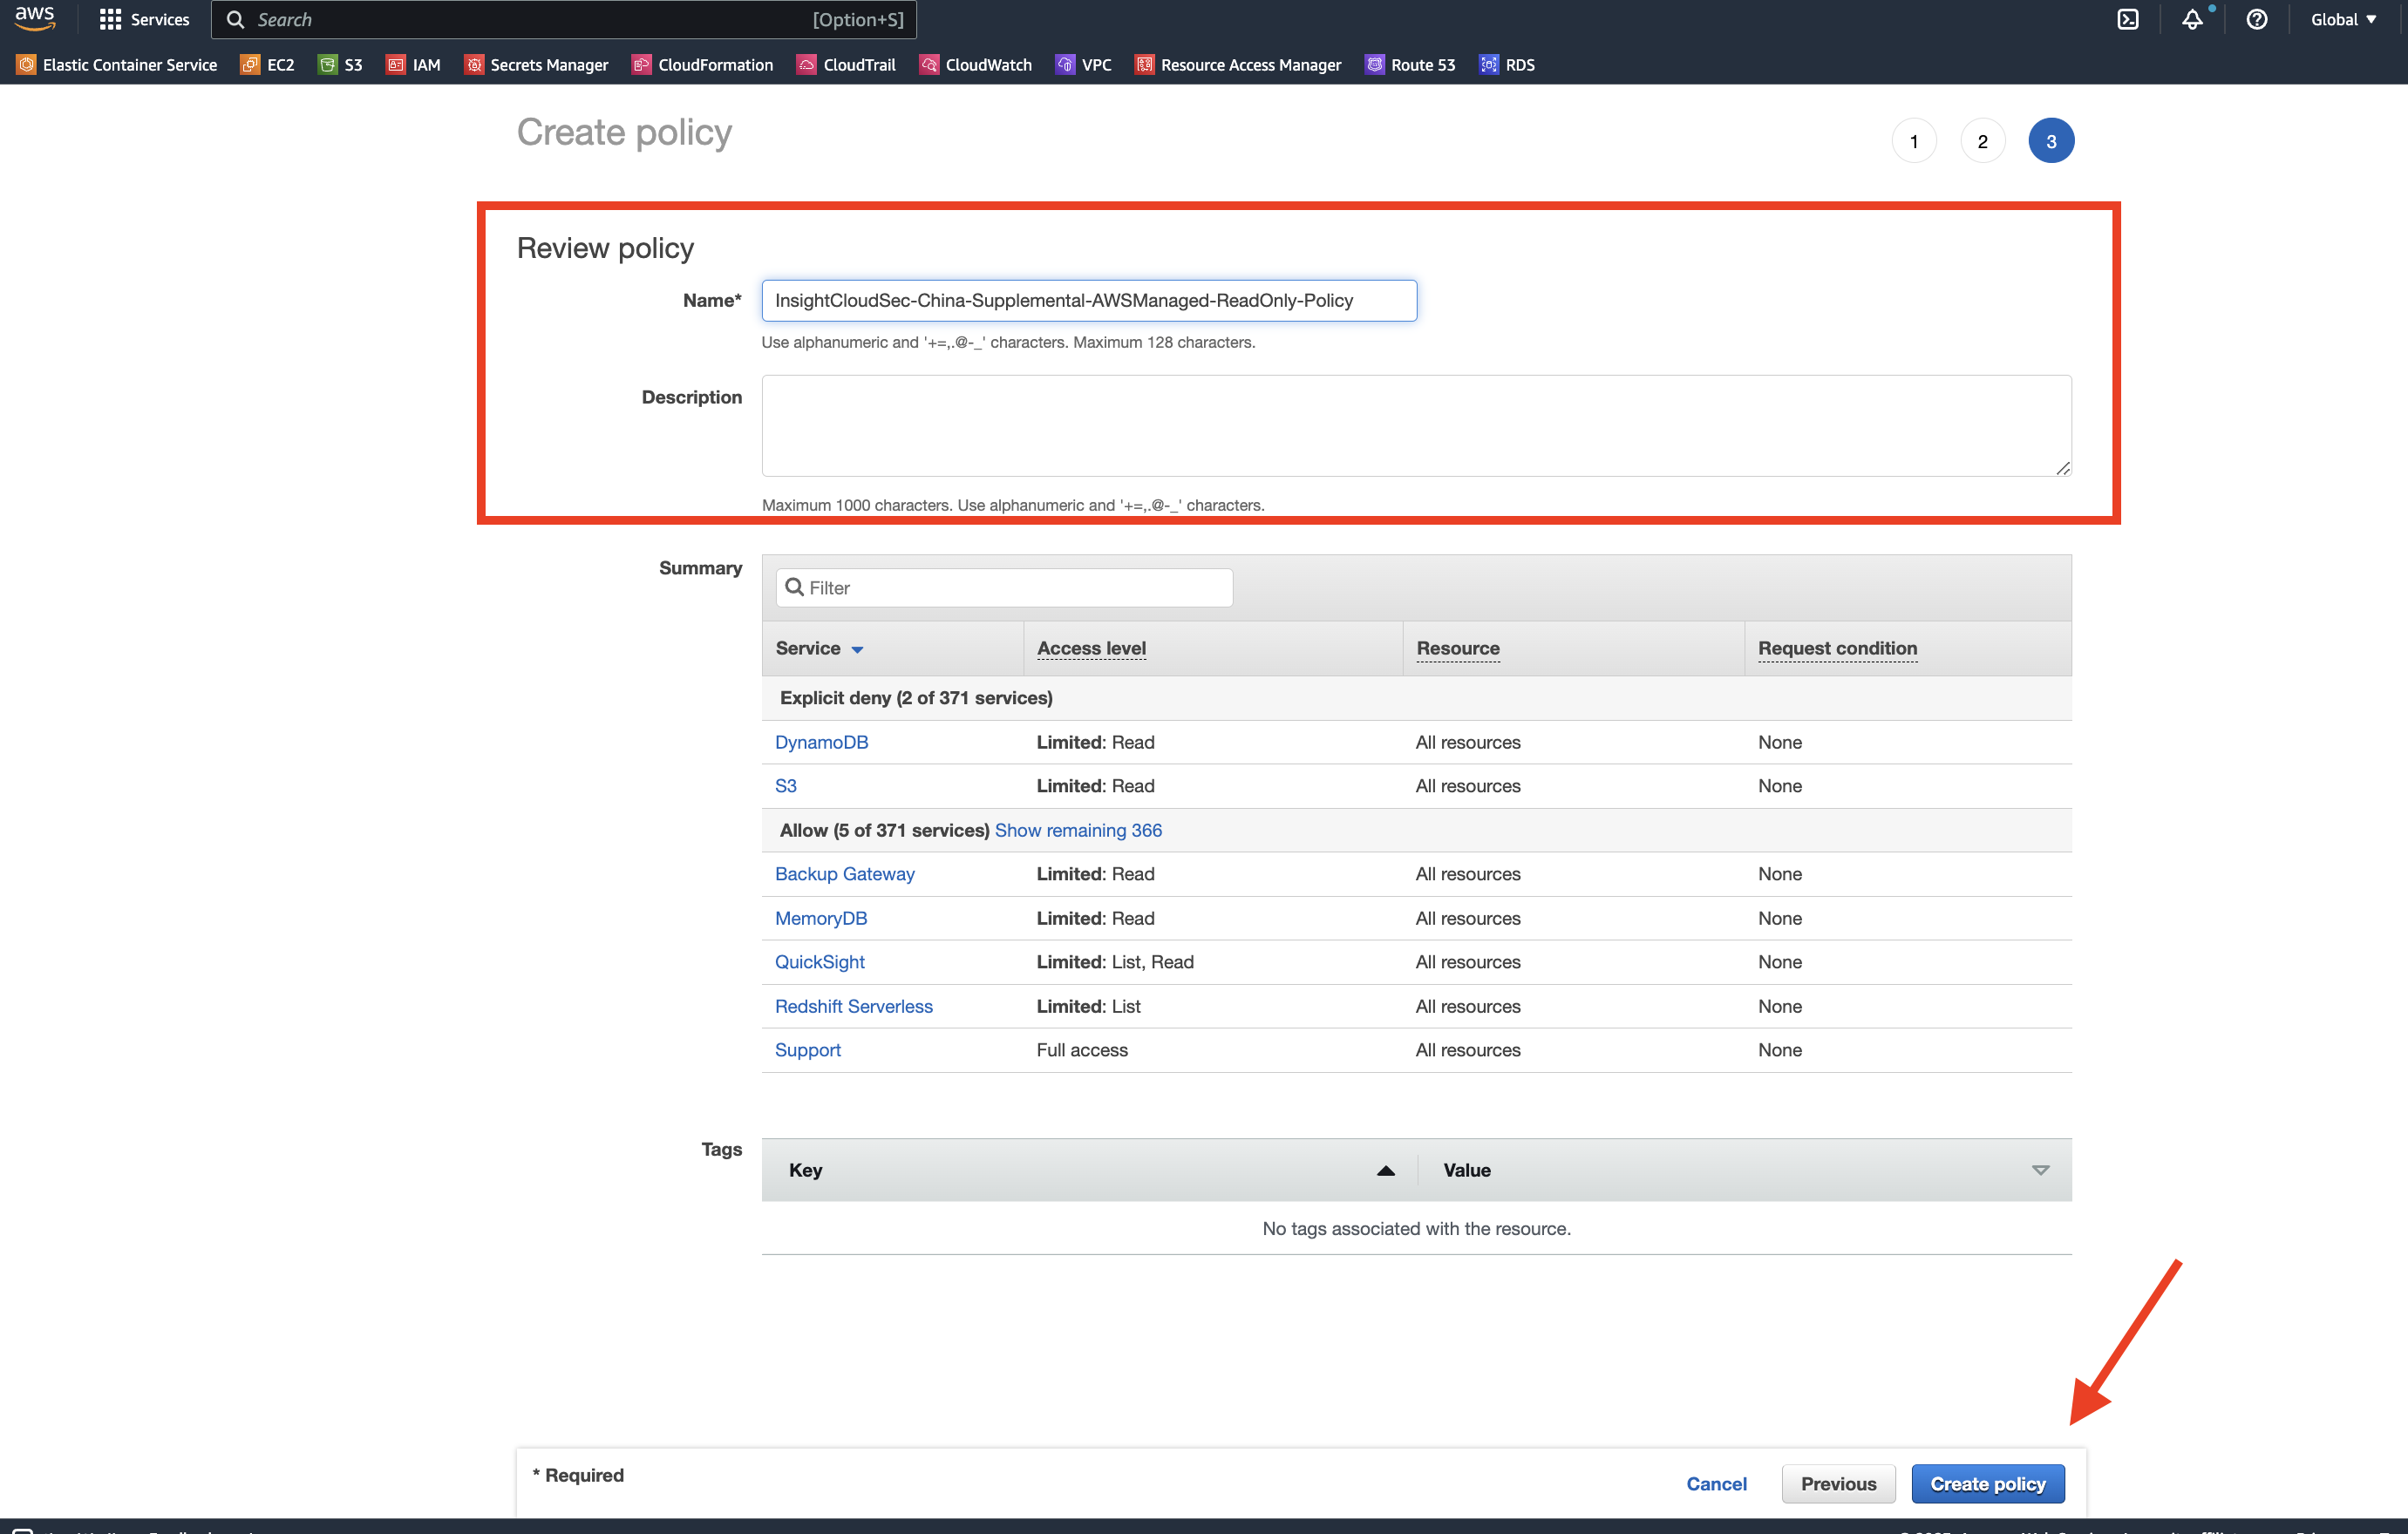
5. Review and create the policy.
- Name your policy something meaningful to you. We recommend something like
InsightCloudSec-China-Supplemental-AWSManaged-ReadOnly-Policy. - Optionally, add a policy description to help clarify for what the policy will be used.
- If everything looks good, click “Create Policy”.
Assume Role Policy
Repeat the steps above to create an assume role policy that will be used by InsightCloudSec to assume the user associated with your account. Review the Assume Role policy for more information.
1. Return to the Identity & Access Management (IAM) service main page.
- This service can be found on the Services main page under Security, Identity, & Compliance. You can also enter “IAM” into the search bar.
- Once at the IAM dashboard, click “Policies”.

2. Click “Create Policy”.

3. Click “JSON” and paste in the Assume Role policy.
- Select the existing JSON and delete it.
- Open a new tab in your browser to the AWS China Assume Role policy.
- Back in the AWS console, copy and paste the policy into the JSON text window.
- Click “Next: Tags”.
*4.** Optionally, add tags to help identify, organize, or search for the policy.
- Click “Next: Review” when finished adding tags.
5. Review and create the policy.
- Name your policy something meaningful to you. We recommend something like
InsightCloudSec-China-Assume-Role-Policy. - Optionally, add a policy description to help clarify for what the policy will be used.
- If everything looks good, click “Create Policy”.
Step 3: Setup User
To properly harvest data from AWS China, InsightCloudSec relies on an assume role method of authentication, which means you’ll need to create a user within your account that InsightCloudSec can assume to securely access the data.
Create the User
🚧 Prerequisites
Before you can create a user within AWS, you must have already created the policies found in the previous section.
1. Return to the Identity & Access Management (IAM) service main page.
- This service can be found on the Services main page under Security, Identity, & Compliance. You can also enter “IAM” into the search bar.
- Once at the IAM dashboard, click “Users”.
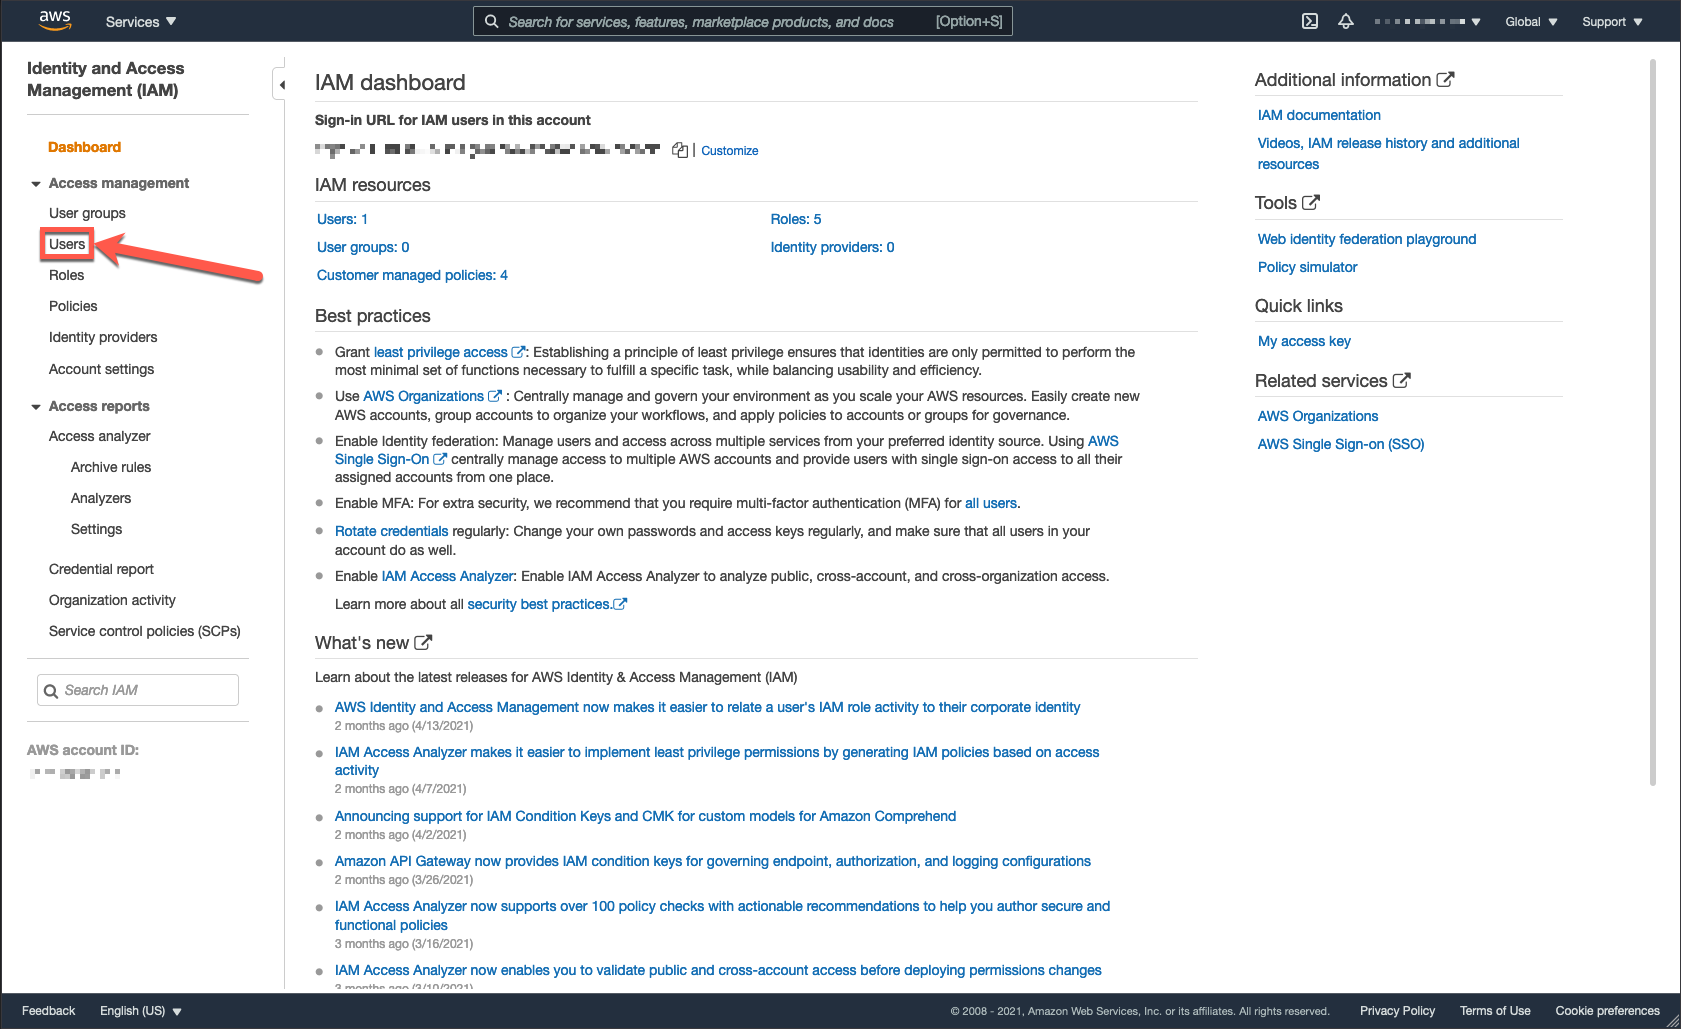
2. Click “Add user”.
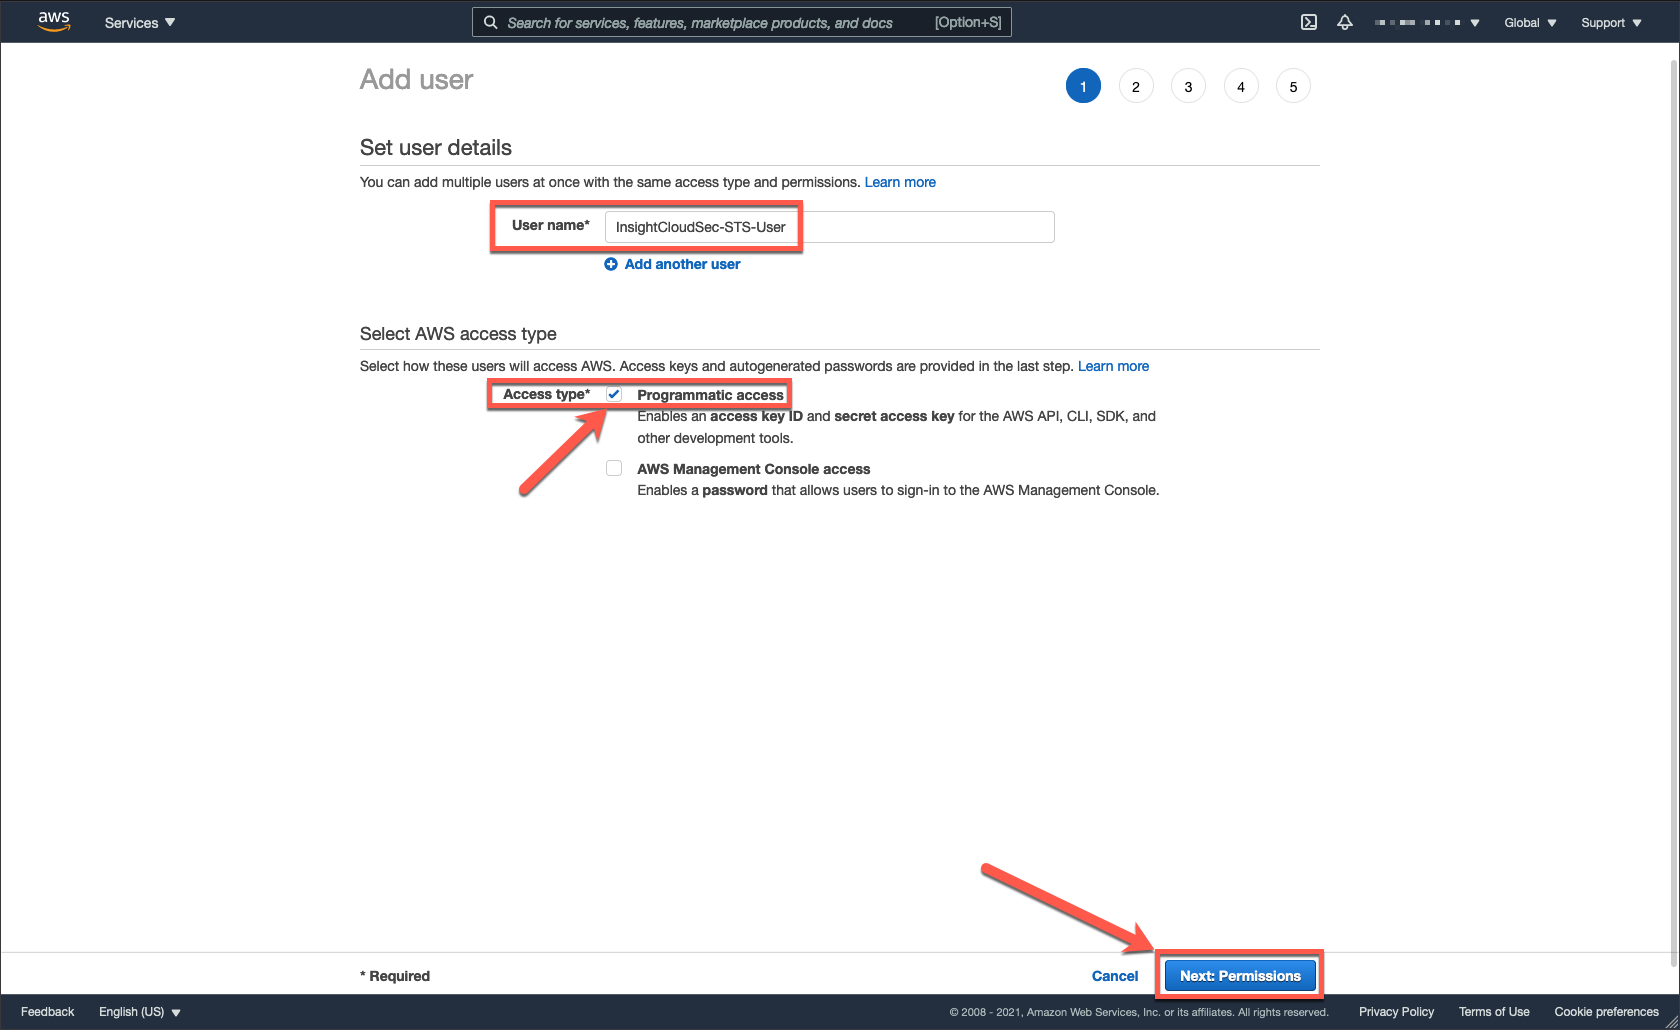
3. Set user details.
- Name the user something meaningful to you. We recommend something like
InsightCloudSec-STS-User. - Select the “Programmatic access” checkbox.
- Click “Next: Permissions”.
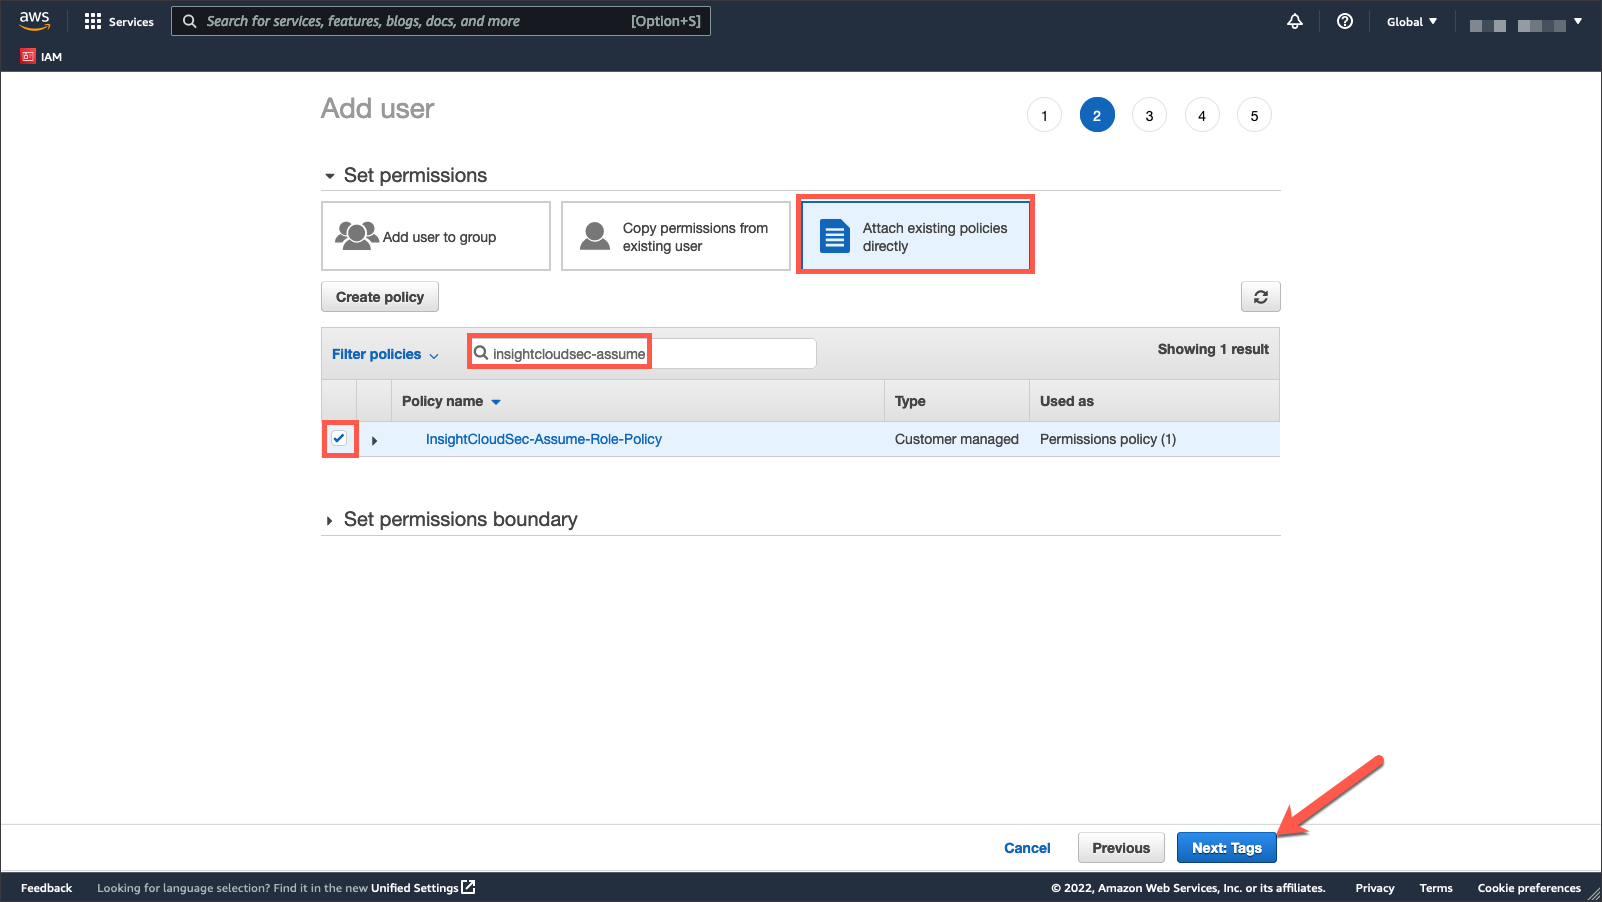
4. Set permissions.
- Select “Attach existing policies directly”.
- Search for and attach the Assume Role policy you created in the previous section.
- Click “Next: Tags”.
5. Optionally, add tags to help identify, organize, or search for the user.
- Provide a “Key” and optional “Value”.
- Click “Next: Review” when finished adding tags.
6. Review and create the user.
- Confirm the correct access type is set and policy is attached.
- If everything looks good, click “Create user”.
- Copy the username and save it for later use. You will use this username to configure AWS trust relationships later.
7. Save the user’s credentials.
- You should receive a Success message from the console at this point. Assuming that you have, you will see your user listed along with an Access key ID and Secret access key.
- Do not close out this screen until you have saved your Access key ID and Secret access key.
- Save your keys by clicking “Download .csv” and copying & pasting the values from the file, or click “Show” under Secret access key column and copy both the Access key ID and Secret access key from this page before clicking “Close”.
❗️ Save Your Credentials
You will need these API credentials for each additional cloud that you onboard, so make sure to save them in a safe place after you create your initial account. This is the only opportunity you have to copy these values. If you leave this page without copying the values, you will not be able to access them and you’ll need to delete the user and create another one.
Attach a Role
🚧 Prerequisites
Before you can create a user within AWS, you will need the following on hand:
- The External ID for your InsightCloudSec instance (generated in step 1)
- The username of the user to be assumed by InsightCloudSec (found in Create the User)
You also must have already created the policies found in the previous step.
1. Return to the Identity & Access Management (IAM) service main page.
- This service can be found on the Services main page under Security, Identity, & Compliance. You can also enter “IAM” into the search bar.
- Once at the IAM dashboard, click “Roles”.
2. Click “Create role”.
3. Select the trusted entity and use case for the role.
- Select “Another AWS account” for the trusted entity
- Provide the Account ID for the AWS account that contains the user you just created in the previous section
- Select the “Require external ID” checkbox, then provide the external ID generated in step 1)
- Click “Next: Permissions”.
4. Attach the harvesting policy you created in the previous step.
❗️ Read Only
If you decided to use the AWS China-managed supplemental policy, do not forget to also attach the AWS
ReadOnlyAccesspolicy as well!
- Type into the search bar or use the filter functionality to search for the policy you created.
- Select the checkbox next to a policy to attach them to the role.
- Click “Next: Tags”.
5. Optionally, add tags to help identify, organize, or search for the role.
- Provide a “Key” and optional “Value”.
- Click “Next: Review” when finished adding tags.
6. Review and create the role.
- Name the role something meaningful to you. We recommend something like
InsightCloudSec-Harvest-Role. Note: you cannot have spaces in the role name. - Optionally, update the role description to help clarify for what the role will be used.
- Confirm both policies are attached.
- If everything looks good, click “Create role”.
7. After successful creation of the role, search for it and click the name.
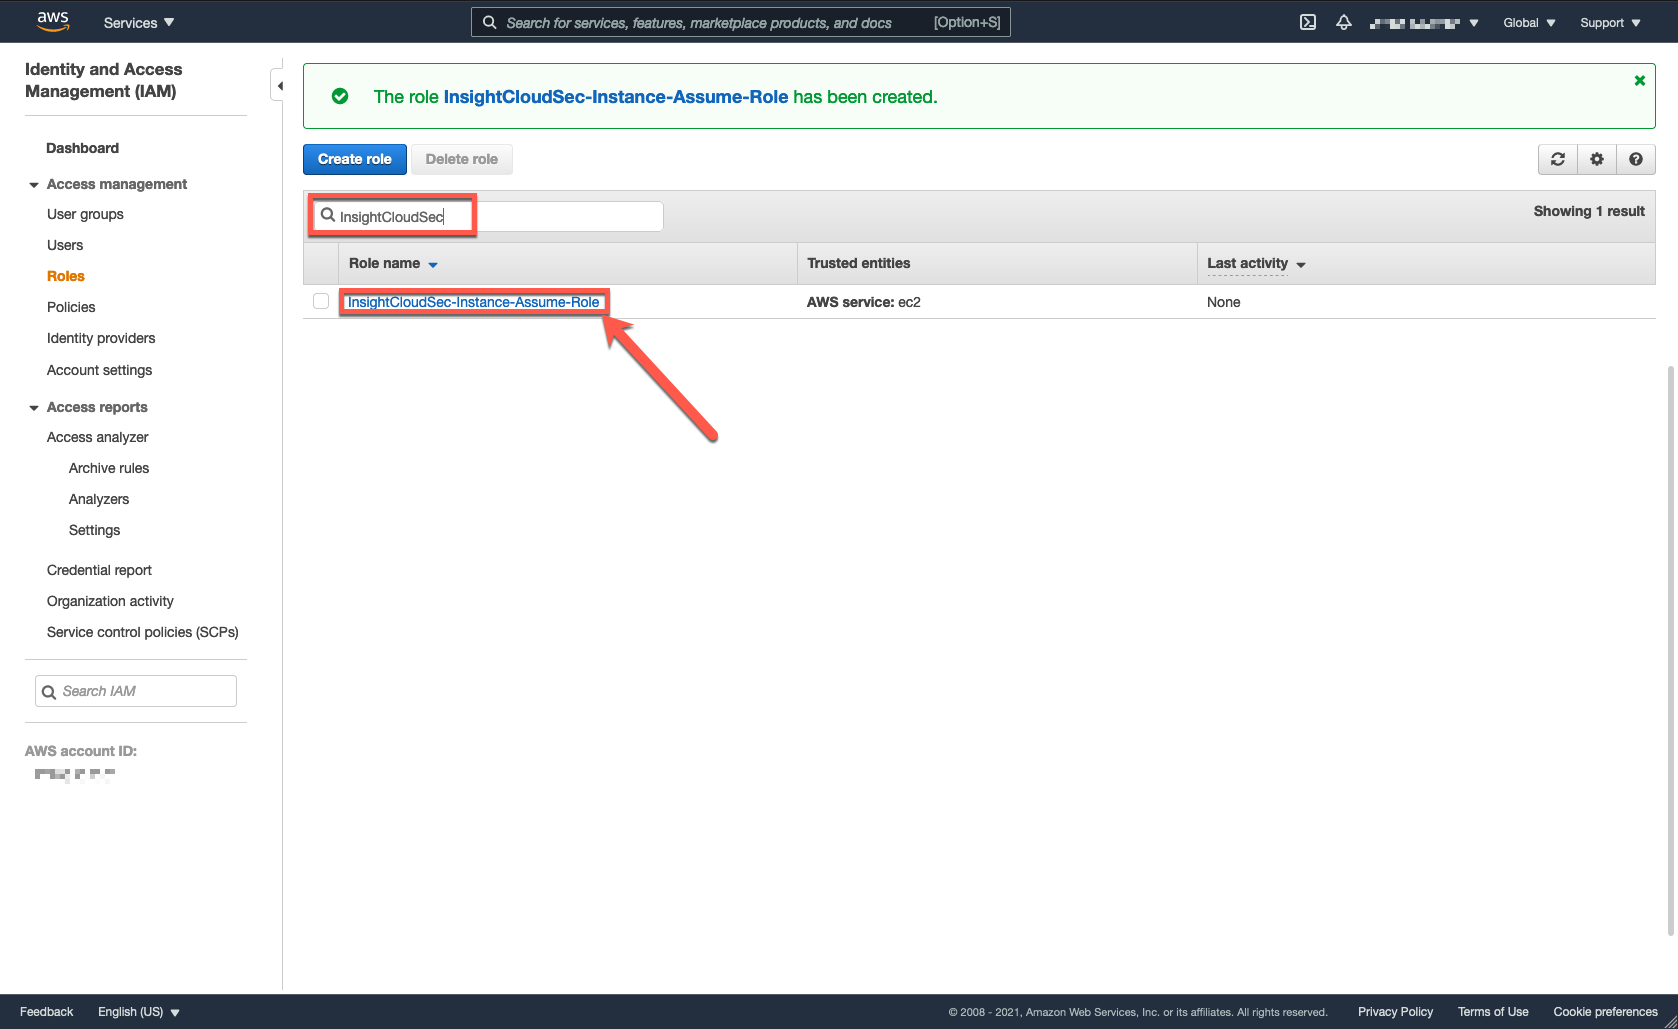
8. Copy the Role ARN and save it for later use. You will use this Amazon Resource Name (ARN) to configure InsightCloudSec and connect to your AWS account.
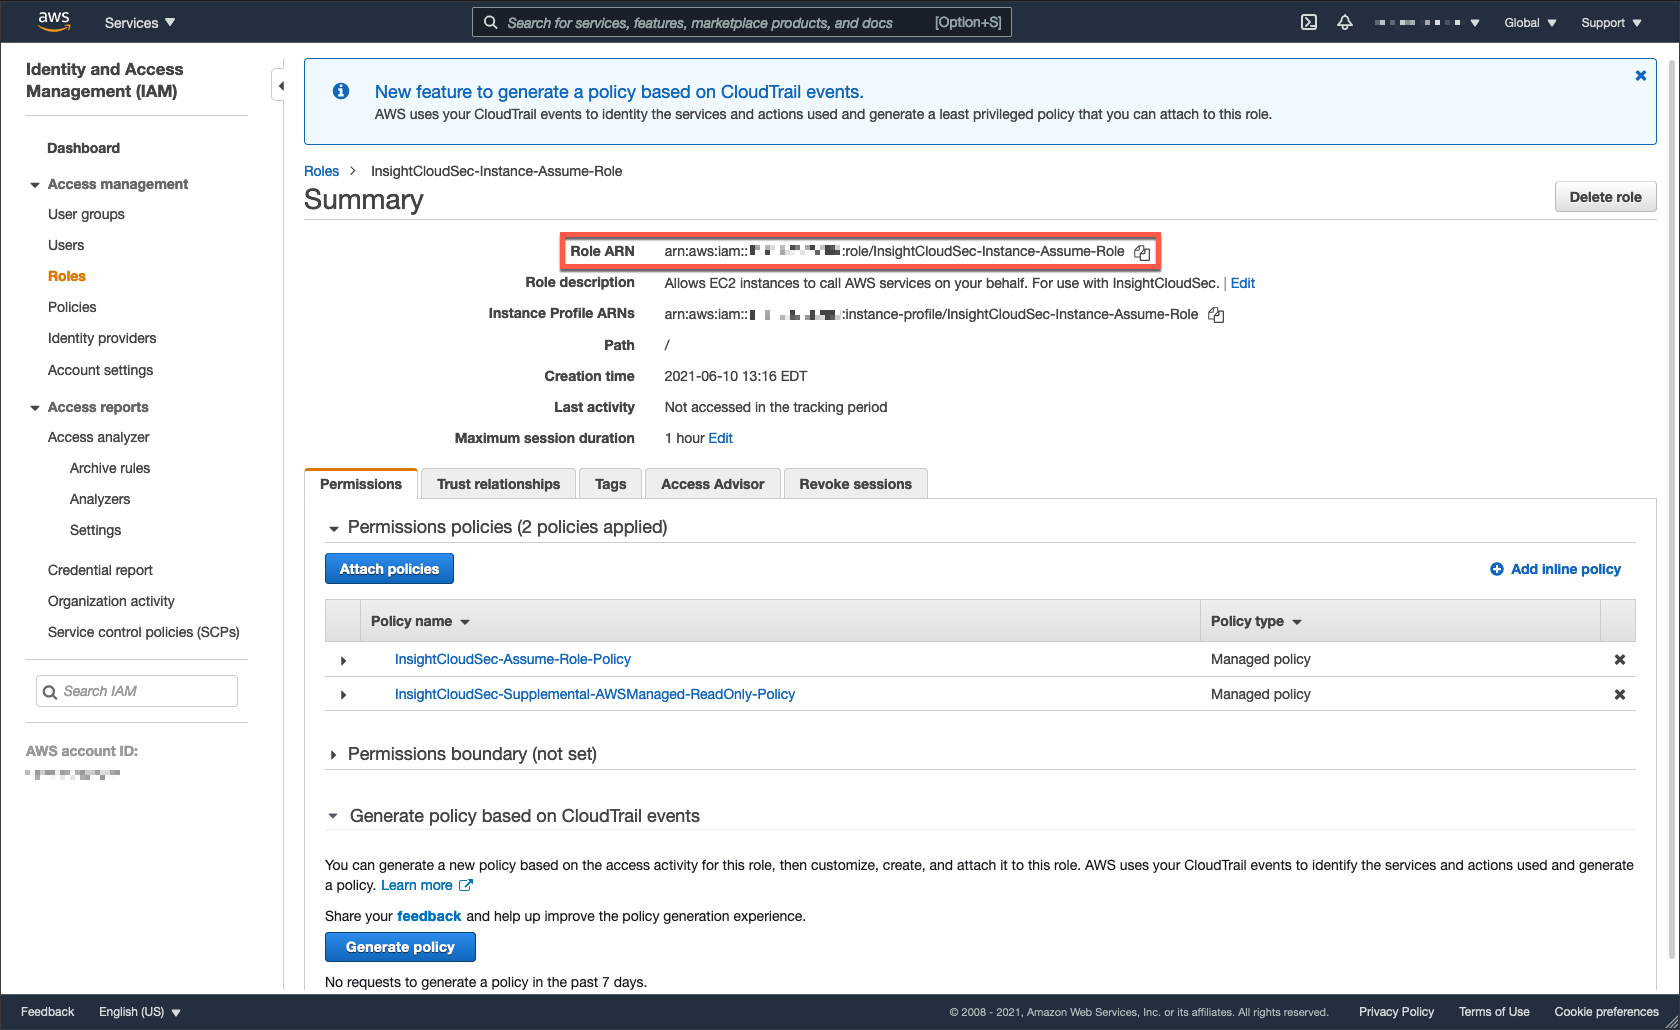
9. Update the new role’s trust relationships.
- Click “Trust Relationships”.
- Click “Edit trust relationship”.
- Replace “root” in the Principal AWS value with the username of the user you created in the previous section, prefixed with
user/. For example, it should look like this when finished:
{
  "Version": "2012-10-17",
  "Statement": [
    {
      "Effect": "Allow",
      "Principal": {
        "AWS": "arn:aws-cn:iam::123412341234:user/InsightCloudSec-STS-User"
      },
      "Action": "sts:AssumeRole",
      "Condition": {
        "StringEquals": {
          "sts:ExternalId": "ics-external-id-example"
        }
      }
    }
  ]
}
Step 4: Configure InsightCloudSec
One final step is required before InsightCloudSec can begin harvesting your AWS data: adding the cloud account information to InsightCloudSec. This is straightforward now that the user and role has been created and properly configured with the desired policies.
🚧 Prerequisites
Before you can successfully add an account to InsightCloudSec, you will need the following on hand:
- The Account ID for the AWS China account being added to InsightCloudSec (found in the user menu in the top-right corner of the AWS Console)
- The API Key and Secret Key for the user to be assumed by InsightCloudSec (created in step 3)
- The Role ARN for the harvest role attached to the user (created in step 3)
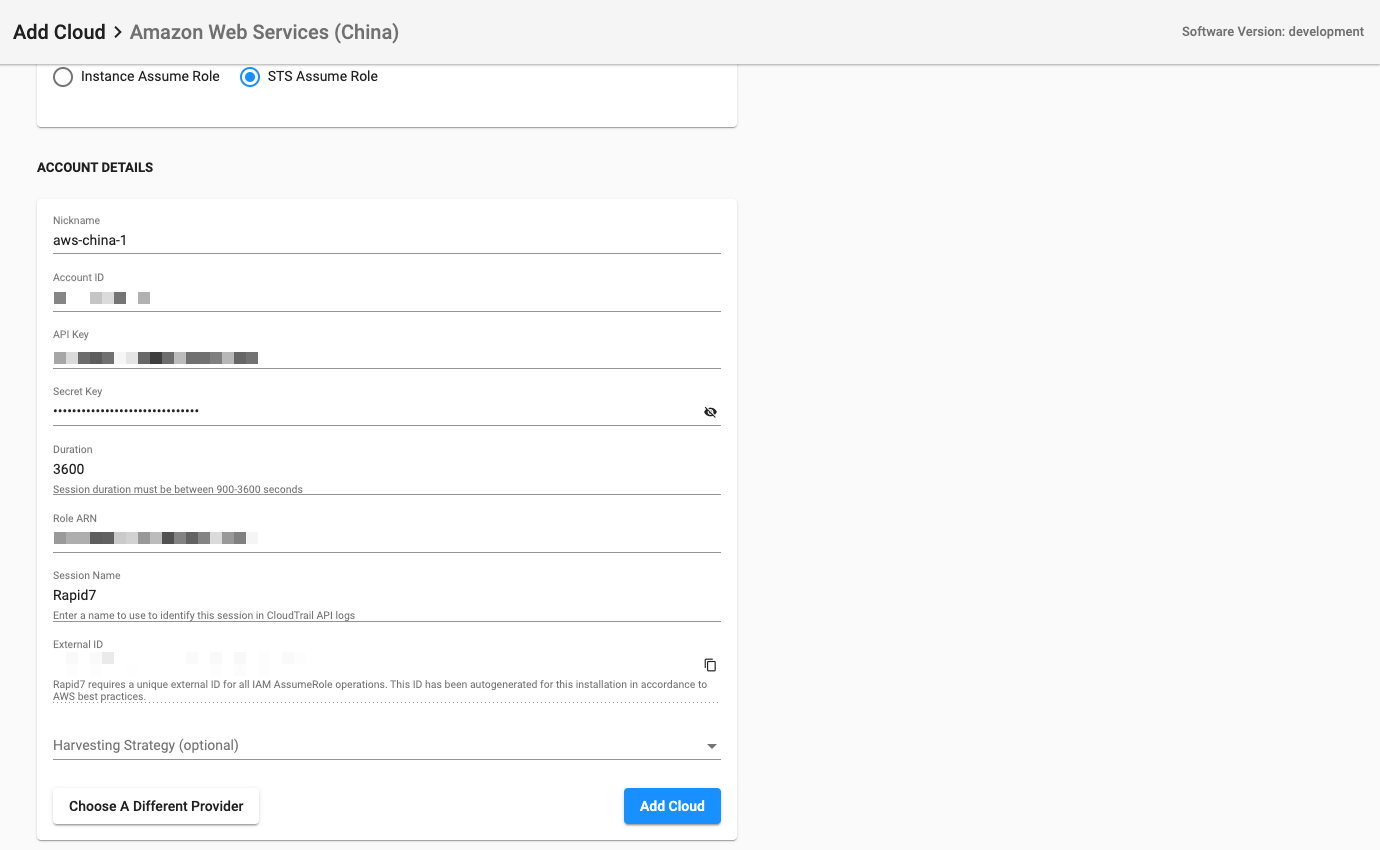
1. Return to your InsightCloudSec platform and the in-progress cloud account setup page.
2. Provide credentials for harvesting the account’s data.
- Provide a nickname for the account.
- Provide the Account ID for the AWS China account being added to InsightCloudSec (found in your AWS console)
- Provide the API and Secret Key for the user to be assumed by InsightCloudSec(created in step 3)
- Provide the Role ARN for the harvest role attached to the user (created in step 3)
3. Optionally:
- Update the default session duration.
- Update the default session name.
- The session name is what will display in any CloudTrail logs and is useful for auditing purposes.
- Select a Harvesting Strategy.
4. Click “Add Cloud”.
After successful submission, a background job is enqueued that will fetch and synchronize all of your accounts. Depending on the number of accounts this will take a few minutes. At this point, you have the option of validating the permissions on the provided harvesting role to ensure successful harvest, adding cloud Badges, adding another cloud, or returning to the Clouds page.
