LDAP authentication
NOTE
The Security Console does not currently support “Round Robin” LDAP configurations.
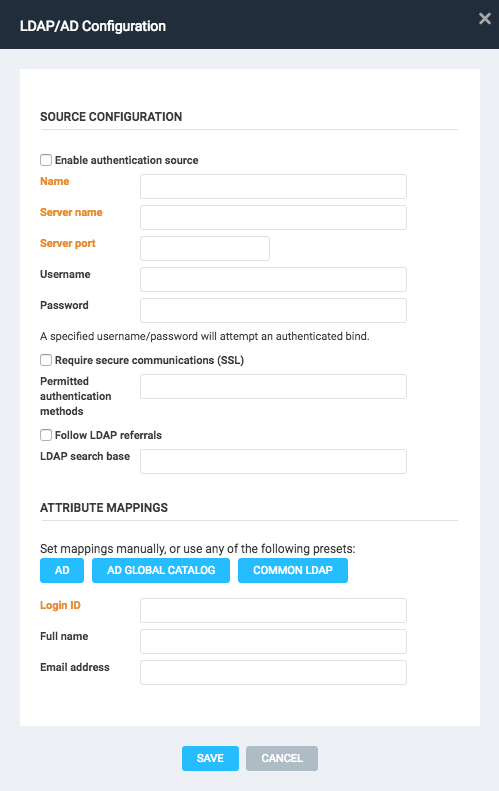
Complete the following steps to configure an LDAP integration as an external authentication source.
Define an external authentication source
- On the Administration page, go to Console > Authentication: 2FA and SSO.
- Under LDAP/AD Authentication Source Listing, click the Add LDAP/AD Source button.

- Click the Enable authentication source checkbox.
LDAP Authentication is case sensitive
You must use your Active Directory server name and credentials.
-
Enter a name for the source.
-
In the Server name field, enter the exact DNS hostname of your AD server.
-
Enter a server port number.
-
If desired, specify LDAP authentication credentials. Credentials are case sensitive.
TIP
Use the provided Username and Password fields to specify LDAP credentials in cases where your LDAP/AD server does not allow for an anonymous bind.
- If desired, check the Require secure communications (SSL) checkbox.
- If desired, specify permitted authentication methods. Multiple entries can be delimited with commas, semicolons, or spaces.
NOTE
Simple Authentication and Security Layer (SASL) authentication methods for permitting LDAP user authentication are defined by the Internet Engineering Task Force in document RFC 2222 http://www.ietf.org/rfc/rfc2222.txt . The application supports the following methods:
GSSAPICRAM-MD5DIGEST-MD5SIMPLE*PLAIN**
* Note that the SIMPLE authentication method is not compatible with Microsoft Active Directory. If you intend to configure an Active Directory server as your authentication source, use one of the following alternatives:
** We do not recommend using PLAIN for non-SSL LDAP connections.
- If desired, check the Follow LDAP referrals checkbox.
LDAP referrals explained
As the application attempts to authenticate a user, it queries the target LDAP server. The LDAP and AD directories on this server may contain information about other directory servers capable of handling requests for contexts that are not defined in the target directory. If so, the target server will return a referral message to the application, which can then contact these additional LDAP servers. For information on LDAP referrals, see the following document LDAPv3 RFC 2251:
- If desired, specify a search base.
LDAP search bases explained
You can initiate LDAP searches at different levels within the directory. A search base is a specific part of the tree where the application will start the search. Example:
CN=sales,DC=acme,DC=com
- Manually set attribute mappings, or click any of the available buttons to autofill the fields based on presets.
- Click Save. The Authentication tab will now list your new LDAP authentication source.
- Finally, click Save on the Security Console Configuration screen to finalize your authentication sources.
Create user accounts
With your external authentication source defined, you can now create accounts for your users.
- On the Administration page, click Users > User Management.
- Click Add User
- Complete all fields as required.
For more information about creating user accounts read our Managing users and authentication docs.
NOTE
Password fields are disabled when external authentication sources are selected. The Security console does not control, or allow for, password changes for users authenticated by external sources.