Upgrade to the Vulnerability Management SaaS Console
This guide helps you upgrade your on-premises Security Console to the Vulnerability Management (VM) SaaS Console on the Command Platform.
The upgrade moves your Security Console data to a Rapid7-managed cloud environment, reducing operational overhead so your team can focus on vulnerability management outcomes rather than infrastructure maintenance. Because the VM SaaS Console runs on cloud infrastructure, the only hardware you need to maintain are scan engines and Rapid7 Agents going forward.
Limited Availability Release
This release is the first available version of the VM SaaS Console. Some capabilities available in on-premises deployments have changed or are not yet supported, but may be included in future releases, based on demand.
Benefits of the VM SaaS Console
The VM SaaS Console helps you move quickly to identify vulnerabilities at scale, reducing your environment’s risk without manual infrastructure overhead.
- Minimal operational overhead: Rapid7 manage the Command Platform so your team doesn’t have to. With automatic updates and maintenance, you do not need to schedule patches or upgrades.
- Scalability: As your environment grows, SaaS Vulnerability Management grows with you. Use the Rapid7 Agent and scan engines to scale your coverage. Add assets and environments with support for cloud, hybrid, and distributed networks where you need them.
- Improved visibility: Gain a centralized view of your security posture with real-time dashboards, filtering, and reporting. View your asset and vulnerability data in one place.
- Streamlined remediation: Use remediation projects to track fixes to action problems as they appear. Integrate ticketing systems to ensure assignment and ownership transparency, ensuring coverage across your environment.
What’s changed
As part of the upgrade to the SaaS experience, some capabilities available for on-premises deployments are not supported or are handled differently. Understanding these differences ahead of time helps you plan your workflows effectively:
| Area | On-Premises Console | VM SaaS Console | Impact | Recommendations (if available) |
|---|---|---|---|---|
| Asset version history | Information on historical asset states are available. | Not currently supported. A full backup of this data is taken when you begin the upgrade process. Asset state history will be added back by the end of 2026. This includes up to 13 months of data. | Data optimized for your current environment’s posture and active prioritization over deep local historical tracking. | If you require this data, ensure you download it prior to removing it from your environment. |
| Reporting | Includes XML 2.0, SQL queries, custom reports, and policy reports. | Command Platform, Exposure Analytics (cloud), API dashboards, and reporting only. | Built-in and on-premises reports, such as XML 2.0, SQL queries, and policy reports are not available. Existing reports are not migrated to the VM SaaS Console. | Download any required Security Console reports before the migration. Use the Command Platform dashboards and reports, using APIs to export data to BI tools. |
| Data warehousing exports | Supported using DB/export tools. | Not supported. | Data movement becomes more controlled and supported, however warehouse pipelines will need API support. | Build API-based data ingestion pipelines into your data warehouse and avail of our latest features and capabilities, such as the option to bulk-export data to your enterprise-approved AI tool . |
| Integrations | Support for multiple types of integrations. | Currently, Command Platform-driven integrations only, including ServiceNow ticketing and security operation integrations. | On-premises Security Console integrations, such as ServiceNow CMDB and CyberArk, are not currently supported. | Use Automation (Insight Connect) within the Command Platform where applicable. |
| Discovery Connections | Custom discovery support. | Command Platform-supported methods only. | Command Platform workflows are simpler to operate, however custom discovery methods are not supported. | Use Command Platform-supported cloud connectors, such as AWS and Azure. |
| Scan logs (historical) | Full historical scan logs are retained locally, with historical scan logs accessible through the VM SaaS Console. Long-term access to scan execution history and customer-controlled retention periods. | New scan logs are retained for up to 13 months according to Command Platform retention standards. Historical scan logs are not migrated and legacy scan logs are not transferred to the VM SaaS Console. | There is a reduced ability to investigate legacy scan activity and historical audit and troubleshooting workflows may be impacted. Historical scan logs are preserved through migration backups only. | Review the VM SaaS Console retention period table for more information. Any long-term retention and retrieval requirements should be assessed before migration. |
| Login and access | Nexpose-specific Security Console login. | Command Platform login (SSO/MFA supported). | Improved access consistency centralized to the Command Platform. | Configure RBAC with SSO early and validate access flows prior to using the VM SaaS Console. |
| User management (RBAC) | Managed for each Security Console, with site-specific permissions. | Managed on the Command Platform, with specific assignments configured at the site-level. | All Vulnerability Management user access is in one place for you to manage. | Review the RBAC roles for the Command Platform to define your team’s access and assign users to sites as required. |
| Database / backend access | Database access is available. | No backend/database access. | The Command Platform manages data integrity and operations for you, so you have less administrative burden and backend risk. | - |
| Scan Engines | Use of local, distributed, and hosted engines. | Distributed scan engines only (reverse pairing required). Hosted engines are not supported in the Limited Availability phase. | Distributed scan engines can improve scalability across networks, with removal of hardware requirements for local engines. | Deploy Distributed Scan Engines where required to provide full coverage of your environment. |
| Malware Exposure | Prioritize remediation based on exploit likelihood and business impact using malware exposure indicators, reducing risk efficiently rather than by vulnerability count. | There are currently no malware exposure indicators available on the VM SaaS Console. | There is a change in contextual information for some vulnerabilities. | - |
| False Positive investigations | Use of False Positive Investigations on the Security Console. | There is currently no support for false-positive investigations. | Potential change in false-positive results. | - |
VM SaaS console retention period
This table describes the changes to retention of your data when you upgrade to the VM SaaS Console.
| Retention Type | On-premises Security Console | VM SaaS Console |
|---|---|---|
| Asset Retention | Configurable by you, no default period. | Default to 3 months, configurable by you for up to a maximum of 13 months. |
| Scan Log Retention | Configurable by you, no default period. | Rapid7-managed, configurable, and retained for 13 months. |
| Report Retention | Configurable by you, no default period . | Not applicable. Reporting is provided through Command Platform dashboards and analytics. |
| Agent Data Retention | Configurable by you, no default period. | Rapid7-managed, not configurable and is retained for 3 months. |
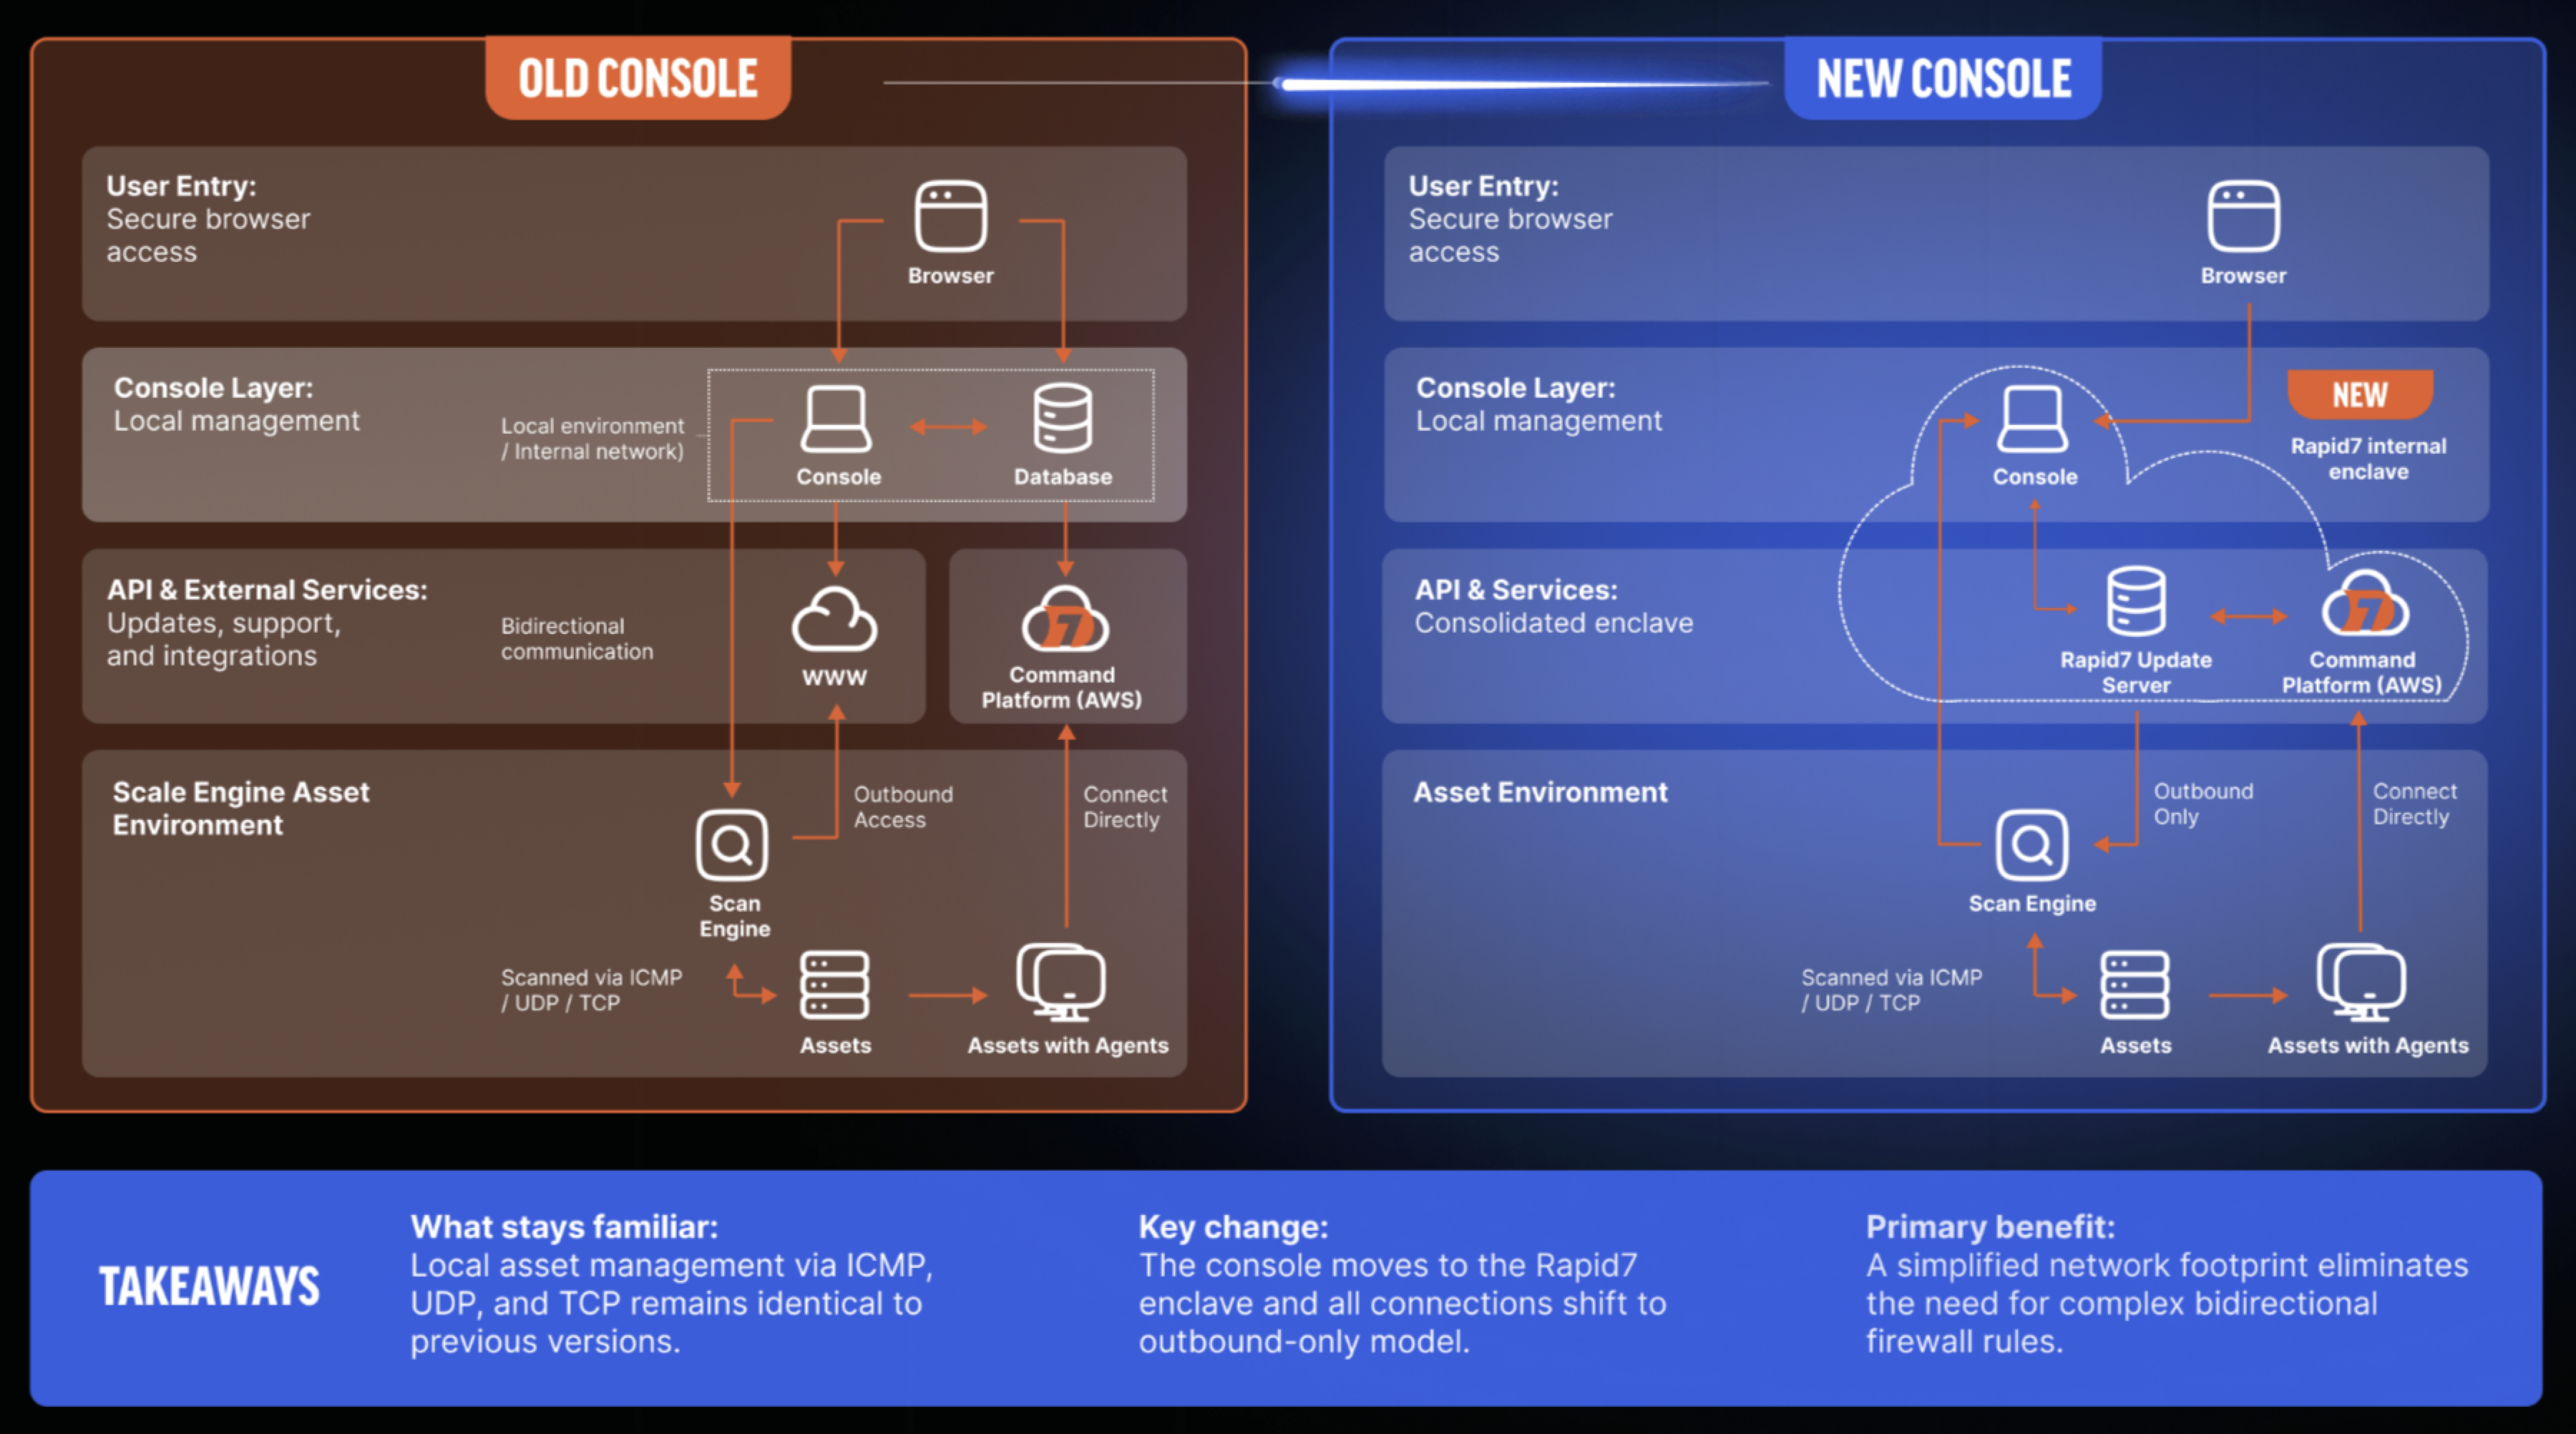
Architecture changes
This diagram illustrates the changes to the system architecture as you move from an on-premises Security Console to the VM SaaS Console.
Navigation changes
The VM SaaS Console is on the Command Platform, so the navigation may be unfamiliar. Review the navigation mapping to find what you need.
Not all navigation items are visible
As you are using the Vulnerability Management SaaS module, you will not see all of the tabs listed here due to reduced complexity for this new environment.
Prerequisites
Prior to starting the upgrade process, you must complete steps to set your on-premises Security Console up for a successful migration. As part of the upgrade process, the Security Console validates that each prerequisite has been met before proceeding.
Disable asset version history
Asset history is not supported for the Command Platform to enable optimization of your data for active prioritization.
To disable asset version history:
- Go to Administration > Database and select Disable Asset Version History.
Backup required before disabling
A backup created within the last 3 days is required before you can disable asset version history. Select the Back Up Console button if you need a more recent backup. You should also download this backup.
- Select Disable Asset Version History. A dialog appears asking you to type
Confirm. - After the request has been received, Rapid7 disables asset version history. The console then restarts in maintenance mode. This may take some time.
- After maintenance is complete, you are no longer able to see asset version history in the console.
Update your Security Console, database, and scan engines
Before upgrading, ensure your Security Console, Nexpose Consoles, and Scan Engines are running version 8.54.0 or later, and your database is running PostgreSQL 15 or later. This is to support your distributed scan engines on the Command Platform. For instructions, read Managing versions, updates, and licenses .
Update the Security Console and all scan engines using the standard update only
Do not modify the default update behavior to exclude scan engine updates, as this is also required for upgrading.
Update your PostgreSQL database
You must be on version 15 or higher of the PostgreSQL database to upgrade. After you switch to the VM SaaS console, Rapid7 manages future PostgreSQL updates for you. For instructions, read the PostgreSQL database migration guide .
Use Active Risk strategies
Active Risk is the only risk strategy supported for VM SaaS Console. To update your risk strategy, read the Legacy Risk Strategies End-of-Life Announcement .
Remove SSO authentication
Prior to the upgrade, you must remove any SSO authentication from the on-premises console . You can then set up SSO authentication for the Command Platform.
If you are a Nexpose-only user, your Administrator needs to create a Command Platform user . For access to the VM SaaS Console, assign users to the Scan Manager role.
Any existing users with Command Platform logins persist during the upgrade, however Administrators are asked to review these users when the upgrade is complete. Users with existing accounts approved by Administrators have 30 days to log in or their account is deactivated. See more information about Role-based Access Contro l (RBAC).
Configure network access
Before you begin the upgrade, open the necessary ports and allowlist the relevant IP addresses to ensure uninterrupted data collection.
Ports
Open the following ports to connect scan engines to the VM SaaS Console:
- Outbound (Engine pairing and API access) - 443 HTTPS
- Outbound (Scan engine) - 9000 TLS/TCP
IP addresses
Allowlist the following IP addresses for your region:
| Region | Public DNS | IP Addresses |
|---|---|---|
| eu-central-1 | eu.engine.scan-manager.insight.rapid7.com | 63.186.22.44, 3.122.153.80, 63.184.34.142 |
| us-east-1 | us.engine.scan-manager.insight.rapid7.com | 44.207.71.197, 13.223.5.67, 3.217.165.234 |
| ap-northeast-1 | ap.engine.scan-manager.insight.rapid7.com | 35.79.205.113, 18.182.98.218, 52.69.3.47 |
| ca-central-1 | ca.engine.scan-manager.insight.rapid7.com | 16.55.4.44, 15.156.249.35, 3.98.147.43 |
| ap-southeast-2 | au.engine.scan-manager.insight.rapid7.com | 52.63.57.124, 13.237.64.199, 54.253.126.120 |
| us-east-2 | us2.engine.scan-manager.insight.rapid7.com | 16.58.178.220, 3.150.239.165, 3.21.116.197 |
| us-west-2 | us3.engine.scan-manager.insight.rapid7.com | 16.146.198.245, 32.187.121.99, 54.188.1.229 |
| ap-south-2 | aps2.engine.scan-manager.insight.rapid7.com | 18.60.249.123, 16.113.4.65, 16.113.93.134 |
Recommendations before upgrading
Although not required for the upgrade, Rapid7 also recommends completing these actions.
Audit scheduled scans and planned maintenance
During the upgrade process, your scan engines are unavailable, so we recommend pausing any scheduled scans. Ensure maintenance tasks are not required during the upgrade process, as these may cause failures. Rapid7 Agent data is still collected, but is not available until the upgrade is completed.
Configure Command Platform API keys
Ensure Command Platform API keys are configured for your organization. These are required for credential management and scan engine communication after the upgrade.
Go to Command Platform Home > Administration > API Key Management to generate and configure keys. For more information, read Manage Platform API Keys .
User keys available only
The current VM SaaS Console experience does not support organization keys: User keys are the only available API key available for the Command Platform. Support for organization keys will be available in future releases.
Review role-based access control (RBAC)
These roles are available for the VM SaaS Console:
| Role | Description |
|---|---|
| Global Administrator | Users assigned this role can manage configuration, maintenance, and diagnostic operations for the Security Console. They can manage sites, scan and report operations, manage shared scan credentials, create tickets, and view asset data in accessible sites and asset groups. These users may also manage vConnections. |
| Security Manager | Users assigned this role can manage site, scan, and report operations. They can create tickets. These users may also view asset data in accessible sites and asset groups. |
| Site Owner | Users assigned this role can manage site, scan, and report operations. They can also create tickets. These users may also view asset data in accessible sites. |
| Asset Owner | Users assigned this role can manage report operations and run unscheduled scans in accessible sites and asset groups. These users may also view asset data in accessible sites and asset groups. |
| User | Users assigned this role do not have scanning permissions and have very limited access to creation and deletion processes, with basic view access to sites and groups. |
| Custom Roles | Console custom roles allow administrators to create tailored permission sets beyond the built-in roles, controlling exactly what actions users can perform within Vulnerability Management, such as scanning, managing sites, viewing reports, and managing asset groups. |
Site and asset group access
Other than Administrators, you must assign users access to sites and asset groups regardless of their RBAC role. Go to Administration > Console Administration > Site/Group Assignment.
To assign a user access to sites and asset groups, that user must first log in to the Command Platform and navigate to one of the VM SaaS Console pages.
Users cannot see data until they have been assigned access
Users must be assigned access to sites or asset groups before they can see any data these sites or asset groups use, such as dashboards and reports.
SSO on the Command Platform
As part of the requirements, you must disable SSO for the on-premises Security Console before upgrading. You can then set up SSO on the Command Platform before the upgrade process to allow users to log in faster. For access to the VM SaaS Console, assign users to the Scan Manager role. For more information, see Configure single sign-on access to the Command Platform .
Use SAML for Command Platform SSO
Certain SSO providers that are supported using the on-premises Security Console are not supported on the Command Platform, including Kerberos and Microsoft AD (LAPD). SAML is the only supported SSO standard on the Command Platform.
Notify your team
Communicate to your team that the Security Console is unavailable during the upgrade process. Rapid7 provides an estimated time for the upgrade when the process begins.
Start the upgrade
After all prerequisites are complete, you can start the process to upgrade from your on-premises Security Console.
To begin the upgrade process:
- Log in to your on-premises Security Console.
- Go to Administration > Console > Upgrade to the Vulnerability Management SaaS Console.
- Review the outlined prerequisites and select Mark as Complete for each item you complete.
- Confirm you have completed the required tasks and select Start Upgrade.
- Validation checks run to confirm these prerequisites have been completed successfully.
- If any of the prerequisite checks fail, read the error for the relevant steps, select Cancel and complete these steps before trying this process again. If a step fails that you believe is complete, contact your system administrator or contact Rapid7 Support with the subject line, “VM SaaS Migration Support”.
- After the checks have completed successfully, select Continue.
- A screen appears outlining the changes to your environment after you upgrade to the VM SaaS Console. Read these carefully before checking the box to agree to the changes, then select Continue.
- Review the information about the upgrade process and the steps following the upgrade, which is also outlined in After the upgrade section of this document. Enter
CONFIRMin the text box and select Save. - The Security Console enters maintenance mode immediately after you select Start Upgrade. Ensure you are ready to upgrade prior to selecting this, as the Security Console is inaccessible to all users until the upgrade process is complete. A banner appears on the Command Platform to let you know the upgrade process has begun.
During the upgrade
Upgrading is permanent
When you start the upgrade, your on-premises Security Console enters maintenance mode and become inaccessible. After the upgrade is complete, the upgrade cannot be undone.
While your on-premises Security Console is in maintenance mode, users can see who has authorized the upgrade process, as well as the date and time they started the process.
The Security Console runs two processes:
- Step 1 of 2 - Backup in Progress: A full backup of your on-premises Security Console is created. The estimated time for upgrading is calculated based on the backup size after this stage is complete. A banner is visible on the Command Platform to let you know the upgrade process has begun.
- Step 2 of 2 - Migrating Data: Your backed-up data from step 1 is migrated to the Command Platform. You will see an estimated time for this on the maintenance screen.
- To check that the upgrade process has finished, you can check the Command Platform that the banner outlining the upgrade process has been removed, and that the Launchpad now lists Vulnerability Management (SaaS).
How to proceed if the upgrade fails
If the upgrade fails, your on-premises console is reinstated and an error banner is displayed. Contact your system administrator or Rapid7 Support immediately. Do not attempt to restart the upgrade without guidance.
After the upgrade
After the upgrade is complete, your data migrates to your new console on the Command Platform and your on-premises Security Console is no longer accessible. If your team needs help finding features in the new interface, review the navigation mapping .
However, you must first ensure your team can access the new console:
Users can be deactivated after 30 days
Ensure each user logs in to the VM SaaS Console in the first 30 days of availability or their account will be deactivated.
- From the Command Home, go to Administration > Users to review user access and RBAC assignments.
- Ensure each user has received an activation email for their own login.
- Assign new non-administrator users access to the appropriate sites and access groups.
Lastly, you must finish these tasks to close unnecessary ports andensure all data is accessible:
- From a terminal or command line interface:
- Close the following ports (unless they are being used for another purpose):
TCP 40814: Inbound to the Scan EngineTCP 40815: Outbound to the on-premises Security Console
- Allowlist the following port for server updates:
TCP 443(PGP Encrypted)
- Close the following ports (unless they are being used for another purpose):
- Manually reverse pair each distributed Scan Engine.
Reverse pair a scan engine
To configure an engine-to-console pairing (also known as a reverse pair) on a Scan Engine you have already installed, you must manually add a new Security Console entry to the Scan Engine configuration and confirm the pairing with a console-generated shared secret.
Scan Engine site and schedule removal required
Any scan engine that you want to reverse pair to the VM SaaS Console must first be removed from any sites or scan schedules.
To reverse pair a scan engine to the VM SaaS Console:
-
Remove and re-add the Scan Engine to the VM SaaS Console:
- From the Command Platform, go to Administration > Engines.
- Copy the Scan Engine’s current name, address, and port.
- Next to the Scan Engine, select Delete.
- Select Yes to confirm the delete.
- Select New Engine.
- Paste the Scan Engine name, address, and port.
- Select Save.
-
Open the Scan Engine command screen:
- Linux Scan Engine: Connect using SSH and run
screen -r - Windows Scan Engine: Access the host directly or through RDP. Stop the Scan Engine service, then restart it in interactive mode from the Scan Engine service applet.
- Linux Scan Engine: Connect using SSH and run
-
Connect the Scan Engine:
-
Generate an organization API key or user API key on the Command Platform. Copy the key.
-
On the Scan Engine command screen, run
register platform api-key -
Paste the key and enter the code for your data storage region:
Data storage region Region code Scan Manager endpoint United States – 1 us1 us.engine.scan-manager.insight.rapid7.com United States – 2 us2 us2.engine.scan-manager.insight.rapid7.com United States – 3 us3 us3.engine.scan-manager.insight.rapid7.com Europe eu eu.engine.scan-manager.insight.rapid7.com Japan ap ap.engine.scan-manager.insight.rapid7.com Canada ca ca.engine.scan-manager.insight.rapid7.com Australia au au.engine.scan-manager.insight.rapid7.com India (Hyderabad) aps2 aps2.engine.scan-manager.insight.rapid7.com Middle East (UAE) me1 me1.engine.scan-manager.insight.rapid7.com
-
-
Add the SaaS Console:
add console vulnerabilitymanagement
Unique Limited Availability command
This command is specific to installations during the Limited Availability release timeframe. Rapid7 will confirm if a different command is required.
- Display all consoles:
show consoles - Copy the SaaS Console ID and initiate the connection:
connect to console <saas-console-id> - Generate and add a shared secret:
- Return to the Command Platform, and go to Administration > Engines.
- In the Generate Scan Engine Shared Secret section, select Generate and copy the secret.
- Return to the Scan Engine command screen and run:
add shared secret <saas-console-id> - Paste the secret.
- Enable the connection:
enable console <saas-console-id>
- Verify the connection:
- Return to the Command Platform, and go to Administration > Engines to confirm that the Scan Engine is connected.
- Run a test scan.
- Confirm the Scan Engine is functioning correctly.
- Repeat these steps for each distributed Scan Engine.
VM SaaS maintenance windows
Rapid7 manages all VM SaaS updates and maintenance. Maintenance takes place weekly on Wednesdays, beginning September 30, 2026. The console may be unavailable for up to four hours, although most updates are expected to complete sooner.
During maintenance:
- Console pages are inaccessible.
- Running scans are interrupted and restart automatically afterward.
- Note: You should schedule scans and reporting activities outside your maintenance window where possible.
- Rapid7 Agents continue collecting data, but results are not displayed until maintenance is complete.
- Data flow from the console to the Command Platform pauses and resumes automatically.
- Scan Engines, Agents, and customer-managed hardware are not updated or restarted.
If a console remains unavailable after the maintenance window closes, contact Rapid7 Support using the case title SaaS VM Migration Support.
| Maintenance Window | Time* (UTC) | Region |
|---|---|---|
| Window A | Wednesday, 9:00-13:00 | Americas |
| Window B | Wednesday, 18:00–22:00 | EMEA and Asia-Pacific |
*Window times are fixed in UTC, so local times change with daylight saving time. For example, the eu-central-1 window begins at 20:00 CEST during summer and 19:00 CET after the clocks change.
Asia-Pacific timing not confirmed
Customers in the Asia-Pacific regions can expect to have maintenance window B, but timing is still being finalized. Contact Rapid7 Support for more details.
Examples:
us-east-1,us-east-2, andca-central-1: 09:00 UTCus-west-2: 09:00 UTCeu-central-1: 18:00 UTC
Support
As the VM SaaS Console is being improved incrementally, Rapid7 appreciates your continued partnership and collaboration in shaping the future of our Command Platform.
For issues or questions, contact Rapid7 Support, using the subject VM SaaS Migration Support.