Bruteforce Attacks
A bruteforce attack automatically and systematically attempts to guess the correct username and private combination for a service. Its goal is to find valid logins and leverage them to gain access to a network to extract sensitive data, such as password hashes and tokens. When you run the Bruteforce feature, it tries each credential pair on each target and attempts to guess the correct username and private combination. If Bruteforce is able to authenticate to a service with a particular credential, the credential is saved to the project and a login for the service is created. Bruteforce continues to iterate through the credentials list until all credentials have been tried or until it reaches a limit that you have defined.
As part of a penetration test, it is important that you assess the effectiveness of a bruteforce attack against a network so that you can identify audit password policies and identify potential attack vectors. This knowledge enables you to create a refined list of technical recommendations and provide real business risk analysis. To help you perform a bruteforce attack, you can use the Bruteforce Workflow, which provides a guided interface that helps you configure an automated password attack against a set of targets.
Access the bruteforce workflow
The Bruteforce Workflow is broken down into Targets, Credentials and Options. Bruteforce can be accessed in two ways. First, select Credentials > Bruteforce from the project tab bar, as shown below.

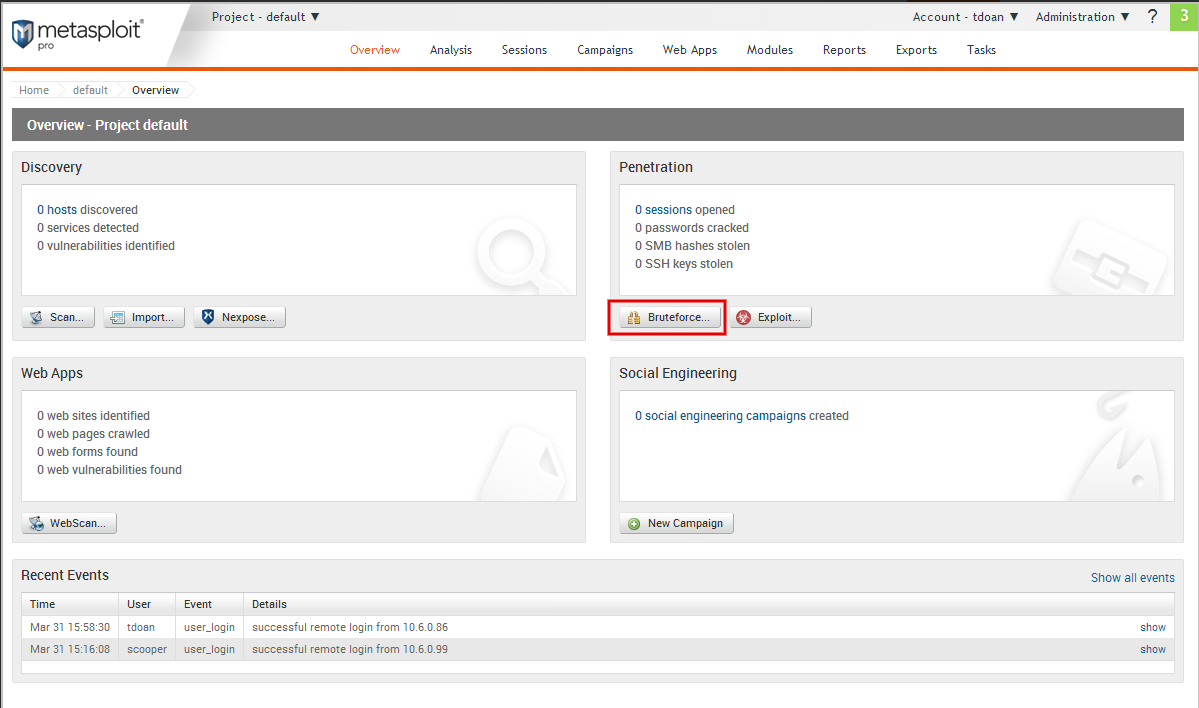
The second way is to select Bruteforce from the project homepage.
Setting the Targets The first thing you need to do in the Bruteforce Workflow is define the scope for the attack. The scope determines the hosts in the project that you want to target during the attack. You can choose to attack all hosts in the project or you can manually define them if you want granular control over the scope of the attack.
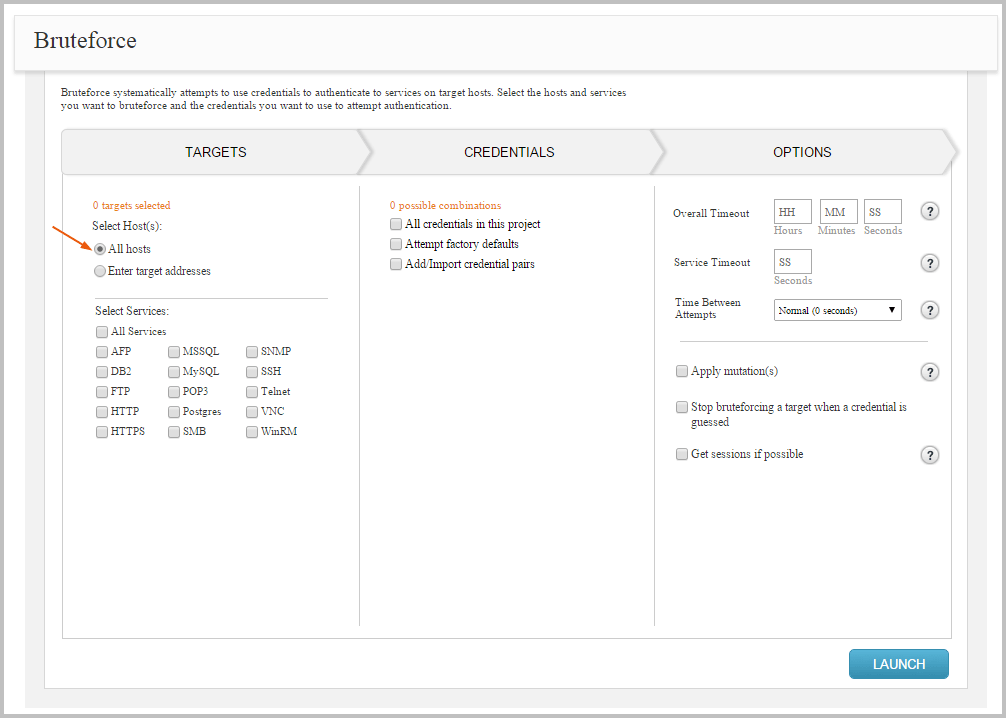
To attack all hosts in a project, select the All hosts option from the Targets section, as shown below.
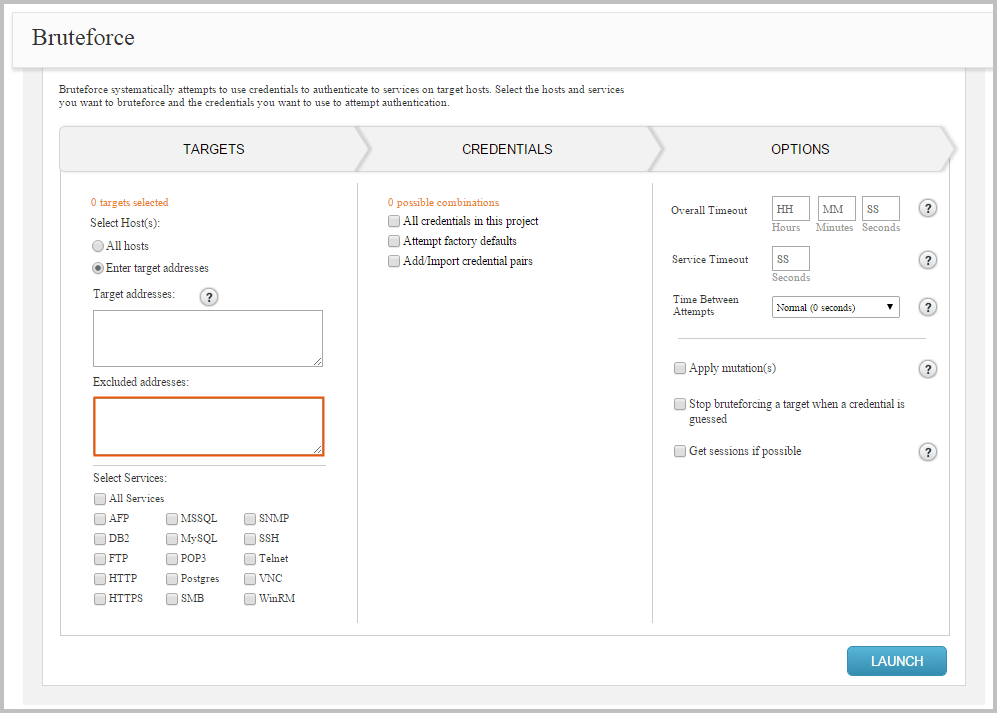
To attack specific hosts in a project, select the Enter target addresses option from the Targets section, as shown below. You can enter targets as:
- Single address (192.168.1.1)
- Range (192.168.1.1-192.168.1.100)
- CIDR notation (192.168.1.0/24)
- Wildcard (192.168.1.*)
You must use a newline to separate each entry. If you want to include all hosts in the project, you can leave this field empty.

Excluded Address
If no hosts are entered in the target field, then all hosts in the project will be targeted except for the ones listed in the Excluded address field below.
Excluding Addresses
An exclusion list defines the hosts that you do not want to attack. An exclusion list is particularly useful if you want to define a range for the target hosts and want to exclude a few hosts from the range. For example, if you have defined 192.168.0.0/24 as the target address range, but you know that you cannot test 192.168.0.1 and 198.168.0.2 due to lockout risks, you can add them to the exclusion list.
To exclude hosts from a bruteforce attack, select the Enter target addresses option from the Targets section. Enter the hosts you want to blacklist in the Excluded addresses field, as shown below.
You can enter a single IP address, an address range, or a CIDR notation. If there are multiple addresses or address ranges, use a newline to separate each entry.
Selecting Services
After you select the hosts that you want to attack, you need to choose the service logins you want to bruteforce. The services that bruteforce targets are limited to the following:
- AFP
- DB2
- FTP
- HTTP
- HTTPS
- MSSQL
- MySQL
- POP3
- PostgreSQL
- SMB
- SNMP
- SSH
- Telnet
- VNC
- WinRM
You can choose to target all services, or you can choose any combination of them. A login attempt only occurs if the service is open on the host. Otherwise, it is skipped.
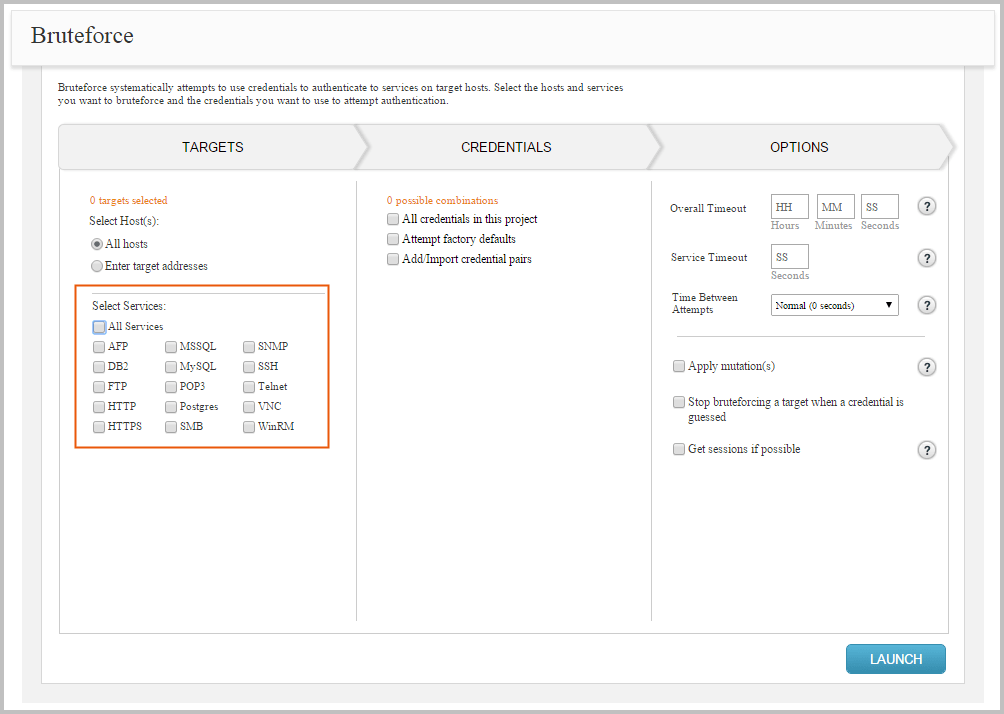
To specify the services for a bruteforce attack, select them from the Services list, as shown below:
After you select services for the bruteforce attack, the total targets count is updated under the Targets section. The total number of targets that are selected is calculated based on the number of hosts and services you have selected. Credentials A bruteforce attack uses a password list, which contains the credentials that can be used to bruteforce service logins. You can obtain password lists online that contain commonly used credentials, such as admin/admin, or you can custom build a password list using the data you have gathered about the target. For example, if you were able to obtain and crack NTLM hashes from a target, you should add them to the password list so that the bruteforce attack can try them against additional targets.
With the Bruteforce Workflow, you can use any combination of the following methods to build a password list for the bruteforce attack:
- You can choose all credentials stored in the project.
- You can try common account default settings.
- You can import a password list.
- You can manually enter a password list.
Bruteforce tries each credential pair in the password list to attempt to authenticate to a service. If it is able to authenticate to a service with a particular credential, the credential is saved to the project and a login for the service is created. Bruteforce continues to iterate through the password list until all credentials have been tried or until it reaches a limit that you have defined.
The total number of credentials that are selected is calculated based on the Cartesian product (https://en.wikipedia.org/wiki/Cartesian_product ) of the credentials you have selected and the number of mutations you have applied.
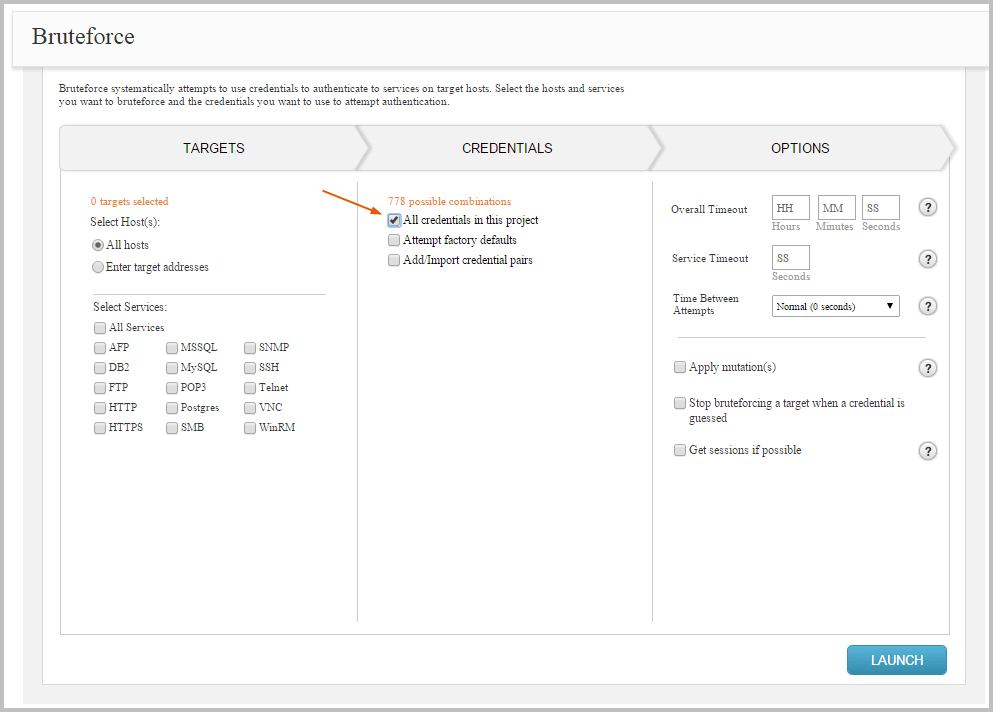
Using All Credentials in a Project for a Bruteforce Attack
To configure a bruteforce attack to use all the credentials in a project, select the All credentials in this project option from the Credentials section of the Bruteforce Workflow, as shown below.
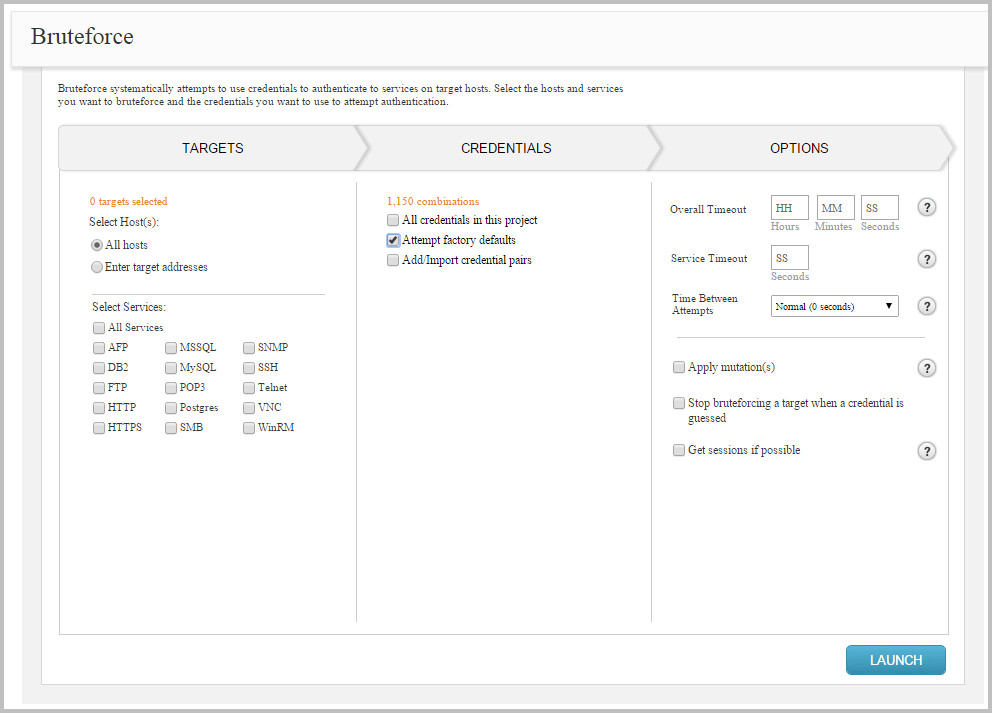
Using Factory Defaults for a Bruteforce Attack
Default credentials are username and password pairs that are shipped with an operating system, database, or software. Oftentimes, these factory defaults are the same for all versions of a software, are publicly documented, and oftentimes left unchanged. Therefore, as a best practice, vendors always recommend that the default password be changed before the system is deployed to a production environment. However, this security practice is not always followed, and systems are often deployed with the default configuration settings, which make them prime targets for bruteforce attacks.
To help you identify systems that use the default configuration, Bruteforce includes an option called Attempt factory defaults, which enables you to bruteforce services using common default credentials. The following section lists the credentials that will be tried for each service if you have this option enabled.
Default Credentials for Axis2
The following usernames and passwords are common defaults for Axis2:
- Usernames - ‘admin’
- Passwords - ‘axis2’
Default Credentials for DB2
The following usernames and passwords are common defaults for DB2:
- Usernames - ‘admin’, ‘dasusr1’, ‘db2admin’, ‘db2fenc1’, and ‘db2inst1’
- Passwords - ‘admin’, ‘dasusr1’, ‘db2admin’, ‘db2fenc1’, ‘db2inst1’, ‘db2pass’, ‘db2password’, and ‘db2pw’
Default Credentials for FTP
The following usernames and passwords are common defaults for FTP:
- Usernames - ‘admin’, ‘anonymous’, ‘ftp’, ‘ftp_admi’, ‘ftp_inst’, ‘ftp_nmc’, ‘ftp_oper’, ‘ftpuser’, ‘login’, ‘rapport’, ‘root’, ‘user’, and ‘xbox’
- Passwords - ‘1234’, ‘access’, ‘chrome@example.com’, ‘Exabyte’, ‘ftp’, ‘help1954’, ‘IEUser@’, ‘kilo1987’, ‘mozilla@example.com ’, ‘pass’, ‘password’, ‘pbxk1064’, ‘r@p8p0r’, ‘tuxalize’, and ‘xbox’
Default Credentials for HTTP
The following usernames and passwords are common defaults for HTTP:
- Usernames - ‘admin’, ‘apc’, ‘axis2’, ‘cisco’, ‘connect’, ‘manager’, ‘newuser’, ‘pass’, ‘private’, ‘root’, ‘security’, ‘sitecom’, ‘sys’, ‘system’, ‘tomcat’, ‘user’, ‘wampp’, ‘xampp’, and ‘xampp-dav-unsecure’
- Passwords - ‘1234’, ‘admin’, ‘apc’, ‘cisco’, ‘connect’, ‘default’, ‘letmein’, ‘manager’, ‘none’, ‘pass’, ‘password’, ‘ppmax2011’, ‘root’, ‘sanfran’, ‘security’, ‘sitecom’, ‘sys’, ‘system’, ‘tomcat’, ‘turnkey’, ‘user’, ‘wampp’, and ‘xampp’
Default Credentials for MSSQL
The following usernames and passwords are common defaults for MSSQL:
- Usernames - ‘Administrator’, ‘ARAdmin’, ‘entldbdbo’, ‘entldbreader’, ‘mon_user’, ‘probe’, ‘repl_publisher’, ‘repl_subscriber’, ‘sa’, and ‘WinCCConnect’
- Passwords - ‘2WSXcder’, ‘AR#Admin#’, ‘blank’, ‘dbopswd’, ‘pass’, ‘pass1’, ‘password’, ‘rdrpswd’
Default Credentials for MySQL
The following usernames and passwords are common defaults for MySQL:
- Usernames - ‘admin’, ‘mysql’, and ‘root’
- Passwords - ‘blank’, ‘pass’, ‘pass1’, ‘password’, and ‘vicidia1now’
Default Credentials for PostgreSQL
The following usernames and passwords are common defaults for PostgreSQL:
- Usernames - ‘admin’, ‘postgres’, ‘scott’, and ‘tom’
- Passwords - ‘admin’, ‘password’, ‘postgres’, and ‘tiger’
Default Credentials for SMB
The following usernames and passwords are common defaults for SMB:
- Usernames - ‘backup’ and ‘helpdesk’
- Passwords - ‘backup’ and ‘hpinvent’
Default Credentials for SNMP
The following usernames and passwords are common defaults for SNMP:
- Usernames -
<BLANK> - Passwords - ‘0392a0’, ‘1234’, ‘2read’, ‘4changes’, ‘access’. ‘adm’, ‘Admin’, ‘admin’, ‘agent’, ‘agent_steal’, ‘all’, ‘all private’, ‘all public’, ‘ANYCOM’, ‘apc’, ‘bintec’, ‘blue’, ‘c’, ‘C0de’, ‘cable-d’, ‘canon_admin’, ‘cc’, ‘CISCO’, ‘cisco’, ‘community’, ‘core’, ‘CR52401’, ‘debug’, ‘default’, ‘dilbert’, ‘enable’, ‘field’, ‘field-service’, ‘freekevin’, ‘fubar’, ‘guest’, ‘hello’, ‘hp_admin’, ‘IBM’, ‘ibm’, ‘ILMI’, ‘ilmi’, ‘Intermec’, ‘intermec’, ‘internal’, ‘l2’, ‘l3’, ‘manager’, ‘mngt’, ‘monitor’, ‘netman’, ‘network’, ‘NoGaH$@!’, ‘none’, ‘openview’, ‘OrigEquipMfr’, ‘pass’, ‘password’, ‘pr1v4t3’, ‘private’, ‘PRIVATE’, ‘Private’, ‘proxy’, ‘publ1c’, ‘public’, ‘PUBLIC’, ‘Public’, ‘read’, ‘read-only’, ‘read-write’, ‘readwrite’, ‘red’, ‘regional’, ‘rmon’, ‘rmon_admin’, ‘ro’, ‘root’, ‘router’, ‘rw’, ‘rwa’, ‘s!a@m#n$p%c’, ‘san-fran’, ‘sanfran’, ‘scotty’, ‘SECRET’, ‘Secret’, ‘secret’, ‘SECURITY’, ‘Security’, ‘security’, ‘seri’, ‘SNMP’, ‘snmp’, ‘SNMP_trap’, ‘snmpd’, ‘snmptrap’, ‘solaris’, ‘SUN’, ‘sun’, ‘superuser’, ‘SWITCH’, ‘Switch’, ‘switch’, ‘SYSTEM’, ‘System’, ‘system’, ‘tech’, ‘TENmanUFactOryPOWER’, ‘TEST’, ‘test’, ‘test2’, ‘tiv0li’, ‘tivoli’, ‘trap’, ‘world’, ‘write’, ‘xyzzy’, and ‘yellow’
Default Credentials for SSH
The following usernames and passwords are common defaults for SSH:
- Usernames - ‘admin’, ‘administrator’, and ‘root’
- Passwords - ‘1234’, ‘admin’, ‘changeme123’, ‘password’, ‘password1’, ‘password123’, ‘password123!’, and ‘toor’
Default Credentials for Telnet
The following usernames and passwords are common defaults for telnet:
- Usernames - ‘admin’, ‘administrator’, ‘Alphanetworks’, ‘cisco’, ‘helpdesk’, ‘pix’, and ‘root’
- Passwords - ‘100’, ‘admin’, ‘changeme123’, ‘cisco’, ‘password’, ‘password1’, ‘password123’, ‘password123!’, ‘sanfran’, ‘root’, ‘wrgg15_di524’, ‘wrgg19_c_dlwbr_dir300 ’, and ‘wrgn22_dlwbr_dir615’
Default Credentials for VNC
The following usernames and passwords are common defaults for VNC:
- Usernames - ‘admin’, ‘administrator’, and ‘root’
- Passwords - ‘100’, ‘1234’, ‘admin’, ‘changeme123’, ‘password’, ‘password1’, ‘password123’, ‘password123!’, and ‘toor’
Default Credentials for WinRM
The following usernames and passwords are common defaults for WinRM:
- Usernames - ‘admin’, ‘administrator’, and ‘root’
- Passwords - ‘1234’, ‘admin’, ‘changeme123’, ‘password’, ‘password1’, ‘password123’, ‘password123!’, and ‘toor’
Add or Import Credential Pairs
You can manually create the password list for a bruteforce attack. To manually add credential pairs for the bruteforce attack to use, select the Add/Import credential pairs option from the Credentials section. The Manually Add Credentials text box appears, as shown below.
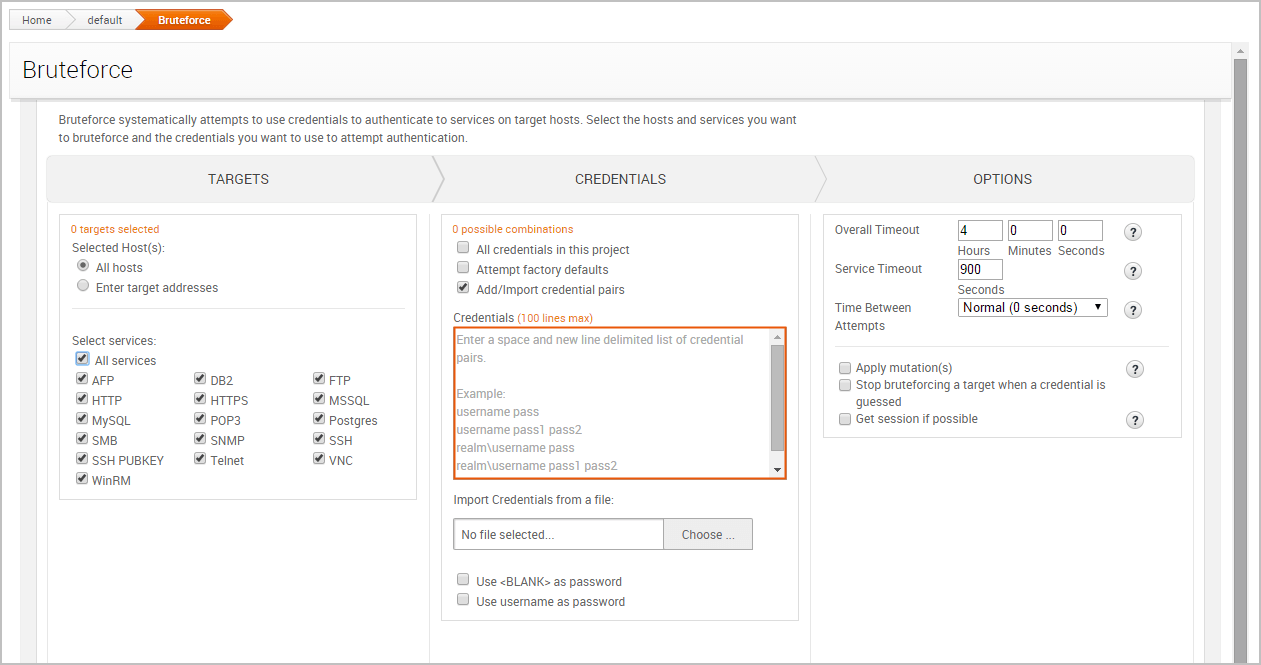
You can provide a space and newline delimited list of credential pairs. The first word on each line is treated as the username. Each word that follows the username is the password. You can enter up to 100 credential pairs in the text box. If you need to add more than 100 credential pairs, you will need to create a credentials file and import the file. For more information on importing a credentials file, see the Importing a Password List for a Bruteforce Attack section.
You must follow these syntax rules when you manually enter a password list:
- To define a credential pair, use the following format:
username password. - To specify multiple passwords for a username, enter the username followed by the passwords.
- Each password must be separated by a space.
- Each credential entry must be on a newline.
- Each item must be space delimited.
- To specify a blank username, use
<BLANK>for the username. - To specify a username with a blank password, enter the username only.
Password List Example
username
`<BLANK>` password
username password
username password1 password2
Importing a Password List for a Bruteforce Attack
A password list is a text file that contains credential pairs. You can manually create a password list using a basic text editor, like Notepad, or you can download a password list online.
The password list must follow these rules:
- Each credential pair must use the following format:
username password. - Each credential pair must be on a newline.
- Each item must be space delimited.
- A blank username must be defined as
<BLANK>. - A blank password does not have to be defined.
- A username with no password indicates a blank password.
To import a password list, select the Add/Import credential pairs option from the Credentials section. Click the Choose File button, as shown below.
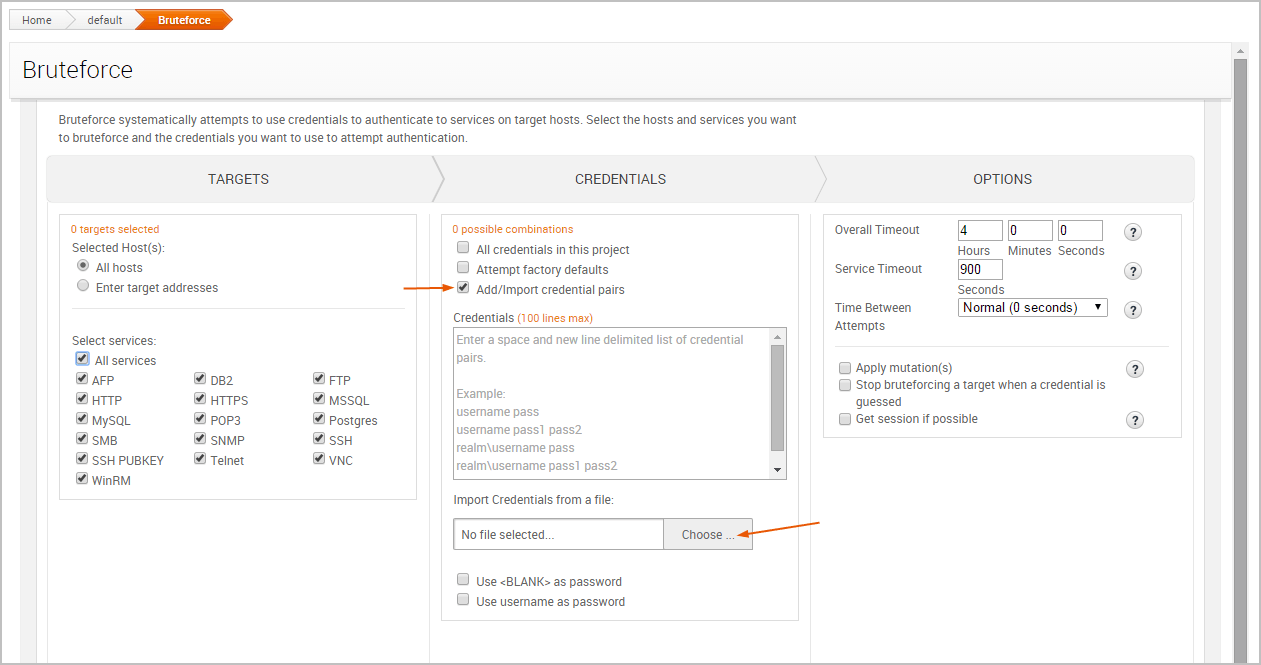
When the directory window appears, navigate to the location of the file that you want to import. Select the file and click the Import button.
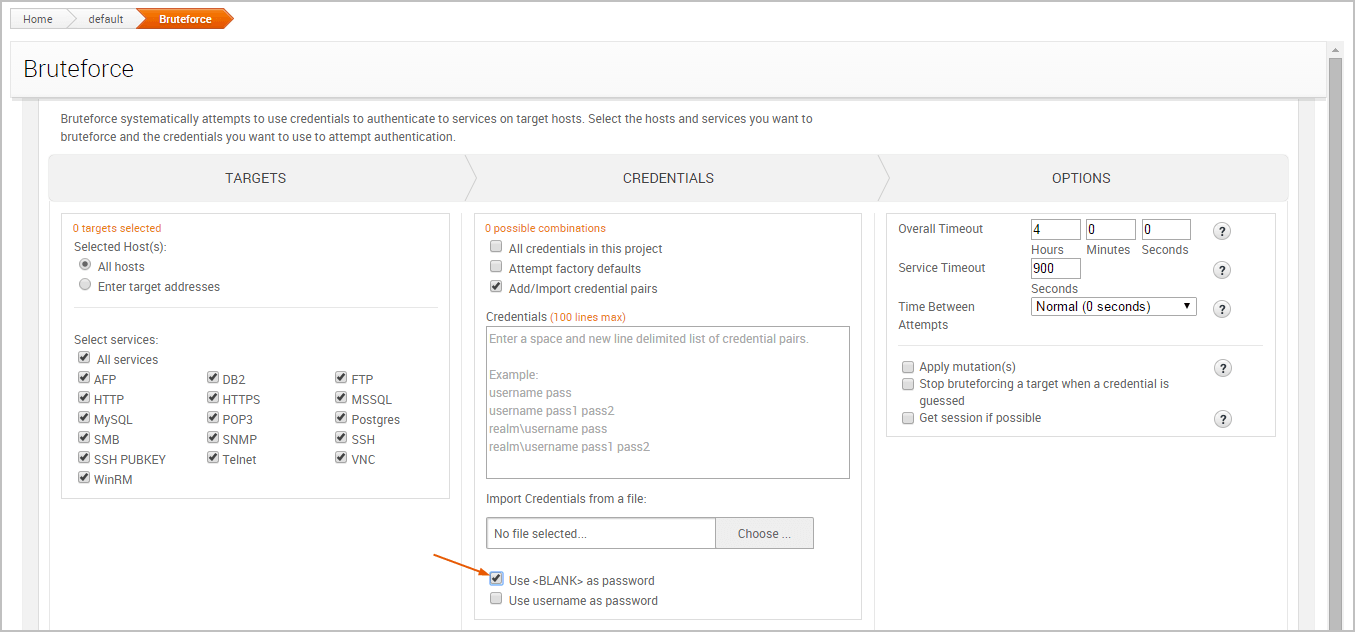
Using Blank Passwords in a Bruteforce Attack
To generate blank passwords for each username in a password list, you can enable the Use <BLANK> as password option, as shown below. For example, if the password list contains a credential pair like ‘admin’/‘admin’, Bruteforce will also try admin/<BLANK>.
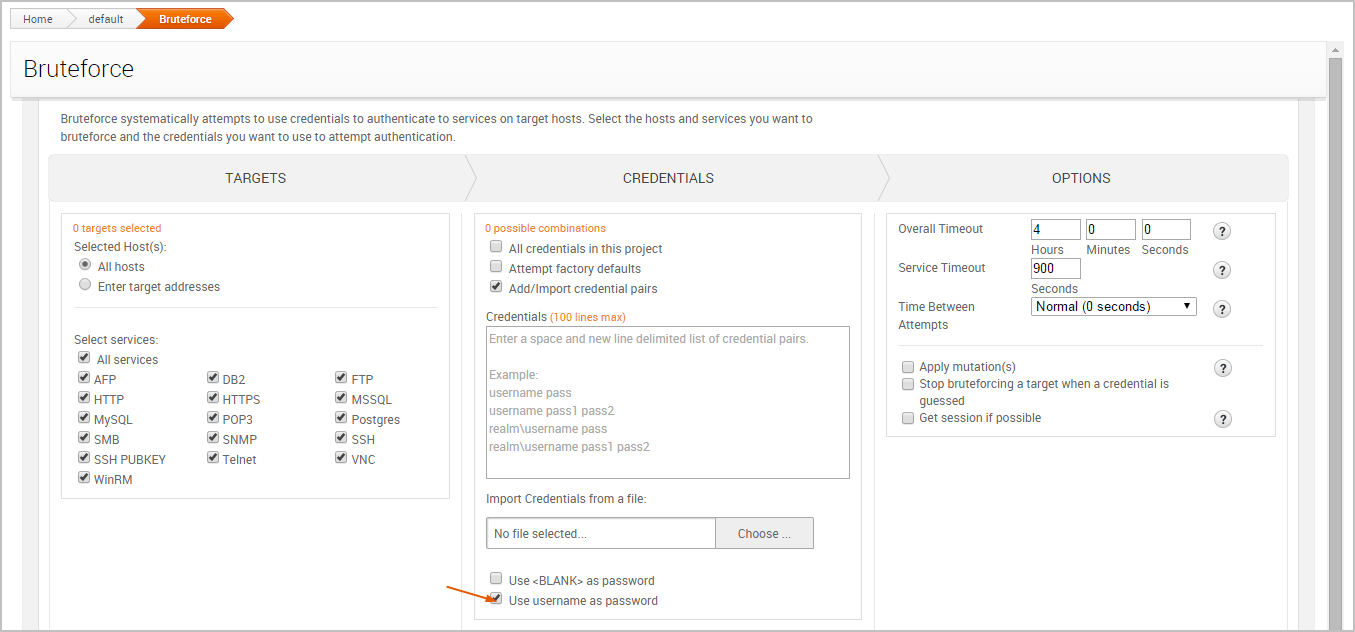
Using a Username as a Password
To use a username as a password, you can enable the Use username as password option, as shown below. For example, if the password list contains a credential pair like ‘user’/‘pass’, the bruteforce attack will also try ‘user’/‘user’.
Options When creating a bruteforce attack there are many options that can be set.
Setting the Timeout
You can control the amount of time that is allocated to the overall bruteforce task and for each individual service. You can set timeout limits from the options area of the Bruteforce workflow, as shown below:
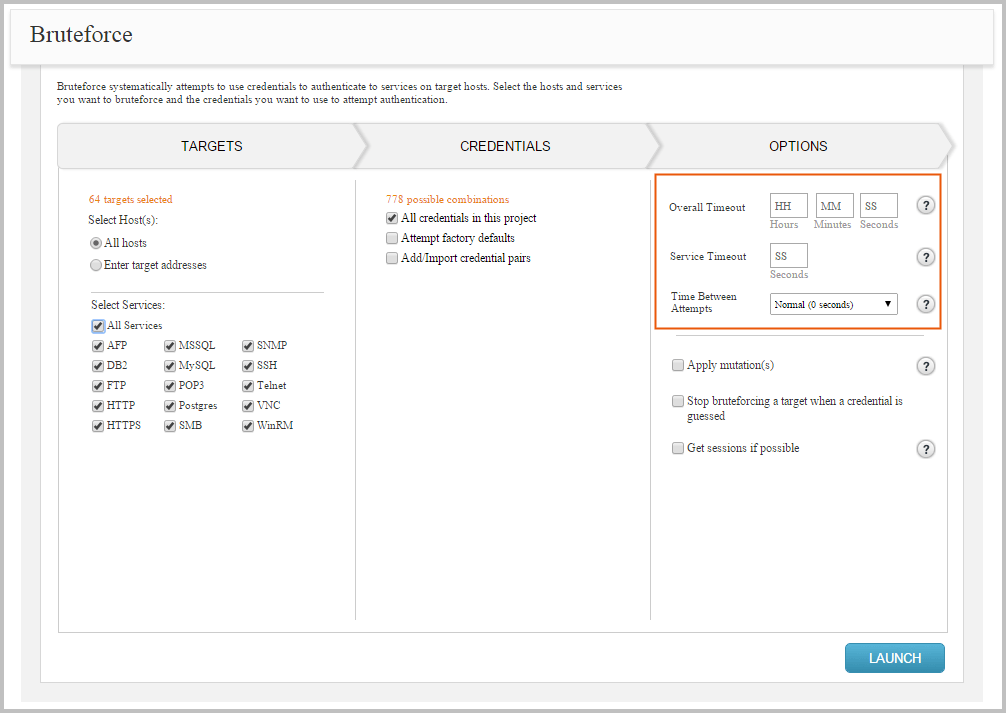
Default Settings
We highly recommend that you do not run Bruteforce using factory defaults and all mutation options because the task may take days to finish.
The following timeout options are available:
- Service timeout - Sets the timeout, in minutes, for each service.
- Overall timeout - Sets the maximum amount of time, in minutes, that will be allocated for the bruteforce run. If an overall timeout is enforced, Bruteforce will attempt as many guesses as it can during that time frame. Bruteforce may not be able to attempt all credentials if a timeout is set.
- Timeout between attempts - Sets the time that elapses, in seconds, between each login attempt. You can choose between any of the predefined time limits:
- None (0 seconds)
- Aggressive (0.1 seconds)
- Normal (0.5 seconds)
- Polite (1 second)
- Sneaky (15 seconds)
- Glacial (5 minutes) If no timeout options are set, the Bruteforce Workflow defaults to 0 and does not enforce a timeout limit.
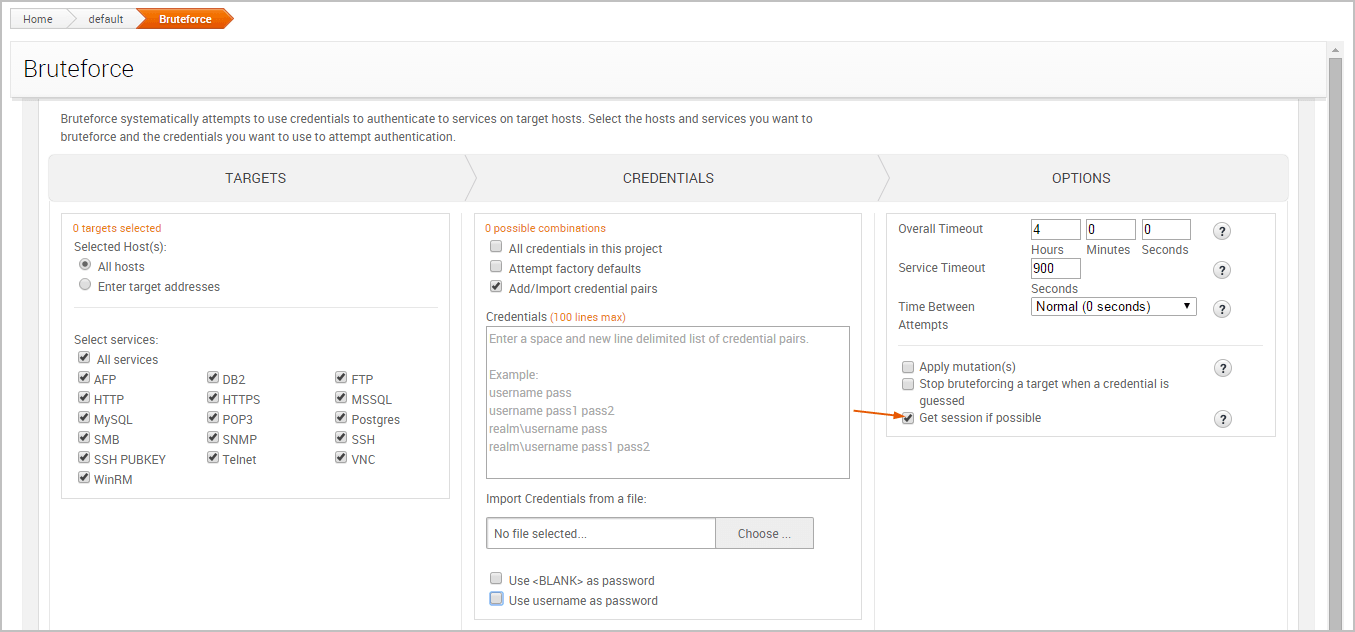
Getting Sessions on Guessed Credentials
In addition to guessing credentials, Bruteforce has the ability to open a session when a credential is guessed for specific services, such as MSSQL, MySQL, PostgreSQL, SMB, SSH, Telnet, WinRM, and some HTTP services, such as Tomcat, Axis2, or GlassFish. Open sessions can be used to perform post-exploitation tasks, such as gathering additional information from the host and leveraging that data to compromise additional hosts.
To open services when Bruteforce successfully cracks a credential on a service, you need to enable the Get sessions if possible option and specify the payload options that you want to use, as shown below. The session will remain open after the attack finishes, which can be used to perform additional post-exploitation tasks.
Configuring Payload Settings for a Bruteforce Attack
The following options can be used to configure the payload settings:
Payload type
This option determines the type of payload gets delivered to the target. You can choose one of the following options:
- Meterpreter - This payload provides an advanced interactive shell that provides extensive post-exploitation capabilities that enable you to do things like escalate privileges, dump password hashes, take screenshots, launch and migrate processes, and upload files to the target. Meterpreter also includes command shell capabilities for basic tasks like adding a user account or running a script. Meterpreter also dynamically loads itself into an existing process on the target host using a technique called reflective DLL injection, which enables it to reside entirely in memory and remain undetected by intrusion prevention and intrusion detection systems.
- Command - This payload provides a command shell that you can use to run single commands on a host to perform simple tasks like adding a user account or changing a password. A command shell provides limited capabilities, but can be later upgraded to a Meterpreter shell for more options. Unlike Meterpreter, a command shell can start a new process that can be easily detected by intrusion prevention and intrusion detection systems.
Connection
This option determines how your Metasploit instance connects to the host. You can choose one of the following options:
- Auto - This connection type uses a reverse connection when NAT or a firewall is detected; otherwise, it uses bind connection.
- Bind - This connection type uses a bind connection. You should use this connection type if there is a direct, unrestricted connection to the target host.
- Reverse - This connection type uses a reverse connection. You should select this connection type if the hosts are behind a firewall or a NAT gateway that will prevent requests from your Metasploit instance to the target.
- Listener ports - This option defines the ports that the listener uses to wait for incoming connections. You can specify a specific port, a comma separated list of ports, or a port range. If you enter a port range, the first available open port is chosen from the range.
- Listener host - This option defines the IP address the target host connects back to. This is typically going to be the external IP address of your local machine. If you do not specify a listener host, the external IP address of your local machine is used.
Applying Mutation Rules for a Bruteforce Attack
Oftentimes, organizations use variations of a base word to configure default account settings, or they use leetspeak to substitute characters. To cover these particular scenarios, you can to apply mutation rules to create different permutations of a private.
A mutation rule appends, prepends, and substitutes characters in a private. You can use them to effectively build a larger list of passwords based on a set of base words. For example, if you have identified that an organization commonly uses passwords that contain the company’s name, you can add the company’s name to the word list and apply mutations to automatically generate multiple variations of it. Therefore, depending on the mutation rules that are applied, a private, like “mycompany” can have several variations, such as “mycompany2014”, “mycompany1”, “mycomp@ny”, and so on.
There are several different types of mutation rules that you can apply, such as appending and prepending digits to a private, applying leetspeak substitutions to a private, and appending and prepending the current year to a private. The mutation rules are disabled by default, so you will need to enable the mutation option and select the rules you want to use. If enabled, the mutation rules will be applied to the credentials you have selected for the bruteforce attack.
Applying mutations can substantially increase the amount of time that it takes Bruteforce to complete. If you attempt to run Bruteforce with all mutation options enabled, it may take a very long time to complete. We highly recommend that you do not run Bruteforce using factory defaults and all mutation options because the task may take days to finish.
Applying Leetspeak Substitutions
Leetspeak is an alternative alphabet that can be used to substitute letters with special characters and numbers.
You can enable the 1337 speak option to perform individual leetspeak substitutions on a private. If you enable the 1337 speak option, the following rules are applied to each private:
- The mutation rule changes all instances of the letter “a” to ”@”.
- The mutation rule changes all instances of the letter “a” to “4”.
- The mutation rule changes all instances of the letter “e” to “3”.
- The mutation rule changes all instances of the letter “l” to “1”.
- The mutation rule changes all instances of the letter “o” to “0”.
- The mutation rule changes all instances of the letter “s” to “5”.
- The mutation rule changes all instances of the letter “s” to ”$”.
- The mutation rule changes all instances of the letter “t” to “7”.
Each leetspeak rule is applied individually. For example, if the private is “mycompany”, the leetspeak mutation rule creates two permutations: “myc0mpany” and “mycomp@ny”. It does not combine leetspeak rules to create “myc0mp@ny”.
Prepending Special Characters (!#*)
You can enable the Prepend special characters option to add a special character to the beginning of a private. If enabled, the rule prepends an exclamation point (!), a hash symbol (#), an ampersand (&), and an asterisk (*) to a private. For example, if the private is “mycompany”, the following permutations are created: “!mycompany”, “#mycompany”, “&mycompany”, and “*mycompany”.
Appending Special Characters (!#*)
You can enable the Append special characters option to add a special character to the end of a private. If enabled, the rule appends an exclamation point (!), a hash symbol (#), an ampersand (&), and an asterisk (*) to a private. For example, if the private is “mycompany”, the following permutations are created: the following permutations are created: “mycompany!”, “mycompany#”, “mycompany&”, and “mycompany*”.
Prepending a Single Digit
You can enable the Prepend single digit option to add a single digit to the beginning of a private. If enabled, the rule prepends the digits 0-9 to a private. For example, if the private is “mycompany”, the following permutations are created: “mycompany0”, “mycompany1”, “mycompany2”, “mycompany3”, and so on.
Appending Single Digit
You can enable the Append single digit option to add a single digit to the end of a private. If enabled, the rule appends the digits 0-9 to a private. For example, if the private is “mycompany”, the following permutations are created: “0mycompany”, “1mycompany”, “2mycompany”, “3mycompany”, and so on.
Prepending Digits
You can enable the Prepend digits option to add three digits to the beginning of a private. For example, if the private is “mycompany”, the following permutations are created: “mycompany000”, “mycompany001”, “mycompany002”, “mycompany003”, and so on.
If enabled, this rule can generate up to 1,000 permutations of a single private.
Appending Digits
You can enable the Append digits option to add three digits to the end of a private. For example, if the private is “mycompany”, the following permutations are created: “000mycompany”, “001mycompany”, “002mycompany”, “003mycompany”, and so on.
If enabled, this rule can generate up to 1,000 permutations of a single private.
Prepending the Current Year
You can enable the Prepend current year option to add the current year to the beginning of a private. For example, if the private is “mycompany”, the following permutations are created: “2014mycompany”, “2014mycompany”, “2014mycompany”, “2014mycompany”, and so on.
Appending the Current Year
You can enable the Append current year option to add the current year to the end of a private. . For example, if the private is “mycompany”, the following permutations will be created: “mycompany2014”, “mycompany2014”, “mycompany2014”, “mycompany2014”, and so on. Launching the Bruteforce Attack The Launch button on the Bruteforce configuration page becomes active when all required fields have been filled out. When you are ready to run the bruteforce attack, click the Launch button.
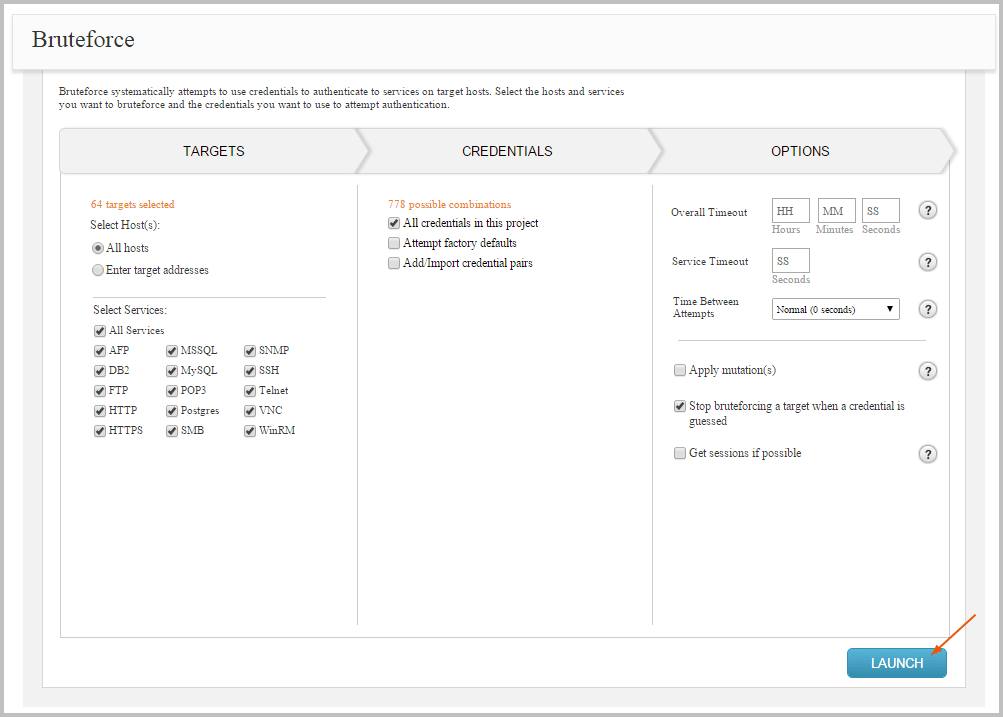
If there are any issues with the attack configuration, a warning will appear next to the misconfigured setting. You must fix the issue before you can launch the bruteforce attack.
Troubleshooting What can I do to make sure my bruteforce attack works?
- Make educated guesses. - For example, computer names frequently match usernames, and you can use a file of common passwords as your first attack vector. Knowing what users exist on a system will make your attack run much more quickly.
- Make sure everything is updated. - You’ll want to make sure you’re on the latest version of Metasploit, and that your embedded libraries are up to date.
- Be selective about credential mutations. - Applying mutations can substantially increase the amount of time that it takes Bruteforce to complete. If you attempt to run Bruteforce with all mutation options enabled, it may take a very long time to complete. We highly recommend that you do not run Bruteforce using factory defaults and all mutation options because the task may take days to finish.
- Watch the options you select to avoid account lockouts. - Only select the hosts, services, and users you want to test. See our help page for a walkthrough of how to select specific hosts, services, and users.
What happens if one of the credentials does not work in a Bruteforce?
- Each time one of the credentials doesn’t work, it shows up as a failed login attempt in the system logs. Bruteforce attacks are therefore “loud” or “noisy,” and can result in locking user accounts if your target has configured a limit on the number of login attempts.
What can I use to generate a custom credential mutation?
- John the Ripper (https://www.openwall.com/john/ ) is a free password cracker that is available for many flavors of Unix, Windows, DOS, BeOS, and OpenVMS. John the Ripper is typically used to detect weak passwords and hashes, but you can also use it to generate a mutated wordlist that you can import into Metasploit to use with Bruteforce.