Sharing Validation Results with Nexpose
The process of sharing vulnerability validation results with Nexpose is called pushing.
During a push, validated vulnerabilities are marked as exploited on the asset’s Vulnerabilities list and the non-exploitable vulnerabilities are added to the Vulnerability Exceptions and Policy Overrides page. The ability to push to Nexpose makes it easy to track and prioritize the vulnerabilities that have already been tested.
There are a couple of ways that you can share results with Nexpose:
- Using the Vulnerability Validation Wizard - The wizard provides an option to push validations and exceptions directly from the Findings page.
- Performing a manual push - You can push validations and exceptions from either the Vulnerabilities Index or the Vulnerability Details Page if you are manually validating Nexpose sourced vulnerabilities.
- Using a Task Chain - You can set up a Task Chain to push validations and exceptions for you. Validation Results There are two sets of results that you can share with Nexpose: validated vulnerabilities and vulnerability exceptions.
Validated Vulnerabilities
A validated vulnerability is a vulnerability that Metasploit was able to successfully exploit to obtain a session on the target. A validated vulnerability will have a validated icon next to it on the asset page’s Vulnerabilities list in Nexpose, as shown below:
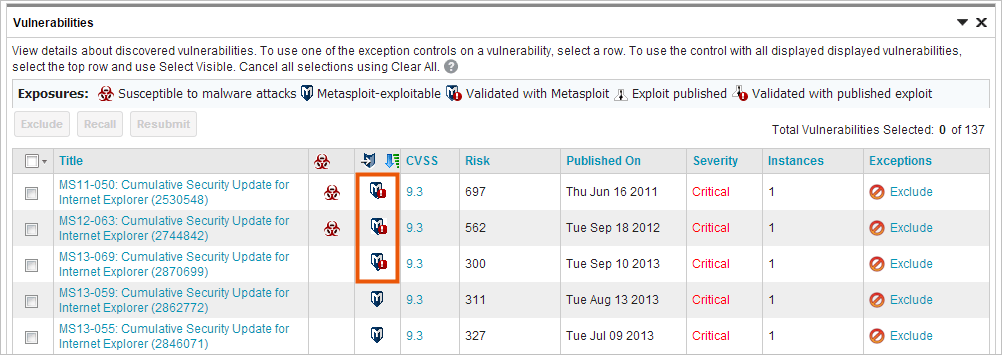
This simply lets you know that the vulnerability has been tested and was successfully exploited by Metasploit.
Vulnerability Exceptions
A vulnerability exception is vulnerability found by Nexpose that Metasploit was unable to exploit. Generally, vulnerability exceptions represent vulnerabilities that are typically low-risk or are used deliberately to mitigate bigger threats. You can create vulnerability exceptions to exclude certain vulnerabilities from a report so that you can manage your risk score.
Vulnerability exceptions should be created for vulnerabilities that have a status of ‘Not Exploitable’, which indicates that Metasploit was unable to obtain a session on the target. The inability to exploit a vulnerability is typically due to compensating controls or back porting.
Here are some reasons why you may want to create a vulnerability exception:
- The vulnerability is used as compensating controls or to mitigate additional risks.
- The vulnerability exists due to an acceptable use case or deliberate practice, such as anonymous FTP access.
- The vulnerability represents an acceptable risk and may require more resources than you are willing to invest to remediate.This type of vulnerability typically poses a minimal risk.
- The vulnerability is a false positive. Understanding Statuses All vulnerabilities imported from Nexpose have a status. The status lets you easily determine if the vulnerability has been tested and the results of the test. The status you see for a particular vulnerability depends on whether you are viewing the Vulnerabilities Index or the Vulnerability Details Page.
Statuses on the Vulnerabilities Index
The Vulnerabilities Index lists all vulnerabilities for all hosts in the project. From the Vulnerabilities Index, you can quickly determine if any action has been taken against the vulnerability. Any action taken against the vulnerability affects the test status, which identifies whether or not an exploit has successfully compromised the target.
To identify the test status for a vulnerability, look at the Nexpose Test Status column in the Vulnerabilities Index, as shown below:
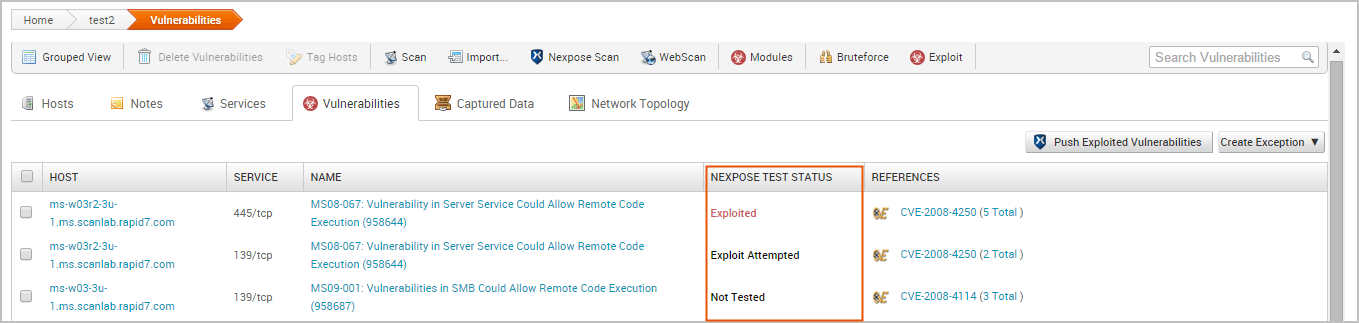
The following statuses are available:
- Not tested - An exploit has not been run against the target. This status is common for vulnerabilities that have been newly added to a project via import or Nexpose scan.
If the vulnerability was imported by the Vulnerability Validation Wizard, this status indicates that a matching remote exploit module with a ranking of great or higher was not found for the vulnerability, so no exploits were run. There may be exploit modules with a lower ranking or auxiliary modules that you can run manually against the vulnerability to test for exploitability. To check for matching exploit modules that can be run against the vulnerability, go to the Vulnerability Details Page and view the Related Modules tab.
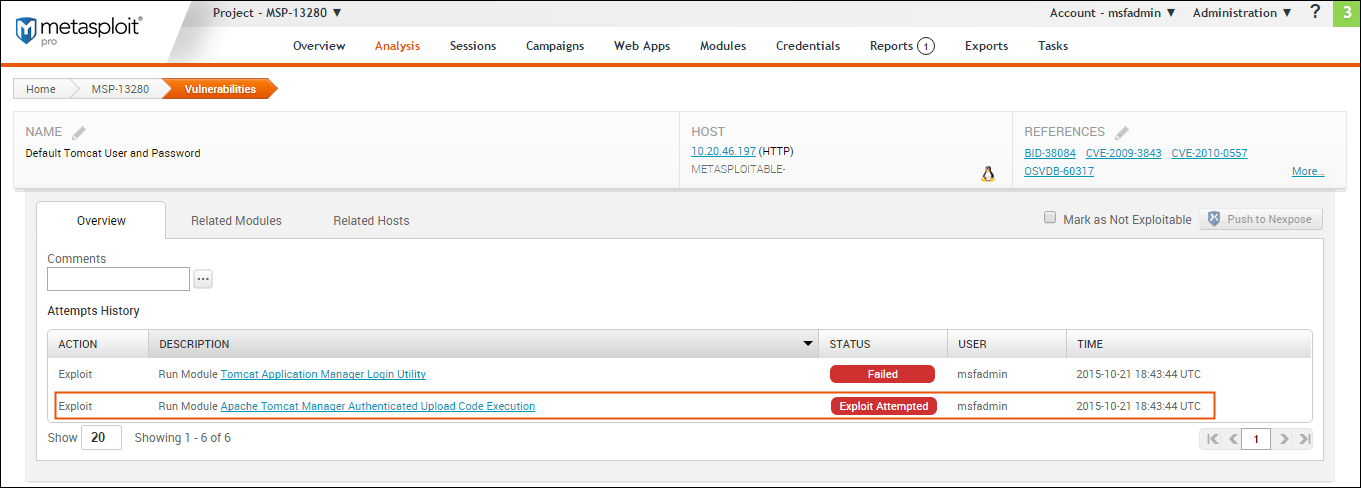
- Exploit Attempted - An exploit has been run against the target, but the exploit attempt was unsuccessful. A vulnerability with a status of ‘Exploit Attempted’ will have a failed module run result.
If the vulnerability was imported by the Vulnerability Validation Wizard, this status indicates that a matching remote exploit module with a ranking of great or higher was found and run against the vulnerability, but the exploit attempt was unsuccessful.
For any vulnerability that has an ‘Exploit Attempted’ status, you can choose to mark it as ‘Not Exploitable’ if you know that the vulnerability is not a valid risk. When you mark a vulnerability as ‘Not Exploitable’, the vulnerability is marked in Nexpose as an exception.
- Not Exploitable - This status indicates that you have determined that the vulnerability cannot be exploited. Any vulnerability with a ‘Not Exploitable’ status can be pushed to Nexpose as a vulnerability exception.
- Exploited - An exploit was able to successfully compromise the target and open a session. Any vulnerability with an ‘Exploited’ status can be pushed to Nexpose as a validated vulnerability.
Statuses on the Vulnerability Details Page
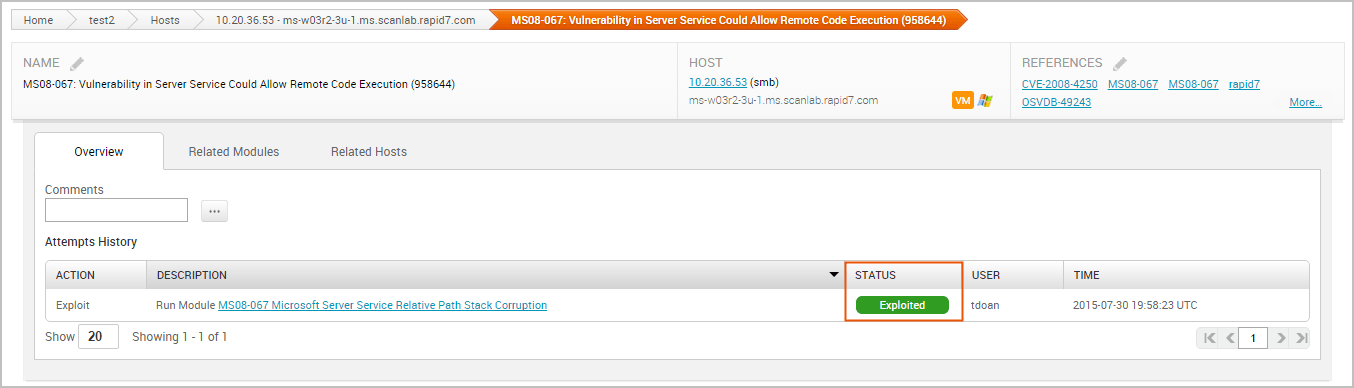
The Vulnerability Details page provides a more comprehensive look at a particular vulnerability. You can see a history of all actions taken against the vulnerability, identify other hosts with the same vulnerability, and find exploits that you can run against the vulnerability.
The Overview tab lists all the exploits that have been run against the vulnerability. The statuses on the Vulnerability Details page indicate the results of a module run.
The following statuses are available:
- Unreachable - Metasploit cannot communicate with the host.
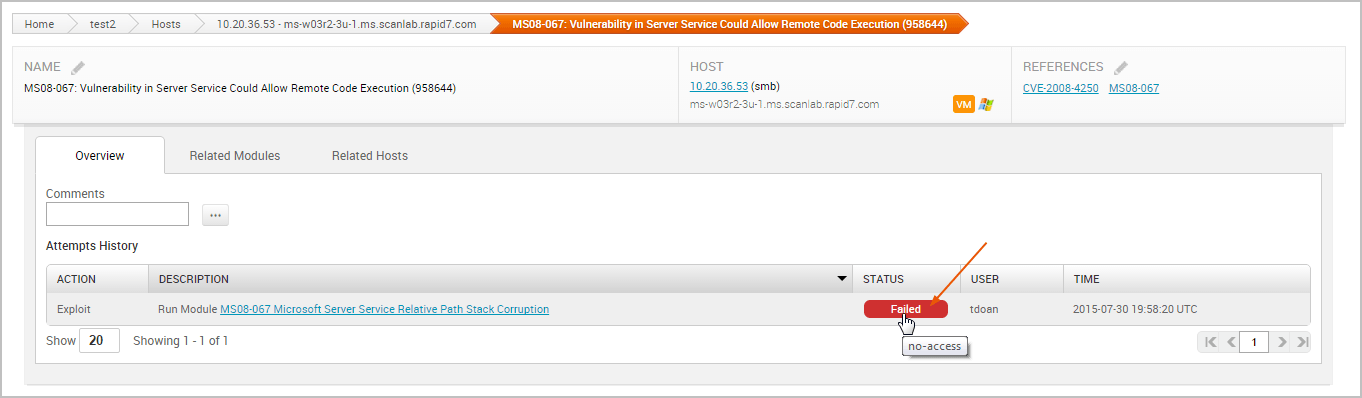
- Failed - The module was unable to open a session on the target.
- Exploited - The exploit was able to successfully open a session on the target.
- Not Exploitable - The exploit failed to open a session, and you manually marked the vulnerability as ‘Not Exploitable’.
- No status available - The vulnerability was not tested. This status typically indicates that there were not any matching remote exploits available for the vulnerability. Understanding Result Codes A result code provides the reason why an exploit failed. If you see a ‘Failed’ status for a module run, you can hover over the status to see the result code, which can help you troubleshoot the issue.
The following result codes are available:
- None - Indicates that Metasploit could not determine if the module ran successfully or failed.
- Unknown - Indicates that Metasploit could not determine if the module ran successfully or failed.
- Unreachable - Indicates that Metasploit could not reach the network service.
- Bad-config - Indicates that the exploit settings were configured incorrectly.
- Disconnected - Indicates that the network service disconnected during a module run.
- Not-found - Indicates that Metasploit could not find the application or service.
- Unexpected-reply - Indicates that Metasploit did not receive the expected response from the application.
- Timeout-expired - Indicates that a timeout occurred.
- User-interrupt - Indicates that the user stopped the module run.
- No-access - Indicates that Metasploit could not access the application.
- No-target - Indicates that the module configuration was not compatible with the target.
- Not-vulnerable - Indicates that the application was not vulnerable.
- Payload-failed - Indicates that Metasploit delivered a payload, but was unable to open a session. Marking a Vulnerability as Not Exploitable You can manually assign a ‘Not exploitable’ status for any vulnerability that has a Nexpose test status of ‘Exploit attempted’. The ‘Not exploitable’ status implies that the vulnerability does not present a real risk and can be treated as an exception.
To mark an vulnerability as not exploitable, select the Mark as Not Exploitable checkbox located on the Vulnerability Details page, as shown below:
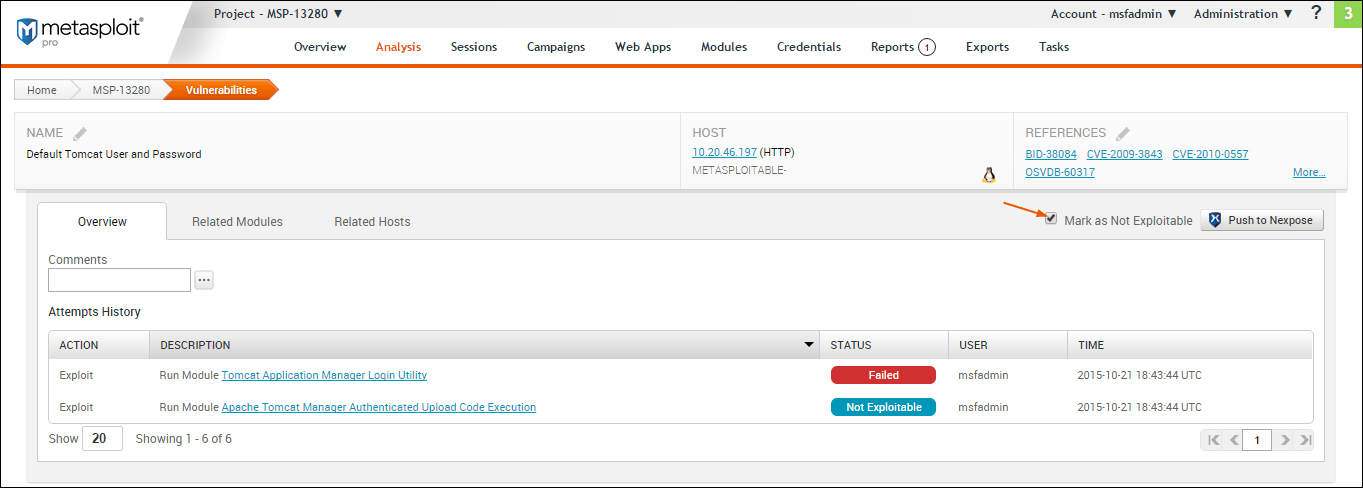
You can only assign a ‘Not exploitable’ status to a vulnerability that has a Nexpose test status of ‘Exploit attempted’. After you push the vulnerability to Nexpose, you cannot change its status back to ‘Exploit Attempted’. Any changes that you make to the vulnerability from the Nexpose console will not be updated in Metasploit.
Pushing Validated Vulnerabilities Pushing validated vulnerabilities is a one-button process. When you are ready to push validated vulnerabilities back to Nexpose, there are a few ways that you can do it:
- From the Vulnerability Validation Wizard’s Findings
- From the Vulnerabilities Index
- From the Vulnerability Details Page
- From a Task Chain
To push validations to Nexpose, you must add an active Nexpose console that Metasploit can reach. See this page to learn how to configure a Nexpose console.
Pushing Validated Vulnerabilities from the Vulnerability Validation Wizard’s Findings
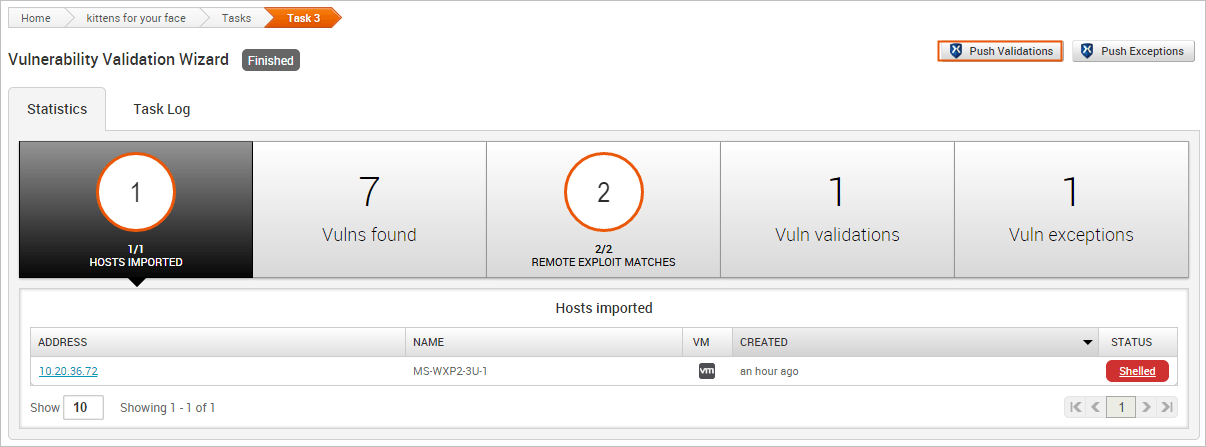
When the Vulnerability Validation Wizard finishes its run, you will be able to push validated vulnerabilities to Nexpose. The process of pushing validated vulnerabilities to Nexpose simply requires clicking the Push Validations button located on the Findings window, which is only active if there are valid vulnerabilities to send to Nexpose.
The image below shows the active Push Validations button:
When you push the validations to Nexpose, any vulnerability that was successfully exploited by that have been exploited will be marked as validated in your Nexpose console, as shown below:
Pushing Validated Vulnerabilities from the Vulnerabilities Index
The Vulnerabilities Index lists all vulnerabilities for all hosts in the project and enables you to quickly determine the current test status for a particular vulnerability. The index view is useful for pushing multiple validations at the same time.
To push validations from the Vulnerabilities Index:
- From within a project, select Analysis > Vulnerabilities. The Vulnerabilities Index appears.
- Select the vulnerabilities with a Nexpose Test Status of ‘Exploited’ that you want to push to Nexpose as a validation.
- Click the Push to Nexpose button.

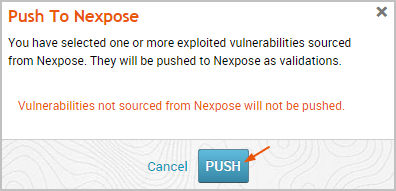
- A dialog window appears and alerts you that you have selected exploited vulnerabilities sourced from Nexpose that will be pushed to Nexpose as validations. Click Push to accept the warning and proceed with the push.
The Task Log appears and shows you when the push is complete.

After you push the validations to Nexpose, any vulnerability that was successfully exploited by that have been exploited will be marked as validated in your Nexpose console, as shown below:
Pushing a Single Validated Vulnerability
You can push from the Vulnerability Details Page if you want to push a specific validation back to Nexpose.
To push validations from the Vulnerability Details Page:
- From within a project, select Analysis > Vulnerabilities. The Vulnerabilities Index appears.
- Find the validated vulnerability you want to push to Nexpose and click on the name to open the Vulnerability Details Page. Validated vulnerabilities will have a status of ‘Exploited’.
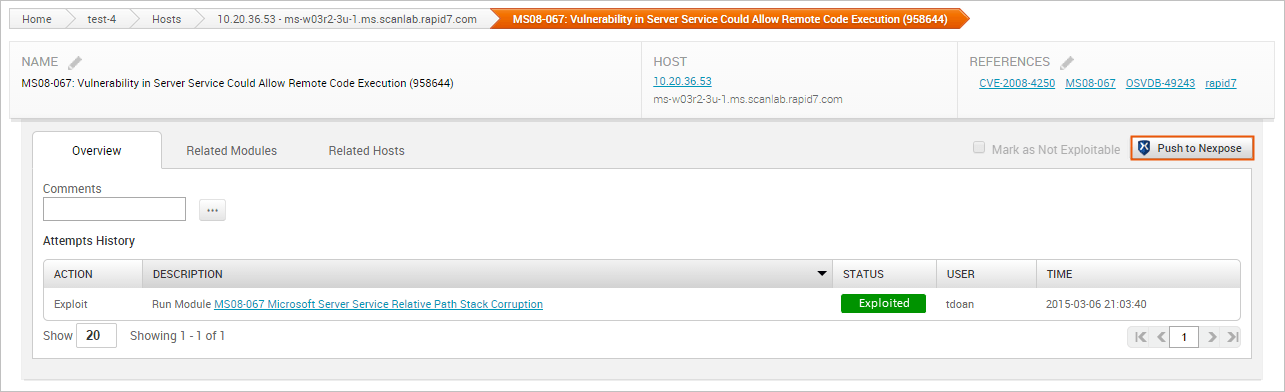
- Click the Push to Nexpose button.
- When the confirmation window appears, click OK to push the validation to Nexpose.
If Metasploit is unable to reach the Nexpose console, an error message appears and alerts you that there is an issue with the console. You can click OK to try the push again. If the error continues to persist, you will need to close the modal and diagnose the console connectivity.
Pushing Validated Vulnerabilities to Nexpose from a Task Chain
You can set up a Task Chain to execute a series of actions for you, including pushing validated vulnerabilities to Nexpose.
- From within a project, select Tasks > Chains from the Project tab bar. The Task Chains list appears.
- Click the New Task Chain button.
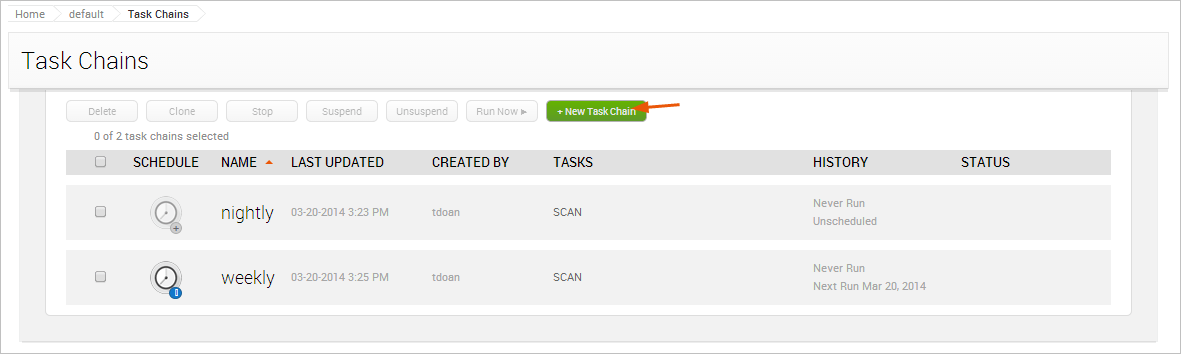
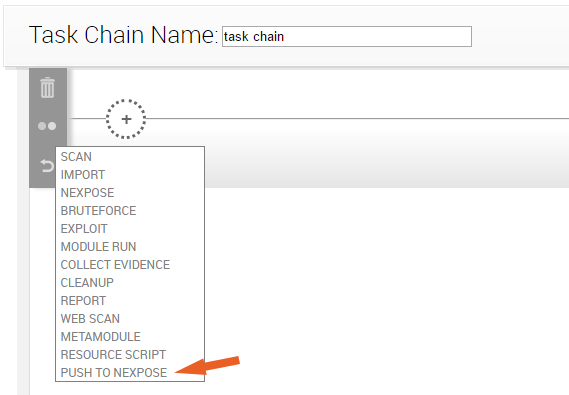
The New Task Chain page appears. 3. Give your Task Chain a name by entering text in the Task Chain Name field.

- Click the + button to add a task.

The task list appears. 5. Select Push to Nexpose from the task list.
- When you’ve finished your task chain, click Save or Save and Run Now.
After you push the validations to Nexpose, any vulnerability that was successfully exploited will be marked as validated in your Nexpose console, as shown below:
Creating and Pushing Vulnerability Exceptions When you are ready to create and push vulnerability exceptions, you can do it from a few different areas in the application:
- From the Vulnerability Validation Wizard’s Findings
- From the Vulnerabilities Index
- From the Vulnerability Details Page
To push exceptions to Nexpose, you must have an active Nexpose console set up that Metasploit can reach.
As previously mentioned, a vulnerability exception is vulnerability found by Nexpose that Metasploit was unable to exploit. To create a vulnerability exception, you, must manually change the status of a vulnerability from ‘Exploit Attempted’ to ‘Not Exploitable’.
When you create a vulnerability exception, you must set an expiration date that determines when the exception will no longer be effective and provide a reason that explains why the exception exists.
Exception Reasons
An exception can have one of the following reasons:
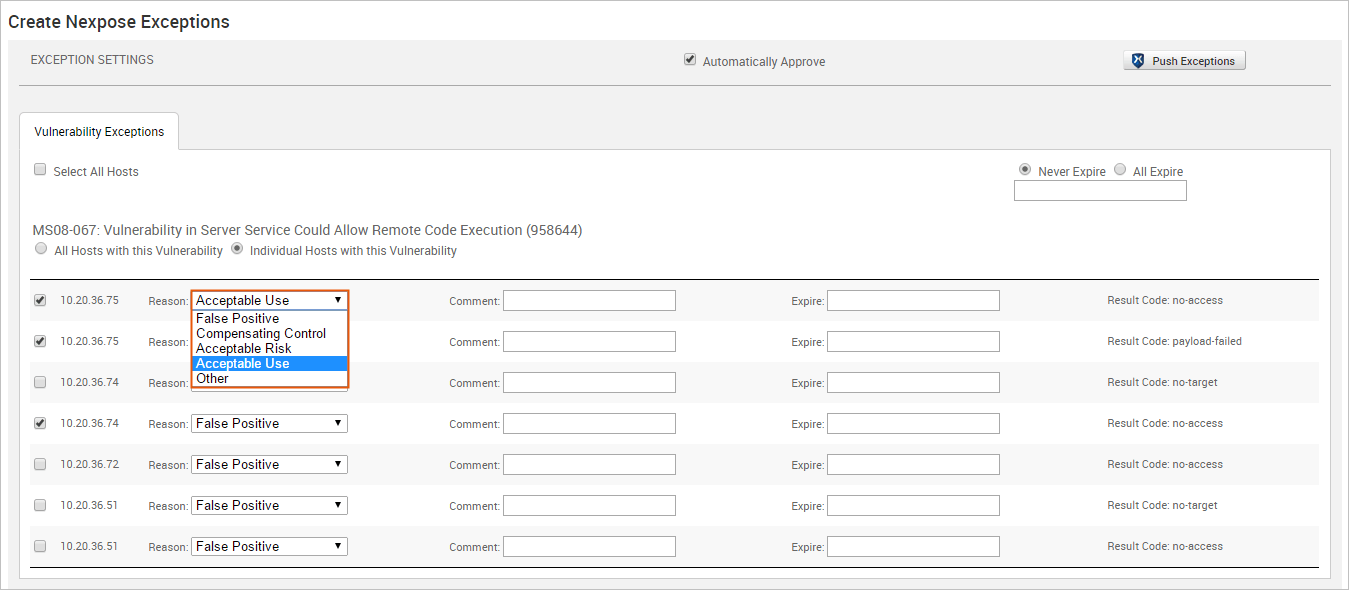
- False positive - Indicates that the vulnerability does not exist.
- Compensating control - Indicates that the vulnerability is a compensating control, or a workaround for a security requirement.
- Acceptable use - Use this exception reason for any vulnerability that is used as part of organizational practices.
- Acceptable risk - Indicates that the vulnerability is considered low risk. These vulnerabilities tend to pose minimal security risk and are likely to consume more resources than they are worth.
- Other - Indicates that the vulnerability has a custom exception reason. If you select Other, you can provide a custom exception reason in the Comment field.
Pushing Vulnerability Exceptions to Nexpose from the Vulnerability Validation Wizard’s Findings
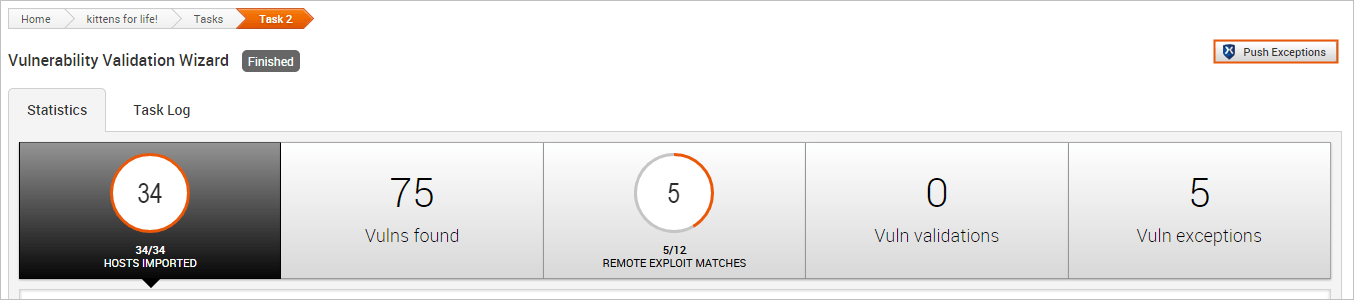
The Vulnerability Validation Wizard makes it extremely easy for you to push validations to Nexpose. When the Vulnerability Validation Wizard finishes its run, the Push Exceptions button appears on the Findings window if Metasploit was unable to exploit any of the tested vulnerabilities. You can click the Push Exceptions button to open the Create Nexpose Exceptions page. From this page, you will be able to create and push vulnerability exceptions.
To push exceptions from the Vulnerability Validation Wizard’s Findings:
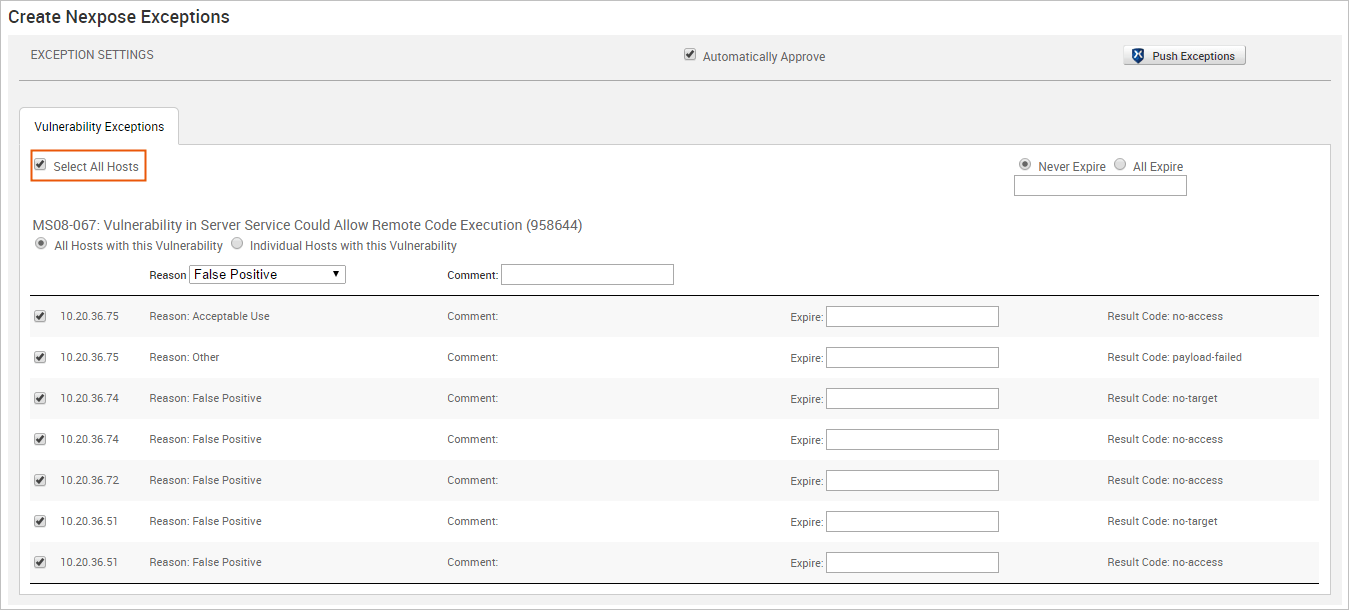
- Click the Push Exceptions button located on the Findings window. The Create Nexpose Exceptions page appears.
- Select the hosts that you want to create exceptions for. Use the Select All Hosts checkbox if you want to create exceptions for all hosts that have a non-exploitable vulnerability.
- For each vulnerability, click the Reason dropdown and choose the vulnerability exception reason you want to assign to it. You can also provide additional information for the exception in the Comment field.
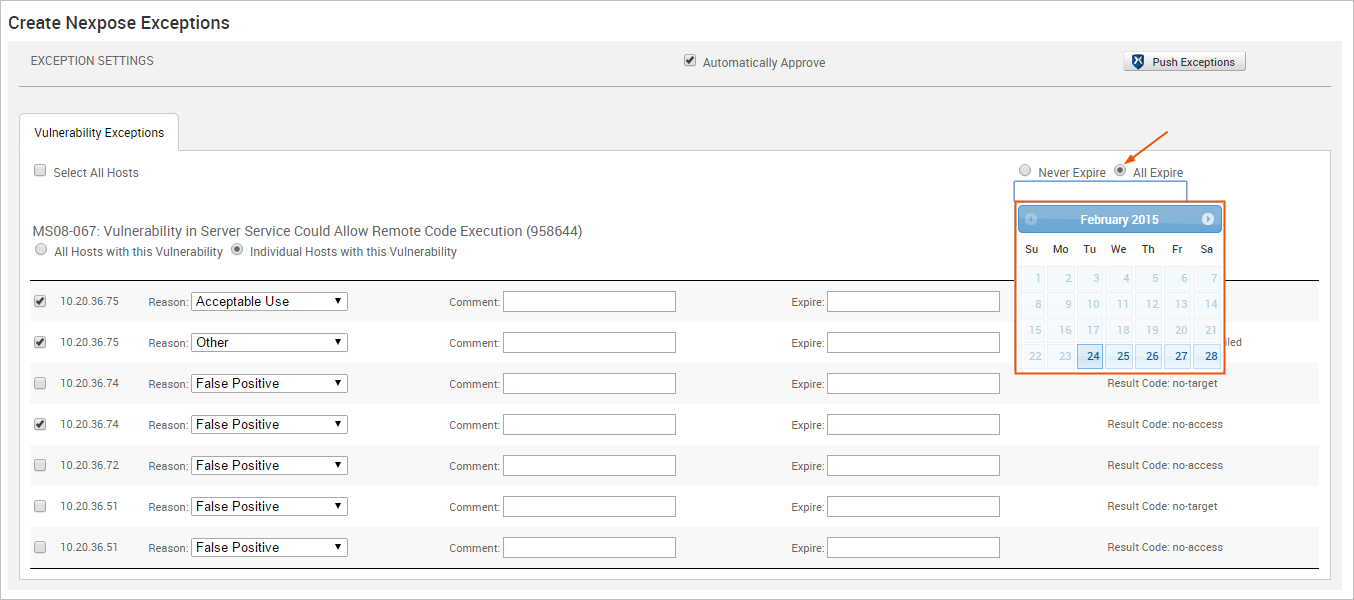
- Choose the All Expire option if you want to set an expiration date for all the vulnerability exceptions.
- If you want to set a unique expiration date for each host, skip this step and go to Step 5.
- If you do not want to set an expiration date for any vulnerability exceptions, keep the default Never Expire option selected and go to Step 6.
- To set the same expiration date for all vulnerability exceptions, select on the All Expire option. A calendar appears.
- Find and select the date that you want to use.
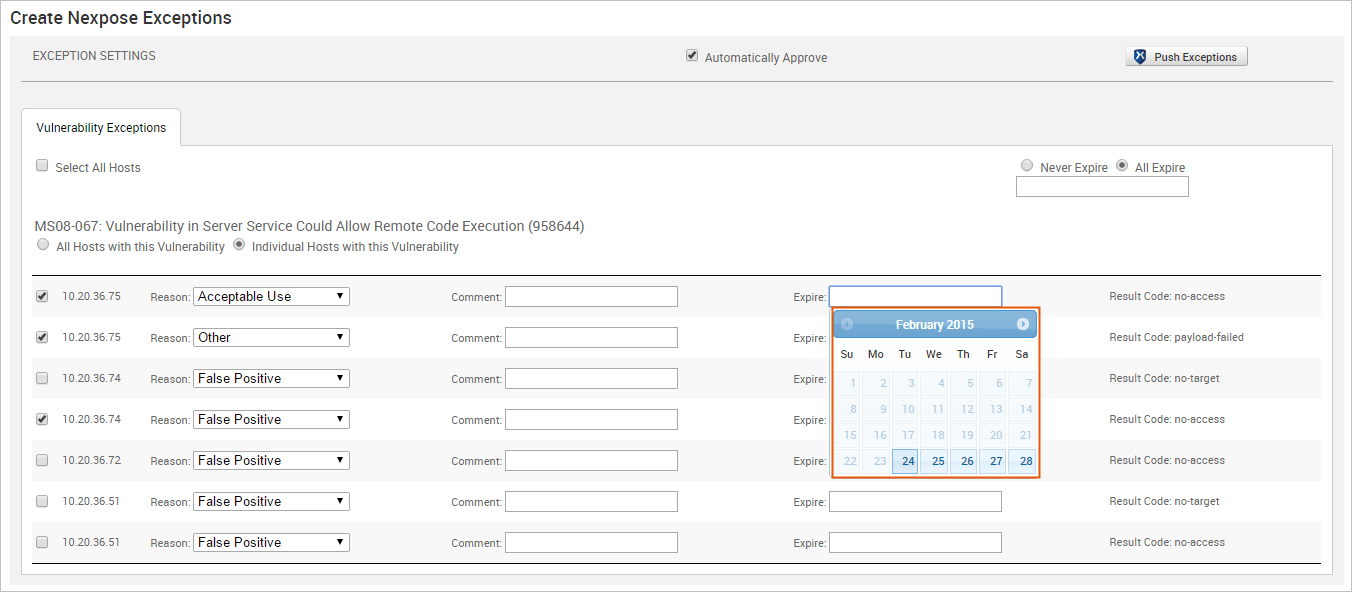
- To set a unique expiration date for each host, click on the Expire field next to each exception to display the calendar. Find the expiration date that you want to use and select it.
- Verify that you want to approve all vulnerability exception requests from Metasploit. If the Automatically Approve option is selected, Nexpose will automatically approve vulnerability exception requests imported from Metasploit. Otherwise, the vulnerability exceptions will need to be manually reviewed and approved from the Nexpose console.
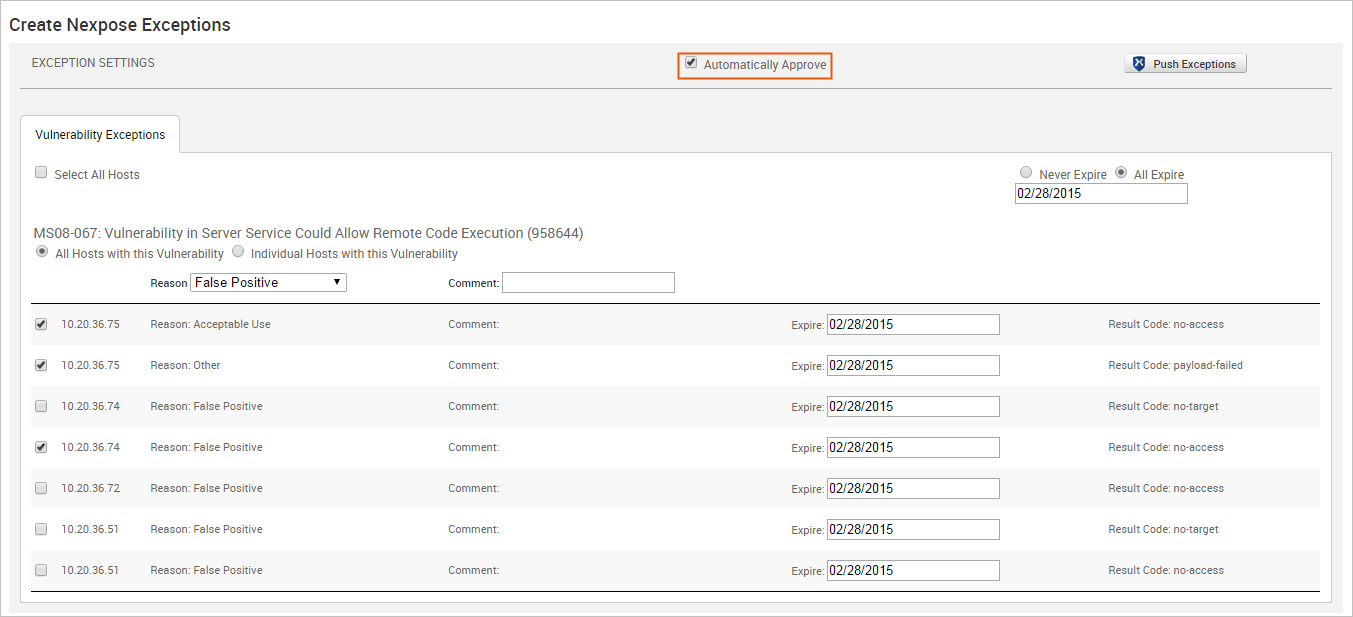
- When you are ready to push the exceptions, click the Push Exceptions button.
If the push is successful, the ‘Push succeeded’ status appears in place of the Push button.
Pushing Vulnerability Exceptions to Nexpose from the Vulnerabilities Index
The Vulnerabilities Index lists all vulnerabilities for all hosts in the project and enables you to quickly determine the current test status for a particular vulnerability. The index view is useful for pushing multiple exceptions at the same time.
To push exceptions from the Vulnerabilities Index:
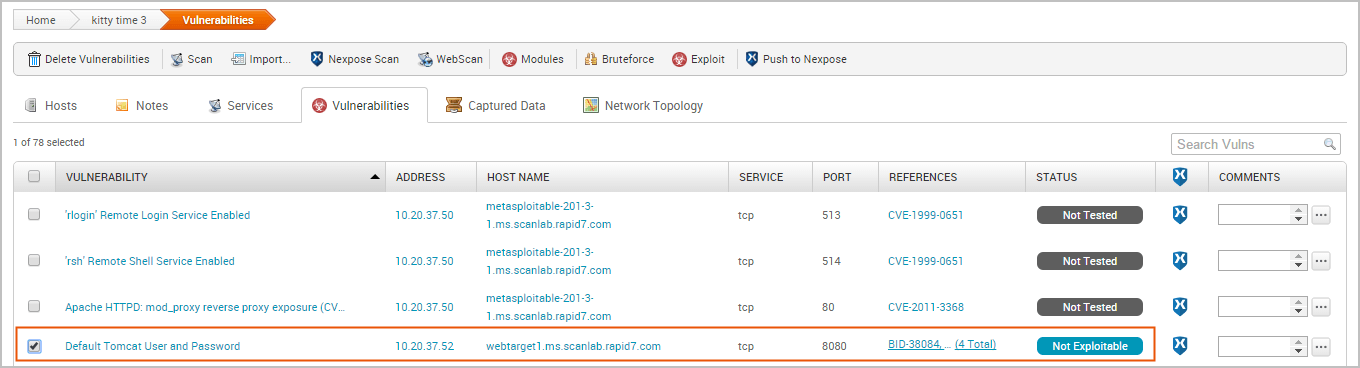
- From within a project, select Analysis > Vulnerabilities. The Vulnerabilities Index appears.
- Select the vulnerabilities with a Nexpose Test Status of ‘Not exploitable’ that you want to push to Nexpose as an exception. The vulnerabilities you select must also share the same exception reason.
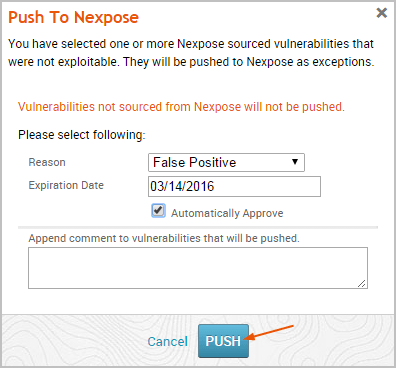
- Click the Push to Nexpose button. The Push to Nexpose dialog appears.
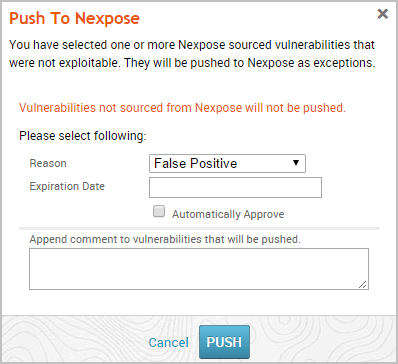
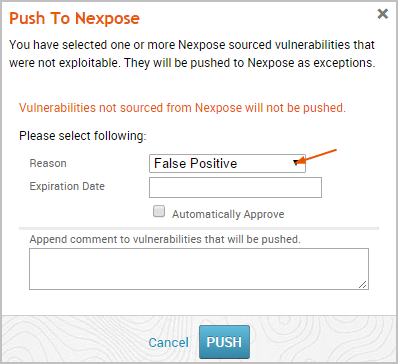
- Click the Reason dropdown and choose the vulnerability exception reason you want to assign to it.
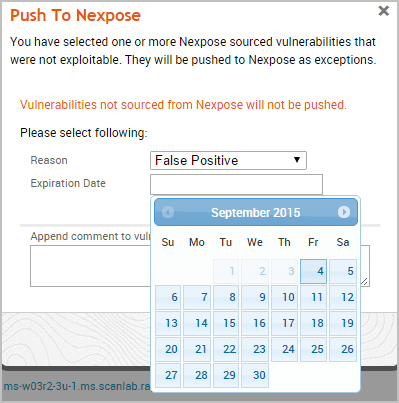
- Click the Expiration Date field and choose a date on which the exception will no longer be effective. If you do not want to specify an expiration date, leave this field empty.
- Select the Automatically Approve option if you want to automatically approve vulnerability exception requests imported from Metasploit. If you do not enable this option, you will need to be manually review and approve them from the Nexpose console.

- When you are ready to push the exceptions, click the Push button.
The task log appears and shows you the status of the push. If the push is successful, the message ‘Successfully pushed exceptions to Nexpose’ appears in the task log.
If Metasploit is unable to reach the Nexpose console, an error message appears and alerts you that there is an issue with the console. You can click OK to try the push again. If the error continues to persist, you will need to close the modal and diagnose the console connectivity.
Pushing Vulnerability Exceptions to Nexpose from the Single Vulnerability Page
You can push from the Vulnerability Details Page if you want to push a specific exception back to Nexpose.
- From within a project, select Analysis > Vulnerabilities. The Vulnerabilities Index appears.
- Find and click on the vulnerability that you want to push to Nexpose as an exception. Vulnerabilities that can be pushed as an exception have a Nexpose test status of ‘Not Exploitable’.
To learn how to assign a status of ‘Not Exploitable’ to a vulnerability, see Marking a Vulnerability as Not Exploitable.
- Click the Push to Nexpose button. The Push to Nexpose dialog appears.
- Click the Reason dropdown and choose the vulnerability exception reason you want to assign to it.
- Click the Expiration Date field and choose a date on which the exception will no longer be effective. If you do not want to specify an expiration date, leave this field empty.
- Select the Automatically Approve option if you want to automatically approve vulnerability exception requests imported from Metasploit. If you do not enable this option, you will need to be manually review and approve them from the Nexpose console.
- Click the OK button to push the exceptions to Nexpose.
The task log appears and shows you the status of the push. If the push is successful, the message ‘Successfully pushed exceptions to Nexpose’ appears in the task log.
If Metasploit is unable to reach the Nexpose console, an error message appears and alerts you that there is an issue with the console. You can click OK to try the push again. If the error continues to persist, you will need to close the modal and diagnose the console connectivity.
Pushing Vulnerability Exceptions to Nexpose from a Task Chain
You can set up a Task Chain to execute a series of actions for you, including pushing vulnerability exceptions to Nexpose.
- From within a project, select Tasks > Chains from the Project tab bar. The Task Chains list appears.
- Click the New Task Chain button.
The New Task Chain page appears. 3. Give your Task Chain a name by entering text in the Task Chain Name field.
- Click the + icon.
The task list appears. 5. Select Push to Nexpose from the task list.
- When you’ve finished your task chain, click Save or Save and Run Now. Updating Vulnerability Exceptions in Nexpose At some point, you may want to update vulnerability validations and exceptions after they have been pushed from Metasploit to Nexpose. In order to update vulnerability validations and exceptions after they have been pushed to Nexpose, you must log in to the Nexpose Console and manually update them. Currently, there is no way to update them from Metasploit. For more information on how to manage exceptions, please take a look at the Nexpose documentation .