Discovery Scan
One of the first steps in penetration testing is reconnaissance. Reconnaissance is the process of gathering information to obtain a better understanding of a network. It enables you to create list of target IP addresses and devise a plan of attack. Once you have a list of IP addresses, you can run a discovery scan to learn more about those hosts. A discovery scan identifies the operating systems that are running on a network, maps those systems to IP addresses, and enumerates the open ports and services on those systems.
A discovery scan is the internal Metasploit scanner. It uses Nmap to perform basic TCP port scanning and runs additional scanner modules to gather more information about the target hosts. By default, the discovery scan includes a UDP scan, which sends UDP probes to the most commonly known UDP ports, such as NETBIOS, DHCP, DNS, and SNMP. The discovery scan tests approximately 250 ports that are typically exposed for external services and are more commonly tested during a penetration test.
During a discovery scan, Metasploit Pro automatically adds the host data to the project. You can review the host data to obtain a better understanding of the topology of the network and to determine the best way to exploit each target. Oftentimes, the network topology provides insight into the types of applications and devices the target has in place. The more information that you can gather about a target, the more it will help you fine-tune a test for it. How a Discovery Scan Works A discovery scan can be divided into four distinct phases:
- Ping scan
- Port scan
- OS and version detection
- Data import
Ping Scan
The first phase of a discovery scan, ping scanning, determines if the hosts are online. The discovery scan sets the -PI option, which tells Nmap to perform a standard ICMP ping sweep. A single ICMP echo request is sent to the target. If there is an ICMP echo reply, the host is considered ‘up’ or online. If a host is online, the discovery scan includes the host in the port scan.
Port Scan
During the second phase, port scanning, Metasploit Pro runs Nmap to identify the ports that are open and the services are available on those ports. Nmap sends probes to various ports and classifies the responses to determine the current state of the port. The scan covers a wide variety of commonly exposed ports, such as HTTP, telnet, SSH, and FTP.
The discovery scan uses the default Nmap settings, but you can add custom Nmap options to customize the Nmap scan. For example, the discovery scan runs a TCP SYN scan by default. If you want to run a TCP Connect Scan instead of a TCP SYN Scan, you can supply the -sT option. Any options that you specify override the default Nmap settings that the discovery scan uses.
OS and Version Detection
After the discovery scan identifies the open ports, the third phase begins. Nmap sends a variety of probes to the open ports and detects the service version numbers and operating system based on how the system responds to the probes. The operating system and version numbers provide valuable information about the system and help you identify a possible vulnerability and eliminate false positives.
Data Import
Finally, after Nmap collects all the data and creates a report, Metasploit Pro imports the data into the project. Metasploit Pro uses the service information to send additional modules that target the discovered services and to probe the target for more data. For example, if the discovery scan sweeps a target with telnet probes, the target system may return a login prompt. A login prompt can indicate that the service allows remote access to the system, so at this point, you may want to run a bruteforce attack to crack the credentials. Ports Included in the Discovery Scan In total, the discovery scan includes over 250 ports, which includes the following set of ports:
- Standard and well known ports, such as ports 20, 21, 22, 23, 25 53, 80, and 443.
- Alternative ports for a service, such as ports 8080 and 8442, which are additional ports that HTTP and web services can use.
- Ports listed as the default port in a module.
If you do not see the port that you want to scan, you can manually add the port to the discovery scan. For example, if you know that your company runs web servers with port 9998 open, you need to manually add port 9998 to the discovery scan. This ensures that the discovery scan includes every port that is potentially open.
If you want to scan all ports, you can specify 1-65535 as the port range. Keep in mind that a discovery scan that includes all ports can take several hours to complete.
If there is a port that you do not want to scan, you can exclude the port from the discovery scan. The discovery scan will not scan any ports on the excluded list. For example, if your company uses an application that runs on port 1234, and you do not want to affect the application’s performance, you can add the port to the excluded list. Discovery Scan Options You can configure the following options for a discovery scan:
Target addresses
Defines the individual hosts or network range that you want to scan.
Perform initial port scan
Performs a port scan before the discovery scan performs service version verification.
Custom Nmap arguments
Sends flags and commands to the Nmap executable. Discovery scan does not support the following Nmap options: -o, -i, -resume, -script, -datadir, and -stylesheet.
Additional TCP ports
Appends additional TCP ports to port scan. By default, the port scan covers a small, but wide range of ports. Use this option if you want to add more ports to the scan.
Excluded TCP ports
Excludes certain TCP ports from service discovery. By default, the port scan covers a specific range of ports. Use this option to add a port that you want to exclude from the scan.
Custom TCP port range
Specifies a range of TCP ports for the discovery scan to use instead of the default ports. If you set a custom TCP port range, the discovery scan ignores all default ports and uses the range that you define instead.
Custom TCP source range
Specifies the TCP source port that the discovery scan uses instead of the default port. Use this option to test firewall rules.
Fast detect: Common TCP ports only
Performs a scan on the most common TCP ports, which reduces the number of ports that the discovery scan scans.
Portscan speed
Controls the Nmap timing option. Choose from the following timing templates:
- Insane (5) - Speeds up the scan. Assumes that you are on a fast network and sacrifices accuracy for speed. The scan delay is less than 5 ms.
- Aggressive (4) - Speeds up the scan. Assumes that you are on a fast and reliable network. The scan delay is less than 10 ms.
- Normal (3) - The default port scan speed and does not affect the scan.
- Polite (2) - Uses less bandwidth and target resources to slow the scan.
- Sneaky (1) - The speed used for IDS evasion.
- Paranoid (0) - The speed used for IDS evasion.
Portscan timeout
Determines the amount of time Nmap spends on each host. The default value is 5 minutes.
UDP service discovery
Sets the discovery scan to find all services that are on the network. Metasploit uses custom modules instead of Nmap to perform UDP service discovery.
Scan SNMP community strings
Launches a background task that scans for devices that respond to a variety of community strings.
Scan H.323 video endpoints
Scans for H.323 devices.
Enumerate users via finger
Queries user names and attempts to bruteforce the user list if the discovery scan detects the Finger protocol.
Identify unknown services
Sets the discovery scan to find all unknown services and applications on the network.
Single scan: scan hosts individually
Runs a scan on individual hosts. The discovery scan scans the first host entirely and stores the information in the database before it moves onto the next host.
Dry run: only show scan information
If enabled, this option prepares the scan and shows all of the options that the Discovery Scan will use in the task log. However, it does not launch the scan.
Web scan: run the Pro Web Scanner
Automatically runs a web scan, web audit, and web exploit along with a discovery scan. It is generally recommended that you do not enable this option unless you are running a scan against a very small set of hosts. If you are running a discovery scan against a large number of hosts, you should run the web scanner separately from the discovery scan.
SMB user name
Defines the SMB user name that the discovery scan uses to attempt to login to SMB services.
SMB password
Defines the SMB password that the discovery scan uses to attempt to login to SMB services.
SMB domain
Defines the SMB server name and share name. Specifying IPv6 Addresses Metasploit Pro does not automatically detect IPv6 addresses during a discovery scan. For hosts with IPv6 addresses, you must know the individual IP addresses that are in use by the target devices and specify those addresses to Metasploit Pro. To identify individual IPv6 addresses, you can use SNMP, Nmap, or thc-alive6, which is part of the thc-ipv6 toolkit.
After you identify the IPv6 addresses for the target devices, you can either import a text file that contains the host addresses into a project or manually add the hosts to a project.
Importing a File that Contains IPv6 Addresses
To import a file, select Analysis > Hosts. When the Hosts page appears, click the Import button. When the Import Data page appears, browse to the location of the host address file and import the host address file. The file must be a text file that lists each IPv6 address on a new line, as shown below:
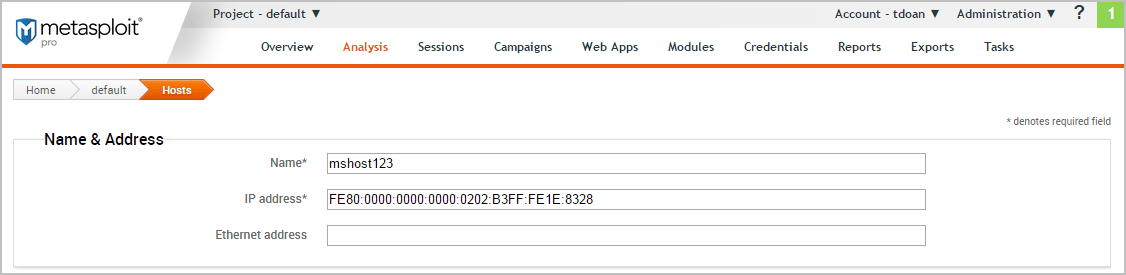
FE80:0000:0000:0000:0202:B3FF:FE1E:8329
FE80:0000:0000:0000:0202:B3FF:FE1E:8328
Manually Adding a Host with an IPv6 Address
To manually add a host, select Analysis > Hosts. When the Hosts page appears, click the New Host button.
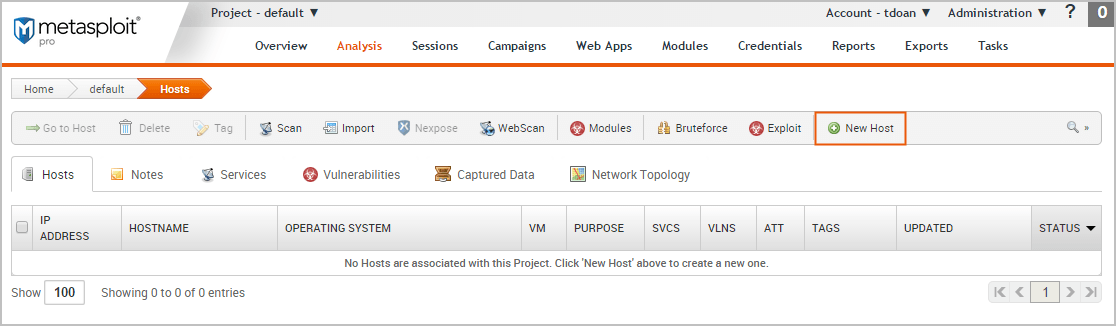
When the Hosts page appears, enter the following information:
- Name - A name for the host.
- IP address - The IPv6 address for the host.
The other fields, such as Ethernet address and OS information, are optional.
Running a Discovery Scan A discovery scan runs Nmap along with a few service specific modules to identify the systems that are alive and to find the open ports and services. At a minimum, you need to specify the addresses of the systems that you want scan. There are also advanced options that you can configure to fine-tune the different scan phases. For example, you can bypass the port scanning phase and move onto version detection, or you can scan each host individually to accelerate the import of hosts into the project. Additionally, these advanced settings let you choose the ports, the target services, the scan speed, and the scan mode.
Since the discovery scan mostly leverages Nmap, you can specify additional Nmap options to customize the scan. For example, if you want to change the scanning technique, you can provide the Nmap command line option for the technique that you want to use, and the discovery scan applies those settings instead of the default ones. For more information on Nmap options, visit the Nmap documentation .
To run a discovery scan:
-
From within a project, click the Overview tab.
-
When the Overview page appears, click the Scan button.

You can also access the Scan button from the Analysis page.
- When the New Discovery Scan page appears, enter the target addresses that you want to include in the scan in the Target addresses field.
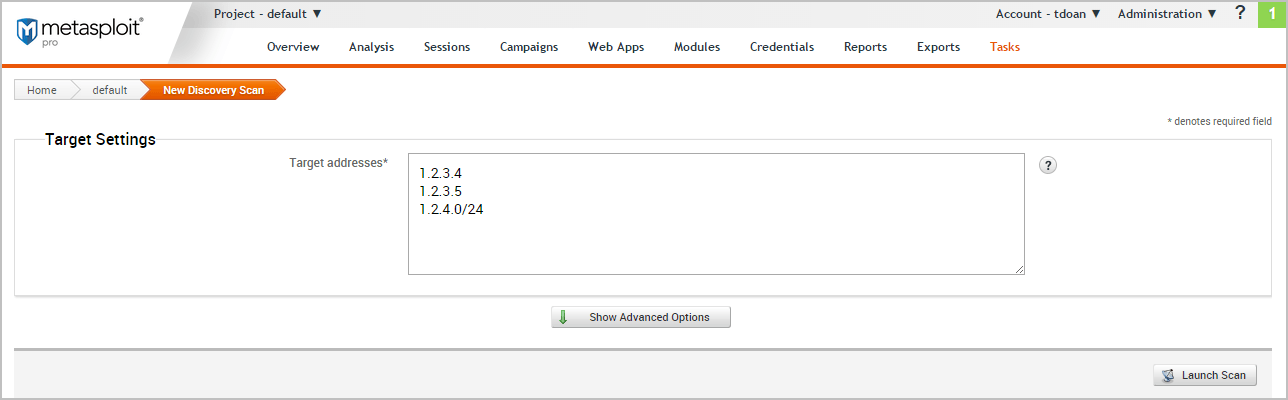
You can enter a single IP address, an address range, or a CIDR notation. If there are multiple addresses or address ranges, use a newline to separate each entry. 4. At this point, you can launch the scan. However, if you want to fine tune the scan, you can click the Show Advanced Options button to display additional options that you can set for the discovery scan. For example, you can specify the IP addresses that you want to explicitly include and exclude from the scan.
For more information about the scan options that are available, see Discovery Scan Options. 5. When you are ready to run the scan, click the Launch Scan button.
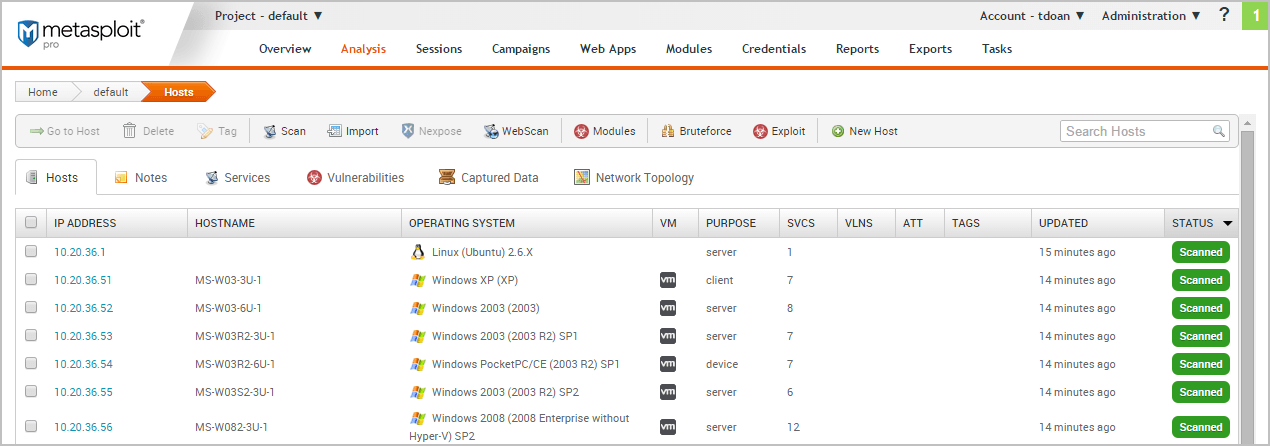
After the discovery scan launches, the task log displays and shows you the status of the progress and status of the scan. If the scan finishes without error, the status is ‘Complete’. Otherwise, the errors are displayed in the task log and the scan is marked as ‘Failed’. Viewing Scan Results The best way to view the data collected by the Discovery Scan is from the Hosts page. To view the Hosts page, select Hosts > Analysis. Each host will have one of the following statuses: scanned, cracked, shelled, or looted. For recently scanned hosts, the easiest way to identify them to sort them by date and their status.
Data Gathered from a Discovery Scan
You’ll notice that for each scanned or imported host, the following information is displayed, if available:
- The IP address
- The host name
- The operating system
- The active services
- The timestamp when the host was last updated
- The host status
Decoding the Host Status
The host status describes the last current event that occurred with the host. There’s a hierarchical order to the statuses.
- Scanned - Indicates a discovery scan, Nexpose scan, or import was performed.
- Shelled - Indicates that a session was opened on the host.
- Looted - Indicates that files or screenshots were obtained from the host.
- Cracked - Indicates that a password hash from the host was decrypted into plain text.