Exporting Project Data
A data export enables you to routinely back up project data and create an archive of your tests. When you export data from a project, its contents are copied and saved to a file that can be imported into other projects or shared with other instances of Metasploit. All exports can be downloaded from the Exports area of the web interface or from the exports directory.
Exports Directory
When Metasploit generates an export, it stores a copy of the file in /path/to/Metasploit/apps/pro/export. The files that are stored in this directory will match the list of exports displayed in the web interface.
You can go to the exports directory to download or view exported data; however, you should not make any changes directly to the default exports directory. If you need to modify the export files, you should make a copy the exports directory and make your changes from the new directory. Any changes that you make directly to the export files can cause disparities between the metadata that displays for the file in the web interface and the file itself.
If you need to remove exports from a project, you should do it from within the web interface. Do not delete them directly from the exports directory.
Viewing Exports Generated with Metasploit 4.8 and Earlier
All exports generated with 4.8 and earlier are stored in /path/to/Metasploit/apps/pro/reports. These exports were created with an older version of Metasploit and were not migrated to the exports directory that was added in Metasploit 4.9. These files will not be listed or accessible from the web interface.
Export Logs
The export log maintains a historical record of all export-related events. Metasploit automatically updates the export log each time you export data from a project. If you experience any issues with an export, you can view the export log to find stack trace errors and troubleshoot them.
Viewing the Export Log
You can find and view the export log in the following directory: /path/to/Metasploit/apps/pro/ui/log. The export log is named exports.log.
Clearing the Export Log
To clear the export log, you need remove it from the log directory, which is located at /path/to/Metasploit/apps/pro/ui/log. Metasploit generates a new export log if it detects that one does not exist.
Before you delete the export log, you should make a copy of it in case you need to reference it later.
Notification Center Statuses for Exports The Notification Center alerts you when an export has started, finished, or encountered an error. The Notification Center appears as an icon in the upper-right corner of the global toolbar and turns green when there is an alert is available for you to review. You can click on the Notification Center icon to view a list of notifications for all projects.

The Notification Center displays the following statuses for exports:
-
Export started - This status indicates that the export has started.
-
Export finished - This status indicates that the export has completed without errors and is ready for you to download. You can click on this alert to open the Exports page, which will list all of the export files that have been generated for the project. You can sort by the creation date to find the latest export file.
-
Problem with export - This status indicates that there was an issue with the export and it was not able to finish. You will need to view the export log to troubleshoot the issue. Export Types Metasploit offers the following export types:
-
XML export - An XML file that contains the attributes for most of the objects in a project and can be imported into another project. XML exports are particularly useful if you have a data set that you want to reuse in another project or share with another instance of Metasploit. For example, you can export an XML of project data if you want to reuse the scan data from a particular project.
-
Workspace ZIP - A ZIP that contains an XML export and any loot files, report files, and tasks logs. This export type is useful if you want to back up the data and contents in a project or share the project with other instances of Metasploit.
-
Replay script - A batch file that reruns tasks that opened sessions on target hosts. A replay script consists of multiple resource files (.rc). Metasploit creates a resource file for each session it opens. You can run a replay script from the pro console or msfconsole.
-
PWDump - A text file that contains all of the credentials for a project, including plaintext passwords, SMB hashes, and SSH keys. Credentials can be masked to enumerate user names only. XML Exports When you export your project as an XML file, it contains most of the data that you see from the Analysis area of a project—with a few exceptions. The exported XML file contains most of the objects in a project’s database and their attributes; it does not include any files that are associated with the objects in a project, such as task logs, generated reports, and loot files.
When you view the XML export file, you will see the following objects:
- Hosts - Contains the details for each host in the project, including the following attributes: notes, tags, vulnerabilities, credentials, and sessions. It also include host details, such as the host ID, IP address, MAC address, host name, OS name, OS flavor, OS service pack, and purpose.
- Events - Contains the event log for the project. Each event includes the workspace ID, event creation date, event name, and name of the user who launched the task.
- Sessions - Contains the details for each session obtained in the project, including the following attributes: host ID, session type, module used, session description, port used, and session open/close dates.
- Services - Contains the details for each service discovered in the project, including the service ID, host ID, port number, protocol type, state, service name, creation date, and modification date.
- Credentials - Contains the details for each credential stored in the project, including the credential ID, service ID, user name, password, creation date, and modification date.
- Web sites - Contains the details for each web server discovered, including the website ID, service ID, host address, VHOST address, HTTP port, creation date, and modification date.
- Web pages - Contains the details for each web page discovered, including the web page ID, HTTP response code, VHOST address, web server address, HTTP port, content type, page content, creation date, and modification date.
- Web forms - Contains the details for each web form discovered, including the web form ID, form path, request method, VHOST address, web server address, HTTP port, content type, page content, creation date, and modification date.
- Web vulnerabilities - Contains the details for each web vulnerability discovered, including the vulnerability category, vulnerability description, vulnerability confidence ranking, request method, vulnerability name, HTTP port, proof text, VHOST address, and vulnerability blame.
Additional attributes may be available for each object; however, this list covers the most common attributes for each object.
Creating an XML Export of Project Data
- Open the project from which you want to export data.
- Select Exports > Export Data from the Project tab bar. The Export Data page appears.

- Select XML Export from the Export Format section.

- Replace the export file name with a custom name, if you do not want to use the default name. (Optional)
- Define the hosts you want to explicitly include in the Included addresses field. (Optional)
- Define the hosts you want to explicitly exclude in the Excluded addresses field. (Optional)
- Select the Mask credentials option from the Export Options section if you do not want to include credentials in the export.
The credentials will be replaced with **MASKED** in the XML file. If you import the XML file into a project, the credentials will not be included.
- Click the Export Data button.
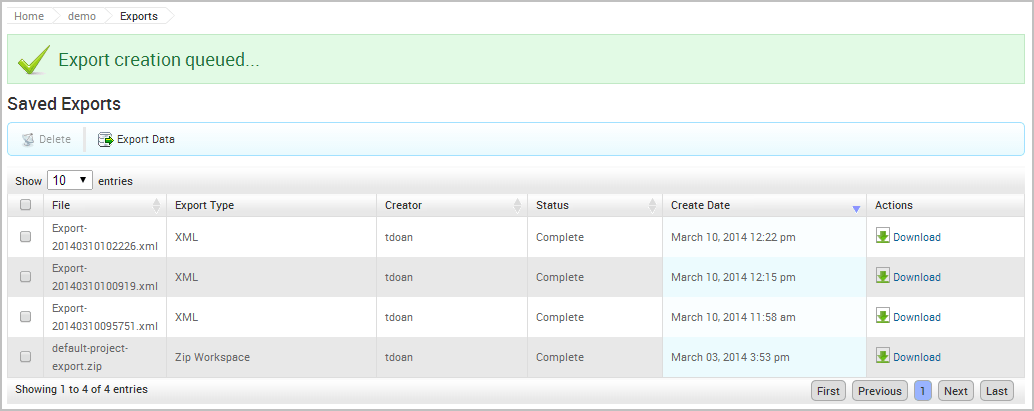
When the export begins, you will be taken back to the Exports page. The Exports page displays an “Export creation queued” message.
The Notification Center icon will turn green and alert you when the export starts and completes. You can click on the Notification Center icon to view a list of system wide alerts. When the export completes, you can click on the notification message or you can select Exports > Show Exports from the Project tab bar to access the Exports area.
When the export is ready, it will listed be at the top of the Exports List. It will use the following naming convention: export-[current date and time]. If you do not see it at the top of the Exports List, click on the Create Date column name to sort the list by descending creation date.
If an error occurred during the export and the export was unable to complete, you can view the export log to identify and troubleshoot any errors that occurred. Workspace ZIP A workspace ZIP contains an XML export, which details the attributes for most of the objects in a project, and any associated directories that contain loot files, report files, and tasks logs. You can export a workspace ZIP to make a copy of a project, its data, and its files. This is useful when you want to back up your findings or when you want to import the data into other projects.
When you export a project, Metasploit generates a ZIP file that contains the following:
- Exported XML file - Contains most of the objects in a project, including hosts, services, sessions, credentials, module details, and events.
- Reports directory - Contains all of the generated reports for the project.
- Tasks directory - Contains texts file that detail each task run.
- Loot directory - Contains the loot files for the project, including hashes and SSH keys.
Compressing a Project into a ZIP File
- Open the project from which you want to export replay scripts.
- Select Exports > Export Data from the Project tab bar. The Export Data page appears.
- Choose ZIP Workspace from the Export Format section.

- Replace the export file name with a custom name, if you do not want to use the default name. (Optional)
- Use the Included addresses to explicitly define the hosts you want to include in the export. (Optional)
- Use the Excluded addresses to explicitly define the hosts you want to exclude from the export. (Optional)
- If you do not want to include credentials in the export, select the Mask credentials option from the Export Options section.
- Click the Export Data button.
The Exports page reappears when the export begins and displays an “Export creation queued” message.
The Notification Center icon will turn green and alert you when the export starts and completes. You can click on the Notification Center icon to view a list of system wide alerts. When the export completes, you can click on the notification message or you can select Exports > Show Exports from the Project tab bar to access the Exports area.
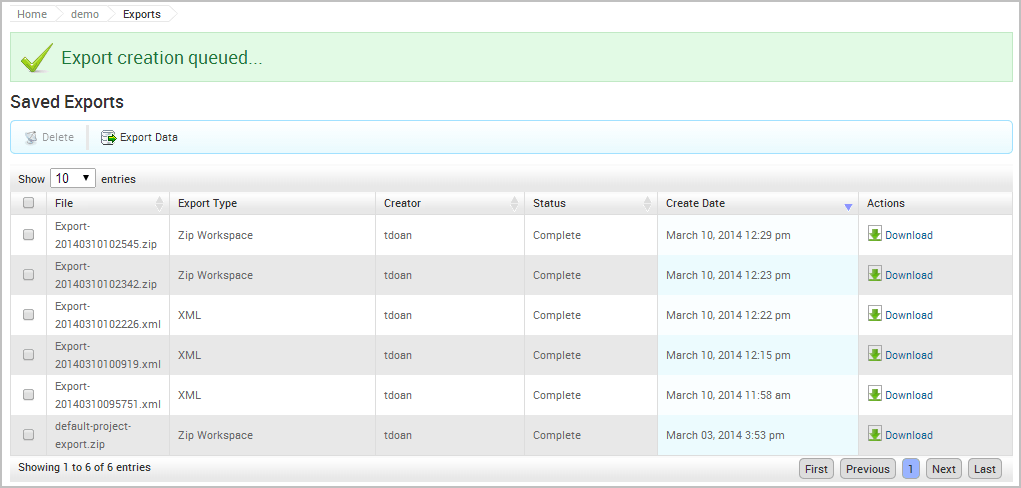
The ZIP file will listed be at the top of the Exports List. It will use the following naming convention: export-[current date and time]. If you do not see it at the top of the Exports List, click on the Create Date column name to sort the list by descending creation date.
If an error occurred during the export and the export was unable to complete, you can view the export log to identify and troubleshoot any errors that occurred. Replay Scripts A replay script is a batch file that reruns tasks that opened sessions on target hosts. You can export a replay script to automate successful attacks through the pro console or msfconsole. When you export a replay script, Metasploit Pro creates a resource file for each opened session and compresses them into a ZIP file.
Exporting Replay Scripts
- Open the project from which you want to export replay scripts.
- Select Exports > Export Data from the Project tab bar. The Export Data page appears.
- Choose Replay Scripts from the Export Format section.

- Use the Included addresses to explicitly define the hosts you want to include in the replay scripts. (Optional)
- Use the Excluded addresses to explicitly define the hosts you want to exclude from the replay scripts. (Optional)
- If you do not want to include credentials in the export, select the Mask credentials option from the Export Options section.
- Click the Export Data button.
When the export begins, you will be taken back to the Exports page. The Exports page displays an “Export creation queued” message.
The Notification Center icon will turn green and alert you when the export starts and completes. You can click on the Notification Center icon to view a list of system wide alerts. When the export completes, you can click on the notification message or you can select Exports > Show Exports from the Project tab bar to access the Exports area.
The ZIP file will listed be at the top of the Exports List. It will use the following naming convention: export-[current date and time]. If you do not see it at the top of the Exports List, click on the Create Date column name to sort the list by descending creation date.
If an error occurred during the export and the export was unable to complete, you can view the export log to identify and troubleshoot any errors that occurred.
Running the Replay Script with the Pro Console or MSFConsole
To run the replay script, you need to use the resource command to load and run the batch files through the pro console or msfconsole.The resource command needs to include the path to the replay script. For example, you can enter resource /path/to/session_ID_IP.rc to load the replay script and run the commands stored in the file.
msf > resource /path/to/session_ID_IP.rcBefore you can run the resource file, you will need to extract them from the ZIP file.
PWDumps A PWDump is a text file that contains all of the credentials for a project, including plaintext passwords, SMB hashes, and SSH keys. You can export a PWDump file to perform offline password cracking with a tool like John the Ripper.
Only credentials that have logins are exported in a PWDump. If a credential does not have a related login, it is not included in the exported file.
Exporting a PWDump
- Open the project from which you want to export data.
- Select Exports > Export Data from the Project tab bar. The Export Data page appears.
- Select PWDump from the Export Format section.

- Use the Included addresses to explicitly define the hosts you want to include in the export. (Optional)
- Use the Excluded addresses to explicitly define the hosts you want to exclude from the export. (Optional)
- Click the Export Data button.
When the export begins, you will be taken back to the Exports page.
The Notification Center icon will turn green and alert you when the export starts and completes. You can click on the Notification Center icon to view a list of system wide alerts. When the export completes, you can click on the notification message or you can select Exports > Show Exports from the Project tab bar to access the Exports area.
The PWDump will listed be at the top of the Exports List. It will use the following naming convention: export-[current date and time]. If you do not see it at the top of the Exports List, click on the Create Date column name to sort the list by descending creation date.
If an error occurred during the export and the export was unable to complete, you can view the export log to identify and troubleshoot any errors that occurred. Viewing Exported Data To see a list of exported data, select Exports > Show Exports from the Project tab bar. The Data Exports list will display all exports associated with the project. You can click on the Download or View link to access each item.