Importing Data
You can perform a data import to upload vulnerability scan data, query data from Project Sonar, or bring in data from other Metasploit projects. The import feature is useful if you have existing vulnerability data to validate or you have data that you want to share between projects. Importing Data from Vulnerability Scanners Metasploit allows you to import scan reports from third party vulnerability scanners, such as Nessus, Core Impact, and Qualys. When you import a scan report, host data, such as each host’s operating system, services, and discovered vulnerabilities, is imported into the project.
To import a scan report from a third party vulnerability scanner:
- From within a project, click the Overview or Analysis tab.
- Click the Import button located in the Quick Tasks bar.
- When the Import Data page appears, select the From file radial button.

- Click on the Choose button to open the File Upload window.

- When the File Upload window appears, browse to the location of the file you want to import, select it, and click the Open button.
- Configure any of the additional settings (optional):
- Excluded Addresses - Enter any hosts you do not want to include in the import. You can enter a single host, an IP range, or a CIDR notation. Each item must appear on a new line.
- Don’t change existing hosts - Select this option if you do not want to overwrite the data for a host that already exists in the project.
- Automatic tagging - Enter any tags you want to apply to the imported hosts. You can also select the Automatically tag by OS option to add an OS tag, such as
os_windows,os_linux, oros_unknowntag, to each imported host.
- Click the Import Data button to start the import.
The task log appears and shows you the status of the import. When the import completes, the task log displays a ‘Completed’ status. To see the imported data, select Analysis > Hosts to go to the Hosts page. Use the Updated column to sort the hosts by last updated to see all recently imported hosts.
Supported Third Party Scan Reports
Metasploit supports most of the major scanners on the market, including Rapid7’s own Nexpose, and other tools like Qualys and Core Impact. The following scan reports are supported:
- Foundstone Network Inventory XML
- Microsoft MBSA SecScan XML
- nCircle IP360 XMLv3 and ASPL
- NetSparker XML
- Nessus NBE
- Nessus XML v1 and v2
- Qualys Asset XML
- Qualys Scan XML
- Burp Sessions XML
- Burp Issues XML
- Acunetix XML
- AppScan XML
- Nmap XML
- Retina XML
- Amap Log
- Critical Watch VM XML
- IP Address List
- Libpcap Network Capture
- Spiceworks Inventory Summary CSV
- Core Impact XML
Metasploit Pro does not import service and port information from Qualys Asset files. If you import a Qualys Asset file, you must run a discovery scan to enumerate services and ports that are active on the imported hosts.
Importing Nexpose Data There are two ways to bring Nexpose data into Metasploit.
Integrating with existing Nexpose infrastructure
If you have a Nexpose vulnerability management infrastructure in place, the best option is integrating Nexpose Consoles directly with Metasploit.
- You’ll be able to launch new scans and import data from existing sites through the consoles.
- You can connect Metasploit to any number of Nexpose Consoles to query and import vulnerability reports without conducting a new scan.
- You don’t have to manually export or import any files.
- If you’re using Metasploit Pro, you also have the option to tag your imports. You can then filter or report by import. See Adding a Nexpose Console .
Manually Import Data
If you prefer to run scans directly from the Nexpose Console, you can import the scan results to share the results and validate them with Metasploit Pro. When you import data from Nexpose, Metasploit Pro automatically indexes the vulnerability data from Nexpose by using the service and vulnerability reference ID to map each vulnerability to a matching exploit. The mapped exploits helps you to easily launch attacks against the vulnerability and to quickly determine if the vulnerability is a real risk or a false positive.
You can either import a site directly from a Nexpose Console or you can import a Nexpose Simple XML or XML export file.
Importing a Nexpose Simple XML or XML Export File
- From within a project, click the Overview or Analysis tab.
- Click the Nexpose button located in the Quick Tasks bar.
- When the Import Data page appears, select the From file radial button.

- Click on the Choose file button to open the File Upload window.

- When the File Upload window appears, browse to the location of the file you want to import, select it, and click the Open button. Metasploit Pro supports the following Nexpose export types: XML Export, XML Export 2.0, and Nexpose Simple XML Export.
- Configure any of the additional settings (optional):
- Excluded Addresses - Enter any hosts you do not want to include in the import. You can enter a single host, an IP range, or a CIDR notation. Each item must appear on a new line.
- Don’t change existing hosts - Select this option if you do not want to overwrite the data for a host that already exists in the project.
- Automatic tagging - Enter any tags you want to apply to the imported hosts. You can also select the Automatically tag by OS option to add an OS tag, such as
os_windows,os_linux, oros_unknowntag, to each imported host.
- Click the Import Data button to start the import.
The task log appears and shows you the status of the import. When the import completes, the task log displays a ‘Completed’ status. To see the imported data, select Analysis > Hosts to go to the Hosts page. Use the Updated column to sort the hosts by last updated to see all recently imported hosts.
Importing Existing Nexpose Sites
- From within a project, click the Overview or Analysis tab.
- Click the Nexpose button located in the Quick Tasks bar.
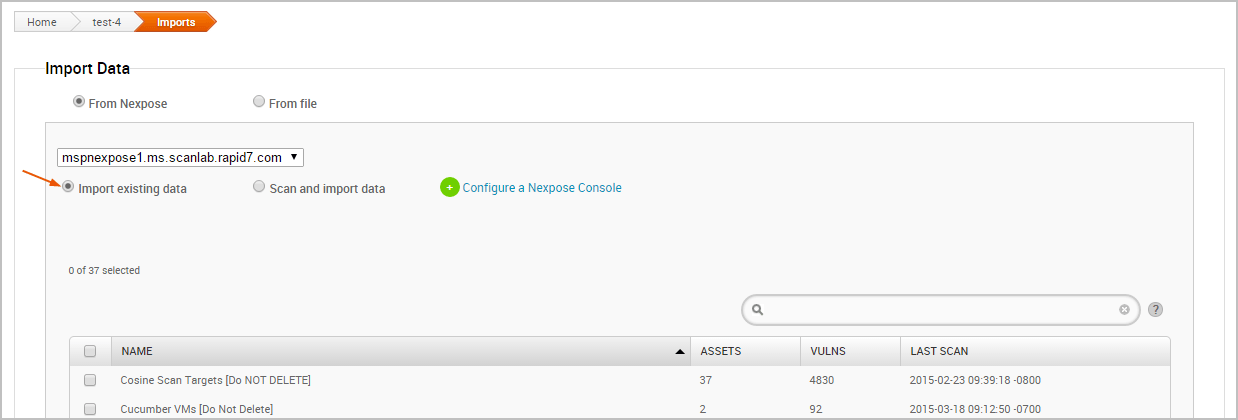
- When the Import Data page appears, select the From Nexpose radial button.

- Click the Choose a Nexpose Console dropdown and select the console from which you want to import data.

- Select the Import existing data option.

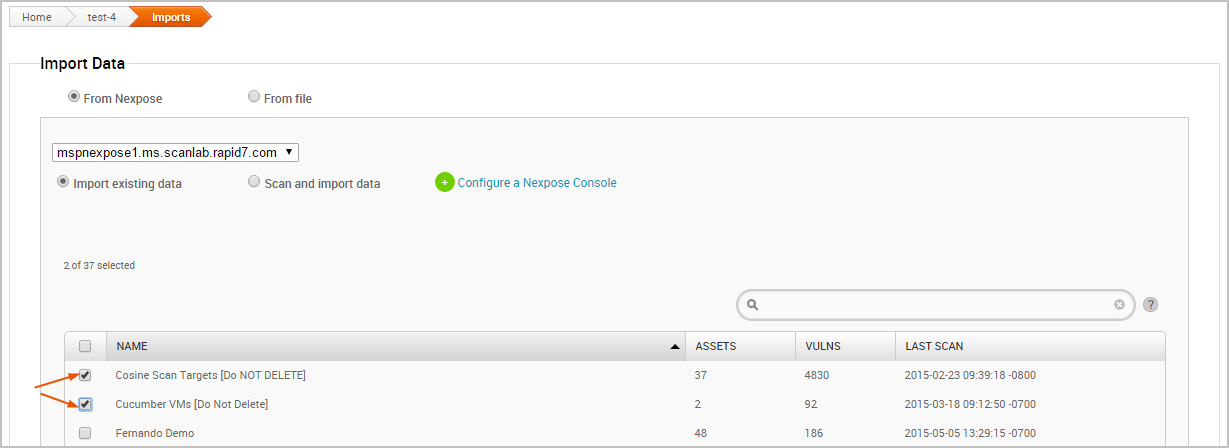
- Select the site(s) you want to import from the Sites table.

- Configure any of the additional settings (optional):
- Don’t change existing hosts - Select this option if you do not want to overwrite the data for a host that already exists in the project.
- Automatic tagging - Enter any tags you want to apply to the imported hosts. You can also select the Automatically tag by OS option to add an OS tag, such as
os_windows,os_linux, oros_unknowntag, to each imported host.
- Click the Import Data button to start the import.
The task log appears and shows you the status of the import. When the import completes, the task log displays a ‘Completed’ status. To see the imported data, select Analysis > Hosts to go to the Hosts page. Use the Updated column to sort the hosts by last updated to see all recently imported hosts. Importing Metasploit Projects Importing Nexpose
- Nexpose XML or XML 2.0
- Nexpose Raw XML or XML Export
Raw XML is only available in commercial editions of Nexpose and includes additional vulnerability information.