RPC API
The RPC API enables you to programmatically drive the Metasploit Framework and commercial products using HTTP-based remote procedure call (RPC) services. An RPC service is a collection of message types and remote methods that provide a structured way for external applications to interact with web applications. You can use the RPC interface to locally or remotely execute Metasploit commands to perform basic tasks like running modules, communicating with the database, interacting with sessions, exporting data, and generating reports.
The Metasploit products are written primarily in Ruby, which is the easiest way to use the remote API. However, in addition to Ruby, any language with support for HTTPS and MessagePack, such as Python, Java, and C, can be used to take advantage of the RPC API. Starting the RPC Server Before you can use the RPC interface, you must start the RPC server. There are a couple of ways that you can start the server depending on the Metasploit product you are using. Choose the appropriate method below.
Starting the RPC Server for Metasploit Pro
With a standard Metasploit Pro installation, the service is listening at 0.0.0.0:3790 with SSL. The SSL certificate is self-signed, however you can exchange it for a root-signed certificate as necessary.
If you are running a development environment, the service is listening at 127.0.0.1:50505 with SSL disabled.
Starting the RPC Server for the Metasploit Framework Using MSGRPC
If you are using the Metasploit Framework, you can load the msgrpc plugin to start the server. The msgrpc plugin provides a MessagePack interface that spawns a listener on a defined port and allows you to issue remote commands so you can facilitate interactions with Metasploit.
To use the msgrpc plugin, you need to launch msfconsole and run the msf > load msgrpc command.
If all goes well, you’ll see the following response, which tells you the IP address, username, and password you can use to connect to the msgrpc server:
[*] MSGRPC Service: 127.0.0.1:55552
[*] MSGRPC Username: msf
[*] MSGRPC Password: abc123
[*] Successfully loaded plugin: msgrpc
Since no options were specified, the default address (127.0.0.1), default port (55552), and random credentials were used. SSL is disabled by default. If you want to customize these settings, you can supply the following options with the load command to define the address, port, username, and password that can be used to connect to the server:
- ServerHost - The local hostname that the server listens on.
- ServerPort - The local port that the server listens on.
- User - The username to access the server.
- Pass - The password to access the server. The password must be enclosed in single quotes.
- SSL - Enables or disables SSL on the RPC socket. Set this value to true or false.
For example, if you want to connect to the server with user/pass123, you can enter the following command:
msf > load msgrpc ServerHost=192.168.1.0 ServerPort=55553 User=user Pass='pass123'
Which returns the following response:
[*] MSGRPC Service: 192.168.1.0:55553
[*] MSGRPC Username: user
[*] MSGRPC Password: pass123
[*] Successfully loaded plugin: msgrpc
Starting the RPC Server for the Metasploit Framework Using MSFRPCD
Another way to start the server is to use the msfrpcd tool, which enables the server to listen on a particular port and provide clients that connect to it with an RPC interface to the Metasploit Framework.
You’ll need to cd into your framework directory, if you’re a Framework user, or the metasploit/apps/pro/msf3 directory if you are a Pro user, and run the following command:
# ruby msfrpcd -U <username> -P <username> -f
You can supply the following arguments:
-a <opt>- The local hostname that the server listens on.-p <opt>- The local port that the server listens on.-U <opt>- The username to access the server.-P <opt>- The password to access the server.-S- Enables or disables SSL on the RPC socket. Set this value to true or false. SSL is on by default.-f- Runs the daemon in the foreground.
For example, if you want to connect to the local server with ‘user/pass123’, you can enter the following command:
# ruby msfrpcd -U user -P pass123
Which returns the following response:
[*] MSGRPC starting on 0.0.0.0:55553 (SSL):Msg...
[*] MSGRPC ready at 2015-06-04 10:32:08 -0700.
Connecting to the RPC Server Now that the RPC server is up and running, you can connect to it using either the msfrpc-client gem or the msfrpc utility, depending on how you set up your server.
Connecting with the MSFRPC Login Utility
The msfrpc login utility enables you to connect to RPC server through msfrpcd. If you started the server using the msfrpcd tool, cd into your framework directory, if you’re a Framework user, or the metasploit/apps/pro/msf3 directory if you are a Pro user, and run the following command to connect to the server:
# ruby msfrpc -U <username> -P <pass> -a <ip address>You can provide the following options:
-P <opt>- The password to access msfrpcd.-S- Enables or disables SSL on the RPC socket. Set this value to true or false. SSL is on by default.-U <opt>- The username to access msfrpcd.-a <opt>- The address msfrpcd runs on.-p <opt>- The port the msfrpc listens on. The default port is 55553.
For example, if you want to connect to the local server, you can enter the following command:
# ruby msfrpc -U user -P pass123 -a 0.0.0.0Which returns the following response:
[*] exec: ruby msfrpc -U user -P pass123 -a 0.0.0.0

[*] The 'rpc' object holds the RPC client interface
[*] Use rpc.call('group.command') to make RPC calls
Connecting with the Metasploit RPC Client Gem If you do not have Metasploit Pro or the Metasploit Framework installed on your client machine, you can use the Metasploit RPC client gem to connect to the RPC server. The gem provides a client to access the Metasploit Pro RPC service and depends on librex and MessagePack.
In order to install the msfrpc-client gem, the client must be running Ruby 2.0+.
The first thing you need to do is install librex. Due to the size of the librex documentation, it is suggested that you install librex separately first without the built-in documentation using the following command:
# gem install librex --no-rdoc --no-riIf the gem is installed successfully, you’ll see the following:
Successfully installed librex-0.0.999
1 gem installed
After you install librex, you are ready to install the msfrpc-client gem. To install the gem, run the following command:
# gem install msfrpc-clientIf the gem is installed successfully, you’ll see the following:
Successfully installed msfrpc-client-1.0.3
Parsing documentation for msfrpc-client-1.0.3
Done installing documentation for msfrpc-client after 5 seconds
1 gem installed
After the gem has been installed, the msfrpc-client library becomes available. Two example files, msfrpc_irb.rb and msfrpc_pro_report.rb, are installed along with the gem. The following commands can be used view the examples:
# cd `gem env gemdir`/gems/msfrpc-client-*/examples
# ls
msfrpc_irb.rb msfrpc_pro_report.rb
The msfrpc_irb.rb script is a good starting point for using the API. This script, along with msfrpc_pro_report.rb, uses a standard option parsing mechanism exposed by the Ruby gem, which allows for you to connect to the RPC service.
For a standard Metasploit Pro installation, the only options you need to specify are the host and either a username and password or an authentication token. The example below authenticates to the local Metasploit Pro instance using the user account you set up for the RPC server:
# ruby ./msfrpc_irb.rb --rpc-user user --rpc-pass pass123
[*] The RPC client is available in variable 'rpc'
[*] Successfully authenticated to the server
[*] Starting IRB shell...
>>
You can provide the following command line options to configure the RPC destination. To view the options, run msfrpc_irb.rb with the --rpc-help option, as shown below:
# ./msfrpc_irb.rb --rpc-help

Usage: ./msfrpc_irb.rb [options]

RPC Options:
--rpc-host HOST
--rpc-port PORT
--rpc-ssl <Table.True|false>
--rpc-uri URI
--rpc-user USERNAME
--rpc-pass PASSWORD
--rpc-token TOKEN
--rpc-config CONFIG-FILE
--rpc-help
The username and password options can either correspond to the credentials you set up for the server through the msgrpc plugin or a Metasploit Pro user account. As an alternative to a Metasploit Pro account, you can use an authentication token instead.
Generating an API Token
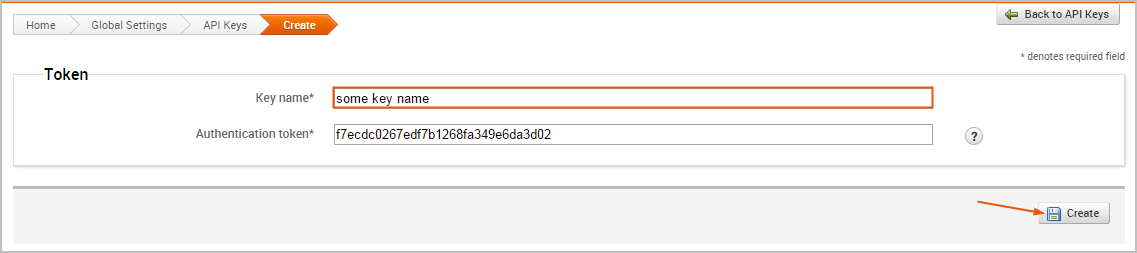
To generate an API key, you can log in to the Metasploit Pro web interface (https://localhost:3790 ) and select Administration > Global Settings. When the Global Settings page appears, click on the API Keys tab and then click the Create an API key button. The form will require that you provide a key name for the API token. After you provide a name, click the Create button to generate the token.
An important consideration with the msfrpc-client library is that the authentication token is automatically passed into each method call for you, so when calling an API function such as “core.version”, you do not need to specify the token as the first parameter. For example, the following code works as expected:
>> rpc.call("core.version")
=> {"version"=>"4.0.0-release", "ruby"=>"1.9.2 x86_64-linux 2010-04-28", "api"=>"1.0"}
Connecting with a YAML File
Instead of manually inputting the configuration settings each time you connect to the RPC service, you can store the configuration settings in a YAML file. The YAML file maps the command line options to the appropriate values and enables you to point to the file using the --rpc-config option.
The configuration file must contain the following content:
options:
host: server
port: 3790
user: username
pass: password
token: token
ssl: true
uri: /api/1.0
The following is an example of a YAML file:
options:
host: 0.0.0.0
port: 3790
user: user
pass: pass123
token: 1234567890
ssl: true
uri: /api/1.0
For example, to point to the YAML file, you can enter something like:
# ruby ./msfrpc_irb.rb --rpc-config ./sample.ymlConnecting with the Process Environment
You can also use the process environment to set these options. The environment is only considered if the command line options are not specified.
The corresponding environment variable names are:
- MSFRPC_HOST
- MSFRPC_PORT
- MSFRPC_USER
- MSFRPC_PASS
- MSFRPC_TOKEN
- MSFRPC_SSL
- MSFRPC_URI
- MSFRPC_CONFIG Calling an API To call an API, run:
rpc.call("pro.about")In the example, pro is name of the handler and about is the method name.
Framework Handlers
Handlers include ‘core’, ‘auth’, ‘console’, ‘module’, ‘session’, ‘plugin’, ‘job’, and ‘db’.
To view the APIs available in the Metasploit Framework, go here .
To see where the Framework handlers are registered, go here .
Pro Handlers
Handlers include ‘pro’.
To view the APIs available in Metasploit Pro, go to the following directory: /path/to/metasploit/pro/engine/rpc.
To see where Pro handlers are registered, go to the following file, /path/to/metasploit/apps/pro/vendor/bundle/ruby/2.3.0/gems/metasploit-framework-<version>/lib/msf/core/services.rb, and find line 50.
Setting up a Client to Make an API Call
The following example shows how you can set up a client to make an API call:
# Set up client

require_relative 'metasploit_rpc_client'
client = MetasploitRPCClient.new(host:host, token:api_token, ssl:false, port:50505)
Authentication Access to the Metasploit API is controlled through authentication tokens. An authentication is typically a randomly generated 32-byte string, but may be created ad-hoc as well. These tokens come in two forms; temporary and permanent.
A temporary token is returned by the API call auth.login, which consults an internal list of valid usernames and passwords. If a correct username and password is supplied, a token is returned that is valid for 5 minutes. This token is automatically extended every time it is used to access an API method. If the token is not used for 5 minutes, another call to auth.login must be made to obtain a new token.
A permanent token acts as an API key that does not expire. Permanent tokens are stored in the database backend (api_keys table) when a database is available and in memory otherwise. There are two ways to create a new permanent token through the API. The first method is to authenticate using a valid login, then using the temporary token to call the auth.token_generate method. This will create a permanent token either in the database backend or in-memory, depending on the whether a database is present.
The Metasploit Framework RPC server requires a username and password to be specified. This username and password combination can be used with the auth.login API to obtain a temporary token that will grant access to the rest of the API.
Metasploit Pro, by contrast, generates a permanent authentication token on startup and store this token in a file named <install>/apps/pro/engine/tmp/service.key. The Metasploit Pro interface provides the ability to manage permanent authentication tokens through the web interface.
The sequence below demonstrates the use of the auth.login API to obtain a token and the subsequent use of this token to call the core.version API.
Client:
["auth.login", "username", "password"]Server:
{ "result" => "success", "token" => "a1a1a1a1a1a1a1a1" }Client:
["core.version", "a1a1a1a1a1a1a1a1"]Server:
{
"version" => "4.0.0-release",
"ruby" => "1.9.1 x86_64-linux 2010-01-10"
}
Making a Request Client requests are encapsulated in a standard HTTP POST to a specific URI, typically “/api” or “/api/1.0”. This POST request must have the Content-Type header specified as “binary/message-pack”, with the body of the request containing actual RPC message.
A sample request is shown below:
POST /api/1.0 HTTP/1.1
Host: RPC Server
Content-Length: 128
Content-Type: binary/message-pack
<128 bytes of encoded data>
Understanding Server Responses Server responses are standard HTTP replies. The HTTP status code indicates the overall result of a particular request. The meaning of each status code is listed below:
- 200 - The request was successfully processed
- 500 - The request resulted in an error
- 401 - The authentication credentials supplied were not valid
- 403 - The authentication credentials supplied were not granted access to the resource
- 404 - The request was sent to an invalid URI
In all circumstances except for a 404 result, the detailed response will be included in the message body.
The response content-type will always be “binary/message-pack” with the exception of the 404 response format, in which case the body may contain a HTML document.
A sample response is shown below
HTTP/1.1 200 OK
Content-Length: 1024
Content-Type: binary/message-pack
<1024 bytes of encoded data>
Encoding Requests and Responses All requests and responses use the MessagePack encoding (http://www.msgpack.org/ ). This encoding provides an efficient, binary-safe way to transfer nested data types. MessagePack provides implementations for many different languages, all under the Apache open source license.
The MessagePack specification is limited to a small set of data types. For this reason, non-native types, such as dates, are represented as integers or strings. Since MessagePack treats strings as binary character arrays, special care needs to be taken when using this encoding with Unicode-friendly languages. For example, in Java, strings used in requests and decoded from responses should always use the byte arrays type.
An example of a MessagePack encoded array is shown below:
["ABC", 1, 2, 3].to_msgpack()
"\x94\xA3\x41\x42\x43\x01\x02\x03"Encoding Requests
Requests are formatted as MessagePack encoded arrays. The specific form is ["MethodName", "Parameter1", "Parameter2", … ].
With the exception of the authentication API, all methods expect an authentication token as the second element of the request array, with the rest of the parameters defined by the specific method. Although most methods use strings and integers for parameters, nested arrays and hashes may be supplied as well. Methods that accept a list of items as input typically expect these as a single parameter consisting of an array of elements and not a separate parameter for each element. Some methods may accept a parameter consisting of a hash that contains specific options.
A call to an authentication method may take the following form:
["auth.login", "username", "password"]A call to a version method may take the following form:
["core.version", "<token>"]A call to a more complex method may take the following form:
["modules.search", "<token>", {
"include" => ["exploits", "payloads"],
"keywords" => ["windows"],
"maximum" => 200
} ]
Encoding Responses Responses use the same MessagePack encoding as requests and are always returned in the form of a hash, also known as a dictionary. If this hash contains an “error” element with the value of true, additional information about the error will be present in the hash fields, otherwise, the hash will contain the results of the API call.
A sample successful response is shown below:
{
"version" => "4.0.0-release",
"ruby" => "1.9.1 x86_64-linux 2010-01-10"
}
A sample error response is shown below:
{
"error" => true,
"error_class" => "ArgumentError",
"error_message" => "Unknown API Call"
}
A sample successful response with nested data is shown below:
{
"name" => "Microsoft Server Service Stack Corruption",
"description" => "This module exploits a parsing flaw…",
"license" => "Metasploit Framework License (BSD)",
"filepath" => "/modules/exploits/windows/smb/ms08_067_netapi.rb",
"version" => "12540",
"rank" => 500,
"references" =>
[
["CVE", "2008-4250"],
["OSVDB", "49243"],
["MSB", "MS08-067"]
],
"authors" =>
[
"hdm <hdm@metasploit.com>",
"Brett Moore <brett.moore@insomniasec.com>",
],
"targets" =>
{
0 => "Automatic Targeting",
1 => "Windows 2000 Universal",
2 => "Windows XP SP0/SP1 Universal",
3 => "Windows XP SP2 English (NX)",
4 => "Windows XP SP3 English (NX)"
}
"default_target" => 0
Versioning API Endpoints
The last parameter in the API URL is the requested version number. To prepare your code for future versions it is recommended that you append /1.0 or whatever version of this API you have tested against. A request for the bare API URL without a version number will result in the latest version of the API being used to handle the request. For example, the request below will request that version 1.1 of the API should be used.
POST /api/1.1 HTTP/1.1
Host: RPC Server
Content-Length: 128
Content-Type: binary/message-pack
<128 bytes of encoded data>