About Task Chains
Task chains enable you to automate and schedule the execution of a series of preconfigured tasks. They are useful for automating repetitive tasks that you need to perform regularly, such as scans and bruteforce attacks.
A task chain comprises of a sequence of predefined tasks that you can schedule to run on a recurring basis or save to run on demand. It defines the tasks that will run, the settings for each task, and the conditions required for the execution of those tasks. You create a task chain by adding the tasks you want to it, configuring the settings you want the tasks to use, arranging the tasks in the order you want them to run, and defining the schedule that it should follow.
Task chains are particularly useful if you want to run a sequence of tasks, but do not want to wait for each task to finish before you can run the next task. For example, if you routinely scan and bruteforce a set of targets hosts, you can string the tasks together so that they run sequentially at a specified time and date. Task Chain UI Tour Task chains tasks are separated into two different areas:
- Task chains list - Displays all the task chains that are stored in the project. From this list, you can bulk manage task chains, view the current status for a task chain, view the contents of the task chain, and identify when a task chain will run next.
- Task chain configuration page - Displays the contents of a task chain. From this page, you can add, configure, and rearrange tasks, and you can create the schedule for the task chain.
Task Chains List
To access the Task Chains list, select Tasks > Chains. The list displays all the task chains that are available in the project.
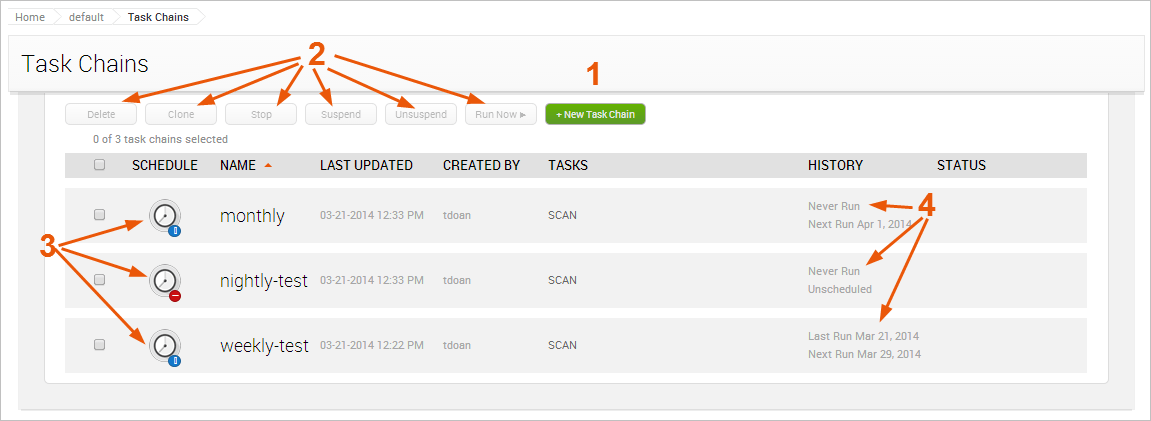
- New Task Chain button - Opens the New Task Chain configuration page.
- Task chain bulk management buttons - Bulk manages task chains. You can do things like delete, clone, suspend, and run multiple task chains at once.
- Task chains list - Lists all of the task chains that have been created for the project.
Each task chain will have one of the following schedule icons:
- Recurring Schedule - Indicates that the task chain repeatedly runs at a specified time and day.
- Single Schedule - Indicates that the task chain is scheduled to run once at a specified time and date.
- Not Scheduled - Indicates that the task chain does not follow a schedule.
- Suspended - Indicates that the task chain is inactive.
- Task chain status - Displays one of the following statuses for each task chain:
- Never run - The task chain has never run.
- Running - The task chain is currently running.
- Last run - The task chain last ran successfully at the specified date.
- Failed - The task chain was unable to finish successfully. If the task chain failed, it will display a link that you can click on to open the Task log and view the errors that occurred.
Task Chain Configuration Page
You access the task chain configuration page to create a new task chain or to modify an existing task chain.
To access the task chain configuration page, select Tasks > Chains from the Project tab bar. When the task chains list appears, click the New Task Chain button.

- Task Chain Name field - Displays an editable field for the task chain name. You can click on the field at any time to edit its name.
- Schedule status - Indicates whether or not a schedule has been created for the task chain. It displays one of the following statuses:
- Scheduled - Indicates that a schedule has been created for the task chain.
- Unscheduled - Indicates that a schedule has not been created for the task chain.
When unscheduled, the Schedule Now link appears in the same place as the Schedule status. See Scheduling Task Chains for details.
- Schedule Now link - Opens the Task Chain Scheduler, which enables you to schedule and suspend task chains. Additionally, you can enable the option to clear project data before the task chain runs.
- Save and Run Now button - Saves the current task chain configuration and immediately runs the task chain.
- Save button - Saves the current task chain configuration. The task chain will be available for you to run on demand or it will run according to the schedule that you have created for it.
- Delete task - Removes the selected task from the task chain.
- Clone task - Duplicates the selected task and adds it to the end of the task chain.
- Reset task configuration - Clears all tasks from the task chain.
- Task bubble - Represents a task. You can click on a task bubble to open the task configuration form. The selected task bubble will be highlighted in blue. Any task highlighted in red indicates that the task has not been configured correctly and the task chain cannot be saved. You can click on the task to fix the issues on the task form. You can also click and drag the task bubble to move the task to a new position in the task chain.
- Add Task button - Displays the task list and enables you to select the task that you want to add to the task chain.
- Task configuration form - Displays the options that you can configure for the task that is selected. Options will vary depending on the task that is selected. Supported Tasks Task chains can be used to execute the following tasks:
- Discovery scan - Enumerate and fingerprint hosts on a target network.
- Import - Bring in data from supported third-party scanners, such as Nexpose and Nessus.
- Vulnerability scan - Scan a target network with Nexpose to find vulnerabilities on a target network.
- Web scan - Scan web forms and applications to find and exploit active content and forms.
- Bruteforce - Systematically attempt various combination of letters, numbers, and characters to crack credentials.
- Auto-exploitation - Automatically build an attack play by cross-referencing open ports, imported vulnerabilities, and fingerprint information to exploit modules.
- Single module run - Launch a module to perform targeted attacks against hosts or to gather additional data about hosts. You can add multiple modules to a task chain.
- MetaModule run - Launch one of the following MetaModules: the Single Password Testing MetaModule, the Known Credentials MetaModule, the SSH Key Testing MetaModule, the Pass the Hash MetaModule, the Firewall Egress Testing MetaModule, or the Passive Network Discovery MetaModule.
- Evidence collection - Collect evidence, such as screenshots, password hashes, and system files, from compromised hosts.
- Resource script execution - Automate and run resource scripts to leverage the full capabilities of Metasploit Framework and Ruby.
- Session clean up - Close any open sessions on compromised hosts.
- Report generation - Create a report to document findings and share test results.