Office365
If your organization uses Outlook via Microsoft Office365 to manage email, you can use the Office365 plugin to access Outlook mailboxes. Use this plugin to monitor incoming messages to find suspicious email, trigger other actions, forward email for further analysis, and many other email actions. Find the full list of available triggers or actions in the plugin documentation.
When setting up an Office 365 connection for the first time, you must register a new application in Microsoft Azure Active Directory.
New Azure Experience
If you are using Azure after November 2018, you may have access to two App Registration experiences. The instructions below are split into notes on the legacy experience and the new “Preview” experience. Please read carefully to make sure the instructions match the experience you are using.
Collect Configuration Information
Before you configure an Office365 connection, you will need to collect these parameters from the Microsoft Azure Active Directory:
- Directory ID
- Application ID
- Secret Key
We recommend copying and pasting these values into a temporary document while you collect them, as you will need to enter them into Automation (InsightConnect) later.
To find parameter information in the Azure Portal:
- Log into your Azure Portal at https://portal.azure.com .
- In the side navigation of the Azure Portal, click Azure Active Directory, then Properties in the secondary navigation menu.
- Copy and save the Directory ID on the Properties page.
- In the secondary navigation menu, click App Registrations, then + New Application Registration. If you are using Microsoft Azure’s new App Registrations experience, this button may be called + New Registration.
- Complete the form with
Automation (InsightConnect)for the name, “Web app/API” for the application type, andhttps://login.microsoftonline.comfor the sign-on URL. Then click Create. - Save the application registration to Azure, then copy and save the Application ID.
- Click Settings for the newly registered application, then click Keys in the menu that appears. If you are using Microsoft Azure’s new App Registrations experience, this tab may be called Certificates & Secrets instead.
- Create a new key using the steps below.
Create a New Key
Azure uses asymmetric keys to authenticate and secure communications with other applications. You will need to create a new key in Azure to use for configuring Automation (InsightConnect) connections.
To create a new key in the legacy Azure experience:
- Navigate to the “Keys” page in the Azure Portal using the steps in the Collect Configuration Information section.
- In the “Passwords” section, enter a key description or name for the key you will create. You can name the key “Automation (InsightConnect)” or follow any naming schemes you use.
- Choose a duration for the life of the key. It will expire when the duration you set ends. Then click Save at the top of the page.
- Azure will generate a value for your new key. Copy and save this string now, as you will not be able to retrieve it after you leave this page in the Azure Portal.
To create a new key in the new Azure experience (11/2018-onward):
- Navigate to the “Certificates & Secrets” page in the Azure Portal using the steps in (doc:office365#collect-configuration-information-in-azure).
- In the “Client Secrets” section, click + New Client Secret to create a new key.
- Give the key a description — this also serves as your key’s name.
- Choose a duration for the life of the key. It will expire when the duration you set ends. Then click Add.
- Azure will generate a value for your new key. Copy and save this string now, as you will not be able to retrieve it after you leave this page in the Azure Portal.
Secret Key
The secret key will only be displayed once! Make sure to copy and paste it now and keep it with the Directory ID and Application ID you gathered earlier. You will need all of these to configure Office365 in Automation (InsightConnect).
Configure Application Permissions
After registering Automation (InsightConnect) in Azure, you will need to configure every permission needed for Office365 to successfully provide data to Automation (InsightConnect). You won’t need all the permissions available in Azure for accessing Outlook.
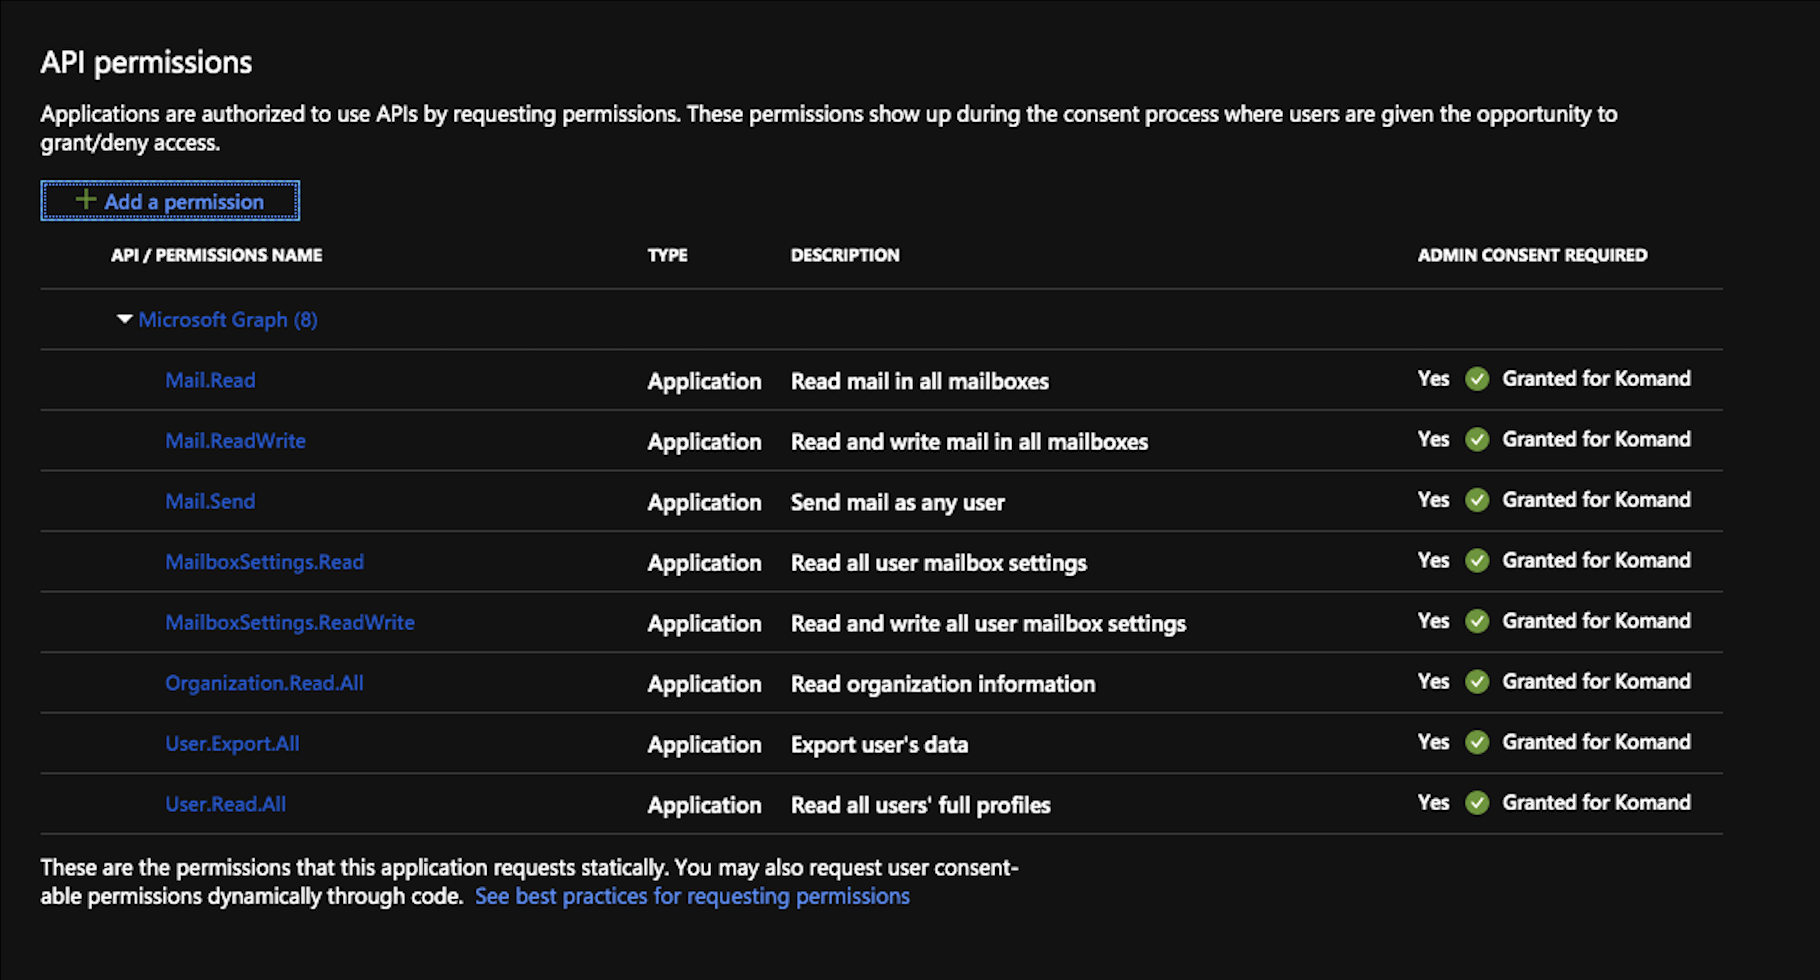
The permissions needed to monitor and send email are:
- Read and write user mailbox settings
- Read User mailbox settings
- Read user mail
- Read and write access to user mail
- Send Mail as a user
- Read and write mail in all mailboxes
- Read all user mailbox settings
- Read Mail in all mailboxes
- Read and Write all user
You may also see these settings in a format like
Mail.ReadorMail.ReadWrite. Make sure to select all permissions matching the list above.
To configure application permissions in the legacy Azure experience:
- Click on Required Permissions in the Settings panel for your app registration.
- Click + Add at the top of the page.
- Click Select an API, then Microsoft Graph. Click Select to continue.
- Select any and all permissions that you need to provision to Automation (InsightConnect) in order to use the Office365 plugin actions. You should have the permissions above selected.
- Click Select and then Done once you are satisfied with your permissions.
- You should now be back on the “Required Permissions” page. Click Grant Permissions at the top of the page, then Yes.
- When the success notification appears in the top right, Office365 is ready for use with Automation (InsightConnect).
To configure application permissions in the new Azure experience (11/2018-onward):
- Click on the API Permissions tab for your app registration.
- Click + Add a Permission.
- Choose Microsoft Graph. It will most likely be the first and largest button on the “Select an API” page.
- Click Application Permissions.
- Select any and all permissions that you need to provision to Automation (InsightConnect) in order to use the Office365 plugin actions. You will most likely need to select permissions from the “Directory,” “MailboxSettings,” “Mail,” and “User” categories, so thoroughly check that the permissions you grant to Automation (InsightConnect) correspond to the plugin actions listed in the Overview of Office365 plugin documentation. You should have the permissions above selected.
- When the “Admin Consent Required” column for Microsoft Graph says “Granted for test,” Office365 is ready for use with Automation (InsightConnect). Contact Microsoft support if you have issues with admin consent.
Conflicting Permissions
If you’re still having trouble getting Office 365 set up, make sure you do not have Mail.ReadBasic or Mail.ReadBasic.All set in your application permissions. These will override some of the other permissions and prevent the plugin from getting attachments or reading from mail subfolders.
Configure a New Office365 Connection in Automation (InsightConnect)
After you collect the information above in your Azure Portal, you can configure connections to Office365 in Automation (InsightConnect). Configure the connection name, where it should run, and credentials as you normally would.
To configure the parameters for an Office365 connection:
- Collect all parameter information you obtained from the Azure Portal.
- Choose a credential to use with Office365. The first time you create a credential for Office365, you will be prompted to name the credential and add a Secret Key. Paste the Azure Private Key Value here. Otherwise, if you choose an existing credential, the Secret Key field will automatically populate with the information from that credential.
- Paste your Directory ID into the “Tenant ID” field.
- Paste your App ID into the “App ID” field.
- Click Continue to configure the rest of the workflow trigger or step.
- Automation (InsightConnect) will automatically run a test for the connection. Learn more here.
Troubleshoot the Office365 Plugin
If you are having problems configuring your Office365 plugin, find solutions to common problems here.
Office365 will not authorize
If your Office365 plugin fails to authorize, check the plugin’s error logs. If you see anything like the following, you did not receive an authorization token after configuring an Office365 connection.
Updating auth token…
Auth request: <Response [400]>
{"error":"invalid_request","error_description":" …
It is likely that the connection settings are invalid. Verify that the App ID, Tenant ID, and Secret Key are correct in your Office365 connections.
Office365 trigger does not work
If a correctly configured Office365 trigger fails to run a workflow when you know it should, it is likely that the permissions in Office365 are incorrect. Verify that your application has the Mail.Read and Mail.ReadWrite permissions selected in Azure Active Directory. Also, verify that the administrator of your tenant consented to the correct application permissions. More information can be found at these Microsoft resources:
https://docs.microsoft.com/en-us/graph/auth-v2-service
https://docs.microsoft.com/en-us/graph/permissions-reference
Known Limitations
A maximum of 10 items per mailbox can be removed at one time. Because the capability to search for and remove messages is intended to be an incident-response tool, this limit helps ensure that messages are quickly removed from mailboxes.
The maximum number of mailboxes in a Content Search that you can delete items in by doing a search and purge action is 50,000. If the Content Search has more than 50,000 source mailboxes, the delete action will fail. Visit https://docs.microsoft.com/en-us/office365/securitycompliance/search-for-and-delete-messages-in-your-organization for more information.