Configuring custom scan templates
To begin modifying a default template go to the Administration page, and click the Scans > Templates.
You cannot directly edit a built-in template. Instead, make a copy of the template and edit that copy. When you click Copy for any default template listed on the page, the console displays the Scan Template Configuration panel.
To create a custom scan template from scratch, go to the Administration page, and click Manage scan templates for Scan Templates.
The PCI-related scanning and reporting templates are packaged with the application, but they require purchase of a license in order to be visible and available for use. The FDCC template is only available with a license that enables FDCC policy scanning.
The console displays the Scan Template Configuration panel. All attribute fields are blank.
Fine-tuning: What can you turn up or down?
Configuring templates to fine-tune scan performance involves trial and error and may include unexpected results at first. You can prevent some of these by knowing your network topology, your asset inventory, and your organization’s schedule and business practices. And always keep the triangle in mind. For example, don’t increase simultaneous scan tasks dramatically if you know that backup operations are in progress. The usage spike might impact bandwidth.
Familiarize yourself with built-in scan templates and how they work before changing any settings or customizing templates from scratch. See Scan templates.
Default and customized credential checking
Many products provide default login user IDs and passwords upon installation. Oracle ships with over 160 default user IDs. Windows users may not disable the guest account in their system. If you don’t disable the default account vulnerability check type when creating a scan template, the application can perform checks for these items. See Configuration steps for vulnerability check settings for information on enabling and disabling vulnerability check types.
The application performs checks against databases, applications, operating systems, and network hardware using the following protocols:
- CVS
- Sybase
- AS/400
- DB2
- SSH
- Oracle
- Telnet
- CIFS (Windows File Sharing)
- FTP
- POP
- HTTP
- SNMP
- SQL/Server
- SMTP
To specify users IDs and passwords for logon, you must enter appropriate credentials during site configuration See Configuring scan credentials. If a specific asset is not chosen to restrict credential attempts then the application will attempt to use these credentials on all assets. If a specific service is not selected then it will attempt to use the supplied credentials to access all services.
Starting a new custom scan template
If you are creating a new scan template from scratch, start with the following steps:
- On the Administration page, click Scans > Templates. OR If you are in the Browse Scan Templates window for a site configuration, click Create.
- On the Scan Template Configuration—General page, enter a name and description for the new template.
- Configure any other template settings as desired. When you have finished configuring the scan template, click Save.
Selecting the type of scanning you want to do
You can configure your template to include all available types of scanning, or you can limit the scope of the scan to focus resources on specific security needs. To select the type of scanning you want to do, take the following steps.
- Go to the Scan Template Configuration—General page.
- Select one or more of the following options:
- Asset Discovery—Asset discovery occurs with every scan, so this option is always selected. If you select only Asset Discovery, the template will not include any vulnerability or policy checks. By default, all other options are selected, so you need to clear the other option check boxes to select asset discovery only.
- Vulnerabilities—Select this option if you want the scan to include vulnerability checks. To select or exclude specific checks, click the Vulnerability Checks link in the left navigation pane of the configuration panel. See Configuration steps for vulnerability check settings.
- Policies—Select this option if you want the scan to include policy checks, including Policy Manager. You will need to select individual checks and configure other settings, depending on the policy. See Selecting Policy Manager checks, Configuring verification of standard policies, and Performing configuration assessment.
- Configure any other template settings as desired. When you have finished configuring the scan template, click Save.
Tuning performance with simultaneous scan tasks
You may want to improve scan performance by tuning the number of scan processes or tasks that occur simultaneously.
Increasing the number of simultaneous scan processes against a host with an excessive number of ports can reduce scan time. In “tar pits,” or scan environments with targets that have a very high number of ports open, such as 60,000 or more, scanning multiple hosts simultaneously can help the scan complete more quickly without timing out.
In another example, when your scan template allows for multiple scan processes to run on a single asset, performance improves for protocol fingerprinting and certain vulnerability checks, meaning that the scan can complete more quickly.
If protocol fingerprinting exceeds one hour, it will stop and be reported as a timeout in the scan log.
You can configure these settings in your scan template:
- scanning multiple hosts simultaneously
- running multiple scan processes on an asset
To access these settings, click the General tab of the Scan Template Configuration panel. The settings appear at the bottom of the General page. To change the value for either default setting, enter a different value in the respective text box.
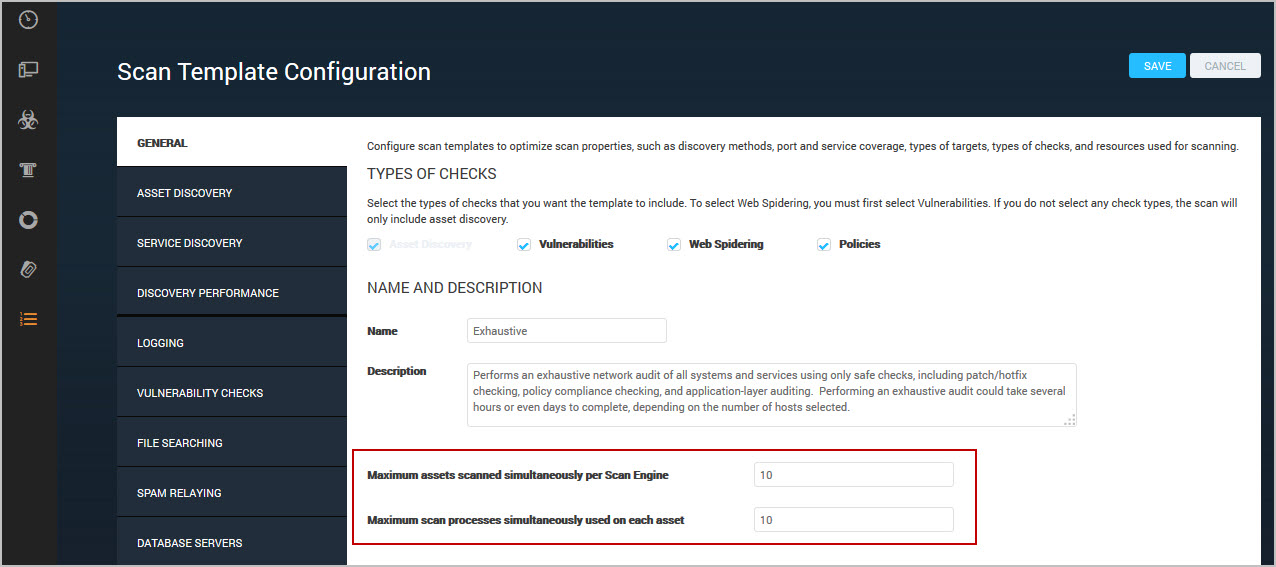
For built-in scan templates, the default values depend on the scan template. For example, in the Discovery Scan - Aggressive template, the default number of hosts to scan simultaneously per Scan Engine is 25. This setting is higher than most built-in templates, because it is designed for higher-speed networks.
You can optimize scan performance by configuring the number of simultaneous scan processes against each host to match the average number of ports open per host in your environment.
You can optimize scan performance even more, but with less efficient use of Scan Engine resources, by setting the number of simultaneous scan processes against each host to match the highest number of ports open on any host in your environment.
Resource considerations
Scanning high numbers of assets simultaneously can be memory intensive. You can consider lowering them if you are encountering short-term memory issues. As a general rule, keep the setting for simultaneous host scanning to within 10 per 4 GB memory on the Scan Engine.
Certain scan operations, such as policy scanning, consumes more memory per host. If such operations are enabled, you may need to reduce the number of hosts being scanned in parallel to compensate.