Custom Policy Builder
The Custom Policy Builder allows you to create, edit, and customize policy checks beyond the standard benchmarks to meet your organization’s specific needs. The Custom Policy Builder also increases your visibility into policy and policy test details.
Information pertains primarily to engine-based assessments
At this time, the Custom Policy Builder page focuses on uploading and editing custom policies for assessments using the Scan Engine. Though it is focused primarily on engine-based assessments much of the information still applies to agent-based assessments.
Benefits
With the Custom Policy Builder you can:
- Customize rule types, operators, and expected values to meet your organization’s needs
- Enable or disable rules to better align with your organization’s goals
- Modify an existing policy for use on a newer OS before an official benchmark is available from CIS or DISA
Requirements
Before starting, confirm that you meet system requirements and are an Vulnerability Management (InsightVM) user whose console is connected to the Insight platform.
Acceptable file naming convention for the Custom Policy Builder
The following naming formats are acceptable when creating files for policy editor uploads:
XCCDF(singletonList(compile(".*-xccdf.*\\.xml"))),CPE_DICT(singletonList(compile(".*-cpe-dict.*\\.xml"))),OVAL(asList(compile(".*-oval.*\\.xml"), compile(".*-patch.*\\.xml"))),This intentionally covers cpe-oval.-patchare PATCH type oval definitions.DATASTREAM(singletonList(compile(".*-datastream.*\\.xml"))),
Edit existing policies
You can access the Custom Policy Builder through the Security Console.
- In the navigation menu, click Policies > Scan Engine Policy.
- Select the check box of the policy you want to modify.
- Click the Copy Policy button. You will be redirected to the Custom Policy Builder after doing so.
- After the Custom Policy Builder launches, you will be taken to the policy’s details page. You can edit the policy’s details by clicking the pencil icon. Editable information includes:
- Policy name
- Version
- Platform
- Description
- Rules
- Save your edits.
Delete, disable, and enable policy rules
- In the policy listing table, click the name of the policy you want to edit.
- Select the check box for the policy rules you want to edit.
- Click Actions and then select the action you want to apply to your chosen policy rules. A dropdown menu displays the following options:
- Delete Rules - Removes the rule from the policy permanently
- Disable Rules - Disables the rule during scanning but leaves it in the policy. It will be shown as Skipped in the Custom Policy Builder.
- Enable Rules - Enables a rule during scanning that was previously disabled
- Save your edits.
Add a custom policy to a scan template
You must be a Security Console and Vulnerability Management (InsightVM) user
The Security Console must be paired with your Vulnerability Management (InsightVM) account in order to add a custom policy to a scan template.
- In the Security Console, go to Scan Template Configuration > Policy Manager.
- Select the check box of the custom policy you want to add to the scan template. The scan template will be included in your custom policy during the next assessment.
Use cases
Here are some examples of common use cases for using the Custom Policy Builder:
Customize a Complex Policy
Customize a Complex Policy
Here is an example on how to use our Custom Policy Builder to create a complex policy check. In this example, we will create a password policy check for two different types of hosts: one with a weaker requirement on password length but shorter password age and the other with a stronger requirement on password length and longer password age.
To accomplish this, you’ll need to create a complex policy check consisting of 2 subgroups that contain 2 tests.
Complex Policy Check Example
In order to pass the policy check, the assets must pass (Test1 AND Test 2) OR (Test 3 AND Test 4)<br/>OR <br/> AND <br/> Test1: password len >= 8<br/> Test2: max password age \<= 30 days<br/> AND<br/> Test3: password len >= 12<br/> Test4: max password age \<= 90 days<br/>
Each subgroup will contain 2 tests that check the password length and password history. In this example, one subgroup will be for a password length of 8 or more characters, but the password will need to be remade in 30 days. For the second subgroup, password length needs to be at least 12 characters, but the password will need to be remade in 90 days. In order to pass the test, at least one of these subgroups must be met.
First, you’ll build 2 tests based on password length, and then add the password history tests to those password length-based tests to create subgroups.
Task 1 - Build the test for password length that is at least 8 characters
To create a test for password length to be 8 characters or greater. This test will become the first subgroup:
- Navigate to the policy that you want to include in these tests.
- Click the + button.
- Complete the fields in the Add New Test screen with the following:
- Test Title - Enter test title. For example, “password len >= 8”
- Operator - Select OR
- Type - Select passwordpolicy_test
- Password Type - Select min_password_len
- Value - 8
- Click Save New Test.
Task 2 - Build the test for password length that is at least 12 characters
Next, we’ll build the second test for password length to be 12 characters or greater. This test will become the second subgroup:
- Click the + button next to OR.
- Complete the fields in the Add New Test screen with the following:
- Test Title - Enter test title. For example, “password len >= 12”
- Operator - Select OR
- Type - Select passwordpolicy_test
- Password Type - Select min_password_len
- Value - 12
- Click Save New Test.
Task 3 - Build the test for password duration of 30 Days
Next, you will create a second test in the first test you created (Task 1, the 8 characters or greater subgroup). This test will check to see if the password history is greater or equal to 30 days:
- Click the + button in the password len>=8 test.
- Complete the fields in the Add New Test screen:
- Test Title - Enter test title. For example, “password history len >= 30“
- Operator - Select AND
- Type - Select passwordpolicy_test
- Password Type - Select password_hist_len
- Operator - Select greater than or equal
- Value - 30
- Click Save New Test.
Task 4 - Build the test for password duration of 90 Days
Lastly, create a second test under the second test (Task 2, the 12 characters or greater subgroup). This test will check to see if the password history is less or equal to 90 days:
- Click the + button in the password len>=12 test.
- Complete the fields in the Add New Test screen:
- Test Title - Enter test title. For example, “password history len >= 90”
- Operator - Select AND
- Type - Select passwordpolicy_test
- Password Type - Select password_hist_len
- Operator - Select less than or equal
- Value - 90
- Click Save New Test.
To save your tests and subgroups, click the caret next to the policy title to return to the Policy Details page and click Save.
Edit Common Platform Enumeration (CPE) Policy
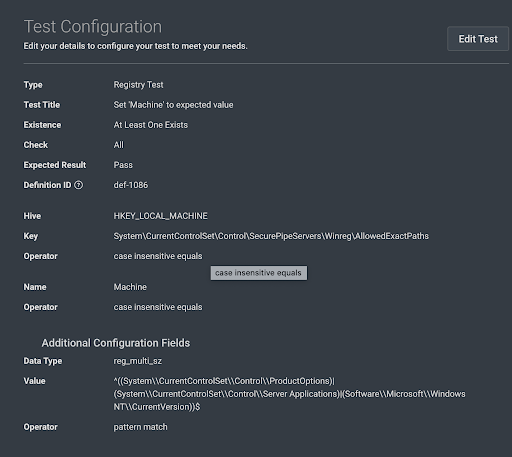
Configuring tests with a Pattern Match (Regex) against a Windows Registry
- Click the Edit Test button to begin test configuration.
- In the target field that you want to use a regex pattern match on, change the Operator to Pattern Match.
- Select the target field and adjust the regular expression as required.
- Click Save.
- In the policy, click Save.
Value Field Test Configuration Example
If you would like to use pattern match on the value field, you can find it under Additional Configuration Fields. Change the operator field to pattern match, then adjust the regular expression of the value field as needed.
Edit a Common Platform Enumeration (CPE) policy
Create a policy based on similar rules for an existing policy, so you can still conduct policy compliance scans on the latest edition, even though CIS has not released it yet. If CIS has not released a new benchmark for the latest macOS version, simply make a few edits on the existing policy, as that most of the rules from their previous version are applicable to the latest platform. To accomplish this, you’ll need to modify the CPE check-in OVAL/XCCDF XML files, which can be tedious and error-prone. In Custom Policy Builder, the CPE check is a shellcommand_test type that uses a shell command and a regex pattern match to check for the OS.
In the following example, we’ll teach you how to assess the existing OS X 10.13 version policy on 10.15 version of the operating systems:
- Navigate to the existing version policy in the Security Console. In this example, the version OS X 10.13.
- Select the check box next to the policy.
- Click Copy to be redirected to the Custom Policy Builder.
- Click the pencil icon in the Platform specification section to edit the CPE.
- Click Edit Test to enable the fields to be editable.
- Change the Stdout Line field to
^10\.15.* - Save the test and then save the policy.
You can now run this custom policy on a Macbook with OS X version 10.15, so all included rules will be assessed against the 10.15 asset.
Edit a Shell Command
Edit a shell command policy
A shell command test uses keyboard commands (shells) to check assets and assess the output of these commands for certain patterns. In this example, we’ll use CIS Amazon Linux 2 Benchmark Level 2 v1.0.0 to add a shell command policy.
- Navigate to the CIS Amazon Linux 2 Benchmark Level 2 v1.0.0 policy in the Security Console.
- Check the box next to the policy to select it.
- Copy the policy to be redirected to the Custom Policy Builder.
- Navigate to rule 1.1.1.1 (Initial Setup > Filesystem Configuration > Disable unused filesystems > 1.1.1.1 Ensure mounting of cramfs filesystems is disabled).
- Click Edit Test to edit these fields:
- Command
- Line Selection
- Stdout line
- Save the test and then save the policy.
Add a File Content Policy
Add a file content policy
You can use a file content test to determine if a particular file (usually a configuration) is compliant by matching the file’s content against a specific pattern in a given file.
A file is identified by:
- The file path
- The file path and file name
In this example, we’ll use CIS Amazon Linux 2 Benchmark Level 2 v1.0.0 to add a file content policy.
- Navigate to the CIS Amazon Linux 2 Benchmark Level 2 v1.0.0 policy in the Security Console.
- Check the box next to the policy to select it.
- Copy the policy to be redirected to the Custom Policy Builder.
- Navigate to rule 4.2.1.3 (Logging and Auditing > Configure Logging > Configure rsyslog > 4.2.1.3 Ensure rsyslog default file permissions configured)
- Click Edit Test to edit these fields:
- Filepath
- Pattern
- Instance
Instance value default is 1
Instance defines the number of times the matching pattern is found in this file, which is usually 1.
- Save the test and then save the policy.